You must be signed in to read the rest of this article.
Registration on CDEWorld is free. Sign up today!
Forgot your password? Click Here!
When replacing a hopeless tooth with an implant-supported restoration, clinicians must deliver a long-lasting, osseointegrated implant with well-maintained healthy peri-implant hard and soft tissue. Various techniques and methods have been utilized to prevent ridge alterations/resorption after tooth extraction. Insights into the superiority of any grafting technique or material, however, are scarce. Immediate implantation involving grafting the gap between the implant and socket wall has been used to prevent ridge alteration and collapse after tooth extraction.1 An immediately delivered provisional crown or customized healing abutment combined with the use of buccal soft-tissue augmentation reportedly enhances peri-implant tissue stability and esthetic outcomes.2 The socket-shield technique (SST) may have clinical significance as an alternative to conventional preservation procedures.3 Leaving the buccal part of the root of a hopeless tooth-as a shield-attached to the buccal socket wall by a healthy periodontal ligament (PDL) may reduce the resorption of the buccal bundle bone, thereby maintaining blood supply to the hard and soft tissue.4
Several published prospective clinical trials comparing immediately post-extraction-placed implants in conjunction with SST to conventionally post-extraction-placed implants have reported better outcomes for hard- and soft-tissue stability and enhanced esthetics in SST groups.5-8 In these studies, standard implant drills were used for implant site preparation, whereas socket-shield design, implant-shield relation, and gap grafting differed. Despite differences, all clinical trials have shown better hard- and soft-tissue stability and esthetic outcomes in SST groups.9
The guidelines for SST procedures have been updated several times over the past decade due to the growing knowledge of and increasing experience with this relatively novel technique.10 A prerequisite for SST is a healthy, stable buccal root fragment with a healthy PDL. The root apex and root canal content, such as pulpal tissue or endodontic obturation material, must be removed entirely before implant site preparation and implant placement. The implant should be placed in a restorative-driven position, with an implant platform 1 mm to 2 mm below the shield midfacial level.10
Late SST complications have been reported.11 The most common late complication is internal and external shield exposure. Exposures may be avoided by preparing the shield at the bone level (a subcrestal level) and providing restorative space.10 Although socket-shield preparation has been reported to be a technique-sensitive procedure,9 minimal reporting exists on surgical complications with SST in conjunction with immediate implant placement. The standard socket-shield design extends the shield from the buccal-mesial to the buccal-distal edge. C-shaped, L-shaped, and proximal socket-shield designs have proximal extensions that help preserve both interproximal hard and soft tissue. This is especially useful for implant sites adjacent to a pre-existing implant or edentulous site. In addition, proximal shield extensions increase shield stability even with short roots.12 Internal shield exposure is the most frequent complication of the SST.11 Internal exposures (toward the restoration) with noticeable inflammation may require reduction of the exposed root with a high-speed diamond bur.11
The most common surgical problems that clinicians face with currently published SST protocols are root fracture, an unstable shield after preparation, incomplete apex removal, perforation of the buccal bone plate, imprecise reduction of buccal root fragment thickness and length, incorrect implant placement trajectory, and insufficient implant primary stability.10
Immediately placed implants have a higher failure rate than delayed placed implants.13,14 This higher failure rate may be due to insufficient primary stability or the loss of primary stability before secondary stability is achieved as well as hard- and soft-tissue remodeling post-implant placement. The conventional approach to achieving primary implant stability is to insert the implant in an undersized osteotomy. Extensive bone remodeling that occurs following trabecular bone fractures may result in implant disintegration. In both prospective and retrospective clinical studies, implant site instrumentation that utilizes the principle of osseodensification has been reported to improve implant stability, both primarily and secondarily, throughout the healing period.15,16 Osseodensification enhances implant stability and significantly increases implant insertion and removal torques compared to standard drilling without the need to undersize the osteotomy.17,18
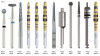
The selective preservation of tooth (SPOT) technique aims to provide a simplified, precise, and reproducible drilling protocol for SST that reduces surgical complications associated with other SST methods (Figure 1). The SPOT protocol produces two independent preparation trajectories: one for root canal widening and apex removal and the other to simultaneously facilitate both socket-shield and implant site preparations.
SPOT Procedure: Step-by-Step
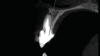
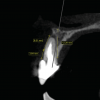
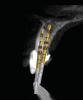
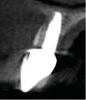
The procedure begins with the use of cone-beam computed tomography (CBCT) to measure the length of the tooth from the apex to the incisal edge, the length between the apex and the gingival margin, and the distance from the gingival margin to the buccal bone level. Obtaining CBCT images with a retracted vestibule is a requisite.19 Merging intraoral scan standard tessellation language (STL) images to a CBCT scan can be a helpful additional diagnostic tool. In summary, the CBCT imaging is used to verify and measure alveolar bone width and length, root length in bone, soft tissue to bone crest, bone crest to tooth apex, alveolar bone height, and implant position (Figure 2 through Figure 4).
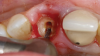
Step 1 - Hollow out the tooth center: A 3-mm diameter round diamond bur (Meisinger 801H-029) is used to hollow out the middle of the tooth 2 mm to 3 mm subgingivally, leaving a 1 mm ring of dentin around the circumference of the root (Figure 5).
Step 2 - Establish the restorative zone: The restorative zone is established using a specified diamond wheel bur (Meisinger 909G-031) to flatten the root to bone level working from inside to outside, following a curve from the buccal to the interproximal bone, avoiding reduction in the interproximal bone height. The goal of this step is to separate and remove the outer occlusal ring of dentin (Figure 6).
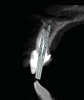
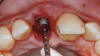
Step 3 - Establish two pilot hole trajectories: A carbide pilot drill (Meisinger HM162SX-014) is used to establish two separate trajectories: one for apex removal and the second for the implant osteotomy (Figure 7 and Figure 8). Pilot hole one establishes the root apex removal trajectory, which entails drilling into the root canal and reaching the apex. If the root canal has been treated or obturated, a Gates Glidden bur (#2, #4, and #6) may be used, if necessary, to remove the gutta-percha/endodontic sealer and confirm the first working length by measurement on a periapical radiograph. Pilot hole two establishes the implant trajectory in the palatal or lingual position. In some cases, the two pilot holes may eventually overlap.
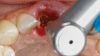
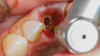
Step 4 - Widen both pilot hole trajectories: Densah® burs VT1525 (2.0) and VT1828 (2.3) are used sequentially in clockwise (CW) mode to widen the root canal hole trajectory to complete apex removal. The Densah burs are advanced in the root canal hole 1 mm beyond the apex. The same burs subsequently are used to establish the preliminary implant osteotomy. In some cases, if the two trajectory preparations overlap it may be necessary to extend the implant site osteotomy 2 mm to 3 mm beyond the apex (Figure 9 through Figure 11).
Densah bur VT2535 (3.0) is used at 1,200 rpm in counterclockwise (CCW) mode to enhance and expand the initial implant osteotomy by autografting bone and dentin particles into the palatal trabecular alveolar bone. Because of the bur's tapered shape, additional dentin autograft from the upper part of the osteotomy will be compacted apically toward the final implant depth (Figure 12).
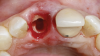
Step 5- Socket shield preparation: A long shanked tapered bur (Meisinger HM34IL-012) is used to produce a mesial-distal split without violating the implant osteotomy site (Figure 13). After gently extracting the palatal root section remnants, a designated shaping bur (Megagen 3DD50) is used to reduce the shield height to bone level approximately 2 mm to 3 mm subgingivally. The shield thickness is then thinned out to approximately 1.5 mm to 2 mm using round diamond burs (Megagen 2DD3034 and 1DD1911). A coronal shield chamfer is created to allow an "S"-shaped restorative space using a designated diamond chamfer shaping bur (Megagen GD40G) (Figure 14). If needed, Densah bur VT2838 (3.3) may be used to widen the implant osteotomy further.
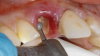
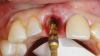
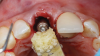
Step 6- Implant placement: The implant is placed to the preplanned depth in the implant osteotomy, and the jumping gap is grafted (Figure 15).
Step 7- Restoration:A provisional crown restoration or custom healing abutment is placed (Figure 16 and Figure 17). A radiograph is taken to confirm adequate placement of the implant.
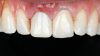
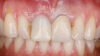
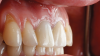
Follow-up images for the case presented, demonstrating a successful restoration, are shown in Figure 18 through Figure 22.
Discussion
The original socket-shield, root-membrane, and PDL-mediated techniques use standard implant drills through the long axis of the root to prepare the implant bed in the palatal part of the socket.3,20,21 The use of regular implant drills in dentin generates significant chatter, often resulting in fracturing of the roots and subsequently increasing the risk of shield failure.10 On the other hand, the flutes in osseodensification burs have a unique chisel edge that focuses the forward thrust and minimizes the tool's vibration. Histological and biomechanical studies showed that bone macro fractures were more evident with standard drilling than CW and CCW drilling with osseodensification burs.17,22,23
An updated SST has recommended the use of high-speed instrumentation to achieve mesial-distal root split and subsequent removal of the palatal segment before socket-shield vertical and horizontal reduction preparation and implant placement.24 This approach has reduced root fracturing incidences, but the arbitrary splitting of the root may miss the apex and may not predictably remove the entire apex. Subsequently, the tooth apex may be left behind, increasing the likelihood of periapical pathology and/or shield eruption. This technique was later updated, with the use of Gates Glidden-type drills recommended to widen the root canal, thus reaching the root apex level before the mesial-distal split.10 It was also further updated with guided implant surgery, either static or dynamic,25,26 to help ensure precise root apex removal and adequate implant placement in the desired preplanned position. Despite being effective for adequate implant placement, the guided approaches are often tedious and time-consuming, requiring extensive planning and multiple forms of guidance to account for apex removal, the mesial-distal root split, shield preparation, and implant placement. As a result, current guided SSTs are not coherent and require several guides for each step, making them impractical. SPOT technique facilitates a more favorable guided surgical approach by eliminating the need for the mesial-distal root split step to remove the root apex.
Using the SPOT technique, two independent trajectories are initiated: one through the root canal to ultimately drill out the apex, and one for implant site preparation and placement. This facilitates simultaneous socket-shield and implant site preparation. Root preparation using osseodensification burs in both forward and reverse motion allows clinicians to prepare the shield and remove the apex simultaneously and precisely. The root apex removal trajectory will help guide the implant site trajectory. The CCW operation of the osseodensification burs during implant site preparation produces combined bone and dentin compaction-autografting, which improves implant primary stability and subsequent healing.15-17 This approach can enable single visits or emergency same-day treatment with sufficient immediate implant primary stability allowing for a socket seal with a provisional crown or customized healing abutment.27
With the SPOT protocol, osseodensification densifying burs cut and compact the dentin. Compacted and autografted dentin from the palatal part of the root is dispersed toward the walls of the osteotomy and may help increase primary stability. Histological evidence confirms that dentin autograft effectively preserves post-extraction alveolar ridge dimensions when utilizing an extracted tooth dentin particulate autograft with platelet-rich fibrin.28 It has also been observed that during the healing period, mineralized particulate dentin autograft produces a progressive increase in the proportion of bone with a decrease in the ratio of dentin after 4, 5, and 6 months.29 Mazor et al observed similar results, reporting 63% new vital bone after 7 months.30 Histomorphometry analysis of an implant placed in a dentin-grafted site using osseodensification densifying burs showed 75% bone-to-implant contact on average.31
There is little data about healing patterns for sockets with a socket shield. Soft-tissue ingrowth along the lingual socket-shield surface is common for socket-shield sites that are healed with only blood clots. Pohl et al demonstrated in 34 sites that autologous dentin particulate or tuberosity cortical bone effectively prevented soft-tissue ingrowth.31,32 Allograft alone or with platelet-rich fibrin33 and different biomaterials may also prevent soft-tissue ingrowth.
Published human and animal histology studies, however, have showed new bone formation between socket-shield dentin and the implant.3,34 Minimal scientific evidence exists on whether the shield and implant gap should be grafted, and more histological research is needed.
Conclusion
SPOT technique is a simplified, precise, and reproducible tooth-guided drilling protocol for partial extraction therapy that avoids potential complications associated with other techniques. It is based on preserving the natural environment for single- and multiple-rooted teeth in all areas of the mouth.
About the Authors
Charles Schwimer, DMD
Adjunct Assistant Professor, Department of Periodontics, University of Pennsylvania School of Dental Medicine, Philadelphia, Pennsylvania; Adjunct Assistant Professor, Department of Periodontics, School of Dental Medicine, University of Pittsburgh, Pittsburgh, Pennsylvania
Marcel Firlej, DDS, PhD
Teaching Assistant, Department of Orthodontics and Craniofacial Anomalies, Poznan University of Medical Sciences, Collegium Maius, Poznan, Poland
Snjezana Pohl, MD, DDS, PhD
Adjunct Assistant Professor, Department of Oral Medicine and Periodontology, University of Rijeka School of Dental Medicine, Rijeka, Croatia
Richard Martin, DDS
Private Practice, Lewisville, Texas
Howard Gluckman, BDS, MChD, PhD
Director, Aesthetic Academy, Cape Town, South Africa; Adjunct Assistant Professor, Department of Periodontics, University of Pennsylvania School of Dental Medicine, Philadelphia, Pennsylvania, Adjunct Professor, Department of Oral Medicine and Periodontology, University of the Western Cape, Bellville, South Africa
Salah Huwais, DDS
Adjunct Assistant Professor, Department of Periodontics, University of Pennsylvania School of Dental Medicine, Philadelphia, Pennsylvania
Rodrigo Neiva, DDS, MS
Chairman and Clinical Professor, Department of Periodontics, University of Pennsylvania School of Dental Medicine, Philadelphia, Pennsylvania
Queries to the author regarding this course may be submitted to authorqueries@broadcastmed.com.
References
1. Seyssens L, Eeckhout C, Cosyn J. Immediate implant placement with or without socket grafting: a systematic review and meta-analysis. Clin Implant Dent Relat Res. 2022;24(3):339-351.
2. Morton D, Gallucci G, Lin WS, et al. Group 2 ITI consensus report: prosthodontics and implant dentistry. Clin Oral Implants Res. 2018;29 suppl 16:215-223.
3. Hürzeler MB, Zuhr O, Schupbach P, et al. The socket-shield technique: a proof-of-principle report. J Clin Periodontol. 2010;37(9):855-862.
4. Gluckman H, Salama M, Du Toit J. Partial extraction therapies (PET) Part 1: maintaining alveolar ridge contour at pontic and immediate implant sites. Int J Periodontics Restorative Dent. 2016;36(5):681-687.
5. Sun C, Zhao J, Liu Z, et al. Comparing conventional flap-less immediate implantation and socket-shield technique for esthetic and clinical outcomes: a randomized clinical study. Clin Oral Implants Res. 2020;31(2):181-191.
6. Abd-Elrahman A, Shaheen M, Askar N, Atef M. Socket shield technique vs conventional immediate implant placement with immediate temporization. Randomized clinical trial. Clin Implant Dent Relat Res. 2020;22(5):602-611.
7. Atef M, El Barbary A, Dahrous MS, Zahran AF. Comparison of the soft and hard peri-implant tissue dimensional changes around single immediate implants in the esthetic zone with socket shield technique versus using xenograft: a randomized controlled clinical trial. Clin Implant Dent Relat Res. 2021;23(3):456-465.
8. Bramanti E, Norcia A, Cicciù M, et al. Postextraction dental implant in the aesthetic zone, socket shield technique versus conventional protocol. J Craniofac Surg. 2018;29(4):1037-1041.
9. Blaschke C, Schwass DR. The socket-shield technique: a critical literature review. Int J Implant Dent. 2020;6(1):52.
10. Gluckman H, Du Toit J, Salama M, et al. A decade of the socket-shield technique: a step-by-step partial extraction therapy protocol. Int J Esthet Dent. 2020;15(2):212-225.
11. Gluckman H, Salama M, Du Toit J. A retrospective evaluation of 128 socket-shield cases in the esthetic zone and posterior sites: partial extraction therapy with up to 4 years follow-up. Clin Implant Dent Relat Res. 2018;20(2):122-129.
12. Pohl S, Kher U, Salama MA, Buljan M. The socket shield technique with proximal extensions for single-rooted teeth. Int J Esthet Dent. 2022; 17(4):424-435.
13. Tonetti MS, Cortellini P, Graziani F, et al. Immediate versus delayed implant placement after anterior single tooth extraction: the timing randomized controlled clinical trial. J Clin Periodontol. 2017;44(2):215-224.
14. Patel R, Ucer C, Wright S, Khan RS. Differences in dental implant survival between immediate vs. delayed placement: a systematic review and meta-analysis. Dent J (Basel). 2023;11(9):218.
15. Tanello B, Huwais S, Tawil I, et al. Osseodensification protocols for enhancement of primary and secondary implant stability - a retrospective 5-year follow-up multi-center study. Clin Oral Implants Res. 2019;30(S19):414-414.
16. Bergamo ETP, Zahoui A, Barrera RB, et al. Osseodensification effect on implants primary and secondary stability: multicenter controlled clinical trial. Clin Implant Dent Relat Res. 2021;23(3):317-328.
17. Huwais S, Meyer EG. A novel osseous densification approach in implant osteotomy preparation to increase biomechanical primary stability, bone mineral density, and bone-to-implant contact. Int J Oral Maxillofac Implants. 2017;32(1):27-36.
18. Cáceres F, Troncoso C, Silva R, Pinto N. Effects of osseodensification protocol on insertion, removal torques, and resonance frequency analysis of BioHorizons® conical implants. An ex vivo study. J Oral Biol Craniofac Res. 2020;10(4):625-628.
19. Januário AL, Barriviera M, Duarte WR. Soft tissue cone-beam computed tomography: a novel method for the measurement of gingival tissue and the dimensions of the dentogingival unit. J Esthet Restor Dent. 2008;20(6):366-373.
20. Mitsias ME, Siormpas KD, Kotsakis GA, et al. The root membrane technique: human histologic evidence after five years of function. Biomed Res Int. 2017;2017:7269467.
21. Mitsias ME, Siormpas KD, Kontsiotou-Siormpa E, et al. A step-by-step description of PDL-mediated ridge preservation for immediate implant rehabilitation in the esthetic region. Int J Periodontics Restorative Dent. 2015;35(6):835-841.
22. Slete FB, Olin P, Prasad H. Histomorphometric comparison of 3 osteotomy techniques. Implant Dent. 2018;27(4):424-428.
23. Witek L, Neiva R, Alifarag A, et al. Absence of healing impairment in osteotomies prepared via osseodensification drilling. Int J Periodontics Restorative Dent. 2019;39(1):65-71.
24. Gluckman H, Salama M, Du Toit J. Partial extraction therapies (PET) Part 2: procedures and technical aspects. Int J Periodontics Restorative Dent. 2017;37(3):377-385.
25. Zhang X, Wang J, Wan Q, Li L. Guided residual root preparation for socket-shield procedures: a clinical report. J Prosthet Dent.2020;124
(6):625-631.
26. Chen JT. A novel application of dynamic navigation system in socket shield technique. J Oral Implantol. 2019;45(5):409-415.
27. Firlej M, Pieniak D, Niewczas AM, et al. Effect of artificial aging on mechanical and tribological properties of CAD/CAM composite materials used in dentistry. Materials (Basel). 2021;14(16):4678.
28. Pohl S, Binderman I, Tomac J. Maintenance of alveolar ridge dimensions utilizing an extracted tooth dentin particulate autograft and platelet-rich fibrin: a retrospective radiographic cone-beam computed tomography study. Materials (Basel). 2020;13(5):1083.
29. Andrade C, Camino J, Nally M, et al. Combining autologous particulate dentin, L-PRF, and fibrinogen to create a matrix for predictable ridge preservation: a pilot clinical study. Clin Oral Investig. 2020;24(3):1151-1160.
30. Mazor Z, Horowitz RA, Prasad H, Kotsakis GA. Healing dynamics following alveolar ridge preservation with autologous tooth structure. Int J Periodontics Restorative Dent. 2019;39(5):697-702.
31. Pohl S, Prasad H, Kotsakis GA. Human histologic analysis of implant osseointegration in a healed site grafted with nondemineralized autologous tooth-derived graft material. Int J Periodontics Restorative Dent. 2022;42(6):e199-e207.
32. Pohl S, Binderman I, Božić D, et al. Effectiveness of autologous tissue grafts on soft tissue ingrowth in patients following partial root extraction with socket shield: a retrospective analysis of a case series. Int J Oral Maxillofac Implants. 2021;36(2):362-370.
33. Thakkar DJ, Deshpande NC, Dave DH, Narayankar SD. A comparative evaluation of extraction socket preservation with demineralized freeze-dried bone allograft alone and along with platelet-rich fibrin: a clinical and radiographic study. Contemp Clin Dent. 2016;7(3):371-376.
34. Schwimer C, Pette GA, Gluckman H, et al. Human histologic evidence of new bone formation and osseointegration between root dentin (unplanned socket-shield) and dental implant: case report. Int J Oral Maxillofac Implants. 2018;33(1):e19-e23.