You must be signed in to read the rest of this article.
Registration on CDEWorld is free. Sign up today!
Forgot your password? Click Here!
Gingival Tissue Recontouring
When adequate amounts of free gingiva are present, gingival recontouring (gingivectomy) can predictably increase cervico-incisal heights of clinical crowns to create esthetic harmony. In the maxillary anterior region, it is esthetically pleasing to have gingival symmetry (right and left), particularly when patients display gingival tissue when smiling. As long as biologic width is not violated (2 mm for connective tissue and epithelial attachments and 1 mm for minimal sulcus depth), amounts of free gingiva in excess of the 1 mm minimal sulcus depth can be excised for esthetic reasons. Artistic contouring of the gingival tissues can be accomplished using an electrosurgery instrument (Sensimatic Electrosurge 600SE, Parkell, Inc; Ultraflex, Macan; Force FX™, Valleylab) with local anesthesia. The electrosurgery instrument cuts soft tissue effortlessly and bloodlessly when the electrode is directed with a light “paint stroke” motion. It is recommended by the author that the operator use the needle electrode for most electrosurgery procedures to limit the zone of necrosis around the surgical site. Also, the gingival sulcus may be retracted with #1 retraction cord prior to using electrosurgery to act as a “safety net” protecting the remaining 1-mm minimum sulcus depth while the surgical cut is made. This procedure is also helpful when restoring Class V cavity preparations to gain unimpeded access to the gingival margin with the restorative material. Thin biotypes can be a contraindication for the use of electrosurgery on the facial surfaces in the esthetic zone due to the initial possibility of unsightly gingival recession. Keep in mind, however, that it is the crestal bone position, not the tissue biotype, that ultimately determines the final height of the free gingival margin. But, it may take months for the free gingival levels to reestablish their preoperative height. Too often, the clinician prematurely lowers the restorative margin and violates the biologic width in these cases. It is best to avoid thin biotype tissues in esthetic areas completely, or delay master impressions until the tissue is fully matured. Turning down the current on the electrosurgery unit may decrease the zone of necrosis, but in a “low crest” patient, it will not ensure that recession will not occur.
Esthetic Correction of Gingival Levels
Many patients may exhibit maxillary anterior teeth that have disparate gingival heights. This can be an esthetic problem for the patient if there is gingival display when the patient smiles. An electrosurgery unit can be used to correct the tissue levels above the affected area prior to making master impressions only if a sufficient amount of free gingival tissue exists. First, the periodontal sulcular environment needs to be evaluated. The depth of the gingival sulcus is measured using a periodontal probe. If the biologic width is to be altered due to the esthetic requirements of the case, the distance from the base of the sulcus to the crest of the alveolar bone must also be measured by sounding. For the average 3-mm sulcus, leaving a minimum sulcus depth of 1 mm is required, which means that there is 2 mm of free gingival tissue that can be altered for esthetic needs. In general, it is esthetically desirable to have the gingival tissue over the maxillary central incisors slightly higher (apically) than the tissue over the maxillary lateral incisors. The tissue over the maxillary cuspids should be slightly higher than the tissue over both the lateral and central incisors. The height of contour of the gingival tissue (gingival zenith) should be located toward the distolabial line angles.
According to Kois,1 this gingival architecture is a reflection of the underlying alveolar crest. The distance from the alveolar crest to the restorative margin (free gingival margin) for anterior teeth should be 3 mm facially and 4 mm interproximally. Kois, Coslet, and others2,3 also describe a variation in biologic width that compares the distance from the alveolar crest to the free gingival margin (FGM) and divide this into three categories: normal crest, high crest, and low crest. In simplified terms, normal crest patients (about 70%) have approximately a 2-mm combined epithelial and connective tissue attachment and an average 1-mm to 3-mm sulcus depth. If the sulcus depth is greater than 1 mm, the free gingival excess can be safely resected and, upon healing, will result in a dentogingival complex measuring 3 mm on the facial aspect. Patients with a high crest often have a shallower sulcus depth and a combined epithelial and connective tissue attachment of less than 2 mm. These patients have relatively stable FGM positions and are not prone to recession upon manipulation of the tissues. Low-crest patients often have normal sulcus depth (1 mm to 3 mm) and a combined epithelial and connective tissue attachment that is less than 2 mm. These patients are highly prone to recession and must be treatment planned accordingly. The FGM of low-crest patients will tend to apically reposition and turn into a normal crest situation after gingival retraction or surgery. Therefore, the most important factor in post-restorative gingival health and stability is the position of the restorative margin relative to the bony crest, not the preoperative health and/or position of the gingival tissues.
Taking these parameters into consideration, an electrosurgery unit can be used effectively to artistically create these changes. The author uses hydrogen peroxide to debride the surgical site following electrosurgery as needed by loading it into a syringe with a “fuzzy tipped” applicator placed on the syringe tip. The tip of the syringe is filled with hydrogen peroxide and used in a sweeping motion to debride the surgical site. In general, the lowest power to adequately remove the tissue is recommended.
Use of Electrosurgery to Control Inflammatory Tissue and for Troughing Prior to the Registration of Master Impressions
When replacing failing dental restorations for a patient, it is not uncommon to find unhealthy marginal gingival tissues, even when the patient’s homecare is adequate. Localized chronic inflammatory tissue can be removed and hemorrhage controlled by using an electrosurgery instrument (thin-needle electrode) prior to the impression-making process. The resultant healing will be predictable and a margin placed at the time of surgery will be located in the same relation to the gingival crest after healing occurs as long as the above guidelines are followed. This can be especially critical when using porcelain-fused-to-metal restorations in the esthetic zone.
Troughing is a procedure by which an electrosurgery electrode is used to create a space between the preparation margin and the tissue to aid in the proper registration of master impressions. While many electrosurgery users claim to not use retraction cord at all, it is the opinion of the author that troughing is a reliable procedure only when there is enough horizontal thickness of tissue that troughing around the preparation does not result in loss of vertical tissue height. If the periotype is thin (indicating low levels of keratinization), this can also create problems when a troughing technique is used. It is not that the tissues will not eventually reestablish biologic width based on the bony crest position, but this can take up to 2 years and there is a tendency in these cases to drop the restorative margins to a free gingival margin that looks healed, but is not fully matured. The result is biologic width violation and chronic inflammation. It is still a good practice to use mechanical tissue retraction when possible, particularly in the esthetic zone, and use gingival troughing when localized gingival excess or chronic inflammation is present, and in areas outside the esthetic zone. It is not uncommon practice to trough interproximal and lingual areas around the preparation and mechanically retract on the facial aspect, which may be an area that can be “esthetically compromised” from an injudicious troughing technique or unpredictable healing.
An electrosurgery instrument, in general, will provide consistent coagulation. In many cases, troughing can be performed, and retraction cord “laid” (not “packed”) in place following troughing, to displace any tissue tags and create 360° of totally patent sulcus for placement of light-bodied impression material. This will virtually ensure a perfect impression every time. The goal is not only to capture the margins, but also 0.5 mm of root surface apical to the margin so that the laboratory can create the proper emergence angle for the restoration.4
Case 1: Correction of Gingival Levels above the Maxillary Central Incisors
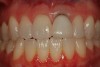
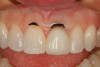
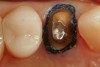
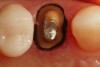
This patient presented with gingival recession above tooth No. 9 (Figure 1). Since this tooth had previous root canal therapy, the exposed root surface was dark and unesthetic. When comparing gingival zenith levels, the maxillary central incisors could be adjusted slightly in the apical direction so that they would be slightly higher than the lateral incisors. Also, the zenith above tooth No. 8 was slightly different in shape (flat) when compared to tooth No. 9. A thin tissue marker (Figure 2) was used to mark the tissue at the proposed corrected level and a photograph was taken to verify positions.
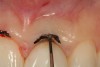
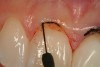
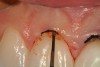
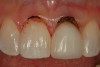
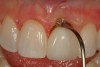
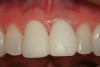
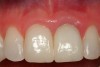
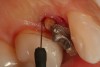
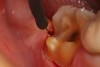
The first step prior to adjusting the heights of the tissue was to measure the depth of the gingival sulci to determine if there was adequate free gingival present to make an adjustment in the tissue levels and maintain a minimum sulcular depth of 1 mm (Figure 3). Again, there must be a minimum of 1 mm of sulcus depth remaining apical to the proposed corrected level; otherwise, a bony correction would be needed as well. The needle electrode (Figure 4) was used at the lowest setting (in this case, 3) which yielded a smooth cut (Figure 5). When the procedure was complete (Figure 6 and Figure 7), the remaining sulcus depth was verified with a periodontal probe and the surgical site was debrided with hydrogen peroxide solution (Figure 8). A 2-week postoperative view (Figure 9) with the patient wearing provisional restorations shows nice healing and gingival zenith levels that are more symmetrical. The restorative margins were placed subgingivally to mask out the darkness of the root structure on tooth No. 9. Figure 10 shows the patient after the definitive restorations were placed.
Cases Using Troughing to Aid in the Making of Master Impressions
As previously stated, troughing is a procedure by which the sulcular gingiva is surgically removed creating a space between the soft tissue and the preparation margin for the purpose of making a master impression. Remember, the “perfect” master impression not only captures the restorative margin, but 0.5 mm of tooth or root surface apical to the margin so that the ceramist can develop the proper emergence profile in the restoration. It is important to emphasize again that in order to have a minimal effect on the marginal soft tissues, this procedure should be carried out very carefully. The author feels that tissues of thin biotype/periotype, particularly in the esthetic zone on a patient with a high smile line, are not suitable for troughing and can be a challenge dealing with conventional retraction techniques. Add to this a low-crest bony position, and recession is inevitable. It is recommended to restrict the use of troughing to posterior, interproximal, and lingual areas and only trough on the facial aspect if the tissue is thick enough to avoid a vertical loss of tissue height in the process. When vertical tissue height is lost as a result of troughing, the tendency is to compensate by dropping the restorative margin in the apical direction. This could, in turn, violate the biologic width creating a whole new set of issues where bony crown lengthening now becomes necessary. This being said, troughing is a very useful tissue management procedure when used appropriately.
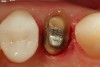
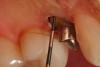
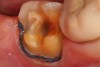
Again, use the needle electrode on the electrosurgery unit to limit the zone of necrosis. It is the author’s opinion that troughing is an excellent adjunct to mechanical retraction and most of the time when troughing, he will “lay” a cord in the sulcus after troughing to help push away any small tissue tags that can remain and further aid in hemostasis. The goal of retraction is to have a “moat around the castle,” or unimpeded access to the sulcular area for the impression material to flow. The maxillary premolar in Figure 11 had a post and core placed and is ready for master impression. Due to the subgingival margin position on the lingual aspect of the preparation and thickness of the interproximal tissue, the proximal and lingual aspects of the preparation were troughed with the electrosurgery needle electrode (Figure 12 and Figure 13). After sounding to the crest of bone to verify that biologic width was not encroached upon (Figure 14), a #1 retraction cord soaked in a hemostatic agent was “laid” into the sulcus (Figure 15). The only “packing” of cord took place on the facial where due to the thinness of the tissue, troughing was not done. Figure 16 shows a totally patent gingival sulcus with no signs of hemorrhage, ready for placement of impression material. Figure 17 shows a master impression taken after a troughing/retraction procedure on tooth No. 5.
Another area where troughing is extremely useful is in retromolar areas. There, because of the alveolar anatomy, very little clinical crown may appear above the free gingival margin, yet the attachment apparatus and bone levels may be several millimeters apical to the free gingival margin and the depth of the sulcus may exceed 3 mm. For these cases, troughing allows the restorative margin to be placed apical enough to have a retentive distal axial wall, yet allow the impression material to capture the area apical to the restorative margin with ease (Figure 18 through Figure 22).
Conclusion
Electrosurgery is an excellent adjunct to control minor soft tissue abnormalities that are part of the restorative process. Techniques have been discussed that can help the dentist use this technology and improve on the results obtained.
References
1. Spear FM, Kokich, VG, Mathews D. Interdisciplinary management of anterior dental aesthetics. J Am Dent Assoc. 2006;137(2):160-169.
2. Kois JC. Altering gingival levels: The restorative connection Part 1: Biologic variables. J Esthet Dent. 1994;6(1):3-9.
3. Coslet GJ, Vanarsdall R, Weisgold A. Diagnosis and classification of delayed passive eruption of the dentogingival junction in the adult. Alpha Omegan. December 1997:24-28.
4. Kois JC. New paradigms for anterior tooth preparation. Oral Health. 1988;88(4):19-30.