You must be signed in to read the rest of this article.
Registration on CDEWorld is free. Sign up today!
Forgot your password? Click Here!
The earliest evidence of glass or ceramic materials being used for dental restorations was found in the Central Americas.1 The Mayan classical period (300 AD to 900 AD) and the 12th-century Aztec civilizations inlaid obsidian and jade ground plugs into prepared teeth for decorative and esthetic purposes.2 Surely they were pleased with the result or it would have not been a common practice. But did the recipients experience postoperative sensitivity as a result of these inlays? No one knows.
Since the 19th century, postoperative sensitivity has been reported in association with indirect restorations and, recently, with direct composite resin restorations. The introduction of resin-modified glass-ionomer cement nearly eliminated postoperative sensitivity according to unanimous observations of practitioners worldwide.3 The increasing use of all-ceramic and laboratory-processed indirect polymer restorations has brought postoperative sensitivity back to the forefront. Most monolithic all-ceramic and indirect polymer restorations are inserted with composite resin cements. With the increased use of resin cement systems, numerous reports of postoperative sensitivity have surfaced.4-7
Brännström8 reported the hydrodynamic link between mechanical distortion of pain-sensitive nerves in the pulp and procedures known to produce dentinal sensitivity. Insensitive dentin was attributed to nature’s way of obliteration of the dentin tubule by either production of irregular, atubular dentin at the pulpal wall; sclerotic occlusion of dentinal tubules by sclerosis; or mineralization of a superficial layer, pellicle, or plaque at the exposed surface. He also reported that there were few clinical procedures that could accelerate these mechanisms but did describe a technique of resin impregnation that created resin tags that subsequently sealed the exposed dentinal tubules.
The following article will discuss reducing postoperative sensitivity by sealing exposed dentinal tubules during indirect restorative procedures. Indications, variations of the technique, and the different materials used will also be discussed.
Prehybridization
The clinical procedure in which the exposed dentinal tubules are sealed with a dentin adhesive before impressing the prepared tooth has been referred to as prehybridization,9 the dual-bonding technique,10 resin coating,11 and immediate dentin sealing.12 The advantages of hybridizing the exposed dentin before taking the impression include: a decrease in the risk of bacterial contamination resulting in sensitivity during the provisional stage,12-16 improved bond strength as a result of the second application of adhesive during the insertion phase,17-20 and alleviating occlusal load stress with an increased adhesive thickness.17,21,22
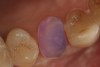
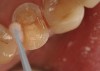
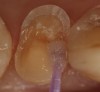
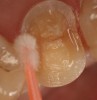
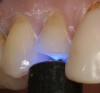
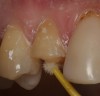
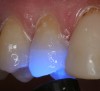
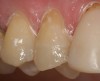
Magne23 described the technique of immediate dentin sealing with the use of a three-step dentin bonding adhesive system. The author has made modifications to this technique as follows. After the tooth has been prepared and isolated, the enamel and dentin are etched with 35% phosphoric acid for 30 and 15 seconds, respectively (Figure 1). Both surfaces are then thoroughly rinsed with water and gently air-dried for 5 seconds. A desensitizer is then vigorously applied to the dentin surface with a microbrush applicator for 30 seconds (Figure 2). To remove excess desensitizing agent from the dentin surface, the microbrush applicator is dried with a gauze pad and then brought back to the wet dentin surface to absorb the excess desensitizer. This step is repeated twice and provides a sufficient wet surface to the dentin. Next, a primer is applied to the enamel and dentin with a microbrush applicator using a light scrubbing motion for 30 seconds (Figure 3). Using light air pressure, the excess primer is air-thinned but still leaves a slightly moist surface. In other words, the surfaces are not desiccated but are left moist. An adhesive is then applied to the enamel and dentin surfaces using a scrubbing motion with a microbrush applicator (Figure 4). The adhesive should be left in contact with the tooth for 30 seconds and then air-thinned. A second coat of adhesive is then applied for the same length of time before it is air-thinned. The adhesive is then light-polymerized for 5 seconds. This step is necessary to fix the adhesive in place before applying a water-soluble glycerin gel. After the initial light polymerization, the gel is applied with a syringe over the adhesive-covered area to block out the oxygen (Figure 5). This step is necessary to eliminate the formation of an oxygen-inhibited layer on the adhesive surface. The presence of the oxygen-inhibited layer can interfere with the surface polymerization of polyvinyl and especially polyether impression material.24 The polymerization of the adhesive is then resumed (Figure 6) for 30 seconds. The glycerin gel is washed away and the tooth is air-dried. A scaling instrument is then used to remove any adhesive flash remaining beyond the margin. After the impression, the temporary restoration can be fabricated and placed with non-eugenol provisional cement.
At the insertion appointment, the temporary is removed and the bonding surfaces of the preparation are lightly cleaned with a micro-abrasion unit. The cementation surface is reactivated with one coat of adhesive, air-thinned, and light-polymerized (Figure 7). The restoration is then placed with a dual-cure resin cement and light-polymerized (Figure 8 and Figure 9).
For a typical crown preparation, a majority of the preparation may expose tubules of unaffected dentin.25 Caries-affected dentin is less permeable than unaffected dentin.26 Freshly cut dentin is the ideal substrate for dentin bonding,27 which is what most laboratory studies use.27 However, in a typical dental practice using conventional crown-and-bridge techniques, prepared teeth have to be protected with provisional restorations for the patient’s comfort and functional needs.
Thermal changes and osmotic gradients can cause fluid movement within the dentinal tubules resulting in tooth sensitivity.28 In addition, tooth sensitivity can result from pulpal inflammation resulting from the presence of bacteria on the prepared surfaces.29 Therefore, minimizing the contact of the exposed dentinal tubules with the oral environment during the provisional stage of indirect restorative procedures may reduce postoperative sensitivity. The bond strength of the final restoration also can be affected by residual remnants of provisional cements.30 Latta et al reported in their study that the placement of a dentin adhesive before provisionalization may prevent the temporary cement from affecting the bond of the final resin cement to the tooth.31
Available Dentin Bonding Agents
It is an accepted rule that the more steps there are in a particular procedure, the more technique-sensitive it becomes. For this reason clinicians have moved toward more simplified dentin adhesive systems and the creation of self-etching two-step and eventually one-step adhesives. There are two basic categories of self-etching dentin adhesive systems, depending on their acidity.32 Van Meerbeek et al showed different interaction patterns on dentin substrates that were pH-dependent.33 Self-etching adhesives with a pH of 1 or below are considered strong and exhibit greater demineralization patterns with complete dissolution of the smear layer that results in thick hybrid layers.32 Conversely, mild self-etching adhesives have a pH of 2 or greater and superficially demineralize dentin to a depth of 1 µm or less,34 which results in a thinner hybrid layer.32 In addition, the mild self-etching adhesive system leaves the hydroxyapatite remaining attached to the individual collagen fibrils.35 This suggests a chemical interaction between the functional monomers and the hydroxyapatite crystals.36
Self-etching adhesives consists of three basic elements: a resin polymer, a catalyst (proprietary), and a penetrating agent or functional monomer. Examples of functional monomers are 10-methacryloxydecyl dihydrogen phosphate (10-MDP), 4-methacryloxyethyl trimellitic acid (4-META), and 2-methacryloxyethyl phenyl hydrogen phosphate (phenyl-P). They have bi-functional roles in the bonding process; one is to be hydrophilic in nature and bond to the dental substrate, and the other is to be hydrophobic in nature and bond to the overlaying resin adhesive. They can vary in their ability to penetrate the substrate, and their subsequent bond strengths.
Alternative Methods of the Adhesive Application
The rationale for the previously described use of a three-step, total-etch system that is applied before taking the impression is the film thickness. Placing the adhesive after the impression would cause a discrepancy between the laboratory die and the actual prepared tooth. Thicknesses of dentin bonding agents have been reported up to 60 μm to 80 μm on a smooth convex surface and up to 200 μm to 300 μm on concave structures. 27,37,38 An alternative method would use a one-step dentin adhesive with a very low film thickness (5 μm) after the impression has been completed. For example, Brush&Bond (Parkell), a one-step, self-etching dentin adhesive, uses 4-META chemistry with a film thickness of 5 μm or less (personal conversation with the manufacturer). The technique allows for sealing of the exposed dentinal tubules during the provisional stage of indirect restorative treatment. It is a two-part system composed of a bottle of light-curable liquid resin and chemically treated brushes that contain the self-cure proprietary activators.
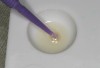
This alternative method involves preparing the tooth, taking the impression and then fabricating the temporary before sealing the dentin. The uncured, oxygen-inhibited layer should be removed before placing a temporary resin material with a solvent-like acetone or ethyl alcohol. Applying a water-soluble glycerin gel on the resin tooth surfaces and light polymerizing for 10 seconds will also eliminate the oxygen-inhibited layer. The dentin sealing steps require that one to three drops of Brush&Bond be dispensed into a mixing well and stirred with a supplied Brush&Bond activator-containing microbrush for 2 seconds (Figure 10). The bonding agent is now active. If more bonding agent is required, then more liquid can be dispensed and a new microbrush must be used for new activation.
Using the microbrush, apply the liquid to the prepared tooth for 20 seconds, keeping the tooth moist the entire time. Next, an air-water syringe is used gently for 10 seconds to evaporate the solvents and as much water as possible. Van Landuyt et al39 found lower bond strengths with one-step adhesives that entrapped water droplets within the adhesive layer. Once polymerized, the droplets jeopardize the durability of the bond. Their study found that using strong air-drying of the adhesive would remove the water droplets and improve the bond effectiveness. Pooling of the adhesive in any line angles of the preparation has been shown to decrease bond strength because of excessive solvent confined within the adhesive layer.40 Therefore, the air-drying is a critical step and must not be taken lightly. The amount of time the adhesive is light-polymerized is dependent on the light source (plasma arc curing light: 3 seconds; halogen light: 5 seconds; LED light: 10 seconds; high-intensity LED: 5 seconds). A water-soluble lubricant is applied to the coronal portion of the preparation, leaving the margins clean. The temporary restoration can now be cemented with non-eugenol temporary cement.
When the patient returns for the insertion, anesthesia is usually not necessary because of the fact that the dentin is already sealed. The temporary restoration is removed and the prepared surfaces are cleaned with either an acetone-soaked cotton pledget or phosphoric acid gel on a rotary brush or cup. It is important not to create any bleeding from the surrounding gingival tissue. The tooth is rinsed with water and air-dried. To refresh the bonding surface, apply a coat of Brush&Bond to the preparation for 20 seconds, air-thin for 10 seconds, and light-polymerize for the necessary time. The restoration can now be inserted with either a resin cement or a resin-modified glass-ionomer cement.
Single-Visit Restorations
Single-visit computer-assisted-design/computer-assisted-manufactured (CAD/CAM) restorative systems are increasing in acceptance. Conventional preparation techniques and requirements have been replaced with specific preparation requirements that allow the “eye” of the computer to digitize the surfaces of the prepared tooth more readily. The scope of this article does not address these specifics. The time differential between preparation and insertion may only be a short time interval but, as previously mentioned, freshly cut dentin provides the ideal scenario for dentin bonding. Magne27 has suggested that dentin should be sealed once exposed to prevent salvia contamination. Therefore, whatever generation of dentin bonding system the clinician is using, sealing the exposed dentin immediately after preparing the tooth but prior to image acquisition can minimize potential postoperative sensitivity and improve the bond strength.10,12,17,41
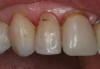
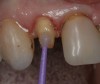
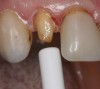
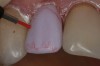
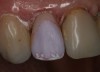
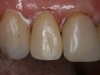
If using a three-step, total-etch technique, then the previously described steps should be followed. In the case of a one-step, self-etch adhesive, a slight variation to the previously described technique can be used. The steps of applying the one-step, self-etch are exactly the same. For example, after completing the tooth preparation on a maxillary right lateral where the patient had recurrent decay around the existing restoration margin (Figure 11), activated Brush&Bond was applied for 20 seconds (Figure 12). An air-water syringe was used to remove the excess adhesive and evaporate the solvents and water (Figure 13) and then light-polymerized for 10 seconds.
It is necessary with the CEREC® (Sirona Dental Systems) to lightly coat the prepared tooth with titanium dioxide to acquire an image using the acquisition camera. The prepared tooth was powdered and scanned. Using the CEREC software correlation program, a full-contour crown was designed and electronically sent to the milling device. A lithium disilicate was selected and milled. The crown was steam-cleaned to remove the milling surfactant. The remaining sprue attachment was removed with a green stone. A fine-diamond tapered bur was used to refine the final contour. Then, a ceramic polisher was used to produce the initial crown finish. The crown was then tried in to confirm the fit and occlusion.
The next step was to draw a map of the staining scheme with a red wax margin liner pencil on the facial surface of the crown (Figure 14). The use of the red wax pencil allows the clinician to visualize the color map of the matching tooth and draw areas to receive the appropriate stain (similar to a “paint by numbers” exercise). Instead of using the glaze liquid that is supplied by the manufacturer, distilled water is used to mix the stains. The water evaporates much faster than the glaze liquid and prevents, along with the red wax pencil line, the stains running together. Using a fine brush, the stains were placed in the appropriate areas. This “stain within the lines” technique simplifies the staining process (Figure 15). The temperature of the crystallization cycle burns off the red wax without leaving any residue. The crown was then carefully removed from the patient’s mouth.
The next step was the crystallization process, where the crown was secured to a silver nitride firing pin. Holding the crown by means of the pin, it was placed on the crystallization tray. A glaze spray was applied to the entire crown then placed on the silver nitride crystallization tray and placed in the oven. The 20-minute, 840°C firing cycle crystallizes the lithium disilicate through a controlled growth of the crystals. The firing cycle increases the flexural strength by 170% to 360 MPa.42,43 After a 5-minute bench cool, the crown was removed from the firing pin and steam-cleaned.
The crown was then tried in to evaluate the shade and the stain effect. The chroma of the crown was high in the red-yellow range, and had a high value (brightness) (Figure 16). It was necessary to equalize the red-yellow by neutralizing it with its complementary color (violet). Grey is the result when two complementary colors are mixed, which also reduces the value. An incisal stain, which is violet, was applied to the entire facial surface (Figure 17). The crown was then placed on a honeycomb firing tray and placed back into the porcelain oven and fired using the corrective firing program. After cooling, the crown was again tried in to verify the color change.
To prepare the crown for insertion with a resin luting agent, the intaglio surface was conditioned with phosphoric acid for 5 seconds to hydrate the ceramic surface. The intaglio surface was thoroughly rinsed with water, air-dried, and ceramic primer was applied. The primer was immediately air-dried. This method was used in lieu of traditional hydrofluoric acid conditioning followed with a silane application.
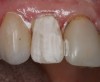
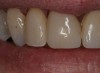
To prepare the tooth for insertion, phosphoric acid was applied to the tooth and lightly scrubbed with an ordinary microbrush or cotton pledget for 5 seconds. This step is necessary to remove salivary contaminates and any residual titanium dioxide scanning powder. The tooth was rinsed and dried. To refresh the Brush&Bond already present on the tooth surface, two drops from the bottle were placed in the mixing well and a new activator-containing microbrush was used to stir the resin for 2 seconds. The activated Brush&Bond was then applied to the prepared surface for 10 seconds, air-thinned, and light-polymerized. SEcure (Parkell), a resin cement containing 4-META, was mixed and placed in the crown. The crown was inserted and light-polymerized around the margins for 10 seconds on the facial and lingual surfaces. The excess cement was removed and the occlusion was verified (Figure 18).
Conclusion
Different methods and materials have been described which basically achieve the same goal of protecting the exposed dentin resulting from the contaminated oral fluids released during tooth preparation. Depending on the clinician’s comfort level with the different adhesives available, “total-etch” or one-step, self-etching dentin bonding agents can be used to protect the exposed dentin during either the temporary phase for a two-appointment indirect restoration or the milling time for a single-visit CAD/CAM restoration. Not only does this method protect the dentin, but it essentially eliminates postoperative sensitivity, which benefits both the patient and the clinician.
References
1. Wildgoose DG, Johnson A, Winstanley RB. Glass/ceramic/refractory techniques, their development and introduction into dentistry: A historical review. J Prosth Dent. 2004;91:136-143.
2. Ring ME. Dentistry. An Illustrated History. New York: Abrams, Abradale; 1992;15-17.
3. Christensen GJ. Resin cements and postoperative sensitivity. J Am Dent Assoc. 2000;131(8):1197-1199.
4. Clinical Research Associates. Filled polymer crowns: 1- and 2-year status reports. CRA Newsletter. 1998;22(10):1-3.
5. Sorensen JA, Choi C, Fanuscu MI, Mito WT. IPS Empress Crown System: Three-year clinical trial results. J Calif Dent Assoc. 1998;26(2):130-136.
6. Smales RJ, Etemadi S. Survival of ceramic inlays placed with and without metal reinforcement. J Prosth Dent. 2004;91(5):548-553.
7. Clinical Research Associates. Artglass, belleGlass, and Targis System crowns compared at one year. CRA Newsletter. 1998;22(10):1-3.
8. Brännström M, Johnson G, Nordenyall KJ. Transmission and control of dentinal pain: resin impregnation for the desensitization of dentin. J Am Dent Assoc. 1979;99(4):612-618.
9. Helvey GA Prehybridization: an alternative method for dentin bonding. Dent Today. 2000;19(12):82-87.
10. Paul SJ, Schärer P. The dual bonding technique: a modified method to improve adhesive luting procedures. Int J Perio Restor Dent. 1997;17(6):536-545.
11. Okuda M, Nikaido T, Maruoka R, et al. Microtensile bond strengths to cavity floor dentin in indirect composite restorations using resin coating. J Esthet Rest Dent. 2007;19(1):38-46.
12. Magne P, Kim TH, Cascione D, Donovan T. Immediate dentin sealing improves bond strength of indirect restorations. J Prosth Dent. 2005;94:511-519.
13. Bertschinger C, Paul SJ, Lüthy H, Schärer P. Dual application of dentin bonding agents: Effect on bond strength. Am J Dent. 1996;9:115-119.
14. Dietschi D, Monasevic M, Krejci I, Davidson C. Marginal and internal adaptation of class II restorations after immediate or delayed composite placement. J Dent. 2002;30:259-269.
15. Pashley EL, Comer RW, Simpson MD, et al. Dentin permeability: sealing the dentin in crown preparations. Oper Dent. 1992;17:13-20.
16. Stavridakis MM, Krejci I, Mange P. Immediate dentin sealing of onlay preparations: thickness of pre-cured dentin bonding agent and effect of surface cleaning. Oper Dent. 2005;30:747-757.
17. Dillenburg ALK, Soares CG, Paranhos MPG, et al. Microtensile bond strength of prehybridized dentin: Storage time and surface effects. J Adhes Dent. 2009;11:213-237.
18. Andrade OS, de Goes MF, Montes MA. Marginal adaptation and microtensile bond strength of composite indirect restorations bonded to dentin treated with adhesive and low-viscosity composite. Dent Mater. 2007;23:279-287.
19. Jaysooriya PR, Pereira PN, Nikaido T, et al. The effect of a “resin-coating” on the interfacial adaptation of composite inlays. Oper Dent. 2003;28:28-35.
20. Nikaido T, Cho E, Nakajima M, et al. Tensile bond strengths of resin cements to bovine dentin using resin coating. Am J Dent. 2003;16:41A-46A.
21. Dietschi D, Olsburg S, Krejci I, Davidson C. In vitro evaluation of marginal and internal adaptation after occlusal stressing of indirect class II composite restorations with different resinous bases. Eur J Oral Sci. 2003;111:73-80.
22. Van Meerbeek B, Vargas M, Inoue S, et al. Adhesives and cements to promote preservation dentistry. Oper Dent. 2001;26(Suppl 6):S119-S44.
23. Magne P. Porcelain veneers: Dentin bonding optimization and biomimetic recovery of the crown. Int J Prosthodont. 1999;12(2):103-110.
24. Magne P, Belser U. Bonded porcelain restorations in the anterior dentition: a biomimetic approach. 2002; Quintessence Publishing Co, Inc, Chicago: 272.
25. Nakaoki Y, Ogata M, Foxton R, Tagami J. The resin-coating technique: Effect of a single-step bonding system on dentin bond strengths. J Adhes Dent. 2003;5:293-300.
26. Mjör IA, Ferrari M. Pulp-dentin biology in restorative dentistry. Part 6: Reactions to restorative materials, tooth-restoration interferences, and adhesive techniques. Quintessence Int. 2002;33:35-63.
27. Magne P. Immediate dentin sealing: A fundamental procedure for indirect bonded restorations. J Esthet Restor Dent. 2005;17:144-155.
28. Brännström M, Astrom A. The hydrodynamics of the dentine: Its possible relationship to dentinal pain. Int Dent J. 1972;22:219-227.
29. Bergenholtz G. Effect of bacterial products on inflammatory reactions in the dental pulp. Scand J Dent Res. 1977;85:122-129.
30. Sarac D, Bilucu B, Sarac S, Kulunk S. The effect of dentin-cleaning agents on resin cement bond strength to dentin. J Am Dent Assoc. 2008;139(6):751-758.
31. Latta M, Kelsey PW, Murdock CM. Effects of adhesive liner and provisional cement on the bond strength of nickel/chrome/beryllium alloy cemented to dentin. Quintessence Int. 2005;36:817-823.
32. Kaneshiro AV, Imazato S, Ebisu S. Comparison of bonding ability of single-step, self-etching adhesives with different etching aggressiveness to root dentin. Dent Mater. 2007;26(6):773-784.
33. Van Meerbeek B, De Munck J, Yoshida Y, et al. Adhesion to enamel and dentin: Current status and future challenges. Oper Dent. 2003;28:215-235.
34. Tay FR, Pashley DH, Yoshiyama M. Two modes of nanoleakage expression in single-step adhesives. J Dent Res. 2002;81:472-476.
35. Ikemura K, Tay FR, Hironaka T, et al. Bonding mechanism and ultrastructural interfacial analysis of a single-step adhesive to dentin. Dent Mater. 2003;19:707-715.
36. Yoshida Y, Van Meerbeek B, Nakayama Y, et al. Evidence of chemical bonding at biomaterial-hard tissue interface. J Dent Res. 2000;79:709-714.
37. Magne P, Douglas WH. Porcelain veneers: dentin bonding optimization and biomimetic recovery of the crown. Int J Prosthodont. 1999;12:111-121.
38. Pashley EL, Comer RW, Simpson MD, et al. Dentin permeability: sealing the dentin in crown preparations. Oper Dent. 1992;17:13-20.
39. Van Landuyt, De Munck J, Snauwaert E, et al. Monomer-solvent phase separation in one-step self-etch adhesives. J Dent Res. 2005;84(2):183-188.
40. Zheng L, Pereira PNR, Nakajima M, et al. Relationship between adhesive thickness and microtensile bond strength. Oper Dent. 2001;26:97-104.
41. Duarte Jr S, Buanain de Freitas CR, Saad JRC, Sadan A. The effect of immediate sealing on the marginal adaptation and bond strengths of total-etch and self-etch adhesives. J Prosth Dent. 2009;102(1):1-9.
42. Powers JM, Sakaguchi RL. Craig’s Restorative Dental Materials. 12th ed. 2006; Mosby Elsevier; St. Louis, Mo: 469.
43. Helvey GA. Chairside CAD/CAM: Lithium disilicate restoration for anterior teeth made simple. Inside Dentistry. 2009. In press.
About the Author
Gregg A. Helvey, DDS, Adjunct Associate Professor, Virginia Commonwealth University, School of Dentistry, Richmond, Virginia; Private Practice, Middleburg, Virginia