You must be signed in to read the rest of this article.
Registration on CDEWorld is free. Sign up today!
Forgot your password? Click Here!
Introduction: The Process of Bonding
Dentistry was changed forever when the acid-etch technique and adhesive dentistry became “mainstream” in the mid 1980s. The ability to affix a restorative material adhesively to enamel and dentin not only advanced our ability to create more esthetic dental restorations, but also decreased the potential for damage caused by microleakage and recurrent decay by sealing the dentinal tubules. The technique of bonding can be, however, a “technique-sensitive” process; if the procedures are not properly followed, less than desirable results can follow. Thus, the struggle with the advance of this process has been to simplify the use of materials and technique, yet maintain optimal clinical results. When proper technique is followed, bonding is a very successful procedure. This article will discuss bonding to several substrates that cover a range of clinical applications to today’s restorative dentist. Some of the types of bonding that will be discussed include:
- bonding of glass-ionomer cement to dentin
- bonding direct composite and porcelain to enamel and dentin
- bonding new composite to old composite (composite repair)
- bonding porcelain to porcelain (crown-and-bridge repair)
So, what is “optimal bonding?” The answer is that which yields the best esthetic and functional long-term result. Today’s practice of clinical dentistry demands that the dentist have intimate knowledge of the above-mentioned processes.
Glass-Ionomer Cement as the Universal Dentin Replacement
One of the best “well-kept secrets” in this day of dentin adhesive dentistry is the use of glass-ionomer cements as a useful adjunct in both the direct and indirect restorative process. Since their discovery, these cements (eg, Fuji IX, GC America; Riva, SDI, Bensenville, IL) have been one of the most widely researched of all dental materials. In many parts of the world, it is the restorative material of choice, because of its low cost and anti-cariogenic properties. According to Ngo,1 glass-ionomer cement forms a chemically fused seal to dentin that many argue is superior to dentin adhesive. What most clinicians do not understand is that there is some truth to that statement. It has been argued that the dentin bond hydrolyzes with time, allowing microleakage to occur. Anecdotally, some believe that the “dentin bond does not work.” Bonded restorative material to enamel has to be cut off, while material bonded to dentin can be “popped off.” Again, this is only part true. However, an important clinical distinction that needs to be made is that there is “good” dentin to which to bond and “not so good dentin” as well. Dentin close to the dentinoenamel junction (DEJ) has fewer dentinal tubules per square millimeter, so therefore it has more peritubular dentin to demineralize through the acid-etch process. This creates a very good micromechanical surface to which adhesive resins can bond. Deeper, excavated areas close to the dental pulp, such as Class V cervical areas, sclerotic dentin, and deep Class II proximal boxes without an enamel rim, are areas where the dentin bond does not perform well, leading to the possibility of recurrent decay and marginal failure of the restorative material. It is important as a clinician to differentiate between “good dentin” and “bad dentin” when choosing a material to close this restorative interface.2
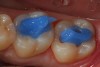
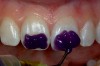
It is well accepted that glass-ionomer cements seal “bad dentin” better than dentin bonding systems. In areas of “good dentin,” dentin adhesives perform very well. Obviously, the key is to use the appropriate material where it performs the best. Because of the challenges associated with the placement and finishing of glass-ionomer materials and the esthetics that can be achieved, it is easy to overlook this as a direct restorative, but as a liner or base (dentin replacement), it is hard to beat. The coefficient of thermal expansion is the same as dentin, so it expands and contracts at the same rate as dentin. Figure 1 shows cavity preparations in tooth Nos. 18 and 19 being etched with 37% phosphoric acid for 2 seconds. This step is an alternative to using the tooth conditioner (polyacrylic acid) that is often supplied with glass-ionomer cements. Isolation has been achieved using a retraction-suction-isolation system. After a thorough rinse, the glass-ionomer cement is mixed and syringed into the cavity preparations. After setting, an ideal preparation is made with the operator’s bur of choice, and the direct composite restoration is completed.
Treating the Enamel and Dentin Surfaces for Bonding of Composite or Porcelain
After shade selection and tooth preparation is completed, the restorative process can commence. The first step is the conditioning of the enamel and dentin surfaces. Total-etch systems require a 15-second conditioning (etching) of enamel and dentin surfaces with 37% phosphoric acid. In a 15-second “total-etch” procedure, place the etchant on enamel first. The dentin only needs about 5 seconds of contact with the etchant. The conditioning of enamel results in a conditioned prismatic surface that is highly irregular in configuration, which is ideal for micromechanical retention. The result of the conditioning step on the dentin is complete removal of the smear layer and smear plugs in the dentinal tubules, which also increases the surface area for retentive purposes. For self-etching systems, it is still recommended to etch the enamel surfaces for optimal results. Because the dentin is not etched, the smear layer and smear plugs will be modified, but not removed.
The use of the total-etch technique with fourth- and fifth-generation bonding systems for placing direct composite restorations has been very popular for some time. However, the total-etch approach can be technique-sensitive, and if not used properly, can lead to postoperative sensitivity for some patients. These types of dentin adhesives generally require three steps for completion of the bonding process: (1) application of phosphoric acid for a specified amount of time, usually 15 seconds or less; (2) application of an adhesion-promoting agent, or primer; and (3) application of a bonding agent, or adhesive. Between the first and second steps, water rinsing and drying are generally required. Between the second and third steps, drying, or solvent evaporation, is required. After completion of all of these steps, light-curing is required to polymerize and harden the adhesive.
Efforts have been directed toward developing new systems to simplify the dentin adhesion process3 and single-bottle systems that contain acidic, polymerizable monomers are now a reality. These self-etching, self-priming dentin adhesive systems can be easier to use, because they require fewer clinical steps. Also, self-etching, self-priming systems have shown a decrease in postoperative sensitivity, because their use does not involve removal of the smear plugs and opening of the dentinal tubules, which is what occurs when using a total-etch technique with 37% phosphoric acid.4 A less aggressive acid is used in the seventh-generation systems, which has led to some concerns in the clinical arena regarding shear bond strength, and the effectiveness of the acid component providing optimal etching of the enamel, both cut and uncut.5 Some of the new seventh-generation (self-etch) bonding materials have been reported by the manufacturers to demonstrate high bond strength on dentin as well as effective enamel etching, which should result clinically in strong and durable bonds between restorative materials and tooth structure.6
Technique: Fifth-Generation Bonding Systems (Total Etch)
After the preparation is etched with 37% phosphoric acid for 15 seconds (Figure 4), the etchant is vigorously rinsed off for at least another 15 seconds or more. The preparation is then thoroughly dried (enamel and dentin), then the dentin is rewetted with a desensitizer (AquaSeal B™: AcquaMed Technologies, Chicago, IL; Gluma®, Heraeus Kulzer, Armonk, NY) (Figure 5) and high-volume suction is placed within a millimeter of the prepared surfaces for 2 seconds (Figure 6), and then removed. This will create a perfect, moist surface to place a hydrophilic primer, not too desiccated (collapsed collagen), and not too moist.7 A fifth-generation dentin bonding adhesive (OptiBond® Solo Plus™: Kerr Corporation, Orange, CA; Adper™ SingleBond, 3M ESPE, St. Paul, MN; Prime & Bond® NT™, DENTSPLY International, York, PA) is copiously placed with a microapplicator and agitated into the prepared surface (Figure 7). After air-thinning and evaporation of the solvent (ethanol), the adhesive is light-cured according to the manufacturer’s instructions. Figure 8 shows the completed restoration of the facial surfaces of tooth Nos. 8 and 9 (Herculite® Ultra: Kerr Corporation; Kalore™, GC America, Alsip, IL; Esthet-X® HD: DENTSPLY International; Amaris®, VOCO America, New York, NY; Rok, SDI).
Technique: Seventh-Generation Bonding Systems (Self-Etch)
After etching the enamel for 15 seconds, a seventh-generation dentin bonding adhesive (OptiBond All-In-One, Kerr Corporation; Go!, SDI; G-Bond™, GC America; Futurabond SE, VOCO America) is copiously placed with a microapplicator and agitated into the prepared surface (Figure 9). After air-thinning and evaporation of the solvent (ethanol) in the adhesive (Figure 10), a second layer of adhesive is applied in the same fashion and light-cured (Figure 11) according to the manufacturer’s instructions.8 Because the acidic component of the self-etching system is “less aggressive” than 37% phosphoric acid, repetition of this step is recommended for optimal bonding.
Repairing an Existing Direct Composite Restoration: Composite-to-Composite Bonding
One of the clinical benefits of direct composite restorations is the ability to repair, or “renew,” an existing fractured or marginally defective, but clinically serviceable restoration. By virtue of the enamel and dentin adhesive process, areas of the restoration not affected by the “localized” failure should still be well sealed clinically and not require removal of the entire restorative material for the remake process, unlike conventional metallic restorations (alloy or gold), that do not “seal” the tooth–restorative interface. The successful addition of new composite material to existing composite material, however, does present its own challenges.
There are some clinicians who believe that the oxygen-inhibited layer is necessary to successfully place composite in an incremental fashion. Suh,9 Blank,10 and others have written about how this requirement is not actually true. Because the conversion of composite (polymerization) continues many hours after initial photo-curing, additional increments of composite can be added to previously cured increments during the build-up phase of the restorative process as long as the previously cured composite surface is not contaminated. However, this does not appear to be true for older composite restorations that have completed the conversion process and have been contaminated by the oral environment.
After verification of shade selection, the fractured area is resurfaced using a micro-abrader with 50-µm aluminum-oxide particles (Figure 12). This will create micro-mechanical retention, increase surface energy to help wet the surface, and remove unsuitable contaminated material. Next, the area is etched with 37% phosphoric acid for 15 seconds, thoroughly rinsed and air-dried to ensure thorough decontamination of the existing composite surface and to etch any adjacent enamel and dentin surfaces. A traditional dentin adhesive can be placed on any enamel and dentin surfaces after rewetting with a desensitizer, such as AquaSeal B or Gluma, and then light-cured. The composite surface onto which the additional restorative material will be added is treated with CompositRestore® (All Dental PRODX, Ocean View, NJ), brushing the material in for 30 seconds before light-curing (Figure 13). The area of composite-to-composite bonding continues to be a challenge for clinicians using standard dentin bonding adhesive resins. For resin-to-resin, bonding has traditionally been “mechanical only” and really has acted as only a “wetting agent.” CompositRestore is a material that penetrates the old composite matrix and locks onto uncured double bonds; 10% to 15% of the double bonds remain uncured (unused during the conversion process) after initial composite placement. When the new composite is added (Figure 14), it can chemically attach to the uncured double bonds again, creating mechanical and chemical retention of the added material. Figure 15 shows the completed composite repair.11
Bonding Porcelain to Porcelain: The Porcelain “Repair”
Repairing a broken porcelain (or porcelain-fused-to-metal) restoration is a clinical reality in everyone’s practice. The traditional technique is to use composite resin to repair chipped porcelain. This is an attempt to use unlike materials to affect a long-term repair that rarely works. Early “porcelain repair kits” used 37% phosphoric etch, silane primer, adhesive resin, and composite resin to repair chipped porcelain. This system did not work because 37% phosphoric acid cannot appreciably etch a porcelain surface. Without adequate micromechanical retention to affix the composite resin to the porcelain surface, any repair will likely not withstand the forces of mastication. The use of hydrofluoric acid provides an adequate etched surface to create an improved micromechanical bond of composite to porcelain. However, the bond of composite to porcelain is not the only clinical problem. Another is the finishing and polishing of the porcelain–composite interface. Regardless of the finishing and polishing technique and materials used, the fine line of demarcation between the composite and porcelain is hard to eradicate. If the broken restoration is a single unit, a complete remake may be the most predicable solution. But what about multiple-unit fixed bridgework? It may not be economically or clinically feasible to sacrifice a long-span restoration for one unit with a porcelain fracture. In esthetic cases, a clinically acceptable posterior bridge may not be the same shade as the one chosen for the anterior reconstruction. So, for these clinical problems, is there a long-term solution short of replacement of the entire restoration?
Re-Veneering Existing Porcelain Restorations
When a patient fractures the ceramic off of a fixed bridge, the immediate reaction by the dentist and the patient may be to replace the entire prosthesis. This necessitates removal of the defective bridge and starting the case over, which can mean a tremendous expense to the patient, additional hours of non-productive chair time for the dentist, and possibly another laboratory charge. Through the use of adhesive technology, there is another choice.
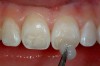
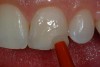
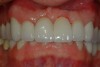
In this case, the patient had a six-unit porcelain-to-Captek™ (Precious Chemicals, Inc, Altamonte Springs, FL) bridge placed using the maxillary canines as abutments with the lateral and central incisors being pontics. After approximately 2 years of service, the patient presented with a porcelain fracture in the middle and incisal one thirds of tooth No. 9 (Figure 16). Because the fracture does not expose any of the metal understructure, one option is to repair the fracture using composite resin.
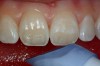
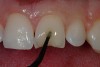
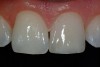
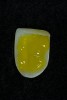
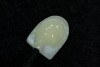
While this is a perfectly acceptable way to proceed, this author has always found it particularly challenging to match the degree of opacity or translucency and to invisibly blend the composite margin into the existing porcelain. In most cases, a composite repair of ceramic is only a short-term fix for the problem. Another option for a more long-term result is to bond a new piece of ceramic to the existing porcelain using adhesive resin technology. The plan is to prepare a porcelain veneer preparation into the existing ceramic. Because the porcelain covering the metal substructure is ideally at least 1.5 mm thick, a conservative porcelain veneer preparation removing only 0.5 mm of porcelain can be accomplished without exposing underlying metal (Figure 17).
The success of this procedure will depend on having a sufficient amount of remaining ceramic to provide micromechanical retention for the porcelain veneer that will be placed to repair the fractured surface. Once the preparation is complete, a master impression is taken and the tooth is provisionalized using direct composite resin that is “spot-etched” to the ceramic surface. Supplying digital photographs of the existing bridge, particularly the adjacent central incisor, will aid the technician in the placement of internal effects and incisal translucency.
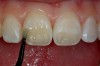
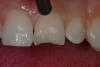
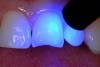
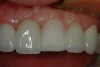
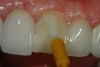
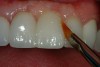
After removal of the provisional direct resin temporary, the porcelain veneer is checked for color match and marginal fit. The best way to evaluate color is to try on the veneer with water only and photograph using a digital camera. If the color and fit is good, the restoration is ready for placement. The first step is to etch the porcelain veneer and porcelain surface of the preparation (Figure 18) with hydrofluoric acid for 60 seconds then thoroughly rinse for an additional 60 seconds. Next, both ceramic surfaces are silanated and air-dried. After the silanation process, a fifth-generation dentin adhesive (OptiBond Solo Plus; Single Bond; Prime & Bond) is copiously applied, scrubbed into the surface of the ceramic using a microbrush, air-dried, and light-cured for 20 seconds (Figure 19). A clear (untinted) composite resin cement (NX3 Nexus® Third Generation, Kerr Corporation; Calibra®, DENTSPLY International; RelyX™ ARC, 3M ESPE) is applied to the internal surface of the porcelain veneer.
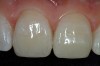
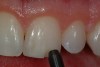
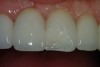
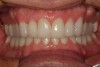
The restoration is then placed on the prepared surface of the tooth and fully seated expressing the excess resin cement (Figure 20). A number 2 Keystone brush (Patterson Dental, St Paul, MN) is used to carefully remove the majority of the excess resin cement, being careful not to move or dislodge the restoration (Figure 21). Reseating the veneer with finger pressure intermittently during the resin cement “clean up” will ensure that the restoration remains in the proper orientation. A large cotton ball in a cotton forceps can be used to carefully remove the remaining resin from the surface of the ceramic material. Once the majority of the resin cement is removed, the restoration is light-cured for 60 seconds. Figure 22 shows the repaired tooth No. 9 using a porcelain veneer bonded to existing porcelain. The esthetic match of the ceramic is perfect as the restoration is undetectable. The bond of ceramic-to-ceramic is very strong and this “repair” should last for years to come. Certainly a repair in this fashion is preferable to remaking the entire bridge and the result is excellent.12
Resin Cements: Total-Etch and Self-Etch Systems
The resin cement family for indirect restorative materials evolved out of the total-etch and dentin adhesive technologies. For proper use, they require pretreatment of the tooth surface with 37% phosphoric acid and application of a dentin bonding agent before application of the resin cement. These cements truly form a micromechanical bond to both tooth structure on one side and restorative material on the other side. Also, they are insoluble in oral fluids.
There are two types of “traditional resin cements” (those that require the use of the total-etch technique and dentin adhesive technology) that are commonly used: dual-cure and light-cure. The most recent addition to the resin cement family are the self-etching resin cements, which require no pretreatment of the tooth surface, and they appear to have many of the clinical advantages of traditional resin cement systems, such as ease of use.
It is important to note that in some cases, bond strengths of self-etching resin cements are not as high as those for resin cements using the total-etch technique. It is for that reason that most clinicians do not advocate self-etching resin cements for use with porcelain veneers. More recent generations of self-etching resin cements, such as Maxcem Elite™ (Kerr Corporation), SmartCem™2 (DENTSPLY International), BiFix SE (VOCO America), G-Cem™ (GC America), Set! (SDI) are showing significant increases in bond strength. Kerr reports up to 24 MPa of bond strength for Maxcem Elite, without pretreating the tooth surface. However, it is important to remember that the purpose of any cement is to fill the microgap between tooth structure and restorative material, and to aid in retention of the restoration. Proper resistance and retention form of the preparation is still more important for the successful retention of any restorative material.
Self-etching resin cements have been successfully used for a variety of indirect restorations including porcelain-fused-to-metal, pressed ceramic crowns, inlays, and onlays, aluminous crowns, Premise Indirect (Kerr Corporation), TESCERA™ (BISCO, Schaumburg, IL), Cristobal® (DENTSPLY Ceramco, York, PA) crowns, inlays, and onlays, including chairside CAD/CAM restorations. One clinical advantage is the reduced chance of postoperative sensitivity that can occur more commonly with the more technique-sensitive total-etch systems. Because there is no separate etching step that can open the exposed dentinal tubules, sensitivity is greatly reduced. There is also no need for the use of desensitizers because the smear plugs remain in the tubules. Some of the benefits of Maxcem Elite reported by the manufacturer include a redox initiating system that increases color stability and fluoride release due to the incorporation of acidic monomers and reactive fluoroaluminosilicate filler. Dispensing through the automix cartridge and intraoral tips (including one that fits into the root canal space for cementing posts) makes delivery of the material very simple. Upon follow-up of numerous clinical cases, it has been observed by the author that there is no change in marginal integrity from the date of original placement. There is no clinical evidence of marginal leakage or staining. Most patients have reported complete overall satisfaction, both from a comfort standpoint (lack of sensitivity) and from an esthetic and functional standpoint as well. Self-etching resin cements offer a predictable long-term solution for conventional indirect restoration cementation. Figure 23 shows a 1-year postoperative view of the completed porcelain-to-zirconium case cemented with self-etching resin cement (Maxcem Elite).13,14,15
Conclusion
Different clinical bonding situations have been discussed and techniques described to achieve optimal bonding. Understanding the substrates involved and predictable techniques used to effectively bond to these surfaces will greatly enhance restorative outcomes in clinical practice.
References
1. Yip HK, Tay FR, Ngo HC, et al. Bonding of contemporary glass ionomer cements to dentin. Dent Mater. 2001;17(5):456-470.
2. de Melo RM, Galhano G, Barbarosa SH, et al. Effect of adhesive system type and tooth region on the bond strength to dentin. J Adhes Dent. 2008;10:127-133.
3. Inoue S, van Meerbeek B, Vargas M, et al. Adhesion mechanism of self-etching adhesives. In: Proceedings of Advanced Dentistry, 3rd International Kuraray Symposium. December 3-4, 1999; Granada, Spain.
4. De Munck J, Van Meerbeek B, Satoshi I, et al. Microtensile bond strengths of one and two step self-etching adhesives to bur cut enamel and dentin. Am J Dent. 2003;16(4):414-420.
5. Unemori M, Matsuya Y, Akashi A, et al. Self-etching adhesives and postoperative sensitivity. Am J Dent. 2004;17(3):191-195.
6. Ramos RP, Chinelatti MA, Chimello DT, et al. Assessing microleakage in resin composite restorations rebonded with a surface sealant and three low viscosity resin systems. Quintessence Int. 2002;33(6):450-456.
7. Jackson R. The importance of technique in preventing postoperative sensitivity when placing bonded restorations. Dent Today. 1999;18(9):44-49.
8. Chen X, Le M, Quin D, et al. Bond strength of a new All-In-One self-etching adhesive system. Data on file. Kerr Corporation, Orange, CA.
9. Suh B. Oxygen-inhibited layer in adhesive dentistry. J Esthet Restor Dent. 2004;16(5):316-323.
10. Blank JT, Latta M. Composite resin layering and placement techniques: Case presentation and scientific evaluation. Pract Proced Asthet Dent. 2005;17(6):385-390.
11. Lowe RA. Adding new + old. Dental Products Report. 2007;188-122.
12. Lowe RA. Repair, don’t replace. Dental Products Report. 2006;20-23.
13. Poss SD. Use of a self-etch, self-adhesive resin cement: clinical technique. Dent Today. 2006;25(9):94-96.
14. Weiner R. An advanced self-etching resin cement: Clinical application. Dent Today. 2008;27(3):82-84.
15. Lowe RA. The Noah Technique. Dental Products Report. 2008;28-36.
About the Author
Robert A. Lowe, DDS, Private Practice, Charlotte, North Carolina