You must be signed in to read the rest of this article.
Registration on CDEWorld is free. Sign up today!
Forgot your password? Click Here!
Lesson
Tooth preparation for indirect bonded restorations (eg, composite/ceramic inlays, onlays, and veneers) can generate significant dentin exposures. It is recommended to seal these freshly cut dentin surfaces with a dentin bonding agent (DBA) immediately after tooth preparation, before impression taking. A three-step total-etch DBA with a filled adhesive resin is recommended for this specific purpose. The major advantages, as well as the technical challenges of this procedure, are presented in detail.
DENTINOENAMEL JUNCTION AS A MODEL FOR DENTIN BONDING OPTIMIZATION
Whenever a substantial accessible area of dentin has been exposed during tooth preparation for indirect bonded restorations, local application of a DBA is recommended. The principles for dentin bonding are well established today based on the work of Nakabayashi and colleagues in the 1980s,1 the principle of which is to create an interphase or interdiffusion layer, also called the hybrid layer,2 by the interpenetration of monomers into the hard tissues. This approach was landmark because once the infiltrating resin is polymerized, it can generate a "structural" bond somewhat similar to the interphase formed at the dentinoenamel junction (DEJ).3 Studies have shown that the DEJ can be regarded as a perfect fibril reinforced bond.4,5 It is composed of a moderately mineralized interface between two highly mineralized tissues (enamel and dentin). Parallel-oriented coarse collagen bundles form massive consolidations that can divert and blunt enamel cracks through considerable plastic deformation. There are startling similarities between the DEJ and the current principles of dentin-resin hybridization. Both can be considered complex interphases (fibril reinforced) and not simple interfaces. Consequently, the clinical performance of present-day DBA has significantly improved, allowing adhesive restorations to be placed with a highly predictable level of clinical success. Simulation of the DEJ by dentin hybridization has proved to set a new reference for the optimization of dentin bonding procedures and opens a wide window of opportunities to the biomimetic and conservative restoration of teeth using bonded porcelain as an enamel/DEJ substitute.6
EVIDENCE-BASED CLINICAL APPLICATION OF DBA FOR INDIRECT BONDED RESTORATION
The clinical significance of successful dentin bonding is particularly strong in the case of indirect bonded porcelain restorations (BPRs) such as inlays, onlays, and veneers because the final strength of the tooth restoration complex is highly dependent on adhesive procedures. Long-term clinical trials by Dumfahrt and by Friedman showed that porcelain veneers partially bonded to dentin have an increased risk of failure.7,8 Recent advances in the knowledge database for DBA application suggest that these failures can likely be prevented by changing the application procedure of the DBA. In fact, there are basic principles to be respected during the clinical procedure of dentin-resin hybridization, the most important of which are related to problems of (1) dentin contamination and (2) susceptibility of the hybrid layer to collapse until it is polymerized. These essential elements when considered within the frame of indirect bonded restorations, especially BPRs, lead to the conclusion that dentin could be sealed immediately after tooth preparation, the so-called immediate dentin sealing (IDS),9 before impression taking. There are at least 4 rational motives and several other practical and technical reasons supporting IDS.
- Freshly cut dentin is the ideal substrate for dentin bonding. Most studies on DBA bond strength use freshly prepared dentin. However, in daily practice, teeth have to be temporarily protected for the patient's functional and esthetic needs. In 1996 and 1997, Paul and colleagues raised the concern that dentin contamination owing to provisionalization can reduce the potential for dentin bonding.10-12 Their research demonstrated that significant reductions in bond strength can occur when simulating dentin contamination with various provisional cements compared with freshly cut dentin. They did not simulate additional contamination sources such as saliva and bacterial leakage, which will be discussed later. In practice, freshly cut dentin is present only at the time of tooth preparation (before impression).
- Precuring of the DBA leads to improved bond strength. In most studies on DBA bond strength, the infiltrating resin and adhesive layer are usually polymerized first (precuring), before composite increments are placed, which appears to generate improved bond strength when compared with samples in which DBA and the overlaying composite are cured together.13,14 These results can be explained by the collapse of the uncured dentin-resin hybrid layer caused by pressure during composite placement or seating of the restoration.15-17 The hybrid layer may be weakened superficially as a consequence of the lower resin content of the compacted collagen fibers. This hypothesis is supported by the fact that structural defects and an intrinsic weakness of the hybrid layer have been shown to be associated with handling conditions of the DBA.18 Precuring the DBA is fully compatible with the direct application of composite restorations; however, it raises several issues when applied during the luting of indirect bonded restorations. Cured DBA thicknesses can vary significantly according to surface geometry, on average 60 µm to 80 µm on a smooth convex surface and up to 200 µm to 300 µm on concave structures such as marginal chamfers. 16,19 As a result, applying and curing the DBA immediately before the insertion of an indirect composite or porcelain restoration could interfere with the complete seating of the restoration. Practically speaking, it is therefore recommended that the adhesive resin be kept uncured before the restoration is fully seated. This, in turn, generates at least two significant problems: (1) while the restoration is being inserted, the outwardly directed flow of dentinal fluid dilutes the bonding agent and blocks microporosities into which the resin otherwise would have penetrated20,21; and (2) the pressure of the luting composite during the seating of the veneer can create a collapse of demineralized dentin (collagen fibers) and subsequently affect the adhesive interface cohesiveness.15-17 It has been proposed that the adhesive layer be thinned to less than 40 µm to allow for precuring (before the insertion of the restoration); however, because methacrylate resins show an inhibition layer up to 40 µm when they are light cured,22 excessive thinning can prevent the curing of light-activated DBAs. All the aforementioned issues can be resolved if eventual dentin exposures are sealed immediately, with the DBA being applied and cured directly after the completion of tooth preparations, before the final impression itself, which has been confirmed to generate superior bond strength23,24 and fewer gap formations.16,25 The resulting interphase could potentially better withstand long-term exposure to thermal and functional loads compared with the same adhesive being applied and cured together with the restoration.
- Immediate dentin sealing allows stress-free dentin bond development. Dentin bond strength develops progressively over time, probably owing to the completion of the copolymerization process involving the different monomers. Reis and colleagues showed significant increases in bond strength over a period of 1 week.26 In directly placed adhesive restorations, the weaker early dentin bonding is immediately challenged by the overlaying composite shrinkage and subsequent occlusal forces. On the other hand, when using IDS and indirect bonded restorations, because of the delayed placement of the restoration (intrinsic to indirect techniques) and postponed occlusal loading, the dentin bond can develop without stress, resulting in significantly improved restoration adaptation.27
- Immediate dentin sealing protects dentin against bacterial leakage and sensitivity during provisionalization. Based on the fact that provisional restorations may permit microleakage of bacteria and subsequently dentin sensitivity, in 1992 Pashley and colleagues proposed sealing dentin in crown preparations.19 This idea proves even more useful when using bonded porcelain restoration (eg, veneers) given the specific difficulty to obtain sealed and stable provisionals. An in vivo study confirmed the ability of different primers to prevent sensitivity and bacterial penetration when preparing for porcelain veneers.28
PRACTICAL AND CLINICAL FACTS SUPPORTING IDS
The following practical and clinical facts account for the use of IDS:
- Patient comfort. Patients experience improved comfort during provisionalization, limiting the need for anesthesia during definitive insertion of the restorations, and reduction of postoperative sensitivity.19,28
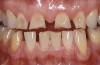
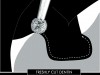
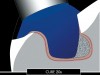
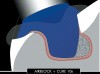
- i>Maximum tooth structure preservation. When used on full-crown coverage preparations and combined with glass ionomer or modified-resin cements, IDS can result in significantly increased retention, exceeding the cohesive strength of the tooth.29 IDS can therefore constitute a useful tool for improving retention when dealing with short clinical crowns and excessively tapered preparations. Provided that optimal adhesion is achieved also at the inner restoration surface (eg, porcelain etching and silanization, as in the case of inlays, onlays, and veneers), traditional principles of tooth preparation can be omitted and significantly more conservative tooth structure removal is enabled (Figure 1).30
- Systematic use of light-activated DBA. When applying IDS, owing to the direct and immediate curing mode, light-activated DBAs can be used. Without IDS, the use of dual-cure DBA to ensure complete curing through the restoration might be required. The knowledge database about dual-cure resins is limited and, therefore, they should not be the first choice as a luting material. The formulation of dual-cure materials is known to represent a balance between high levels of polymerization in all aspects of the restoration and color instability owing to amine degradation.31 Therefore, either the mechanical characteristics or esthetic properties might be compromised.
- Separate conditioning of enamel and dentin. As IDS is performed primarily on exposed dentin surfaces, the operator can focus on the "wet bonding" to dentin (in cases of total etching), whereas enamel conditioning can be performed separately at the stage of final restoration placement (see step-by-step procedure below).
PRACTICAL CONSIDERATIONS
Dentin Identification
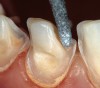
The first technical step for the application of IDS is the identification of exposed dentin surfaces. A simple but efficient method is to proceed to a short etching (2 to 3 seconds) and thorough drying of the prepared surfaces. Dentin can be easily recognized because of its glossy aspect, whereas enamel is frosty. It goes without saying that after this initial etch, the dentin surface must be reprepared (eg, a slight roughening with a diamond bur) to expose a fresh layer of dentin and re-etched before the application of the DBA.
Preparation
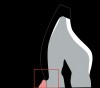
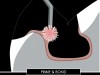
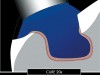
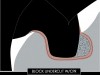
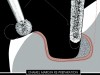
As mentioned earlier, DBA thicknesses can reach several hundred micrometers when applied to concave areas.19 When using IDS, the additional adhesive layer can sometimes negatively affect the thickness of the future restoration. This is particularly evident in the case of porcelain veneers and in the presence of gingival margins in dentin (Figure 2). When margins terminate in dentin, a marked chamfer (0.7 mm to 0.8 mm) is recommended to provide adequate margin definition and enough space for the adhesive and overlaying restoration (Figures 2A through 2C). A shallow chamfer would cause the adhesive resin to pull over the margin and compromise both margin definition and porcelain thickness.9 In other axial locations, confined and superficial dentin exposure gives only a limited space for the restorative materials, including the bonding agent. The application and curing of the DBA would significantly reduce the space left for the ceramic buildup. Considering that a low ratio of ceramic to luting agent thickness can negatively influence the stress distribution within the porcelain,32,33 IDS is not indicated for very superficial dentin exposures. On the other hand, deeper preparation surfaces (ie, in the presence of Class IV or V defects or in the case of inlay/onlay/overlay preparations) can be easily treated with IDS before impression taking because sufficient space is left for the restorative material to maintain a reasonable ratio of thicknesses between the ceramic and the luting agent.
Adhesive Technique
The technique described focuses on the use of the total-etch technique (also called "etch and rinse"), which can include either 3-step (separated primer and resin) or 2-step (self-priming resin) dentin adhesives. Although there is a tendency to simplify bonding procedures, recent data confirm that conventional 3-step total-etch adhesives still perform most favorably and are most reliable in the long term.34,35
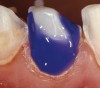
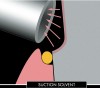
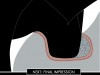
Etching the freshly cut dentin (with H3PO4 for 5 to 15 seconds) must immediately follow tooth preparation (Figures 2D and 2E) to avoid saliva contamination. After rinsing, excess water must be removed. One should be cautious as both excessive drying and excessive wetting can cause an inferior bond owing to demineralized collagen collapse and nanoleakage/water treeing, respectively.36 Accordingly, air drying should be avoided. Excess moisture removal can be achieved by use of suction drying (negative air pressure) (Figures 2F and 2G) without applying positive pressure to demineralized dentin.
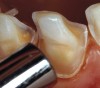
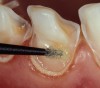
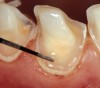
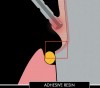
The next steps can include the application of either the primer (3-step systems) or the self-priming resin (2-step systems). Practically, the separate primer application should be favored (Figures 2H through 2J), not only because of the superior subsequent bond but also because it allows a more accurate placement of the adhesive resin. In fact, the application of a priming agent or self-priming resin often requires a slight brushing motion, which frequently results in the spread of resin above the exposed dentin limits. There are no consequences when using a separate primer as the latter does not create any detectable thickness or layer. After the suction of the excess solvent (Figure 2J), the adhesive resin can be placed accurately (eg, with a periodontal probe, as in the case of veneer preparation margins [Figures 2K through 2N). On the other hand, the use of self-priming resins generates excesses and may pull over the margin (into the gingival sulcus), requiring additional corrections with a bur, again exposing dentin at the margin.
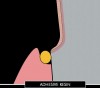
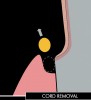
After a first curing (regular mode 20 seconds [Figure 2O and 2P), a layer of glycerin jelly (air block) is applied to the adhesive and slightly beyond. Additional curing (regular mode 10 seconds) of the DBA through a layer of glycerin jelly is recommended (Figure 2Q) to polymerize the oxygen inhibition layer and prevent interaction of the dentin adhesive with the impression material (especially polyethers). Accurate placement of the adhesive resin is usually confirmed by the removal of the deflection cord as the latter should not adhere to the margin (Figures 2R and 2S).
CAUTION WITH PROVISIONALIZATION
Sealed dentin surfaces have the potential to bond to resin-based provisional materials and cements. As a result, retrieval and removal of provisional restorations can prove extremely difficult. Tooth preparations must be rigorously isolated with a separating medium (eg, a thick layer of petroleum jelly) during fabrication of the provisional restoration. It is strongly suggested to avoid resin-based provisional cements but to provide mechanical retention and stabilization instead (eg, locking the restoration through additions of liquid resin in palatal embrasures; splinting multiple restorations can also significantly enhance the primary stability of the provisional restoration). Given the potential exposure of the cured adhesive to the oral fluids as well as the water sorption mechanism,37 it is recommended to keep the provisionalization period reduced to a maximum of 2 weeks.
ADHESIVE RESINS: FINAL RESTORATION PLACEMENT
Just before the luting procedures (when placing the final restoration), it is recommended to roughen the existing adhesive resin using a coarse diamond bur at low speed or by microsandblasting. The entire tooth preparation surface can then be conditioned as it would be done in the absence of dentin exposure: H3PO4 etch (30 seconds), rinse, dry, and coat with adhesive resin. This time, no precuring of the adhesive is indicated because it would prevent the complete insertion of the restoration. Unfilled DBA can also be used to seal dentin; however, one must keep in mind that cleaning and roughening procedures could easily destroy the hybrid layer and reexpose the dentin because of the reduced thickness and stiffness of the adhesive (related to the absence of filler). Surfaces sealed with an unfilled DBA should therefore be cleansed gently with a soft brush and pumice only. In deeper preparations (eg, in posterior teeth), unfilled DBA covered by a thin layer of flowable composite can also be used to achieve IDS. Under no circumstances should the flowable resin replace the use of the unfilled resin because of the insufficient penetration of such resin at the top of the hybrid layer as well as numerous tubules obstructed by filler particles.38
Universal Approach
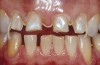
The above-described technique is applicable to both anterior and posterior bonded restorations. A typical situation of adhesive onlay preparation after amalgam removal is described in Figure 3, following the same protocol. As in anterior teeth, etching should always extend slightly over enamel to ensure the conditioning of the entire dentin surface (Figure 3C). In posterior teeth, given the greater average size, depth, and more favorable configuration of most preparations, use of either 2-step or 3-step DBAs is equally possible (Figures 3D through 3F). The clinician, however, should keep in mind that the use of self-priming resins generates more excess resin (owing to the brushing motion), which may pull over the margin and require additional corrections with a bur. This appears more critical in the case of proximal dentin margins as excess resin into the gingival sulcus might involve repreparation, reexposing dentin at the margin, and the subsequent use of the DBA during restoration insertion.
IDS can be immediately followed by the placement of a base of composite (Figures 3G and 3H) to block eventual undercuts and/or to build up excessively deep cavities to maintain reasonable restoration thickness, facilitating the subsequent use of a light-cured composite as luting agent. After final polymerization of the inhibition layer (Figure 3I), enamel margins are usually reprepared just before final impression to remove excess adhesive resin and provide ideal taper (Figures 3J and 3K).
CONCLUSION
Significant evidence from the literature as well as clinical experience indicate the need for a revised application procedure for dentin bonding when placing indirect bonded restorations such as composite/ceramic inlays, onlays, and veneers. Immediate application and polymerization of the DBA to the freshly cut dentin, before impression taking, is recommended. The IDS appears to achieve improved bond strength, fewer gap formations, decreased bacterial leakage, and reduced dentin sensitivity. The use of a filled DBA or the combined use of an unfilled DBA and a flowable composite liner facilitates the clinical and technical aspects of IDS. This concept should stimulate both researchers and clinicians in the study and development of new protocols for the rationalization of adhesive techniques and materials leading to maximum tooth structure preservation, improved patient comfort, and long-term survival of indirect bonded restorations.
ACKNOWLEDGMENT
The author wishes to express his gratitude to Dr. Richard Kahn (professor of clinical dentistry, Division of Primary Oral Health Care, University of Southern California School of Dentistry) for helpful discussions as well as a review of the English draft; to Dr. Nikolaos Perakis (prosthodontist, private practice, Bologna, Italy) for help during the clinical procedures illustrated; and to Professor Urs Belser (chair, Department of Prosthodontics, University of Geneva School of Dental Medicine) for significant support in the development of all concepts presented here. "In his heart, a man plans his course, but the Lord determines his steps" (Proverbs 16:9).
References
1. Nakabayashi N, Kojima K, Masuhara E. The promotion of adhesion by the infiltration of monomers into tooth substrates. J Biomed Mater Res. 1982;16:265-273.
2. Nakabayashi N, Nakamura M, Yasuda N. Hybrid layer as a dentin-bonding mechanism. J Esthet Dent. 1991;3:133-138.
3. Lin CP, Douglas WH. Structure-property relations and crack resistance at the bovine dentin-enamel junction. J Dent Res. 1994;73:1072-1078.
4. Lin CP, Douglas WH, Erlandsen SL. Scanning electron microscopy of type I collagen at the dentin-enamel junction of human teeth. J Histochem Cytochem. 1993;41:381-388.
5. Magne P, Belser U. Understanding the intact tooth and the biomimetic principle. In: Magne P, Belser U, eds. Bonded Porcelain Restorations in the Anterior Dentition-A Biomimetic Approach. Chicago: Quintessence Publishing Co., 2002:23-55.
6. Magne P, Douglas WH. Rationalization of esthetic restorative dentistry based on biomimetics. J Esthet Dent. 1999;11:5-15.
7. Dumfahrt H. Porcelain laminate veneers. A retrospective evaluation after 1 to 10 years of service: part II-clinical results. Int J Prosthodont. 2000;13:9-18.
8. Friedman MJ. A 15-year review of porcelain veneer failure-a clinician's observations. Compend Contin Educ Dent. 1998;19:625-628.
9. Magne P, Belser U. Immediate dentin bonding. In: Magne P, Belser U, eds. Bonded Porcelain Restorations in the Anterior Dentition-A Biomimetic Approach. Chicago: Quintessence Publishing Co., 2002:270-273,358-363.
10. Bertshinger C, Paul SJ, Luthy H, Schaerer P. Dual application of dentin bonding agents: its effect on the bond strength. Am J Dent. 1996;9:115-119.
11. Paul SJ, Schaerer P. Effect of provisional cements on the bond strength of various adhesive bonding systems on dentine. J Oral Rehabil. 1997;24:8-14.
12. Paul SJ, Schaerer P. The dual bonding technique: a modified method to improve adhesive luting procedures. Int J Periodontics Restorative Dent. 1997;17:536-545.
13. McCabe JF, Rusby S. Dentine bonding-the effect of pre-curing the bonding resin. Br Dent J. 1994;176:333-336.
14. Frankenberger R, Sindel J, Kramer N, et al. Dentin bond strength and marginal adaptation: direct composite resins vs ceramic inlays. Oper Dent. 1999;24:147-155.
15. Dietschi D, Magne P, Holz J. Bonded to tooth ceramic restorations: in vitro evaluation of the efficiency and failure mode of two modern adhesives. Schweiz Monatsschr Zahnmed. 1995;105:299-305.
16. Magne P, Douglas WH. Porcelain veneers: dentin bonding optimization and biomimetic recovery of the crown. Int J Prosthodont. 1999;12:111-121.
17. Dietshi D, Hertzfeld D. In-vitro evaluation of marginal and internal adaptation of Class II resin composite restorations after thermal and occlusal stressing. Eur J Oral Sci. 1998;106:1033-1042.
18. Tay FR, Gwinnett AJ, Pang KM, Wei SH. Variability in microleakage observed in a total-etch wet-bonding technique under different handling conditions. J Dent Res. 1995;74:1168-1178.
19. Pashley EL, Comer RW, Simpson MD, et al. Dentin permeability: sealing the dentin in crown preparations. Oper Dent. 1992;17:13-20.
20. Paul SJ, Scharer P. Factors in dentin bonding. Part II: a review of the morphology and physiology of human dentin. J Esthet Dent. 1993;5:51-54.
21. Paul SJ, Scharer P. Intrapulpal pressure and thermal cycling: effect on shear bond strength of eleven modern dentin bonding agents. J Esthet Dent. 1993;5:179-185.
22. Rueggeberg FA, Margeson DH. The effect of oxygen inhibition on an unfilled/filled composite system. J Dent Res. 1990;69: 1652-1658.
23. Ozturk N, Aykent F. Dentin bond strengths of two ceramic inlay systems after cementation with three different techniques and one bonding system. J Prosthet Dent. 2003;89:275-281.
24. Jayasooriya PR, Pereira PN, Nikaido T, et al. Efficacy of a resin coating on bond strengths of resin cement to dentin. J Esthet Restor Dent. 2003;15:105-113.
25. Jayasooriya PR, Pereira PN, Nikaido T, et al. The effect of a "resin coating" on the interfacial adaptation of composite inlays. Oper Dent. 2003; 28:28-35.
26. Reis A, Rocha de Oliveira Carrilho M, Schroeder M, et al. The influence of storage time and cutting speed on microtensile bond strength. J Adhes Dent. 2004;6:7-11.
27. Dietschi D, Monasevic M, Krejci I, et al. Marginal and internal adaptation of Class II restorations after immediate or delayed composite placement. J Dent. 2002;30:259-269.
28. Cagidiaco MC, Ferrari M, Garberoglio R, et al. Dentin contamination protection after mechanical preparation for veneering. Am J Dent. 1996;9:57-60.
29. Johnson GH, Hazelton LR, Bales DJ, et al. The effect of a resin-based sealer on crown retention for three types of cement. J Prosthet Dent. 2004;91:428-435.
30. Magne P, Perroud R, Hodges JS, et al. Clinical performance of novel-design porcelain veneers for the recovery of coronal volume and length. Int J Periodontics Restorative Dent. 2000;20:440-457.
31. Darr AH, Jacobsen PH. Conversion of dual cure luting cements. J Oral Rehabil. 1995;22:43-47.
32. Magne P, Kwon KR, Belser UC, et al. Crack propensity of porcelain laminate veneers: a simulated operatory evaluation. J Prosthet Dent. 1999;81:327-334.
33. Magne P, Versluis A, Douglas WH. Effect of luting composite shrinkage and thermal loads on the stress distribution in porcelain laminate veneers. J Prosthet Dent. 1999;81:335-344.
34. Van Meerbeek B, De Munck J, Yoshida Y, et al. Buonocore memorial lecture. Adhesion to enamel and dentin: current status and future challenges. Oper Dent. 2003;28:215-235.
35. De Munck J, Van Meerbeek B, Satoshi I, et al. Microtensile bond strengths of one and two-step self-etch adhesives to bur-cut enamel and dentin. Am J Dent. 2003;16:414-420.
36. Ferrari M, Tay FR. Technique sensitivity in bonding to vital, acid-etched dentin. Oper Dent. 2003;28:3-8.