You must be signed in to read the rest of this article.
Registration on CDEWorld is free. Sign up today!
Forgot your password? Click Here!
Taking accurate impressions can remain a challenge for even the most experienced clinicians. Despite everyday use, perfection can be elusive due to issues such as pulls, bubbles, and missed margins. Each material has different properties as well as advantages and disadvantages. Proper technique—especially tissue management and retraction—is essential not only with the different impression materials but also with digital impressions.
Impression Materials Overview
The four impression materials discussed here include alginate, alginate substitute, vinyl polysiloxane (VPS), and polyether. The author generally uses the alginates and alginate substitutes for diagnostic purposes, reserving VPS and polyether materials for final restorations. However, with the advent of milled bite splints and orthodontic aligners, the silicone-based materials are now being used to take full-arch impressions for diagnostic purposes in these clinical situations.
Among these materials, only alginates are hydrophilic—ie, moisture tolerant; and only alginate substitutes use a one-step technique, rather than including a light-body wash first, then a heavy-body tray material.1,2
Alginates
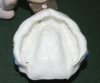
As mentioned, alginates are hydrophilic, so the focus with them is not on keeping teeth dry, which is challenging with hydrophobic materials, but keeping them moist after the impression is taken to preserve accuracy.3 Many clinicians who are long familiar with this material find it accurate, easy to use, and patient-friendly. However, it requires accurate measurement and a thorough mixing of the materials; the additional need for careful attention to set-time accuracy is less challenging with the triphasic materials that are now available, as they change color to indicate when it is the correct time to seat the tray, and when to start timing the final set. Alginates should be poured quickly, and most can be poured only once (Figure 1). The clinician must also take care to avoid pulls, which can cause distortion during removal. Alginate impressions that are not poured immediately need to be stored in a moist environment. They can be wrapped in a wet paper towel or stored in a plastic box that is designed to contain humidity.
As noted above, the author uses alginate materials mainly for study models (which can be quickly poured), diagnostic work-ups on sets of mounted models, trial equilibration, or sending models to a laboratory to have a wax-up completed.
Alginate Substitutes
Because they are hydrophobic, alginate substitutes need a dry environment during use in the mouth, but not for storage or transport. They are patient-friendly in terms of taste, demonstrate stability over time, and can be poured multiple times. Problems are usually related to moisture on initial contact with the oral environment, especially on the lingual of maxillary second molars.4
For diagnostic purposes, alginate substitutes are versatile because: (1) they require just one step; (2) they offer silicone’s advantages of not needing to rush to pour; and (3) they can be poured multiple times with equal accuracy, enabling clinicians to have separate sets for office and laboratory.
Vinyl Polysiloxane
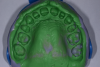
VPS materials are the author’s preference for restorative impressions (Figure 2). Many VPS impression materials are on the market, and they are available in a wide variety of viscosities and set times to suit the clinician’s preference. In general, they are stable over time and accurate, and allow multiple pours and set times.5-7
Because they are hydrophobic, keeping the surface completely dry is important,8 as is tissue retraction—which has nothing to do with the hydrophobic nature of the material—and there are choices of viscosity/consistency in tray materials. As noted in the technique discussion below, the author prefers to use a plastic disposable tray.
Polyether
Polyether materials used properly can offer extremely fine detail and accuracy in crown-and-bridge impressions.9 Other advantages include the ability to do multiple pours and have a longer set time and long-term stability. However, they are rigid and more difficult to remove from the mouth than VPS—especially when there are multiple restorations or undercuts. In addition, many patients object to their taste, although this has been improved in recent years. The author recommends using a custom impression tray to help with the rigidity and getting it in and out, and blocking out undercuts where this material can become locked.
Impression-Making Issues and Tools
Depending on the material and application, techniques for impression making differ. Some specific methods preferred by the author are described below for the different materials. However, it is useful to first discuss some general concepts—particularly retraction for the hydrophobic materials, whose accuracy depends on controlling moisture—and tools.
Tissue Management
Tissue management is the most important piece of the puzzle when it comes to creating high-quality impressions that will deliver exquisite restorations such as crown-and-bridge, veneers, inlays, and onlays. Successful tissue management rests primarily on retraction—ie, pushing tissue out of the way to make space for the impression material. This can be achieved using a variety of methods, including retraction cords, retraction paste, and lasers. (The author describes the approach she favors for healthy tissue below.)
Retraction
All retraction techniques have pros and cons based on the clinical situation, so the author recommends that clinicians have multiple tools for different scenarios.
Retraction Cords
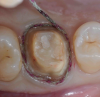
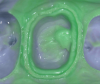
Retraction cords are available with and without vasoconstrictors; the author prefers stiffer ones and using the two-cord method described below. They are usually placed completely around the prepared tooth and placed at the top of the sulcus, so the entire diameter of the cord is visible and the clinician can ascertain that the flash of the light-body material will have the desired 1-mm depth and 1-mm thickness (Figure 3 and Figure 4). If placed too deeply in the sulcus, the tissue can partially cover the cord and prevent the light-body material from correctly recording a correct impression.
The author favors using two retraction cords when tissue is healthy. The first is a smaller-diameter cord placed after completion of the initial preparation with an equigingival margin placement. If the final desired margin placement is subgingival, the first cord is placed and enables the clinician to move the gingival tissue out of the way to refine, polish, and drop the margin without nicking the tissues during preparation. Next, the larger cord is placed to retract the tissue from the margin to obtain the impression.
Retraction Paste
The author finds retraction paste especially useful for crown-and-bridge impressions, mainly as a hemostatic agent because it does not interfere with impression materials, does not remain in the tissues or teeth, and does not change the preparation color. She uses the following techniques for hemostasis and retraction, respectively, with a retraction paste dispensed in a composite gun. As a hemostatic agent, it prevents bleeding for 5 to 10 minutes—even while instruments are used—when employed as follows: The paste is placed in the desired location for 60 seconds, then rinsed and dried.
For retraction, the paste can be used instead of the second cord—based on the method described above—although the author usually still uses the two-cord method and puts paste over the top as a final hemostatic agent, then lets it sit for a full 60 seconds before rinsing and allowing to dry.
Lasers
Lasers typically cut or, as termed in laser technology, trough. With a laser, the clinician is literally thinning/removing the free gingival margin tissue to create that 1-mm space for impression material. Care should be taken not to shorten the tissue unless a gingivectomy is intended. With most lasers, if settings are correct, the coagulant effect of the laser energy enables the clinician to control sulcular fluid and hemorrhage.10
When Tissue Is Unhealthy
Ideally—ie, when the tissue is healthy—retraction is done immediately after the tooth is prepared. However, issues such as inflamed gingival tissues, gingivitis, periodontitis, old restorations with big margins, or plaque on the teeth may necessitate therapy to improve the environment, then taking the impression at a later time.11,12 This might involve placing a provisional after preparing and first having the patient undergo therapy with hydrogen peroxide rinses, using an interproximal brush or rubber tip stimulator, or employing a product such as a chlorhexidine varnish on a provisional restoration. If an impression in an unfavorable environment is necessary, the author recommends considering the use of retraction paste in addition to retraction cords.
Impression Trays
The author primarily employs two types of impression trays for crown-and-bridge—full-arch or triple-tray. Triple-tray impressions are extremely accurate in capturing margins, creating dies, and recording intercuspal position for single-unit restorations.13,14 However, the full-arch tray impression, followed by a facebow, offers the laboratory the flexibility to refine the function in excursive positions as well as the maximum intercuspal position.15-17
For alginate study models, the author uses rigid, reusable metal trays recommended for alginate impressions because they provide firm retention of set impression material, reducing the chance of impression distortion on removal. Some plastic disposable trays with plastic rims come with a self-adhesive mesh that makes the use of tray adhesive unnecessary. These trays are ideal for VPS impressions. The author does not favor adhesives due to their flavor, smell, and stickiness.
In some situations—such as when using rigid polyether materials—it is better to use a custom impression tray. Employing a custom tray can make it easier to overcome challenges such as getting a rigid material in and out of the oral environment without difficulty and tray distortion.
Wash and Tray Material
Using the two-step impression technique employed with all materials except alginate substitutes involves the use of a light-body material—eg, light, extra-light, or ultra-light—which is syringed on teeth prior to tray insertion, and a tray material—heavy-body, medium-body, or putty, which is placed directly in the tray.18
While many believe the stiffer tray materials force the light-body material into the sulcus around a crown preparation19,20 the author focuses not on the heavy-body material but accurate and adequate tissue management and retraction to best capture margin definition and an impression.
Set Times
The author keeps on hand both light-body and tray materials with different set times to be prepared for various scenarios. For example, clinicians can do a single-crown triple-tray impression using a fast- or ultrafast-set material, but need to be prepared for other situations, such as taking a full-arch diagnostic impression or creating an impression for more advanced crown-and-bridge restorations—eg, a six-unit veneer case, or multiple units of crown-and-bridge. Sometimes, the working time of a regular-set material is preferred.
Step-by-Step Techniques
Alginate Diagnostic Impression
Step 1. Fluff alginate powder by tipping container back and forth.
Step 2. Precisely measure the materials using the manufacturer’s water measurement device and scoop.
Step 3. Mix thoroughly to get a smooth mix. (The author recommends a plastic disposable tray with rope wax on the sharp edges to protect tender tissue right up in the vestibule of the patient’s mouth.)
Step 4. Load a small amount of alginate in a syringe while the dental assistant loads the tray.
The patient should lick teeth to provide needed moisture for this hydrophilic material prior to seating.
Step 5. Use the alginate-filled syringe to inject the material directly over the occlusal tables of the teeth in the patient’s mouth.
Step 6. Always seat alginate trays on second molars first and then roll the tray to the anterior, so it fills the vestibule, excess comes out in the anterior, and the clinician can see proper tray seating. (If the tray is seated on the anterior and rolled to the posterior, the excess will go down the patient’s throat.)
Step 7. Avoid overseating by using accurate pressure. Using the tactile cue of the pressure of the edge of the tray against the tissue, the wax will sit comfortably against the patient’s tissue; make sure to extend the vestibule of the tray enough.
Step 8. The final set time of a triphasic material can be calculated based on the last color change. Note that the temperature of the water will affect the set time.
Step 9. When removing the tray from the patient’s mouth, do not initially use the handle with this or any impression material. Instead, slide a finger all the way to the posterior in the vestibule until the suction-release “pop” is heard; then use the handle just to hang onto the impression as well as remove it from the mouth. This avoids separation of the impression material from the tray, which can cause distortion during removal.
Step 10. Inspect the impression to make sure everything needed has been picked up. Note that if you can see through the material to the tray, the model will be inaccurate.
Step 11. Finally, wrap the impression properly to keep it wet for storage or transport, although it is recommended that alginates not be transported to the laboratory but poured as quickly as possible.
Putty Wash Diagnostic Impression
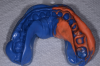
Step 1. Mix putty in your hand wearing nitrile gloves to thoroughly incorporate the base and catalyst and ensure no color streaking.
Step 2. Use your fingers to shape the putty in the tray, pushing it up over the vestibule of the tray before placing it in the patient’s mouth.
Step 3. Seat the tray on the second molars, rolling it to the anterior, which, due to viscosity of material, requires a fair amount of pressure. Wiggle the tray up and down and back and forth to make space for the light-body material to be added.
Step 4. Remove the putty from the patient’s mouth without allowing it to set.
Step 5. Next, load the entire putty impression with light-body material, using just the mixing tip.
Step 6. Return the impression to the patient’s mouth; the tray should be seated from the second molars and rolled to the anterior. (The impression-taker border molds, and then holds the material with the fingers.)
Step 7. The material should be allowed to fully set.
Step 8. To remove, have the patient close—but not bite down on the tray—while reaching as far back as possible into the vestibule by the second molars, releasing until the suction comes loose with an audible “pop,” then grasp the handle and remove it from the patient’s mouth.
Step 9. Carefully examine the impression to ensure there is vestibular extension everywhere—ie, no place where the tray can be seen, no voids, and the impression has captured fine details; it is especially important to examine the second molars, making sure that there are no streaks or pulls that would create inaccuracy.
Alginate Substitute Diagnostic Impression
Step 1. Using a plastic disposable tray, place adhesive between the tray and the alginate substitute impression material. Allow the material to dry and the solvent to evaporate for 1 to 2 minutes.
Step 2. After the tray is loaded, dry the teeth using the air-water syringe tip.
Step 3. Next, seat the tray as previously described, from second molars rolling to the anterior, and holding the tray steady to keep the patient from biting against the tray and distorting the material.
Step 4. Removal should be handled as described in step 8 above.
Step 5. Carefully examine the impression as described in step 9 above.
Restorative Impressions
Issues Related to Flash
Flash is the material that goes beyond the margin of the preparation of the tooth. If it is extremely thin and fragile, it will actually pull off between the two layers of stone in the first pour. If a second pour is performed, the margin will not be accurate. The impression material around a prepared tooth should be thick enough for multiple pours and to create accurate dies.
Two-Step, Two-Stage VPS Impression Method
Step 1.Use a light-body material to capture the fine detail around teeth that are prepared or in a diagnostic impression or occlusal table.
Step 2. Seat the tray already loaded with the tray material—typically, medium-body, heavy-body, or putty material—in the recommended method, starting on the second molars rolling toward the anterior teeth.
Step 3. Allow it to set. Set times usually range from 2 to 4 minutes in the oral environment, with 60 to 90 seconds of working time. (Some ultrafast-set materials need a total time of less than 90 seconds.)
Full-Arch VPS Impression
For the author, a full-arch impression means taking a facebow so that the model can be mounted on an articulator to simulate excursive function in addition to the contacts for intercuspal position. The steps for taking a full-arch VPS impression are as follows:
Step 1. Try the tray in for size.
Step 2. Make sure the tray does not bind anywhere. It is desirable to have several millimeters of space, both lingual and buccal, to enable the clinician to wiggle the tray around slightly and not hit teeth, thus verifying that it does not bind.
Step 3. Make sure that the tray is not too large. A trick used by the author is to take a mandibular impression with a maxillary tray to avoid seating the vestibular extensions of a tray up against their tori.
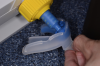
Step 4. Load the tray with heavy-body/medium-body material. Have the dental assistant load the tray either with a mixing machine or the material and a gun (Figure 5).
Step 5. Manage the retraction cord. When the assistant is one half to three fourths through loading the tray, manage the cord.
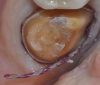
Step 6. The cord must be wet for removal, but for hydrophobic material, the preparations need to be dry (Figure 6). Therefore, first wet and pull the top cord, then use the air-water syringe tip to remove the moisture.
Step 7. Inject the light-body material (Figure 7). For this, while the assistant holds the patient’s cheek and the dentist holds the tongue, the preferred viscosity light-body material is syringed into the patient’s mouth.
Step 8. If the retraction is good, there is no need to blow the material down into the sulcus, which can cause the flash to be thin and tear when the model is poured.
Step 9. Place the loaded tray over the light-body material in the patient’s mouth.
Step 10. Determine the set time, keeping in mind that materials have a working time and an intraoral time which, added together, are the full set time.
Step 11. Remove the tray.
Step 12. Evaluate the impression for flash, presence of bubbles, or voids (Figure 8). The author uses loupes, but laboratories use microscopes at 20 power magnification.
Considerations for Virtual/Digital Impressions
Digital impressions are the way of the future. Although they do not require the use of impression materials, tissue management and retraction are still as important as ever. Replacing concerns about material characteristics and methods for using them are those tied to the technology. As with any new process or technique, there is a learning curve. Using digital impressions effectively requires a familiarity with the hardware and software involved. Issues like file storage and file transfer to the lab become technology issues each practice has to address.
Among the digital systems available today one difference to consider is the size and feel of the camera. Being able to accurately manipulate the camera is critical in obtaining an accurate image. Patients with small mouths or difficulty opening can pose a challenge for placing the camera. Similarly multiple tipped teeth will require skillful movement of the camera to accurately capture all of the tooth surfaces and line angles.
Another factor to consider is the size of the digital impression system and in a multi-operatory office the ease of moving it from room to room. A hybrid technique available today is to use a box scanner and digitize a traditional impression.
There are also entirely new issues such as electronically transmitting the data to the laboratory and the HIPAA compliance associated with the information transfer across the internet. From a digital impression you can proceed completely in the virtual world all the way to production of the final restoration. Alternatively your digital impression can be used to fabricate a solid model. All choices ultimately rest on operator preference and the clinical situation.
Conclusion
Being able to accurately capture an impression affects the dentistry we provide everyday. Impressions are a key component of dentistry whether we are dealing with diagnostics, restorative, orthodontics or even advanced oral surgery procedures. Taking the time to understand the materials and techniques available today and how to use them to their maximum clinical effectiveness is critical for success.
References
1. Wettability of elastomeric impression materials and voids in gypsum casts. Cullen DR, Mikesell JW, Sandrik JL. J Prosthet Dent. 1991;66(2):261-265.
2. Chee WW, Donovan TE. Polyvinyl siloxane impression materials: a review of properties and techniques. J Prosthet Dent. 1992;68(5):728-732.
3. Kulkarni MM, Thombare RU. Dimensional changes of alginate dental impression materials—an in vitro study. Journal of Clinical and Diagnostic Research. 2015 Aug;9(8):ZC98-ZC102. doi: 10.7860/JCDR/2015/13627.6407. Epub 2015 Aug 1.
4. Burgess JO. Impression material basics. Inside Dentistry. 2005;1(1).
5. Shaba OP, Adegbulugbe IC, Oderinu OH. Dimensional stability of alginate impression material over a four-hour time frame. Nig Q J Hosp Med. 2007;17(1):1-4.
6. Clancy JM, Scandrett FR, Ettinger RL. Long-term dimensional stability of three current elastomers. J Oral Rehabil. 1983;10(4):325-333.
7. Nassar U, Oko A, Adeeb S, et al. An in vitro study on the dimensional stability of a vinyl polyether silicone impression material over a prolonged storage period. J Prosthet Dent. 2013;109(3):172-178. doi: 10.1016/S0022-3913(13)60038-4.
8. Perry R. Using polyvinyl impressions for study models: a case report. Dent Today. 2004;23:106-107.
9. Nagrath R, Lahori M, Agrawal M. A comparative evaluation of dimensional accuracy and surface detail reproduction of four hydrophilic vinyl polysiloxane impression materials tested under dry, moist, and wet conditions—an in vitro study. J Indian Prosthodont Soc. 2014;14(Suppl 1):59-66. doi: 10.1007/s13191-014-0365-z. Epub 2014 May 11.
10. Stuffken M, Vahidi F. Preimpression troughing with the diode laser: a preliminary study. J Prosthet Dent. 2015 Dec 23. pii: S0022-3913(15)00611-3. doi: 10.1016/j.prosdent.2015.10.008. Epub ahead of print.
11. Chai J, Takahashi Y, Lautenschlager EP. Clinically relevant mechanical properties of elastomeric impression materials. Int J Prosthodont. 1998;11(3):219-223.
12. Ahmed SN, Donovan TE, Rau CT. Accurate elastomeric impressions: the importance of effective soft tissue management. J Esthet Restor Dent. 2016 Jan 5. doi: 10.1111/jerd.12191. Epub ahead of print.
13. Ceyhan JA, Johnson GH, Lepe X, Phillips KM. A clinical study comparing the three-dimensional accuracy of a working die generated from two dual-arch trays and a complete-arch custom tray. J Prosthet Dent. 2003;90(3):228-234.
14. Kang AH, Johnson GH, Lepe X, Wataha JC. Accuracy of a reformulated fast-set vinyl polysiloxane impression material using dual-arch trays. J Prosthet Dent. 2009;101(5):332-341. doi: 10.1016/S0022-3913(09)60066-4.
15. Hatano Y, Kolling JN, Stern N, Clayton JA. A graphic comparison of mandibular border movements generated by various articulators. Part II: Results. J Prosthet Dent. 1989;61(4):425-429.
16. Celenza FV. An analysis of articulators. Dent Clin North Am. 1979;23(2):305-326.
17. Weiner S. Biomechanics of occlusion and the articulator. Dent Clin North Am. 1995;39(2):257-284.
18. Donovan TE, Chee WW. A review of contemporary impression materials and techniques. Dent Clin North Am. 2004;48(2):vi-vii, 445-470.
19. Luthardt RG, Walter MH, Weber A, et al. Clinical parameters influencing the accuracy of 1- and 2-stage impressions: a randomized controlled trial. Int J Prosthodont. 2008;21(4):322-327.
20. Luthardt RG, Walter MH, Quaas S, et al. Comparison of the three-dimensional correctness of impression techniques: a randomized controlled trial. Quintessence Int. 2010;41(10):845-853.