You must be signed in to read the rest of this article.
Registration on CDEWorld is free. Sign up today!
Forgot your password? Click Here!
To use the common vernacular, posterior composites are “trending.” Due to patient demand for tooth-colored fillings, practitioners are providing far fewer metallic restorations in the posterior than in the past. However, compared to amalgam, which could be compacted so that proximal contacts for Class II restorations could be more easily attained, posterior composites offer challenges in their placement, finishing, and use.
Considerations with Posterior Composite Resins
Issues associated with these more esthetic restorations include: 1) composite placement; 2) postoperative sensitivity; 3) the need for better light-curing; 4) techniques and devices to improve proximal contacts; and 5) easier finishing techniques.
Composite Placement
Composite placement techniques have generally focused on minimizing composite polymerization shrinkage stress—ie, the shrinkage of composite resin from the walls of a cavity preparation, creating gaps between the restoration and cavity preparation—as well as the fact that composites are viscous liquids that cannot be compacted against matrix bands to establish proximal contacts. Recommendations to place the material in increments of no greater than 2 mm for posterior teeth were designed to minimize shrinkage while using either a universal composite resin for both anterior and posterior or one that is posterior-specific.1
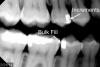
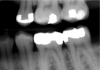
However, in the past decade, a new generation of low-shrinkage composites was developed specifically for bulk placement. These products’ advantages for placement relative to composites designed to be layered are radiographically apparent (Figure 1 and Figure 2); areas of porosity raise concerns about recurrent decay, and with a highly viscous composite, the chance of trapping air bubbles is significantly increased, compared to a dense, homogeneous void-free composite resin (Figure 2).2
Polymerization Shrinkage Stress and the C-factor
Davidson’s research sheds light on polymerization shrinkage stress, specifically the configuration factor, or C-factor, which is the ratio of the restoration’s bonded to unbonded (free) surfaces of the tooth preparation.3 The higher the C-factor, the greater the potential for disruption of the bond due to polymerization shrinkage and shrinkage stresses of the composite, causing gaps that may be responsible for adverse events such as postoperative sensitivity or restoration failure. For example, in a Class IV restoration with one bonded and four unbonded surfaces, there is a C-factor of one, or 0.25, which is correlated with a low risk for adverse polymerization shrinkage effects (Figure 3). Conversely, there is a high risk of adverse polymerization shrinkage effects in more intricate cavity preparations such as Class I or Class V restorations with five bonded surfaces and only one unbonded (free) surface, for a C-factor of five (Figure 4 and Figure 5). The C-factor of two in routine Class II and Class III restorations with four bonded and two unbonded (free) surfaces is associated with a moderate risk for adverse polymerization shrinkage effects.
Strategies to minimize these C-factor effects of polymerization shrinkage were, in fact, the basis of the recommendation to use small volumes of composite—no greater than 2 mm—because the smaller the volume, the less shrinkage stress.4 Other approaches include use of a stress-breaking liner, placement of resin-modified glass ionomer or flowable composite liners, and using less composite and a thicker liner. Low-shrinkage bulk-fill composite resins, which are a new development, are designed to control these effects of polymerization shrinkage.
Postoperative Sensitivity
Possible Causes
Postoperative sensitivity associated with posterior composite restorations may be traced to other aspects of technique or the product itself. Among the “suspects” are: inadequately rinsing the etchant off the tooth, applying the etchant incorrectly, leaving too much water in the cavity preparation during moist bonding, getting etchant on root surfaces, failing to prevent contamination from blood or saliva during bonding, inadequate adhesive drying, inadequate cooling during preparation, inadequate light-curing, overheating the tooth when light-curing, overdessicating the tooth while drying, and problems with occlusion.
Suggested Solutions
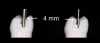
Some problems can be avoided once their potential causes are known. For example, if the adhesive is being applied incorrectly using a microbrush, it may be necessary to use a conventional brush to apply to all surfaces. To avoid overheating the tooth at various times during the process, the clinician should make sure to have adequate air-water spray on the bur. To adequately light-cure and cool light-cure bulk-fill composites for that 4-mm increment requires at least 20 joules of energy; because most curing lights provide only 8 to 12 joules in 10 seconds, the time should be increased to 20 seconds. As for cooling during light-curing, the author has his assistant blow air on the tooth while light-curing for 20 seconds, with 10 seconds on, 3 to 4 seconds off, then 10 seconds on. Other solutions include having liners—either resin-modified glass-ionomer liners or thin applications of flowable composites—in cavity preparations; using self-etch adhesives, which are believed to be associated with a lower rate of postoperative sensitivity;5 using good placement techniques in proximal boxes; and using low-shrinkage composites. Evaluate occlusion on both the restoration and tooth for changes. In fact, research has demonstrated that shrinkage of composite can cause cusps to move closer together and thereby change the occlusion from being on the restoration to being on cusp ridges.6
Achieving Improved Proximal Contacts
Although few patients want them, amalgam posterior restorations are far more predictable for clinicians to place, and they generally perform better than composite restorations. A study by Bernardo et al7 concluded that the difference in performance was accentuated in restorations that were large and involved more than three surfaces; this finding supports the C-factor theory described above, and points to the challenges involved in restoring proximal surfaces with a composite resin, which is a viscous material that, unlike amalgam, cannot be packed into cavity preparation and adapted or pushed against a matrix band.
To overcome these challenges, good placement techniques in the proximal boxes are essential. Fortunately, new techniques and devices are available for achieving proximal contact, such as wedges (and prewedges) and specialized matrices and ring systems, including sectional matrix systems. New-generation rings straddle and adapt to matrix bands beyond the margins much more easily, especially when the preparation extends past the axial line angles. Some specialized wedges are flexible, adapting to metal sectional matrix materials to provide excellent gingival adaptation. In this author’s experience, one rationale for using low-shrinkage bulk-fill composites for bulk filling is to minimize layering and the voids associated with that method.1
Best Practices for Light-Curing
Light-curing is not as easy as it looks. As noted above, common problems associated with composite restoration longevity in particular are traced to inadequate light-curing.
An international symposium on light-curing in dentistry held in 2014 at Dalhousie University in Halifax, Canada, reached a consensus on best practices for light-curing anterior and posterior restorations.8 Tips for Success, which were based on that meeting, but presented by Price at the 2015 Annual Meeting of Canadian Academy of Pediatric Dentistry/Academie Canadienne de Dentisterie Pediatrique (CAPD/ACDP), focus on the safety of both operator and patient as well as the quality of the restoration.9 For clinicians, having a better understanding of light-curing and delivering adequate energy to polymerize composite resin is important.8,10,11 Time of curing should be based not on instructions from the light manufacturer but on the energy requirements of the composite provided by the composite manufacturer.10 The light should be stabilized and positioned to ensure complete polymerization.10 When using the light for extended times, cool the tooth and soft tissue to avoid pulpal damage or thermal damage to the soft tissue.8,10,11
In a 2010 report12 about light-curing, Price and others specified that to maximize energy delivered to the restoration, the operator—who should wear eye protection—should hold the light both close to and perpendicular to the restoration. Price and Felix13 also demonstrated the impact of the distance between the light and restoration in terms of irradiance received, as well as reporting on the effect of distance from the restoration on power density from curing lights.
Low-Shrinkage Bulk-Fill Composites
As mentioned previously, numerous low-shrinkage bulk-fill composites are on the market, including FiltekTM Bulk Fill (3M ESPE, www.3mespe.com), HyperFILTM (Parkell, www.parkell.com), SureFil® SDR® (DENTSPLY Caulk, www.dentsply.com), SonicFillTM 2 (Kerr, www.kerrdental.com), Venus® Bulk Fill (Heraeus Kulzer, www.hereaus-kulzer.com), N’Durance® (Septodont, www.septodontusa.com), and Tetric EvoCeram® Bulk Fill and Tetric EvoFlow Bulk Fill (Ivoclar Vivadent, www.ivoclarvivadent.com).
As a group, these products, which each have different handling and placement features, offer significant advantages in terms of ease of placement and avoidance of problems associated with polymerization shrinkage and shrinkage stress, such as reduction in sensitivity, recurrent caries, and marginal staining. Because these composites can be placed in larger increments, they are easier to adapt to the preparation, and at up to 4 mm, there is less need for the incremental layering that is time-consuming and technique-sensitive, and leads to voids. However, more energy is needed to polymerize the composite at these larger, thicker increments, so more curing time is necessary. To decide on the curing time required, clinicians need to know the energy their lights are delivering; also bulk-fill composites for the posterior are generally more translucent, which allows for a greater depth of cure.
As noted, dentists have choices in this category and need to select a material to meet their own ways of practicing dentistry. With bulk-fill composites, the 4-mm increments can be dispensed using a large syringe tube, preloaded tips, or compule tips.
With one brand of high-viscosity bulk-fill composite, optimized adaptation requires a special instrument for sonic placement. Another bulk-fill composite is placed using an automix dual-cure formulation that has lower viscosity for improved adaptation. Although it does not require light-curing, the most occlusal increment can be light-cured, removing the concern about not light-curing to the full depth of the preparation. Other bulk-fill composites are flowable and require a second increment of wear-resistant composite over the top. All these techniques work well and have been demonstrated in evidence-based studies to be successful.14,15
Using Bulk-Fill Composites
Given that the recommended depth for the restoration placement is generally 4 mm for bulk-fill composites, obtaining accurate measurement is important. For this reason, the “measure twice, cut once” rule used by carpenters could be modified for dentists to be: “Measure twice, restore once.” Available for this are adaptation instruments for packing the composite with incremental lines—eg, 2 mm, 4 mm, and 6 mm (Figure 6); clinicians can also use periodontal probes to measure the distance from the cavosurface margins. Some bulk-fill composites specify unique placement techniques to enhance restoration adaptation to cavity walls. This would include devices such as SonicFill’s for placing compules with sonic energy and the HyperFil Dual-Cure from Parkell, which is placed with an automix syringe. For most composites that are in the Class II category, measure from the gingival margin to the occlusal cavosurface margin to determine the depth of the restorations; for preparation depths greater than 4 mm, it is this author’s recommendation to place the composite resin and light-cure in two increments.
Predictable Posterior Bulk-Fill Composite Cases
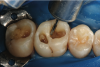
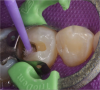
In the case below, a technique for predictable posterior bulk-fill composites is described step by step. For this routine Class II composite resin preparation, caries is apparent radiographically on the distal surface of tooth No. 20 (Figure 7).
The separation is prewedged (Figure 8) to compensate for the thickness of the metal matrix band.
The tooth is prepared.
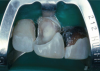
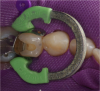
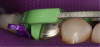
The sectional matrix of dead-soft stainless steel is placed (Figure 9).
The ring system (V3 Ring [Triodent, www.triodent.com) of the matrix should be straddling the soft-sided wedge to enable optimized adaptation of the gingival margin, which is at greatest risk for recurrent decay (Figure 10 and Figure 11).
A self-etch adhesive is placed on this self-retentive preparation (Figure 12).
The adhesive is light-cured for 10 seconds at right angles to the tooth, as close to the tooth as possible over the Class II proximal box, remembering that the matrix and the ring are moving the light tip slightly farther.
A dual-cure automix composite (HyperFIL) is placed into the proximal box in a single increment of up to 4 mm.
The dual-cure composite—in contrast to light-cure composite—requires only 10 seconds of light-curing for the occlusal section. Complete polymerization will continue with the self-cure component. In this period, the cure reaches a depth of 2 mm to 4 mm and hardens the occlusal surface.
A finishing bur is used on the occlusal surface.
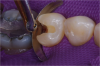
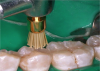
The final restoration polish is completed using diamond-impregnated finishing brushes (Figure 13), which adapt to the anatomic features of the composite.
The result is an anatomic restoration both clinically and radiographically. It is a smooth, esthetic, and well-functioning restoration.
Summary
Bulk-filling, as described, offers significant advantages, including easier placement and adaptation to the proximal box, and restorations without the voids associated with the incremental layering technique. However, practitioners need to be aware that larger amounts of material affect light-energy delivery, as does the greater translucency of these composites. This means curing time is increased and, with it, there is a greater need to cool the teeth. In general, practitioners should follow guidelines provided by the manufacturer of the product and use best practices as described here and elsewhere.
About the Author
Howard E. Strassler, DMD, FADM, FAGD
Professor, Director Operative Dentistry
University of Maryland
Baltimore, Maryland
References
1. Aranha AC, Pimenta LA. Effect of two different restorative techniques using resin-based composites on microleakage. Am J Dent. 2004;17(2):99-103.
2. da Costa JB, Hilton TJ, Swift EJ Jr. Critical appraisal: preheating composites. J Esthet Restor Dent. 2011;23(4):269-275.
3. Feilzer AJ, De Gee AJ, Davidson CL. Setting stress in composite resin in relation to configuration of the restoration. J Dent Res. 1987;66(11):1636-1639.
4. Carvalho RM, Pereira JC, Yoshiyama M, Pashley DH. A review of polymerization contraction: the influence of stress development versus stress relief. Oper Dent. 1996;21(1):17-24.
5. Reis A, Dourado Loguercio A, Schroeder M, et al. Does the adhesive strategy influence the post-operative sensitivity in adult patients with posterior resin composite restorations?: A systematic review and meta-analysis. Dent Mater. 2015;31(9):1052-1067.
6. González-López S, Lucena-Martín C, de Haro-Gasquet F, et al. Influence of different composite restoration techniques on cuspal deflection: an in vitro study. Oper Dent. 2004;29(6):656-660.
7. Bernardo M, Luis H, Martin MD, et al. Survival and reasons for failure of amalgam versus composite posterior restorations placed in a randomized clinical trial. J Am Dent Assoc. 2007;138(6):775-783.
8. Roulet JF, Price R. Light curing—guidelines for practitioners—a consensus statement from the 2014 symposium on light curing in dentistry held at Dalhousie University, Halifax, Canada. J Adhes Dent. 2014;16(4):303-304.
9. Price RB. Fast curing with high power curing lights: is this a good idea? Canadian Academy of Pediatric Dentistry (CAPD)/Académie Canadienne de Dentisterie Pédiatrique (ACDP) CAPD/ADCP 2015 Annual Meeting. http://conference.capd-acdp.org/wp-content/uploads/2015/01/Dr.-Richard-Price-Course-Outline.pdf. Accessed October 28, 2015.
10. Strassler HE. Successful light curing—not as easy as it looks. Oral Health Group. 2013;July 1, 2013. http://www.oralhealthgroup.com/news/successful-light-curing-not-as-easy-as-it-looks-howard-e-strassler-dmd/1002445470/?&er=NA. Accessed October 28, 2015.
11. Strassler HE, Price RB. Understanding light curing. Part 1. Delivering predictable and successful restorations. Dent Today. 2014;33(5):114-121.
12. Price RB, McLeod ME, Felix CM. Quantifying light energy delivered to a Class I restoration. J Can Dent Assoc. 2010;76:a23.
13. Felix CA, Price RB. Effect of distance on power density from curing lights. J Dent Res. 2006;85(Special Issue B): Abstract 2486.
14. Moraschini V, Fai CK, Alto RM, Dos Santos GO. Amalgam and resin composite longevity of posterior restorations: a systematic review and meta-analysis. J Dent. 2015;43(9):1043-1050.
15. Heintze SD, Rousson V. Clinical effectiveness of direct class II restorations—a meta-analysis. J Adhes Dent. 2012;14(5):407-431.