You must be signed in to read the rest of this article.
Registration on CDEWorld is free. Sign up today!
Forgot your password? Click Here!
Advances in adhesive dentistry have transformed the way clinicians approach restorative failures, shifting the focus from complete replacement to minimally invasive repair. When a veneer chips, a composite restoration fractures, or a crown debonds, today’s adhesive protocols allow for conservative, esthetic, and durable solutions that preserve sound tooth structure and reduce treatment time and cost. Adhesive repair has become an essential skill for modern practitioners, offering patients a more comfortable experience and helping to extend the lifespan of their existing restorations.1,2 This article outlines a practical, step-by-step approach to adhesive repair, supported by real clinical cases that demonstrate how a systematic protocol can produce reliable and a variety of restorative failures.
Understanding Restorative Failures
When a restoration fails, the first step is to pause and look closely at why it happened before deciding what to do next. A chipped veneer or a fractured cusp might be the result of something as simple as a traumatic bite on a hard object, or it could point to a deeper issue such as parafunctional habits, a high occlusal contact, crack formation, or inadequate thickness of the material from the start. Similarly, a loose crown could be related to poor initial bonding, contamination during cementation, or a gradual loss of retention over years of function. Taking time to understand the failure saves the patient from repeated problems and allows the clinician to choose with confidence between repair and complete replacement.
This diagnostic phase is not just a quick look—it is a thorough process. Magnification and photography can reveal subtle fracture lines or marginal gaps, and radiographs help rule out caries or endodontic complications. Just as important is determining what substrate we have available to bond to—enamel, dentin, ceramic, or composite—because this will dictate the surface conditioning and adhesive strategy. The amount of remaining restoration also matters: If enough material is left and the tooth is structurally sound, repair is often the most conservative choice. By taking these careful steps up front, clinicians can approach adhesive repair with a clear plan and a higher likelihood of long-term success.
The Science Behind Adhesive Repair
When a restoration fails, the first step is to identify where the failure occurred, because this determines how the surfaces should be treated. Failures are generally classified as adhesive, cohesive, or mixed. An adhesive failure occurs exactly at the interface—either between the tooth substrate (enamel or dentin) and the adhesive, or between the adhesive and the restoration surface. Essentially, the bond between the two substrates did not hold, leaving one side completely clean after separation.3
A cohesive failure occurs within one of the materials involved—either within the restorative material, within the tooth structure, or even within the adhesive layer itself. For example, this distinction is clinically important because cohesive failures generally indicate that the bond itself was strong enough; the fracture occurred in the weaker material, meaning the adhesive strategy was successful but the substrate or adhesive layer could not withstand the stress.
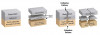
Mixed failures—a combination of adhesive and cohesive failure—are the most frequently encountered in daily practice. A portion of the interface debonds while another portion fractures through the material or adhesive layer, leaving a combination of exposed substrate and fractured adhesive or restoration. These situations require a dual approach: reconditioning the exposed substrate and preparing the fractured surface to achieve optimal adhesion (Figure 1).
Understanding whether the failure is adhesive, cohesive, or mixed is more than a theoretical exercise—it is the foundation of a predictable repair protocol. It tells the clinician whether the bond must be completely re-established, whether the fractured material surface must be roughened and treated, or whether a combination of both strategies is needed to ensure that the repaired restoration will withstand functional stress over time.
The following four case studies outline a step-by-step adhesive repair protocol, highlighting clinical application and outcomes.
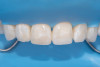
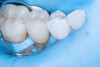
Case 1: Broken Feldspathic Veneer
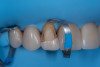
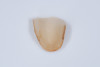
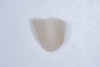
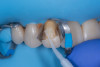
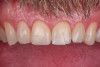
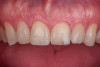
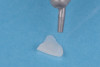
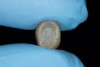
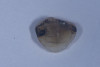
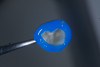
This case involved a patient with multiple feldspathic porcelain restorations done more than 15 years ago in the esthetic zone. Multiple restorations presented with tissue recession and marginal discoloration, some also presented with microcracks that were visible during clinical examination and were in need of replacement in the near future. However, the patient was not financially committed to replace the other failing restorations. Maxillary right lateral incisor presented with an unusual failure pattern: The incisal third remained fully bonded and intact, while the middle-to-cervical portion of the veneer was fractured away as a single piece (Figure 2). This type of fracture could be described as a cervical shear fracture with incisal retention—a form of mixed failure, since part of the restoration remained bonded but the majority separated cleanly. Examination revealed almost no adhesive layer on the tooth surface, while the fractured restoration still showed adhesive remnants (Figure 3). This indicated that the weak point was the interface between adhesive and tooth substrate, rather than between ceramic and adhesive.
The likely etiology was multifactorial: a pre-existing microcrack from the fabrication process, flexure of the tooth under function (particularly during protrusive movements), or minor trauma to the cervical third. Because the fragment was intact and fitted precisely, a decision was made to re-bond the fractured piece rather than replace the entire restoration.
Clinical Procedure
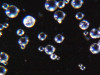
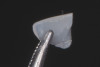
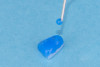
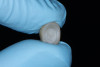
After shade selection and clinical photos, absolute isolation with a rubber dam was achieved. The intaglio surface of the fractured piece was air abraded with glass beads at 2 bars of pressure to remove residual cement. Aluminum oxide powder should be avoided on glass ceramics, as it tends to create microcracks and has shown to decrease bonding strength (Figure 4 and Figure 5).4 The fractured piece was etched with 9% hydrofluoric acid for 120 seconds followed by thorough rinsing for 20 seconds, then scrubbed with 37% phosphoric acid for 60 seconds and placed in an ultrasonic bath for four minutes in distilled water, rinsed, dried, and treated with silane to promote chemical bonding and heat treated at 100 °C for 5 seconds (Figure 6).5,6 The combination of the phosphoric acid scrub and the ultrasonic bath after HF etching helps to remove any calcium salt residues created during HF etching.
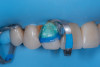
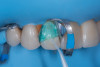
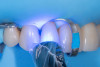
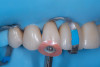
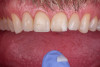
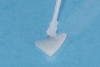
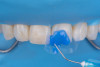
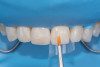
On the tooth side, exposed dentin was protected with a liquid dam (OpalDam, Ultradent) during ceramic conditioning to prevent HF contamination and maintain bond strength and scrubbed with phosphoric acid and rinsed and dried (in a similar manner as the fractured piece), and silane applied (Figure 7 through Figure 9). After surface cleaning, the tooth surface was air abraded with 30-micron aluminum oxide (RONDOflex, KaVo) with care taken not to air abrade the ceramic, then primed with adhesive using OptiBond FL (Kerr Dental) following manufacturer’s recommendations (Figure 10).
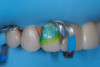
A layer of adhesive was applied both inside the restoration and on the prepared tooth surface but not light-cured at this stage. Preheated composite resin (Clearfil APX XL, Kuraray) heated at 68 °C for 5 minutes was placed as a thin layer inside the restoration, and the fractured piece was carefully repositioned to its original place. For a thin restoration, a flowable/injectable composite is recommended. After verifying fit and removing excess bonding/composite with a microbrush, the restoration was light-cured from multiple directions to ensure complete polymerization (Figure 11). Glycerin gel was applied and light-cured again to remove oxygen inhibited layer to minimize future discoloration.7
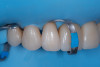
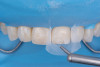
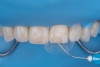
Finally, the fracture line was finished and polished meticulously with a 3M Sof-Lex disc (Solventum) until it became virtually invisible (Figure 12 and Figure 13).
Clinical Considerations and Tips
Avoid air abrasion of glass ceramics (feldspathic porcelain, leucite reinforced, and lithium silicate reinforced) before rebonding—it can initiate microcracks and compromise the strength of the ceramic. Instead use glass beads (same material that ceramists use to remove refractory material from the surface of feldspathic, castable, and pressable ceramics).
Ultrasonic cleaning after HF etching is critical to remove precipitates and enhance silane effectiveness.
Protect dentin during ceramic etching and silanation—HF and silane contact with dentin can reduce bond strength and harm tooth structure.
Use preheated composite for optimal adaptation, higher degree of conversion, and improved handling.
This case highlights how precise diagnosis of the failure mode, meticulous surface treatment, and correct adhesive protocol can restore both function and esthetics in a minimally invasive manner.
Case 2: Composite Facing Fracture
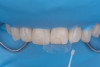
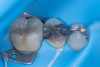
This case involved a patient with generalized mild anterior wear and an existing composite restoration on the maxillary left central incisor. The restoration extended from the middle third to the incisal edge and had excellent shade match and no marginal discoloration. The patient presented with a fractured central mesial portion of the composite (Figure 14 through Figure 16). Examination revealed a mixed failure pattern: Some adhesive and composite remnants remained on the tooth surface, while the fractured piece showed no residue internally. This finding suggested that the weak point was at the interface between composite and adhesive layer, with a minor cohesive component within the composite itself (Figure 17).
From a clinical standpoint, this pattern is reassuring, as it indicates a strong bond to the tooth substrate and that the restoration had functioned successfully until the composite material itself reached its fracture threshold. Considering the generalized wear pattern and patient history, parafunctional habits were suspected as the main cause of failure—the composite likely fractured when the applied functional stress exceeded its material strength.
Clinical Procedure
After achieving rubber dam isolation, the fractured composite segment was first air-abraded with aluminum oxide particles to clean and roughen the surface. It was then etched with phosphoric acid for 60 seconds, rinsed, dried, and treated with silane to enhance chemical adhesion (Figure 18 through Figure 20).8,9
The tooth surface was similarly air-abraded to remove biofilm and aged resin remnants, then selectively etched with phosphoric acid. Silane was applied intraorally to the exposed composite surface to promote bonding between the old and new composite layers.10 Following this, a universal bonding agent was applied to both the tooth surface and the fractured composite segment (Figure 21 through Figure 24).
Before light-curing, flowable composite resin was placed in the cavity, and the fractured segment was repositioned precisely into its original location. Heated packable composite was avoided due to thinness and brittleness of the fractured piece. Excess bonding and composite were carefully removed using a microbrush. The restoration was then polymerized from multiple directions to ensure optimal cure (Figure 25 and Figure 26). Finally, the restoration was polished and contoured to blend seamlessly with the surrounding tooth structure and adjacent composite (Figure 27).
Clinical Considerations and Tips
Air abrasion is crucial to remove the superficial, aged composite layer and expose fresh, bondable material.
Silane application on fractured composite surfaces improves chemical bonding and contributes to a stronger repair interface.
Flowable/injectable composite offers lower viscosity to avoid fracturing of such a thin fragment during placement.
Identifying parafunctional habits early is important—occlusal splint therapy may be indicated to protect the repaired restoration from fracture in the future.
The result was a seamless repair, preserving sound tooth structure and maintaining the excellent esthetic integration of the original restoration.
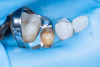
Case 3: Debonded Ceramic Crown
This patient presented with a completely debonded monolithic zirconia crown on a mandibular premolar. Clinical inspection revealed that all the resin cement remained inside the crown, leaving the tooth surface clean. This is a textbook example of an adhesive failure at the interface between the tooth substrate and the adhesive/cement layer, indicating that the bond to dentin was the weak link. The zirconia-cement interface, on the other hand, was intact, showing that the original surface treatment of the restoration was successful (Figure 28).
Given the integrity of the restoration and absence of recurrent caries, a conservative approach was chosen: to clean and re-bond the existing crown rather than replace it.
Clinical Procedure
The internal surface of the zirconia crown was first air-abraded with aluminum oxide to remove residual cement and increase micromechanical retention (Figure 29).11 After cleaning, an MDP-containing ceramic primer was applied to the intaglio surface to enhance chemical bonding to zirconia.12 An adhesive was then applied but left unpolymerized to improve wetting before cementation.
Intraorally, absolute rubber dam isolation was achieved to ensure a contamination-free environment (Figure 30). The prepared tooth was air-abraded with aluminum oxide to clean the surface and increase surface energy. A primer and bonding agent were applied to the tooth surface.
The crown was then filled with adhesive resin cement and seated onto the preparation with firm pressure. Excess cement was removed carefully with a microbrush and floss before light-curing from multiple directions. The result was a well-seated crown with optimal marginal seal and retention (Figure 31).
Clinical Considerations and Tips
Adhesive failures require careful cleaning of both the tooth and restoration to remove contaminants and maximize new bond strength.
Air abrasion of zirconia is essential for reactivation of the surface and improved mechanical interlocking.
Use of an MDP-containing primer is critical for durable bonding to zirconia ceramics.
Ensure strict isolation—even minimal contamination can compromise the bond during re-cementation.
Dual-cure composite is used in this case because complete polymerization through a thick restoration could not be achieved by light curing alone.
This case demonstrates that even a completely debonded zirconia crown can be predictably salvaged using a systematic adhesive re-bonding protocol, avoiding the need for costly remakes.
Case 4: Fractured Cusp
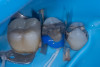
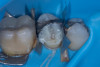
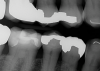
A patient presented on an urgent basis with a fractured buccal cusp of the mandibular second premolar (Figure 32). The tooth had a large MOD amalgam restoration, and the patient fortunately brought the fractured cusp fragment with them. Cuspal fractures of this type are common in teeth restored with amalgam or in teeth with thin, unsupported cusps under bonded restorations. Over time, occlusal forces flex the cusps, leading to crack initiation along the stress plane until catastrophic fracture occurs.
The ideal long-term management of this tooth would involve removing the amalgam, evaluating the remaining tooth structure, and placing a cuspal coverage restoration (e.g., indirect bonded onlay or full-coverage crown). However, given the urgency of the appointment and the patient’s desire for a quick, esthetic solution, a decision was made to re-attach the fractured cusp using an adhesive approach. This would immediately eliminate sensitivity, restore esthetics, and buy time before definitive treatment.13
Clinical Procedure
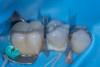
After verifying the fit of the fractured cusp, three-tooth rubber dam isolation was achieved (first premolar to first molar). Dentin adjacent to the fracture line was protected with liquid dam to prevent contamination during amalgam surface preparation (Figure 33). The existing amalgam restoration and fractured surfaces were air-abraded with 27-μm aluminum oxide particles, which effectively cleansed the surface and created micromechanical retention. Care was taken to avoid excessive abrasion of exposed dentin to prevent unnecessary loss of tissue.
The enamel margins were etched with phosphoric acid, rinsed, and dried (Figure 34). A primer and adhesive were applied to both the tooth and the cusp fragment but were left unpolymerized at this stage to allow for chemical coupling (Figure 35 and Figure 36). A layer of heated packable composite resin was applied to the fractured interface, and the cusp was carefully repositioned in its original place. Excess adhesive and composite were removed with a microbrush, and the restoration was light-cured thoroughly from multiple angles.
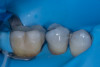
Because the fractured piece fit precisely, occlusal adjustment was unnecessary after rubber dam removal. The fracture line was polished until nearly invisible, resulting in an immediate functional and esthetic improvement (Figure 37 through Figure 40).
Clinical Considerations and Tips
Cuspal fractures over large amalgam restorations are typically the result of flexure of unsupported cusps over time.
Air abrasion of amalgam is critical for mechanical retention, but care must be taken to avoid unnecessary removal of dentin.
Use preheated composite for optimal adaptation, higher degree of conversion, and improved handling.
This repair serves as an excellent interim treatment—definitive cuspal coverage should still be considered to prevent future fractures.
This case illustrates how even in an urgent setting, proper isolation, surface preparation, and adhesive technique can allow for a quick, conservative, and highly esthetic solution that restores comfort and function immediately.
Discussion
Every restorative failure has one or more underlying causes—mechanical, biological, or material-related—and identifying these causes is essential to achieving a lasting repair. If the etiology is not properly diagnosed and addressed, it is almost inevitable that the clinician and patient will face the same, or even more catastrophic, failure in the future. The cases presented here worked because the failures were carefully analyzed, and a controlled, evidence-based protocol was followed for each repair.
The use of proper isolation, substrate-specific surface treatment, and meticulous adhesive selection allowed for a reliable re-bonding process. Ultrasonic cleaning after HF etching, air abrasion where indicated, and proper use of silane or MDP primers maximized bond strength and durability. Inadequate cleaning of the fractured surface, skipping or shortening silanization, contamination during bonding, and premature light-curing of the adhesive before full seating are among the most common reasons for repair failures.
Achieving and maintaining occlusal harmony is critical to reduce functional stress on repaired restorations. Proper finishing and polishing not only improve esthetics but also reduce plaque accumulation and wear. Finally, patient education regarding parafunction, diet, and maintenance is key to extending the life of the repair.
Conclusion
Adhesive repair represents a predictable, conservative, and patient-friendly solution when performed systematically. Understanding the type of failure—adhesive, cohesive, or mixed—and following substrate-specific surface treatment protocols are critical to clinical success. The clinical cases presented demonstrate that even significant restorative failures can be effectively managed without resorting to complete replacement, preserving sound tooth structure and reducing treatment cost and time.
About the Authors
Kiarash Karimi, DMD, DDS
Lecturer, UCLA School of Dentistry
Private Practice,
La Mirada, California
Masoud Hassan Zadeh, DDS
Private Practice,
Drachten, Friesland, Netherlands
References
1. Opdam NJ, Bronkhorst EM, Loomans BA, Huysmans MC. Longevity of repaired restorations: a practice based study. J Dent. 2012 Oct;40(10):829-35. doi: 10.1016/j.jdent.2012.06.007. Epub 2012 Jul 4.
2. Mendes LT, Pedrotti D, Casagrande L, Lenzi TL. Risk of failure of repaired versus replaced defective direct restorations in permanent teeth: a systematic review and meta-analysis. Clinical Oral Investigations. 2022 Jul;26(7):4917-4927.
3. von Fraunhofer JA. Adhesion and cohesion. Int J Dent. 2012;2012:951324.
4. Nobuaki A, Keiichi Y, Takashi S. Effects of air abrasion with alumina or glass beads on surface characteristics of CAD/CAM composite materials and the bond strength of resin cements. J Appl Oral Sci. 2015 Nov-Dec;23(6):629-36.
5. Shiu P, De Souza-Zaroni WC, Eduardo Cde P, Youssef MN. Effect of feldspathic ceramic surface treatments on bond strength to resin cement. Photomed Laser Surg. 2007 Aug;25(4):291-6.
6. Valian A, Moravej-Salehi E. Surface treatment of feldspathic porcelain: scanning electron microscopy analysis. J Adv Prosthodont. 2014 Oct;6(5):387-94.
7. M Hassan Zadeh, Glossary of Biomimetic Restorative Dentistry. Amazon Publishing. 2023, P 106.
8. Zimmer R, Mantelli AR, Montagna K, Reston EG, Arossi GA. Does sandblasting improve bond strength in resin composite repair? Dentistry Rev. 2024;4:100077.
9. Bulut A, Bala O, Akgül S. The effect of different treatment protocols on shear bond strength in resin composite restoration repair. BMC Oral Health. 2024 Oct 24;24(1):1279.
10. Staxrud F, Dahl JE. Silanising agents promote resin-composite repair. Int Dent J. 2015 Dec;65(6):311-5.
11. Shahin R, Kern M. Effect of air-abrasion on the retention of zirconia ceramic crowns luted with different cements before and after artificial aging. Dent Mater. 2010 Sep;26(9):922-8.
12. Tyor S, Al-Zordk W, Sakrana AA. Fracture resistance of monolithic translucent zirconia crown bonded with different self-adhesive resin cement: influence of MDP-containing zirconia primer after aging. BMC Oral Health. 2023 Sep 5;23(1):636.
13. Canoglu H, Cehreli ZC. Reattachment of a fractured permanent molar cusp: a 12-month follow-up. Dent Traumatol. 2007 Feb;23(1):42-6.