You must be signed in to read the rest of this article.
Registration on CDEWorld is free. Sign up today!
Forgot your password? Click Here!
Dentistry has changed dramatically in just the past 20 years, with new innovations impacting almost every aspect of the dental industry. Novel dental materials and technologies have essentially overhauled our profession, yet many of these changes have in fact also helped foster conservative dentistry and enable it to thrive.1 With newer ceramic restorative materials, for example, conservative approaches and outcomes are achieved that were not previously possible with tooth-colored materials.1 In the past, gold was almost always the principal material used in conserving healthy tooth structure; however, while most dentists greatly value the predictability of this material, the "esthetic revolution" has pushed gold as a dental material to the fringes, as many patients do not see it as an esthetically viable treatment option. With the development of newer ceramics with excellent handling properties such as lithium disilicate and zirconia, and a better understanding of adhesion and how to durably bond these ceramics to tooth structure, a conservative "revival" has begun to flourish in esthetic restorative dentistry. Data also suggest that these ceramics can provide restoration longevity that rivals that of gold.2 Based on the documented success of ceramics in posterior restorations, practitioners can be confident that these materials will likewise perform well in anterior cases in which the occlusion is not ideal.
Digital dental technologies have also emerged that help facilitate conservative approaches by allowing for more efficient workflows and better laboratory communication.3As result, the patient and practition-
er's shared vision for the treatment goals can be better conveyed to the laboratory technician, ensuring a higher likelihood for a successful outcome.
The case study discussed in this article illustrates the advantages of modern-day conservative approaches to restorative dentistry.
CASE STUDY
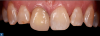
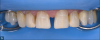
A 58-year-old woman presented at the dental clinic of the Medical University of South Carolina with a chief complaint of a 40-year-old feldspathic crown on the right central incisor (tooth No. 8), which had outlived its esthetic usefulness (Figure 1). This crown had originally been placed after trauma to the tooth when the patient was a teenager, and she now desired a brighter smile, which the fixed shade of the crown was prohibiting. Upon examination, the patient also was found to have a displaced composite on tooth No. 7, as well as some incipient interproximal decay on teeth Nos. 7, 9, and 10 (Figure 1). When determining the proper treatment for esthetic cases, it is advisable to begin with the fewest number of units necessary to achieve the patient's goals. In the case of this patient, most of the major correction that was needed involved the right-sided incisors. While this type of unilateral case can be completed successfully, the larger issue is that the necessary restorations can be difficult to maintain, as the natural dentition undergoes progressive staining in contrast to the fixed shade of the ceramic. The pros and cons of treatment options were provided to the patient, along with restoration material options. After these options were discussed with the patient, she chose a treatment plan that included whitening and three lithium disilicate, laboratory-fabricated veneers and a crown.
Designing the Digital Wax-up
Utilizing a digital workflow, the first step was to digitize the patient's dentition by means of an intraoral scanner. Intraoral scanners have been shown to be highly accurate in creating digital impressions using a full-arch scan.3-5Intraoral scanning was performed for this patient to develop a digital esthetic wax-up for her approval before preparation of the teeth. The importance of a digital diagnostic wax-up cannot be overstated, as the wax-up accomplishes several objectives and serves multiple functions.6 It provides a starting point for a discussion with the patient regarding tooth shapes, and, if the wax-up is additive in nature, it allows the restorations to be visualized in the patient's mouth.7,8 The practitioner is also able to visualize how much tooth preparation will be necessary to achieve the given esthetics, while the wax-up provides the means of fabricating preoperative preparation guides that can help limit over- or under-preparation to the tooth structure.9-12 In addition, the wax-up is used to help fabricate provisional restorations on preparation day.
In this patient, the initial intraoral scan was used to fabricate a wax-up using digital design software, with tooth No. 9 serving as the basis for the design. During the initial appointment, the patient indicated that she liked the shape of this tooth but desired a bit more length in the incisors. When designing a wax-up digitally, it is important to first establish the incisal edge position by taking three full-face photographs of the patient: the retracted view, maximum smile full-face view, and the lips in repose. These photo-
graphs are used to determine the initial incisal edge position based on a combination of the patient's wishes, the canine position in repose, and the position relative to the lower lip.13
Approval of the Wax-up Design
Once the wax-up is completed, there are two ways to proceed. The digital wax-up can be shown to the patient via the software to discuss possible modifications that could be made to the design of the restorations or, if the patient wishes, the wax-up can be 3D printed and a putty matrix utilized to create a "trial smile" (or, try-in) that can be transferred into the patient's mouth to verify the initial design. The latter can be done only if the wax-up is additive-ie, no reduction was done to the digital model. For this patient, the proposed wax-up was presented to her visually for approval.
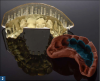
After the patient approved the initial design, the wax-up was 3D printed using a digital light processing (DLP) printer to create a physical model for fabricating the putty used for provisionalization (Figure 2). In a digital workflow, it is the 3D printer that allows the practitioner to bring the case back into an analog workflow. Current generations of 3D printers have been shown to create dental models with acceptable levels of accuracy.14,15 These models of the wax-up can be used to make matrices to serve as preparation reduction guides as well as for fabrication of bis-acryl-based provisionals.
Conservative Tooth Preparation and Creation of Impressions
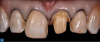
Next, the patient was scheduled for preparation of the teeth and removal of the existing feldspathic crown. The goal at this stage of the treatment plan is to remove as little healthy tooth structure as possible during preparation. Minimal reduction veneer preparations with removal of incipient decay were performed, along with removal of existing restorative materials (Figure 3). This was undertaken with fine-diamond burs and coarse discs, which were utilized to remove sharp angles on the preparation. Data show that veneer preparations that are placed completely within enamel have shown a reduced incidence of chipping and fracture compared with preparations in enamel and dentin.16,17
Once the preparations were completed, a 00 cord was placed and two impressions were created: a digital impression using an IOS, and a polyether physical, full-arch impression. Both digital and physical impressions were created, owing to the minimal nature of the preparations. The subtleties of preparations can often be captured better with a physical impression, even though the workflow is frequently completely digital. Different laboratory technicians have different preferences, and it is often best to allow the technician to select the impression based on his or her own preference.
Provisionalization of the Preparations
After the final impressions were captured, the putty matrix formed from the wax-up was used to provisionalize the preparations (Figure 4). The shrink wrap technique was utilized with the following protocol: spot etch with 35% phosphoric acid, rinse with water, application of desensitizer to all the preparations to inhibit microbial growth during this phase, and seating of the matrix filled with bis-acryl material in the chosen shade (in this case, A1) for
2 minutes.18 Once set, the matrix was removed, leaving the waxed-up design over the prepared teeth. It is important to remove excess temporary material that tends to impinge on the gingival tissue and in the papilla area. When clean-up is completed, the practitioner examines the provisionals for correct incisal edge and vertical midline position. The clinician should also examine the patient's speech for any phonetic issues. Next, the patient is asked to look in the mirror to give feedback on the design so that adjustments can be made in the provisional material if necessary.
Once the clinician and patient are pleased with the provisionals, the arch is scanned again to allow communication of the accepted esthetics to the laboratory technician. This scan is added to the retracted view and smiling full-face photographs of the patient to allow the laboratory to correct any discrepancies in the midline or incisal plane, using the facial features as a reference. After this is completed, the practitioner can judge if any additional characterization is necessary on the provisionals. In this patient, some white resin stain was added to the provisionals to mimic similar staining on the unprepped canines. After the patient approved the shade and stain profile of the provisionals, additional photographs were taken to communicate her wishes to the laboratory.19-21
Delivery of the Restoration
In the dental school setting, it is rare for students to have the opportunity to execute a veneer case, and this is especially true for students in their first clinical year. For many practitioners, it is the delivery appointment that can cause the most stress. Delivering veneers, while taught in theory in dental school, is not something that undergraduate students have the chance to execute prior to graduation and entering clinical practice. For this patient, as the delivery date approached, a great deal of thought was given to how this procedure could be simplified to ensure a successful delivery. Light-cured veneer cements are the common choice for delivering such restorations. These materials give the practitioner as much working time as needed to position the veneers in the correct position while cleaning up excess material. Traditionally, dual-cure resin cements have been known to shade-shift over time owing to the presence of tertiary amines in their chemistry. However, different products currently available on the market vary in terms of their handling properties. Higher-viscosity veneer cements can simplify the delivery procedure because, once seated, the veneer tends to more readily remain in that position and is less likely to move during cleanup. The drawback of these higher-viscosity cements is that they cannot be used with more fragile ceramic materials, such as feldspathic porcelain, as seating a fragile veneer on viscous resin can cause the ceramic to fracture. Since the restorations were fabricated using e.max, a high-strength ceramic, concerns regarding fracture upon seating did not apply. Because the cement shade can have a subtle effect on the final value of the restoration, it was decided that the same veneer cement should be used for the crown delivery as well.22
Since there is no dual-cure activator in this cement, special care was taken to sufficiently cure the cement by utilizing a 1,200 mW/cm2curing light and adding curing time above and beyond what the instructions for use call for to ensure adequate polymerization. Prior to this appointment, the veneers had been etched with 9% hydrofluoric acid for 20 seconds and silanated using a two-part silane mixture that was mixed immediately prior to application.23
For the delivery appointment, a split dam was utilized for isolation (Figure 5), along with a dry 00 cord in the sulcus of the teeth being restored. The provisionals were removed, the preparations were air-abraded with 50-micron aluminum oxide, and a dry 00 cord was placed to help create some space between the margin and the tissue. The veneers were tried in to ensure fit and then placed using a neutral try-in paste to allow for patient approval. Once approved, the areas of the preparations that were enamel were selectively etched using a high-viscosity, 35% phosphoric acid.24 This material is designed specifically for selective etching of enamel and relies on its higher-viscosity properties that keep the etchant where the clini-
cian places it without concern that it will run or slump into areas of dentin. In this patient, because there were areas of incipient decay on some proximal surfaces, the veneer preparations were a mix of enamel and dentin, and this product helped the student etch with a higher degree of precision. The selective etch process was followed with application of a universal adhesive. This adhesive was applied in two coats with a scrubbing motion, with air thinning of the adhesive in between coats. Each preparation was then light-cured for 10 seconds using a 1,200 mW/cm2 curing light.
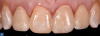
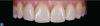
A light-cure resin cement was selected because of its long working time and higher viscosity. Because the dentist and patient approved the esthetics of the restorations when tried in with a neutral try-in paste, neutral or clear cement was utilized for the delivery. A light coat of universal bonding agent was painted on the intaglio surface of each veneer and left uncured. This was done to enable the more viscous veneer cement to settle more intimately on the veneer surface. The central incisor restorations were seated first, cleaned up completely, and then cured. The veneer for the right lateral incisor was then tried in again to ensure that excess cement from the previous restorations would not inhibit seating. It was delivered in a similar fashion, and this was repeated for the left lateral incisor. Once all restorations were seated and the cement adequately polymerized, the cord was removed and any additional cement was cleaned using a scaler and interproximal polishing strips. The occlusion was checked and refined with emphasis on potential interferences within the envelope of function. The patient was also asked to sit up and chew on the articulating paper to mimic a chewing motion to ensure the restorations did not inhibit the envelope of function.25Final polishing was performed using lithium disilicate-specific polishers. The patient was extremely satisfied with the final result (Figure 6). She was brought back for a 1 week follow-up visit to check the health of the tissue and comfort of the restorations, and for final photographs to be taken.
CONCLUSION
While dentistry as a whole has been dramatically transformed by the development of cutting-edge technologies and novel dental materials, modern-day dental care also embraces the re-emergence of conservative approaches to tooth preservation and restoration. When providing patients with esthetic restorations, adopting an approach that is as conservative as possible is often the inherent result of determining the best course of treatment for the individual patient. This can mean following the maxim "less is more" regarding the use of the bur, while whitening natural teeth to make them blend better with the planned restorations may also be part of an overall conservative approach.
Although veneer deliveries are among the more stressful procedures that dental clinicians may undertake, careful selection of materials can make a significant difference in the delivery running smoothly. The use of digital technologies helps make restorations more predictable and leads to greater patient satisfaction; intraoral scans provide clinicians with a vehicle for discussion with the patient about the intended treatment plan, while digital wax-ups provide the patient with an opportunity for a "trial-smile" before the restorations are placed. Finally, these digital tools are tremendously beneficial in aiding communication with laboratory technicians. In the case study highlighted in this article, the amount of information generated for the laboratory technician is impressive: the intraoral scans, extraoral photographs, 3D printed models, and digital wax-ups all serve as a means of communication between the patient and the laboratory technicians. Historically, these two sets of people never meet, yet they are closely linked throughout the process, as these digital records allow the patients' expectations to be recorded and for their wishes to be clearly conveyed to the technician.
Conservative methods, the utilization of digital tools, and careful selection of dental materials are the basis of modern-day esthetic restorative dentistry. Finally, the involvement of the patient throughout the process, made possible largely by the utilization of digital dental technologies, and his or her full approval of the esthetics and fit of the restorations, is the ultimate assurance of the success of this modern approach to esthetic restorative dentistry.
ACKNOWLEDGMENT
The author would like to extend special thanks to Blakely Graham McCormick for her help with this case.
References
1. Stevens CD. Adhesive dentistry: changing restorative treatment for the better. Compend Contin Educ Dent. 2019;40(9):616-617.
2. Irusa K, Al-Rawi B, Donovan T, Alraheam IA. Survival of cast gold and ceramic onlays placed in a school of dentistry: a retrospective study. J Prosthodont. 2020;29(8):693-698.
3. Mennito AS, Evans ZP, Nash J, et al. Evaluation of the trueness and precision of complete arch digital impressions on a human maxilla using seven different intraoral digital impression systems and a laboratory scanner. J Esthet Restor Dent. 2019;31(4):369-377.
4. Nagy Z, Simon B, Mennito A, Evans Z, Renne W, Vág J. Comparing the trueness of seven intraoral scanners and a physical impression on dentate human maxilla by a novel method. BMC Oral Health. 2020;20(1):97.
5. Kernen F, Schlager S, Seidel Alvarez V, et al. Accuracy of intraoral scans: an in vivo study of different scanning devices. J Prosthet Dent. 2021;S0022-3913(21)00145-1.
6. Lv L, He W, Ye H, et al. Interdisciplinary 3D digital treatment simulation before complex esthetic rehabilitation of orthodontic, orthognathic and prosthetic treatment: workflow establishment and primary evaluation. BMC Oral Health. 2022;22(1):34.
7. Wang SW, Ye JH, Liu YS, Sun YC, Ye HQ, Zhou YS. [Application and research progress of digital virtual simulated design in dental esthetic rehabilitation]. Zhonghua Kou Qiang Yi Xue Za Zhi. 2022;57(1):101-106.
8. Touati R, Sailer I, Marchand L, Ducret M, Strasding M. Communication tools and patient satisfaction: a scoping review [published online ahead of print December 25, 2021]. J Esthet Restor Dent. doi: 10.1111/jerd.12854.
9. Gao J, He J, Fan L, Lu J, Xie C, Yu H. Accuracy of reduction depths of tooth preparation for porcelain laminate veneers assisted by different tooth preparation guides: an in vitro study [published online ahead of print December 3, 2021]. J Prosthodont. doi: 10.1111/jopr.13456.
10. Jurado CA, AlResayes S, Sayed ME, Villalobos-Tinoco J, Llanes-Urias N, Tsujimoto A. A customized metal guide for controllable modification of anterior teeth contour prior to minimally invasive preparation. Saudi Dent J. 2021;33(7):518-523.
11. Rebba B, Merlone A, Cantile N, Manazza F, Cattoni F. Digital smile planning technique applied to prosthetic rehabilitation of dental esthetic area: a case report. J Biol Regul Homeost Agents.2021;35(4 Suppl. 1):1-9.
12. Papazoglou E, Ntovas P, Charalambous C, Tsanais E, Koubi S. Digitally designed reduction guide of to correct proclined anterior teeth: an aid before fabricating trial restorations [published online ahead of print May 10, 2021]. J Prosthet Dent. 2021;10:S0022-3913(21)00203-1. doi: 10.1016/j.prosdent.2021.03.028.
13. Seay A. Utilizing digital technology to facilitate dentofacial integration. Compend Contin Educ Dent.2018;39(10):
696-704.
14. Igai F, Junior WS, Iegami C-M, Neto P-T. Assessment of different types of intra oral scanners and 3D printers on the accuracy of printed models: an in vitro study. J Clin Exp Dent. 2021;13(12):e1174-e1181.
15. Suryajaya W, Purbiati M, Ismah N. Accuracy of digital dental models and three-dimensional printed dental models in linear measurements and Bolton analysis. F1000Res.2021;10:180.
16. Gierthmuehlen PC, Jerg A, Fischer JB, Bonfante EA, Spitznagel FA. Posterior minimally invasive full-veneers: effect of ceramic thicknesses, bonding substrate, and preparation designs on failure-load and -mode after fatigue [published online ahead of print January 6, 2022]. J Esthet Restor Dent. doi: 10.1111/jerd.12861.
17. Blunck U, Fischer S, Hajtó J, Frei S, Frankenberger R. Ceramic laminate veneers: effect of preparation design and ceramic thickness on fracture resistance and marginal quality in vitro. Clin Oral Investig. 2020;24(8):2745-2754.
18. Small BW. Provisional restorations for veneers. Gen Dent. 2008;56(7):608-610.
19. Edelhoff D, Prandtner O, Saeidi Pour R, Liebermann A, Stimmelmayr M, Güth JF. Anterior restorations: the performance of ceramic veneers. Quintessence Int. 2018;49
(2):89-101.
20. Casaglia A, De Dominicis P, Arcuri L, Gargari M, Ottria L. Dental photography today. Part 1: basic concepts. Oral Implantol (Rome). 2016;8(4):122-129.
21. Schwartzman A, Zweig AE. Improved communication with the laboratory for the fabrication of labial veneers.
J Calif Dent Assoc.2015;43(4):203-208.
22. Turgut S, Bagis B. Effect of resin cement and ceramic thickness on final color of laminate veneers: an in vitro study. J Prosthet Dent. 2013;109(3):179-186.
23. Tian T, Tsoi JK-H, Matinlinna JP, Burrow MF. Aspects of bonding between resin luting cements and glass ceramic materials. Dent Mater. 2014;30(7):e147-e162.
24. Peumans M, Van Meerbeek B, Lambrechts P, Vanherle G. Porcelain veneers: a review of the literature. J Dent. 2000;28(3):163-177.
25. Chuhuaicura P, Lezcano MF, Dias FJ, Fuentes AD, Arias A, Fuentes R. Mandibular border movements: the two envelopes of motion. J Oral Rehabil. 2021;48(4):384-391.