You must be signed in to read the rest of this article.
Registration on CDEWorld is free. Sign up today!
Forgot your password? Click Here!
INTRODUCTION
A pit and fissure sealant is a thin plastic coating of an organic polymer (resin) placed in the pits and fissures of teeth to act as a physical barrier. The sealant bonds to the enamel surface of the tooth so that plaque bacteria cannot colonize within the pits and fissures. The procedure is esthetic, non-invasive, and cost-effective for dental patients.
Sealants are an integral part of a complete preventive program and a proven component of oral health care. For decades, dental professionals have trusted sealants to protect against dental caries. Used in combination with patient education, effective personal oral hygiene, and fluorides, sealants are a major factor in the prevention of dental caries.
Dentists, dental therapists, dental hygienists, and dental assistants (in certain states) can place dental sealants. Dental assistants are allowed to place sealants in 42 states, most having specific training and supervision requirements. For additional information, refer to the State Board of Dentistry for each individual state.
If a particular state does not allow assistants to apply sealants, the assistant can still play an important role. Assistants must understand the properties of the sealant material, the materials required for set up, and the proper mixing and placement techniques. Patients and parents of pediatric patients need to be informed about the importance and success of sealant application. Since dental assistants can provide patient education in all states, this is an ideal role for the dental assistant.
CLINICAL RESEARCH ON SEALANTS
In the past, numerous preventive innovations were used to combat pit and fissure decay. These included physical blocking of the fissures with zinc phosphate cement, mechanical fissure eradication, prophylactic odontotomy, and chemical treatment with silver nitrate. Michael Buonocore pioneered a technique requiring comparatively less intervention in 1955; the ability to successfully prevent caries by sealing pits and fissures with a bonded resin material was the innovation that led directly to resin sealants.
When the first clinical trials for sealants were being conducted in the 1950s, 1960s, and 1970s, caries rates were relatively high; 70% of all molar occlusal surfaces became carious within 10 years of emergence into the oral cavity. A high percentage of these caries occurred in the first three years after eruption. These early caries data supported the Council of Dental Research policy that sealants were a highly beneficial preventive measure and should be applied to molar teeth within 3 or 4 years of eruption.
Since the 1970s, caries rates have changed dramatically. Fewer patients who are seen in dental practices today fall into high-caries-risk groups. The caries activity has decreased in number, intensity, and recurrence on smooth surfaces as well as occlusal surfaces. Data from the early 1990s, which included an analysis by the National Health and Nutrition Examination Survey (NHANES III), showed the concurrent reduction in fissure caries risk. This data is an indication of the dramatic change that has occurred in occlusal surface caries of young patients in the United States. Pit and fissure decay accounts for over 80%-90% in permanent posterior teeth and 44% in primary teeth of children. Placement of resin-based sealants have been shown to reduce caries by 86% one year after placement, and 58% four years after placement.
SEALANT PLACEMENT IN PRACTICE
Sealant use must be based on the patient's caries risk and the individual teeth being considered for sealants. This risk may change at any time in the life of the patient. Many fissures are at risk immediately at eruption, while others are not. Fissures that are not sealed or restored may become at risk later in life due to changes in a patient's habits, oral microflora, or physical condition. This understanding of risk-based sealant treatment is not new, but the adaptation into dental practice has been relatively slow.
In determining who should receive a dental sealant, the first step is to assess the caries risk of the patient, and determine if the patient is at low, moderate, or high risk for dental caries. Currently, the best predictors of caries risk are recent caries experience of the patient, deep pits and fissures, poor oral hygiene, family history, low fluoride intake, and poor diet. Other considerations are the patient's history of preventive care, if they are currently in the process of orthodontia, and medical issues such as xerostomia.
Sealants are indicated for patients of any age who are at risk for caries. It is also important to keep in mind that the risk status can change over a period of time during both adolescence and adulthood. Due to erosion or changes in saliva as people age and are more prone to prolonged use of medications, sealants are indicated to reduce susceptibility to caries.
In addition, the teeth should be assessed individually to determine their risk by identifying the pit and fissure morphology of the tooth. If there is no indication of proximal dental caries, yet the contour of the pit and fissures is deep and irregular, then a sealant should be placed. Primary molars should be considered for sealant placement if similar morphology is present.
Once a decision has been made by the dentist to provide a preventive treatment, a sealant can be placed if the tooth is determined to be caries-free. The standard procedure of visual examination and radiographs typically used to make the determination is now being supplemented by new technologies such as fluorescence, transillumination, electrical conductance, and digital radiography.
One technological example is the Spectra (Air Techniques), (Figure 1) a device that uses laser fluorescence directed to the occlusal surfaces to determine demineralization and caries. This and other scientific advances benefit clinicians because, although studies have shown that sealing incipient decay will arrest it, frank occlusal decay should not be sealed, nor should primary teeth that are close to exfoliation.
The occlusal surfaces of first and second permanent molars are regarded as the teeth most susceptible to caries, and therefore the teeth likely to benefit most from sealants. However, any teeth assessed at risk can benefit from sealant application. Recent studies suggest that sealants can be placed effectively on buccal and lingual surfaces in pits and along deeper developmental grooves. Adding an intermediate layer of bonding agent primer and adhesive is more advantageous on these surfaces than on occlusal surfaces.
There is often discussion on whether primary teeth should be sealed with the same frequency as permanent teeth. Since permanent teeth are considered to be most at risk for occlusal caries, they have been the focus of most sealant studies. Clinical studies with reports of success on sealing primary molars are rare; however, those that have been published indicate retention success similar to that for sealed permanent molars.
Sealants can be placed on either primary or permanent teeth that are determined to be at risk for pit and fissure caries (Appendix A). There are certain conditions under which a sealant would not be recommended, such as the inability to properly isolate and maintain a dry field (if using a resin-based sealant), the presence of decay, pits, and fissures that are well coalesced, and any allergies to the sealant material.
TYPES OF SEALANTS
The criteria for an ideal dental sealant is one that achieves prolonged bonding to the enamel, is biocompatible with the oral tissues, offers a simple application procedure, is of a low-viscosity capable of entering narrow fissures, and has low solubility in the oral environment.
Classification by Method of Polymerization
Sealants can be classified by the method in which they are converted from a liquid state to a solid state. Polymerization is the process by which sealants harden. It can be accomplished by self-curing (autopolymerization), or light-curing (photopolymerization).
Self-curing sealants are provided in two components: a liquid monomer and a catalyst. When the two components are mixed together, they harden (polymerize) within 60-90 seconds. Self-curing sealants are sometimes used in community health or school-based programs as no special equipment is required. However, the vast majority of sealants are light-cured.
Light-curing sealants harden when exposed to a curing light. Early sealants were activated with an ultraviolet light. Today's sealants are photopolymerized using one of three types of lights: halogen, light-emitting diode, and plasma-arc. The advantages are no mixing is required, and the working time is increased due to control over the start of polymerization. However, disinfection time is required for the curing light, and protective shields and/or glasses should be utilized during the procedure for eye protection from the curing light.
Classification by Sealant Properties
Filled sealants are a combination of resins, chemicals, and fillers. The resins contain monomer and chemicals to hold the filler particles together. The purpose of the filler is to increase bonding strength and resistance to abrasion and wear. Due to the hardness and wear resistance of filled sealants, they must be checked after placement with articulating paper and adjusted with a dental handpiece and bur.
Unfilled sealants have a higher ratio of resin to filler material, and do not need to be adjusted with a dental handpiece; they are in essence self-occluding. Due to the high viscosity (rate of flow) of unfilled sealants, they readily flow into the pits and fissures.
Resin-based sealants, with their characteristics of flow ability and retentiveness, work exceptionally well and serve their function for many years when placed properly. In 2008, the ADA published evidence-based clinical recommendations and stated that resin-based sealants are the first choice of material due to their high retention rates. Their limitation is that the tooth must be properly isolated so that contamination can be avoided throughout the procedure, as moisture contamination can result in failure of the sealant.
Sealants can be clear, tinted, color-changing, or opaque. The addition of color to the sealant material enhances the visibility of the sealant, and aids in monitoring retention. In regards to one type of color changing sealant, the material goes on pink during the initial placement, but then changes to white after photopolymerization. However, it is important to note that the color of a sealant does not affect the retention value.
Fluoride-releasing sealants are generally referred to as glass ionomer sealants. Because glass ionomer material contains slow-release fluoride, it may enhance the caries resistance of the tooth or remineralize an incipient carious lesion at the base of the pit or fissure. Glass ionomers are an alternative to resin sealants, and can be considered for use in primary molars having deeply pitted or fissured surfaces that are difficult to isolate. Other viable situations for glass ionomer sealant placement would be in moist, hard to isolate areas of the mouth, permanent first or second molars that are not yet fully erupted, or situations where a "transitional" sealant is needed prior to the future placement of a resin sealant. It is important to note that retention rates are not as comparable to resin-based sealants.
Amorphous Calcium Phosphate (ACP) is a filler material incorporated into some sealants that slowly
releases calcium and phosphate ions into the tooth structure. ACP acts as a replenishing source for lost
calcium and phosphate ions and has been shown to stimulate remineralization of tooth structure by enhancing the tooth's natural repair system.
Resin-based sealants are the most effective materials for pit and fissure sealants due to their demonstrated superior bond strength and retention.
PROCEDURE FOR SEALANT PLACEMENT
Isolation of the Operating Field
The isolation of the working field is essential for moisture control and operator visibility during placement of sealant. Methods of isolation include, but are not limited to:
Dental dam and saliva ejector
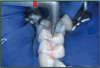
The most effective way to achieve ideal isolation is to use a dental dam (Figure 2) and saliva ejector. It is the best method to achieve optimum moisture control and visibility. It ensures isolation from start to finish for a clinician placing a sealant without assistance. A saliva ejector may be used throughout the procedure or as needed. Disadvantages include the inability to place a secure clamp on a partially erupted tooth, as well as discomfort during clamp placement, which may result in the need for anesthesia.
Cotton rolls, Dri-Angle, and saliva ejector
Cotton roll isolation may be accomplished with or without cotton roll holders. However, the possibility of moisture contamination is a key disadvantage without the use of an assistant. This method is more acceptable if used in a situation where four-handed dentistry is performed.
The use of a moisture control patch (Dri-Angle) over the opening of the parotid gland is helpful in keeping saliva under control. Dri-Angles are thin, absorbent, cellulose triangles offered in two types: plain and silver coated. The silver coating on one side acts as a complete moisture barrier for those patients with heavy salivation.
With this specific method of isolation, it is necessary to use a saliva ejector throughout the entire procedure. Otherwise, moisture contamination may result in inadequate retention and potential failure of the sealant.
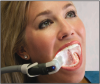
Isolite™ System
The Isolite™ (Figure 3) delivers continuous illumination, aspiration, and retraction all in one easy-to-use, time-saving device. It makes isolation easy, and provides uninterrupted access to the patient. Features of the system are simultaneous isolation of the maxillary and mandibular quadrants, retraction and protection of the tongue and cheek, bright illumination of the oral cavity, aspiration of fluids and oral debris, and blocking of the throat to prevent inadvertent aspiration of material.
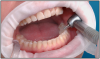
OptraGate
The OptraGate (Figure 4) offers facilitated access to the oral cavity due to gentle perioral retraction of the lips and cheek. It is an auxiliary aid that enables the treatment field to be enlarged easily, effectively and comfortably. OptraGate, available in two adult sizes - "regular" and "small" - is entirely latex-free and can therefore be used in patients with latex allergies.
Tooth Preparation
The pits and fissures of the teeth must be cleaned prior to sealant application; it is imperative that deposits and organic debris have been removed. Commercial pastes contain coloring and/or flavoring agents, glycerin, and/or fluoride, which may interfere with bonding. Use of a bristle brush or air-powder polisher effectively cleans the occlusal surfaces.
Acid Etching
Once the tooth to be sealed is isolated, cleaned, and dried, the enamel surface is ready for acid etching. The acid creates microscopic pores on the enamel surface into which the sealant flows and hardens, and is mechanically locked into place. The acid supplied by most manufacturers is 35%-50% phosphoric acid in either liquid or gel form. Most common acids are at concentrations of 37%. Many dental professionals prefer to use gels as it is easy to control, and the color of the gel assists in identifying where it has been applied.
The etchant should always be applied to all of the susceptible pits and fissures of the tooth, regardless of the type of etchant used. It must extend up the cusp inclines at least two millimeters beyond the anticipated margin of the sealant. If using a liquid etch, apply it with a brush. If using a gel etch, apply it and leave undisturbed. Rubbing the gel acid burnishes the enamel surface, and causes it to become smooth again, which decreases the retention and adversely affects bond strength.
The gel should not come in contact with the soft tissue; if it does, the area should be immediately rinsed thoroughly with water.
After the etchant has remained on the tooth for the time designated in the manufacturer's directions, it must be thoroughly rinsed. This process lasts as long as it takes to completely remove it from the surface of the tooth, approximately 10 to 20 seconds.
After the rinsing is completed, the tooth must be dried with air that is free of oil and moisture. The specific amount of time to dry is not as important as the specific result. A tooth which has been properly etched, rinsed, and dried will exhibit a white, dull, and frosty appearance. If this frosted appearance does not occur, re-etch the tooth surface, rinse, and dry until the desired appearance of the tooth has been achieved. The procedure should also be repeated if saliva contamination occurs at any time during the application of the etchant.
Sealant Application
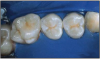
The ultimate goal of sealant application is to place the material so it covers all pits and fissures on the occlusal surface. This includes a thin layer of material carried up the buccal and lingual inclines of the occlusal surface in order to seal any supplementary areas. The sealant is also placed in the buccal pits and lingual grooves as needed. All of these areas must first be properly etched before the sealant is placed.
Placement may include using a custom dispenser that is supplied by the manufacturer, a small brush, a narrow gauge dispensing tip, etc. The dental professional must choose the technique that is most appropriate for him/her.
A successful sealant feels hard and smooth, and is firmly bonded to the tooth. Air bubbles should not be present; if noted, re-etch the tooth for 10 seconds, rinse and dry the teeth, and apply additional sealant. High spot areas contain excess sealant material that interferes with normal occlusion. If this occurs, remove excess filled sealant material identified by the use of articulating paper, with a finishing bur. Minor discrepancies with an unfilled sealant are eliminated by normal masticatory processes.
TECHNIQUES
There are two basic techniques that may be employed for the placement of sealants: the traditional technique using phosphoric acid, or using a self-etching bonding material (adhesive) to bond the sealant to the tooth.
Traditional Sealant Technique(Table A)
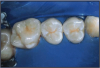
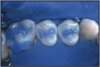
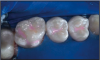
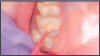
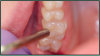
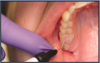
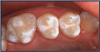
- 1. Prepare the patient by explaining the procedure, and the steps to be performed. Provide the patient with safety eyewear for protection from the chemicals of etching and sealants, and also from the light of the curing unit. 2. Clean the tooth surface with a slurry of pumice and water, bristle brush with clear water, or an air-powder polisher (Figure A). Do not use a paste that contains coloring and/or flavoring agents, glycerin, and/or fluoride, as these may interfere with bonding. Rinse thoroughly with water. 3. Isolate the teeth using one of the methods previously mentioned (Figure B). 4. Dry the tooth surface with compressed air that is free of oil and moisture (Figure C). This will prepare the tooth for the acid etch, and also eliminate moisture and contamination. Dry the tooth for a minimum of ten seconds. 5. Apply phosphoric acid to the clean, dry surface for 15-60 seconds. The etching time varies, therefore follow the manufacturer's instructions. Liquid gel has a low viscosity, allowing good flow into the pits and fissures; however, it may be difficult to control. Gel etch is thick, and tinted for increased visibility and control (Figure D), but may be more difficult to rinse off the tooth surface than a liquid gel. 6. Thoroughly rinse the etched tooth surface using a water syringe and high-speed evacuation. If the etched surface becomes contaminated with saliva, re-etch for ten seconds. 7. If using cotton rolls for isolation, replace the cotton rolls with a cotton forceps as they become wet, as moisture will interfere with bonding and retention. 8. Dry the tooth surface with compressed air for a minimum of ten seconds. A properly etched surface appears white, dull, and frosty (Figure E). 9. Apply the sealant over the pits and fissures (Figure F). Avoid overmanipulation to prevent producing air bubbles. Cover all the pits and fissures, but do not overfill to a high, flat surface. 10. Light-cure the sealant for the required time indicated in the manufacturer's instructions for use. 11. Once the sealant is polymerized, evaluate the sealant with an explorer and check for a hard, smooth surface and retention (Figure G). If necessary, additional sealant can be added if the surface has not been contaminated. 12. If imperfections are apparent, such as incomplete coverage, air bubbles, etc., re-etch the tooth for ten seconds; rinse and dry the tooth, and apply additional sealant. 13. If using a filled sealant, check the occlusion with articulating paper to locate high spots and adjust as required. If using an unfilled sealant, minor discrepancies will be eliminated by normal masticatory processes. 14. Floss the treated teeth to ensure that the sealant has not blocked the contact between the teeth. 15. The sealant should be examined for deficiencies at each dental appointment (preferably every six months).
Bonding Sealants Using Dental Adhesives
An alternative technique can assist in overcoming the limitation of resin-based sealants. The inclusion of a bonding primer and adhesive layer between the etched enamel and the sealant has been shown effective in improving bond strength and minimizing microleakage. It has been reported that the use of single-bottle bonding systems as a layer between enamel and sealant decreased the risk of failure of both occlusal sealants and buccal/lingual sealants.
Recent advances in bonding chemistry, such as self-etch adhesive systems, can dramatically simplify the steps involved in sealant application while providing equivalent sealant retention when compared to the traditional technique of using phosphoric acid. This simplified technique minimizes the time of the sealant placement, helps to decrease the need for patient compliance and minimizes potential errors in technique.
The acidity of various self-etch adhesive materials varies greatly; it can be classified as strong, mild, or intermediary. A strongly acidic material is necessary to etch the enamel in a manner similar to phosphoric acid, especially if the enamel has not been prepared or instrumented in any way.
Alternative Technique: Bonding Sealants with a Self-etching Adhesive
The following technique includes the use of 3M ESPE Adper™ Prompt™ Self-Etch Adhesive, which has a low pH proven to be effective in etching an uncut enamel surface.
Armamentarium
Same as the traditional technique, with the exception of replacing the acid etchant with a strongly acidic self-etching adhesive.
1. Thoroughly clean the teeth to remove plaque and debris from the enamel surfaces and fissures. Rinse thoroughly with water and dry. Do not use a cleaning medium containing oils of fluoride.
2. Prepare the adhesive according to the dispensing instructions.
3. Brush the adhesive on the surface to be sealed; massage for 15 seconds (Figure H), applying moderate pressure. Do not shorten this time, as proper bonding will not occur if the solution is simply applied and dispersed.
4. Use a gentle stream of air to thoroughly dry the adhesive to a thin film (approximately 10 seconds). If the stream of air is too forceful, the adhesive will be blown off the tooth. The tooth surface will appear glossy, but not moist (Figure I). It will not appear frosty as in the "traditional" technique.
5. Apply a light-cured sealant (Figure J).
6. Light-cure the sealant and adhesive together with a halogen, LED, or plasma light for the amount of time specified to cure the sealant (Figure K).
7. Check sealant coverage and wipe clean (Figure L).
LONG-TERM SUCCESS FACTORS
Long-term success of sealant therapy depends on vigilant re-care and repair if necessary. Even partial loss of a sealant can lead to a surface with a risk for caries similar to that for one never sealed. However, studies that incorporated routine re-care and maintenance report greater than 80% success after a decade or more. Simonsen published the longest clinical trial associated with sealants, which identified 15-year results. His data showed the complete retention rate of sealants to be 82% at 5 years, 56% at 10 years, and 27% at 15 years.
It is important that patients, particularly children, have a dental office that they visit regularly, where oral health care maintenance can be appropriately provided. Despite the fact that sealants are presumed safe and effective, the treatment is typically underused. Data show that only 15% of U.S. children ages 6 to 17 have sealants. To improve the usage rates, the U.S. Surgeon General's Healthy People 2010 Report to set a goal to increase sealant use to 50% for 8- and 14-year-old children. The goal was not met and only reached 25.5% for children aged 6-9 for first molars and 19.9% for teens aged 13-15 for second molars. For the updated report in 2020, the U.S. Surgeon General's new goal is set at 28.1% among children 6-9 and 21.9% for teens.
Most dentists attribute the underusage of sealants to a lack of insurance coverage for the application process. Third-party dental providers are seemingly concerned about overtreatment. Unfortunately, the result is that only a small percentage of those who could most benefit from sealants are receiving them.
SUMMARY
The dental professional has a responsibility to assess each patient at each re-care appointment for the necessity of sealant placement. Caries risk may exist at any age, in any tooth with a pit or fissure, including the primary and permanent teeth in children. It takes a relatively short period of time to assess the general caries risk (low, moderate or high) of the individual, whether or not there are any contraindications to sealants for the patient, the individual teeth that would benefit from sealants and the type of sealant material to apply (resin-based for long-term retention or glass ionomer as a transitional sealant), and then to make a recommendation to the patient to receive pit and fissure sealants.
Although patients and/or parents might raise concerns related to their cost, especially if dental insurance is not available or does not fully cover the procedure, it is important to explain the long-term cost effectiveness of placing sealants versus restorative work in the future. With ongoing professional dental care, fluoride therapies, patient compliance with plaque removal, and the placement and maintenance of sealants, we have the tools to help patients keep their teeth relatively "caries-free" for a lifetime.
REFERENCES
American Academy of Pediatric Dentistry, Council on Clinical Affairs. Guideline on Pediatric Restorative Dentistry. Reference Manual 2012; 34(6):214-221.
American Dental Association, Council on Access, Prevention and Interprofessional Relations: Treating caries as an infectious disease, JADA, Special Supplement 126(suppl)1,1995.
Brown LJ, Kaste L, Selwitz R, Furman L. Dental caries and sealant usage in U.S. children, 1988-1991; selected finding from the Third National Health and Nutrition Examination Survey. J Am Dent Assoc 1996;127:335-343.
Brown LJ, Selwitz RH. The impact of recent changes in the epidemiology of dental caries on guidelines for the use of dental sealants. J Publ Health Dent 1995; 55(special issue):274-291.
Beauchamp J, Caufield PW, Crall JJ, Donly K, Feigal R, Gooch B, Ismail A, Kohn W, Siegal M, Simonsen R.. Evidence-based clinical recommendations for the use of pit-and-fissure sealants. A report of the American Dental Association Council on Scientific Affairs. J Am Dent Assoc. 2008 Mar;139(3):257-68.
Chestnutt IG, Schafer F, Jacobson APM, Stephen KW. The prevalence and effectiveness of fissure sealants in Scottish adolescents. Br Den J 1994;77:125-129.
Council on Dental Research. Cost effectiveness of sealants in private practice and standards for use in prepaid dental care. J Am Dent Assoc 1985;110:103.
Darby, Michele Leonardi., Walsh, Margaret M., Dental Hygiene Theory and Practice, Saunders (2003):553-561.
Do Rego MA, de Araujo MA. Microleakage evaluation of pit-and-fissure sealants done with different procedures, materials, and laser after invasive technique. J Clin Pediatr Dent. 1999;24:63-68.
Eklund SA, Ismail AI. Time of development of occlusal and proximal lesions: Implications for fissure sealants. J Publ Health Dent 1986;46:114-121.
Feigal RJ, Musherurue P, Gillespie, B Levy-Polack M Quelhas I, Hebling J. Improved sealant retention with bonding agents: A clinical study of two-bottle and single-bottle systems. J Dent Res 2000; 79:1850-1856.
Feigal RJ, Quelhas I. Clinical trial of a self-etching adhesive for sealant application: success at 24 months with Prompt L-Pop. Am J Dent 2003;16:249-251.
Forss H, Halme E. retention of a glass ionomer cement and a resin-based fissure sealant and effect on carious outcome after 7 years. Community Dent Oral Epidemiol. 1998;26:21-25.
Gary GB, Paterson RC. Management of fissure caries in the community dental services using sealant restorations; a field trail. Eur J Prosthodont Restor Dent. 1998;6:33-40.
Geiger SB, Gulayev S, Weiss EI. Improving fissure sealant quality: mechanical preparation and filling level. J Dent 2000; 38:407-412.
Going, RE, Loesche WJ, Grainger PA, Syed SA. The viability of microorganisms in caries lesions five years after covering with a fissure sealant. J Am Dent. Assoc. 1978;97:455-462.
Gore, D. Not just for kids. Dimensions of Dental Hygiene. 2011; 9(6): 66-69.
Hackmyer, SP. Sealants A - Z. Dimensions of Dental Hygiene. 2011; 9(11): 58-61.
Hayes, MJ. Dental sealants: A cornerstone of preventive care. Inside Dental Assisting; Nov/Dec 2011: 36-38.
Hotuman E, Rolling I, Poulsen S. fissure sealants in a group of 3-4 year old children. Int J Paediatr Dent 1998;8:159-160.
Ismail AI. Reactor paper: minimal intervention techniques for dental caries. J Public Heath Dent. 1996; 56:155-160.
Romcke RG, Lewis DW, Maze BD, Vickerson RA. Retention and maintenance of fissure sealants over 10 years. J Can Dent Assoc 1990;56:235-237.
Simonsen RJ. Retention and effectiveness of dental sealant after 15 years. J Am Dent Assoc 1991;122:34-42
Smales RJ, Wong KC. Two-year clinical performance of a resin-modified glass ionomer sealant. Am J Dent. 1999.12:59-61.
Vrbek V. Retention of a fluoride-containing sealant on primary and permanent teeth 3 years after placement. Quintessence Int 1999;30:825-828.
Warren DP, Infante NB, Rice HG, Turner SD, Chan JT. Effect of topical fluoride on retention of pit and fissure sealants. J Dent Hygiene. 2001;75:21-24.
Wilkins, Esther M., Clinical Practice of the Dental Hygienist. Lippincott Williams and Wilkins (2005):569-578.