You must be signed in to read the rest of this article.
Registration on CDEWorld is free. Sign up today!
Forgot your password? Click Here!
Implant-supported restorations have greatly improved the quality of life for edentulous patients.1-3 While implant restorations may be removable or fixed,4,5 patients generally prefer a fixed implant restoration over one that is removable, as they feel that fixed restorations provide them with a sense of security, are less "bulky," and in a sense become like a "part of their body."5 Patients like the fact that they do not need to worry about removing the restoration and losing or dropping it. Patients also report that fixed restorations improve their self-esteem.5 However, fixed implant-supported restorations may not be indicated for all patients, such as those who have poor oral hygiene compliance, a history of bruxism, or anatomical limitations.5 Oral hygiene maintenance is critical for the success and survival of implants and implant prostheses.5-7For patients who are not motivated or capable of maintaining proper oral hygiene, a removable prosthesis should be recommended for ease of cleaning.7 Patients with a class II or a class III jaw relationship often have a tendency to exert increased forces on the weaker jaw.8-10 These forces are greatly increased if a fixed restoration is placed on the stronger jaw.9 If there is a considerable discrepancy between the position of the ridge and the position of the implants and prosthetic teeth, the discrepancy is more easily managed with a removable restoration than with a fixed prosthesis.9,11
In addition, factors such as the available restorative space, the time required for fabrication and maintenance of the prostheses, and the financial implications need to be taken into consideration during treatment planning.5,8,9, 12-15 Fixed restorations tend to be considerably more expensive than removable implant restorations owing to the increased chair time and complex laboratory procedures.5,15 Thus, many patients choose removable implant restorations because they are more cost-effective than fixed implant restorations.5 It is also challenging to transition a patient from one type of restoration to another because of the substantial costs associated with additional implant placement, as well as the cost of new abutments and the new prostheses. This article presents two cases that illustrate the clinical technique and procedural steps involved with the use of a fixed attachment system that help transition patients from a removable restoration type to a fixed prosthesis in a cost-effective manner.
CASE STUDY 1
The following case study illustrates the planning and fabrication of implant-supported fixed restorations in a patient with limited finances, using conventional locator attachments and fixed housing and inserts.
A 70-year-old male patient was referred to the author's interdisciplinary practice for full-mouth rehabilitation. The patient had a collapsed occlusal vertical dimension (OVD) and complained of pain and discomfort during function (probably associated with temporomandibular joint disorder [TMD]). The patient had received an overlay restoration to re-establish his lost OVD and oral function; however, he seldom wore it, as it was uncomfortable and did not improve his oral function. The patient's pain needed to be managed before any restorative therapy could be initiated, in accordance with the principle of "resolution before reconstruction."16An occlusal orthotic device was fabricated at the predetermined OVD in centric occlusion that helped alleviate the patient's pain and discomfort. The patient was very happy with the provided treatment.
Treatment Planning
The patient's existing teeth were deemed non-restorable. The patient was presented with various options such as conventional dentures, immediate dentures, and implant-supported prostheses. (Options included LOCATOR® FIXED attachment system, Zest Dental Solutions; ERA®-retained prostheses, Sterngold; Ankylos Syncone, Dentsply International; One-piece ball attachments and components, Nobel Biocare.) The patient desired implant-supported prostheses; however, he did not want to be without teeth at any time and many of his teeth had associated periapical infections; hence, transitional immediate dentures were recommended to the patient. The patient agreed with the clinician's recommendation that the nonrestorable teeth should be extracted and replaced with immediate dentures. All the teeth in the patient's mouth were extracted and immediate dentures were placed in his mouth.
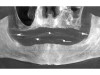
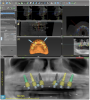
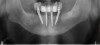
Next, a 3-dimensional (3-D) cone beam computed tomography (CBCT) scan was performed with the immediate dentures (with radiographic markers attached) using the dual scan protocol (Figure 1).17The occlusal, cameo, and intaglio surfaces of the existing dentures were also scanned using an intraoral scanner. An online collaborative implant planning meeting between the implant surgeon and the restorative dentist permitted the formulation of a virtual prosthetic-driven treatment plan. Various treatment options were presented to the patient, such as implant-supported overdentures (utilizing four and six implants), and implant-supported fixed prostheses (metal-acrylic, zirconia, porcelain fused to metal). The patient had limited finances; however, he desired fixed implant-supported prostheses for the maxillary and the mandibular arches. It was planned that, of the options discussed earlier, the LOCATOR FIXED attachment system would be used.
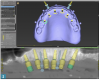
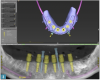
Six implants were planned for both the maxillary and the mandibular arches, respectively (Figure 2 and Figure 3). A dual-arch CBCT was taken (Dentri-Max, HDX WILL; alternatively: CS 9600, Carestream; Explorer PRO, PreXion). The CBCT planning data was sent to the manufacturers to fabricate computer-
aided aided design/computer-aided manufacturing (CAD/CAM) maxillary and mandibular surgical guides for guiding with the implant placement.18,19An online virtual planning meeting was set up through Absolute Dental Navigation team. Using treatment planning software (coDiagnostiX software; alternatively: RealGuide™ Universal Open system; SMOP, Swissmed), of two alternative products] the authors finalized the treatment plan, including diagnostic digital wax-up, surgical guides, and provisionals. It was decided that the existing maxillary immediate denture should continue to be used during the healing phase; however, an immediate fixed implant-supported restoration was planned for the mandibular arch.
Implant Placement
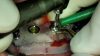
On the day of the surgery, anesthesia was administered, and the maxillary and the mandibular surgical guides were placed in the patient's mouth and checked for proper fit and adjusted as needed. The surgical guides were stabilized using anchor pins (Figure 4 and Figure 5). A tissue punch was used to remove the soft tissues at the osteotomy sites. Osteotomies were performed using multiple drills in a systematic sequence (Figure 6), as per the manufacturer's recommendations, and the implants (Tapered Pro, Biohorizons; alternatively: T3 PRO, ZimVie; SB/LA Implants, Ritter Implants) were placed through the guide (Figure 7). In the mandible, 3.8-mm x 12-mm implants were placed in site Nos. 19, 20, 23, 26, 29, and 30. In the maxilla site No. 4, a 4.6-mm x 7.5-mm implant was placed; at site Nos. 6, 8, 9, and 11, 3.8-mm x
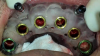
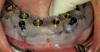
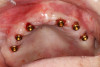
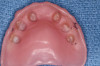
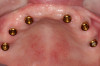
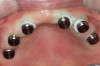
12-mm implants were placed; and at site No. 13, a 4.6-mm x 12-mm implant was placed. Conventional LOCATOR® abutments (Zest Dental Solutions; alternatively: ERA abutments, Sterngold; Ball abutments, Nobel Biocare) were attached to the implants (Figure 8). The existing maxillary prosthesis was relieved, adjusted, relined with a soft reline material (CHAIRSIDE® Soft Reline Material, Zest Dental Solutions; alternatively: Coe-Soft™, GC America; Ufi Gel SC, VOCO), and placed in the oral cavity.
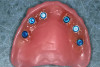
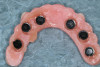
An interim fixed polymethyl methacrylate (PMMA) mandibular prosthesis was fabricated for the patient using the data from the implant and prosthetic plan. The undercuts associated with the abutments were blocked out with block-out spacers (Figure 9). The LOCATOR FIXED™ housings with black processing inserts were placed over the conventional locator abutments. The prosthesis was relieved optimally in the location of the implant abutments. The abutment housings were incorporated into the denture by a chairside pick-up procedure utilizing CHAIRSIDE® Attachment Processing Material (Zest Dental Solutions; alternatively: STELLAR™ DC Acrylic - Dual cure PMMA Resin, Taub Products; Quick Up, VOCO) (Figure 10). The prosthesis was adjusted, finished, and polished as necessary. A radiograph was taken to confirm complete seating of the prosthesis, and it was placed in the oral cavity using the manufacturer's seating and removal tool. The patient was given home care instructions for optimally cleaning and maintaining his prostheses and advised to come to the office the next day for postoperative assessment. The patient was recalled periodically for evaluations during the healing phase of the implants.
Fabrication of the Maxillary and Mandibular Definitive Prostheses
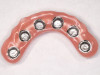
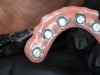
The scan bodies were placed on the existing maxillary and mandibular abutments (Figure 11), and conventional one-step master impressions were made using varying viscosities (medium and light viscosities) of vinyl polysiloxane (VPS) impression material in thermoplastic impression trays (Strong-Massad Denplant Trays, Nobilium; alternatively: Transform heat moldable trays, Astek Innovations; Cotisen Adjustable Impression Trays, Cotisen) for both the maxillary and the mandibular arches. A facebow record, an interocclusal record, and a neutral zone record were registered for the patient and sent to the laboratory for the fabrication of the trial prostheses. The trial prostheses were tried and adjusted to ensure optimal esthetics, phonetics, tissue contour, and occlusion. Cameo impressions were made during the try-in to guide the development of optimal contours of the polished surface of the definitive prostheses.20 The trial prostheses were sent back to the laboratory along with detailed instructions for the fabrication of the definitive prostheses (metal-acrylic fixed complete dentures) with recesses for the chairside pick-up of the fixed housings (Figure 12).
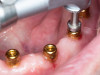
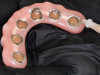
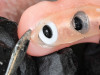
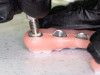
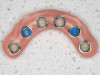
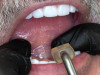
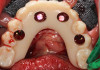
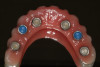
During the prosthesis placement appointment, the abutments were cleaned and torqued to 30 Ncm as per the manufacturer's specifications (Figure 13). Block-out spacers were used to block the undercuts associated with the abutments. The fixed housings with processing inserts were placed on the existing abutments. The prostheses were placed over the abutments and housings, and their fit and occlusion were verified (group function occlusion). Extra-light viscosity VPS impression material was used to ensure that there was no inadvertent contact of the housings with the recesses in the prostheses. The recesses in the prostheses had undercuts (and diatorics) and were roughened to enhance the retention of the housings. A separating agent (petroleum jelly, Vaseline®) was applied to the entire intaglio surface of the prostheses except in the location of the recesses to aid in the quick and easy elimination of the excess resin material. A small amount of dual-cure resin material (CHAIRSIDE Attachment Processing Material, Zest Dental Solutions; alternatively: STELLAR DC Acrylic - Dual cure PMMA Resin, Taub Products; Quick Up, VOCO) was applied around the circumference of each housing and into each recess (Figure 14 and Figure 15). The prostheses were placed over the housings, and the patient was asked to close into light occlusion and hold the position for 5 to 7 minutes to allow the resin to complete setting. The prostheses were removed from the mouth using the manufacturer's seating and removal tool and examined to ensure optimal pick-up of the housings in the prostheses. The black processing inserts were removed, and the excess resin material on the intaglio surface was carefully eliminated. The prostheses were adjusted, finished, and polished as needed. The black processing inserts were replaced with the tan and blue fixed inserts. The inserts were optimally placed in the housing using the core tool by pressing firmly until the insert snapped into place (Figure 16 through Figure 18). The prostheses with the appropriate fixed inserts were placed over the abutments using the manufacturer's seating and removal tool (Figure 19).
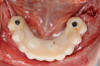
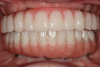
The maxillary and the mandibular prostheses were easily retrievable, as they would need removal for maintenance of hygiene, for changing the levels of retention, or for managing complications. The seating and removal tool was used for placement and retrieval of the prostheses. The patient was pleased with his prostheses (Figure 20).
CASE STUDY 2
The following case presentation describes the seamless transition from a removable to a fixed prosthesis using the same locator abutments that were used for the fabrication of removable implant-supported restorations by simply switching the conventional locator housings and inserts with fixed locator housings and inserts.
A 68-year-old female patient was referred to the author's interdisciplinary practice for the fabrication of implant-supported restorations. The patient had maxillary and mandibular immediate full dentures that were placed in her oral cavity 3 months previously. The patient had lost her maxillary and mandibular teeth due to caries and periodontal disease. The existing oral hygiene of the patient was good. The patient's medical history was noncontributory.
Treatment Planning
As was done for the patient of Case Study 1, a 3-D CBCT scan (CS 9600, Carestream; alternatively, Dentri-Max, HDX WILL; Explorer PRO, PreXion) was performed with the immediate dentures (with radiographic markers attached) using the dual scan protocol,17 and the occlusal, cameo, and intaglio surfaces of the existing dentures were scanned using an intraoral scanner. An online collaborative implant planning meeting between the implant surgeon and the restorative dentist permitted the formulation of a virtual prosthetic-driven treatment plan (absolute navigation guided surgery).
Various treatment options were presented to the patient, including complete dentures,
implant-supported overdentures, and implant-
supported fixed prostheses. (Options included LOCATOR® FIXED attachment system, Zest Dental Solutions; ERA®-retained prostheses, Sterngold; Ankylos Syncone, Dentsply International; One-piece ball attachments and components, Nobel Biocare.) The patient selected a fixed complete denture for the mandibular arch (all-on-X) and an implant-supported overdenture (retained and supported by six implants) for the maxillary arch. However, the patient requested that the treatment plan for the maxillary arch be formulated such that she would be able to upgrade to a fixed restoration in the future. To comply with the patient's demands, six implants were planned for the maxillary arch (Figure 21). It was planned that, of the options discussed with the patient earlier, the LOCATOR FIXED attachment system would be used.
Implant Placement
Implant placement and restoration of the mandibular arch was accomplished using a guided workflow (navigation) that guided the implant surgery and chairside conversion of the PMMA prosthesis. The guided workflow included
a pinned bone reduction guide, a denture
aligner, osteotomy guide, abutment aligner, and latched PMMA.
Maxilla
On the day of the surgery, local anesthesia was administered, and the maxillary pilot surgical guide was placed in the patient's mouth and checked for proper fit and adjusted as needed. The maxillary surgical guide was stabilized using the anchor pins. A tissue punch was used to remove the soft tissues at the osteotomy sites through the surgical guide. Pilot osteotomies were performed for the six overdenture implants (LOCATOR Overdenture Implant; alternatively: Cylindro-conical dental implant, Bredent; Conical dental implant, Noris Medical) The surgical guide was removed, and the final osteotomies were accomplished using multiple drills in a systematic sequence, as per the manu-
ufacturer's recommendations. Conventional
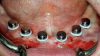
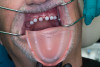
locator abutments (LOCATOR abutments, Zest Dental Solutions; alternatively: ERA abutments, Sterngold; OD Secure abutment, BioHorizons) were attached to all the maxillary implants (Figure 22). The existing maxillary prosthesis was relieved, adjusted (Figure 23), and relined with a soft reline material (CHAIRSIDE Soft Reline Material; alternatively: Coe-Soft, GC America; Ufi Gel SC, VOCO) and placed in the oral cavity. After 3 months of healing, the denture attachment housings were placed on the abutments and picked up in the prosthesis chairside as per the manufacturer's recommended protocol (Figure 24 and Figure 25).
Mandible
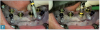
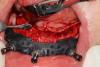
The patient was anesthetized and a full-thickness mucoperiosteal flap was reflected for the lower arch. The carbon fiber unilateral key fixation (UKF) bone reduction guide was seated by hand. The UKF base guide did not require extensive tissue reflection for its optimal placement, as it solely engages the bony anatomy of the buccal plate. It was stabilized by a denture-based aligner for faster and more accurate placement. The mandibular ridge was reduced to the predetermined level using the surgical burs (Figure 26). The latched osteo-tomy guide with sleeves was placed over the UKF base guide. Osteotomies were accomplished for the mandibular implants by using multiple drills from a guided surgical kit in a systematic sequence, as per the manufacturer's recommendations. The implants (Tapered Pro, Biohorizons; alternatively: Nobel Active, Nobel Biocare; T3 PRO, ZimVie; SB/LA Implants, Ritter Implants) were placed through the guide.
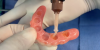
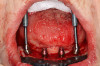
The locator fixed abutments and housings were attached to the anterior two implants. Because a good anteroposterior (AP) spread of implants could not be achieved due to a lack of posterior bone height, the distal-most implants were intentionally angled to improve the AP spread. Multi-unit 30-degree angle correction abutments were used to correct the angulation of the tilted implants (Figure 27). The latched multi-unit abutment placement guide was used to optimally place the multi-unit abutments on the tilted implants. Multi-unit titanium sleeves were attached to the multi-unit abutments. The undercuts associated with the sleeves and the abutments were blocked out with rubber dam material and block-out spacers, respectively. An interim fixed PMMA prosthesis was fabricated for the patient using the data from the implant and prosthetic plan. The prosthesis was relieved optimally in the location of the implant abutments and multi-unit titanium sleeves (Fig-
ure 28). The abutment housings and the titanium sleeves were incorporated into the denture by a chairside pick-up procedure (Figure 29). The prosthesis was adjusted, finished, and polished as necessary. A radiograph was taken to confirm complete seating of the prosthesis (Figure 30), and the prosthesis was placed in the oral cavity. The patient was given home care instructions and advised to come to the office the next day for postoperative assessment. The patient was recalled periodically for evaluations during the healing phase of the implants.
Fabrication of an Interim Maxillary Prosthesis and a Definitive Prostheses
Maxillary Arch
The patient was not happy with the option of a removable maxillary prosthesis and desired a fixed solution for the maxillary arch. The scan bodies were placed on the existing abutments, and a digital impression was accomplished using an intraoral scanner (CS 3800, Carestream; alternatively: TRIOS intraoral scanner, 3Shape; Primescan, Dentsply Sirona). Interocclusal records were registered with the existing maxillary and the mandibular prostheses. The interocclusal record was scanned intraorally along with sections of the maxillary and the mandibular prostheses. Next, the patient's existing maxillary prosthesis was removed from the mouth and all its surfaces were scanned. The scans were delivered electronically to the laboratory. A fixed prototype PMMA prosthesis was designed virtually in the laboratory and printed for a try-in procedure. The try-in prosthesis was adjusted to ensure optimal esthetics, phonetics, tissue contour, and occlusion. It was sent back to the laboratory, where it was rescanned, and an interim prosthesis was fabricated using printed denture base material and milled prosthetic teeth.
During the prosthesis placement appointment, the abutments were cleaned and torqued as per the manufacturer's specifications to 30 Ncm. The block-out spacers were used to block the undercuts associated with the abutments (Figure 31). The locator fixed housings with processing inserts were placed on the existing abutments. The prosthesis was tried in the patient's mouth to verify the fit and occlusion (balanced occlusion). Extra-light viscosity VPS impression material was used to ensure that there was no inadvertent contact of the fixed housings with the recesses in the prosthesis. The fixed housings were cleaned and dried. The recesses in the prosthesis were roughened and a small amount of dual-cure resin material (CHAIRSIDE Attachment Processing Material, Zest Dental Solutions; alternatively: STELLAR DC Acrylic - Dual cure PMMA Resin, Taub Products; Quick Up, VOCO) was applied around the circumference of each fixed housing and into each recess. The prosthesis was placed over the fixed housings, and the patient was asked to close into light occlusion and hold that position for 5 to 7 minutes. The fixed housings were picked up directly within the prosthesis. The black processing inserts were removed, the excess resin was eliminated, and the prosthesis was adjusted, finished, and polished as needed. The black processing inserts were replaced with the tan and blue locator fixed inserts. The inserts were optimally placed in the housing using the manufacturer's core tool by pressing firmly until the insert snapped into place. The prosthesis was placed with the appropriate fixed insert over the abutments as per the manufacturer's recommendations (Figure 32 and Figure 33). A long-term prosthesis with reinforcement was planned to be fabricated in the near future.
Mandibular Arch
Closed tray and open tray impression copings were attached to the LOCATOR FIXED abutments and the multi-unit abutments, respectively. The black processing inserts in the LOCATOR FIXED impression copings were replaced with blue removable retention inserts for enhancing the retention and stability of the impression copings. A master impression was made using VPS impression material (medium and light viscosity) in a thermoplastic tray. The existing PMMA transitional restoration was scanned, and a new PMMA try-in prosthesis was fabricated. The trial prosthesis was tried in the mouth to evaluate occlusion and contour. It was adjusted as necessary and sent to the laboratory along with detailed instructions for the fabrication of the definitive zirconia prosthesis. The definitive fixed prosthesis was adjusted, finished, polished, and placed in the mouth as per the current prosthodontic procedures (Figure 34).
CONCLUSION
The attachment system used in these cases provided both a removable and fixed solution using the same abutments and allowed a seamless transition between removable and fixed prostheses simply by switching out the inserts and housings in the existing prosthesis, followed by fabricating a new prosthesis later. The procedural steps used to fabricate a fixed full-arch prosthesis with a fixed attachment system as illustrated in these two case studies are similar to the ones used to fabricate an implant overdenture supported by a traditional removable attachment, thereby avoiding the need for complex impression procedures or cast verification.
References
1. Allen PF, McMillan AS. A longitudinal study of quality-of-life outcomes in older adults requesting implant prostheses and complete removable dentures. Clin Oral Implants Res. 2003;14(2):173-179.
2. Doornewaard R, Glibert M, Matthys C, Vervaeke S, Bronkhorst E, de Bruyn H. Improvement of quality of life with implant-supported mandibular overdentures and the effect of implant type and surgical procedure on bone and soft tissue stability: a three-year prospective split-mouth trial. J Clin Med. 2019;8(6):773.
3. Sivaramakrishnan G, Sridharan K. Comparison of implant supported mandibular overdentures and conventional dentures on quality of life: a systematic review and meta-analysis of randomized controlled studies. Aust Dent J. 2016;61(4):482-488.
4. Selim K, Ali S, Reda A. Implant supported fixed restorations versus implant supported removable overdentures: a systematic review. Open Access Maced J Med Sci. 2016;4(4):726-732.
5. Vazouras K, Taylor T. Full-arch removable vs fixed implant restorations: a literature review of factors to consider regarding treatment choice and decision-making in elderly patients. Int J Prosthodont. 2021;34:s93-s101.
6 .Louropoulou A, Slot DE, Van der Weijden F. Mechanical self-performed oral hygiene of implant supported restorations: a systematic review. J Evid Based Dent Pract. 2014;14 Suppl:60-69.e1.
7. Ahuja S, Wicks R, Selecman A. Fabrication of new restorations with a consideration of oral hygiene. J Indian Prosthodont Soc. 2016;16(3):307-310.
8. Gowd MS, Shankar T, Ranjan R, Singh A. Prosthetic consideration in implant-supported prosthesis: a review
of literature. J Int Soc Prev Community Dent. 2017;
7(Suppl 1):S1-S7.
9. DeBoer J. Edentulous implants: overdenture versus fixed. J Prosthet Dent. 1993;69(4):386-390.
10. Zitzmann NU, Marinello CP. Treatment plan for restoring the edentulous maxilla with implant-supported restorations: removable overdenture versus fixed partial denture design. J Prosthet Dent. 1999;82(2):188-196.
11. Neves FD, Mendonça G, Fernandes Neto AJ. Analysis of influence of lip line and lip support in esthetics and selection of maxillary implant-supported prosthesis design. J Prosthet Dent. 2004;91(3):286-288.
12. Sadowsky SJ. The implant-supported prosthesis for the edentulous arch: design considerations. J Prosthet Dent. 1997;78(1):28-33.
13. Carpentieri J, Greenstein G, Cavallaro J. Hierarchy of restorative space required for different types of dental implant prostheses. J Am Dent Assoc. 2019;150(8):695-706.
14. Ahuja S, Cagna DR. Defining available restorative space for implant overdentures. J Prosthet Dent. 2010;104(2):13313-6.
15. Ghiasi P, Petrén S, Chrcanovic B, Larsson C. Comparative cost analysis of different prosthetic rehabilitations for the edentulous maxilla: early results from a randomized clinical pilot study. BDJ Open. 2022;8(1):8.
16. McHorris WH. TMJ dysfunction - resolution before reconstruction. J Eur Acad Gnathology.1974;1:16-32.
17. Fully edentulous CBCT scan: dual scan protocol of maxilla. Implant Concierge™ website. https://implantconcierge.com/femaxilla-and-mandible. Accessed November 15, 2022.
18. Hultin M, Svensson KG, Trulsson M. Clinical advantages of computer-guided implant placement: a systematic review. Clin Oral Implants Res. 2012;23(Suppl 6):124-135.
19. Ganz SD. Presurgical planning with CT-derived fabrication of surgical guides. J Oral Maxillofac Surg. 2005;63(9 Suppl 2):59-71.
20. Massad JJ, Wong D, Wicks RA, Ahuja S, Cagna DR. Prospectively engineered implant placement. Dent Today. 2017;36(4):110, 112, 114-116.