You must be signed in to read the rest of this article.
Registration on CDEWorld is free. Sign up today!
Forgot your password? Click Here!
INTRODUCTION
Endodontics is a specialty in dentistry that involves work on the inner tissues of the tooth. The dental assistants' work in this specialty closely resembles that of dental assistants in general practice, although their work includes assisting an endodontist with procedures within that specialty. Patient-related tasks performed by the endodontic assistant include answering patients' questions or concerns, providing them with instructions on pre-operative preparations as needed, and walking the patient through post-operative care requirements. The endodontic assistant also assists the dentist by preparing all necessary instrumentation, which includes ensuring reusable equipment is sterilized and providing necessary disposable items as well. During procedures, the assistant provides help in resecting areas and keeping the surgical area clean.
ENDODONTIC SPECIALTY
Endodontics is the dental specialty that handles the diagnosis and treatment of diseases of the dental pulp and the periapical tissues. Pulp injury or pulp death can occur in a number of ways, including traumatic blows to the teeth, extensive dental caries, mechanical pulp exposure (during cavity preparation), chemical irritation (from improper placement of dental materials, or faulty restorations), and thermal irritation (from hot or cold being transferred to the pulp via metal restorations, or frictional heat generated during cavity preparation). Sometimes the pulp can be treated and it will return to normal; other times the pulp will die and will require endodontic treatment. Endodontic treatment is more commonly known as root canal therapy. Factors that may affect whether or not the pulp will die include: age of the patient, extent of the injury, amount of time between initial injury and treatment, and the method of treatment.1
While all endodontists are dentists, less than three percent of dentists are specialists called endodontists.1 Just like a doctor in any other health field, endodontists are specialists because they have achieved an additional two or more years of training beyond the dental school curriculum. Endodontic training focuses on diagnosing tooth pain, performing root canal treatment and other procedures relating to the pulp of the tooth.2
ENDODONTIC DIAGNOSIS IN THE MAKING
In order for the dentist to make a diagnosis, the dentist and team must interpret a combination of subjective information and objective findings.
Patient History
The dental team must obtain a complete medical and dental history from the patient. This may reveal previous trauma or an accident that may have caused an injury to the tooth, or recent dental treatment done elsewhere. It will also allow the patient to relay information regarding the current problem, giving the dental team the subjective information (symptoms) about the condition. The patient should be asked to describe the symptoms, including the presence or absence of pain, a history of prior pain, the severity and spontaneity of the pain, and the source and stimulus of the pain.
Clinical Observation and Tests
The dental team will also perform a clinical exam, using a variety of tests, which will reveal objective information (signs) about the patient's condition. A series of diagnostic tests may be performed because no single test can determine the status of the dental pulp. These tests are always done using a control tooth first, which lets the patient know what to expect. The control tooth is usually the same tooth on the opposite side of the arch. The various diagnostic tests that may be performed include:
• Visual Exam - to look for such conditions as discolored teeth, soft tissue lesions, fractured teeth, deep caries or extensive restorations, malocclusion. There are times when a tooth on the opposite arch is bombed out and the patient is feeling referred pain. The oral cavity in its entirety needs to be looked at.
• Palpation of the Buccal and Lingual/Palatal Gingival Tissue of the Tooth - firm pressure is applied to the mucosa near the apex of the tooth; pain indicates that inflammation may extend into the periapical tissues. A palpation examination tests for sensitivity of the gingival tissue and for infection or inflammation of the cortical and medullary bone. Even when there is no radiographic evidence of an apical infection, an infection may be present clinically. It is not uncommon to have extensive disease of the bone without evidence on a radiograph.
• Periodontal Examination including Periodontal Probing and Tooth Mobility - periodontal disease can develop anywhere around a tooth so the entire circumference of the tooth, or teeth, must be probed for an accurate diagnosis. When evaluating tooth mobility, the clinician must remember that movement may be endodontic or periodontal in nature. In the case of periodontal disease, the tooth begins to become mobile and loosens as the attachment apparatus and surrounding bone are destroyed. With an acute endodontic infection, mobility is generally associated with an isolated tooth. When there is generalized mobility involving multiple teeth, mobility suggests a periodontal origin. To conduct a mobility test, the index finger is placed on the lingual surface and lateral pressure with the mirror handle is applied on the facial surface; some mobility may be present in teeth with large periapical lesions (movement of 2-3 mm indicates that the tooth does not have adequate support and may not be a candidate for endodontic treatment).
• Percussion Tests for Determining the Status of the Periodontal Ligament - may be considered mistakenly to directly correlate to a pulp's sensitivity. Although a tooth's sensitivity to percussion tests may be due to a pulpitis or pulpal necrosis, they are only indirectly associated. This specific test aids only in determining the status of the periodontal ligament and a bite test may also be necessary if a patient complains about pain while masticating. To conduct the test, the tooth is tapped on the incisal or occlusal surface with the end of the mirror handle held parallel to the long axis of the tooth; sharp pain may indicate periapical inflammation.
• Bite Test - similar to a percussion test in that the patient is asked to bite on a cotton roll or other object; discomfort would signal the need for further testing on that tooth. This test is useful for several things, including the diagnosis of a coronal fracture. It is best to have a Tooth Slooth for testing cusps individually.4 Another item that aids in diagnosis is a burlew wheel, which has some elasticity and may mimic chewing. When using the Slooth, ask the patient to bite down, squeeze their teeth together, and open quickly. Explain each step to him before you start, and instruct the patient to note if the pain is upon biting or release. Pain upon release from biting with the absence of any other symptoms and normal responses to the other diagnostic tests is frequently correlated to a coronal fracture. This is usually effectively treated with a full-coverage restoration.5
• Current Radiographic Examination including Periapical, Bitewings, and/or CBCT - used to help diagnose a pulpal disease; these must be used in conjunction with other tests because early stages may not be visible radiographically. The clinical evaluation is the most important part of the diagnostic process because there is often a lack of radiographic pathology associated with an endodontic problem.5 To view radiographic bone destruction, there must be erosion of one of the cortical plates. There can be extensive loss of cancellous bone without any radiographic pathology. Not all dental practices have cone-beam computed tomography (CBCT) imaging, but the technology is effective at detecting approximately 20% more periapical lesions than are periapical radiographs, particularly in the maxillary anterior and posterior teeth.6 When a patient presents for restorative treatment and reports that a tooth is asymptomatic, a dentist may assume that the pulpal and periradicular diagnosis is within normal limits and hence may skip the above objective clinical tests, with the possible exception of taking a radiograph. However, using only a dental radiograph to determine the etiology of tooth pain and the pretreatment pulpal and periradicular status may lead to a pulpal and periradicular misdiagnosis. Consequently, the dental team must perform all five objective tests to obtain an accurate pretreatment pulpal and periradicular diagnosis.
• Thermal Tests for Cold/Heat and Electronic Pulp Tests for Pulp Responsiveness - electronic and thermal pulp responsiveness tests have been used to indirectly determine the state of pulpal health by assessing the condition of the dental pulp nerves. Heat and cold tests do not jeopardize the health of the pulp.2 Additionally, teeth with porcelain or metal crowns conduct temperature and, therefore, can be tested for pulpal sensibility with cold or heat.3
Thermal Test: Heat - a heat source is applied to the isolated, dried tooth; if pain is sharp and lingers it could indicate a pulpitis (necrotic [dead] pulp will not respond). The most effective way to heat-test teeth is to isolate each tooth using a rubber dam and flood the area with water that approximates the temperature of a warm or hot beverage. Warn the patient that there will be some pressure, but anesthetizing defeats the purpose. Heat testing should never be performed with a melted stick of wax or an electrically or flame-heated instrument.3This type of heat is difficult to control and may cause pulpal damage in healthy teeth. As soon as the patient feels any type of sensation, remove the stimulus and ask the patient to report their feelings: Is the sensation painful? Does it linger? Is this what they feel when drinking or eating something hot or cold?
Thermal Test: Cold - a cold source is applied to the isolated, dried tooth; intense, lingering pain could indicate a pulpitis (necrotic pulp will not respond). There are several ways to reproduce the sensation of cold. These include a skin refrigerant (such as Endo Ice®), ice pellets, or a CO2 stick. The most effective method, especially through full-coverage restorations, is the CO2 stick.4 This requires a tank of liquid CO2, which may not be feasible. The skin refrigerant is the next-best thing. It is important to maximize the cold sensation. It is recommended that you test the tooth by spraying a fluffed cotton pellet held in a metal forceps and placing it on the buccal surface.
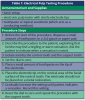
Electrical Pulp Test (EPT) - (see Table 1 for procedure) an electrical stimulus is applied to the tooth to determine whether pulp is vital or nonvital. This should always be used in conjunction with other tests due to possible false readings, and because dying pulp may produce a variety of responses (higher readings indicate greater current to the tooth, and possible pulpitis or necrosis). Although the use an EPT can establish pulp responsiveness, the numerical readout should not be used to determine the overall health of the pulp.5 For example, if tooth No. 6 has an EPT reading of 10 and tooth No. 7 has an EPT reading of 22, it does not mean tooth No. 6 is twice as vital as tooth No. 7. Remember, the EPT is used to determine whether the pulp is vital and when using an EPT, the dental provider must be aware that teeth with metal restorations can give false-positive or false-negative responses. The EPT cannot be used on restorations (for accuracy of readings) and is not reliable when placed too close to the gingiva.6 Ideally, the area should be isolated and the tooth dry. A conducting medium, such as topical anesthetic or toothpaste, should be used and the patient instructed to raise a hand as soon as any sensation is felt. Testing a normal tooth first is good to give the patient a baseline of what the test feels like, even if it is not an adjacent tooth.
Diagnostic Conclusions to Determine Pulpal Diagnosis
By using the symptoms and signs gathered, the dentist will make a diagnosis regarding the state of the pulp. The pulpal nerve fibers, A-delta (which respond to cold and the EPT) and C-fibers (which respond to heat and elicit the nerve response when a patient reports spontaneous tooth pain), are nociceptors. Nociceptors are sensory receptors that respond to stimuli by sending nerve signals to the brain. This stimulus can cause the perception of pain in an individual.7
By objectively testing the pulpal nerve fibers, a dentist can best determine pulpal status. Below are the current pulpal diagnosis terminologies.8
• Normal pulp tests within normal limits to cold. Clinically, a patient will respond to a cold stimulus, and after the stimulus is removed, the cold sensation will dissipate immediately. The length of time it takes for a patient to respond to cold has no correlation to the diagnosis and therefore does not need to be recorded. The pulp is not inflamed, and there are no signs or symptoms of pulpitis.
o Concussed pulp - the pulp may be concussed following trauma to the tooth and may not respond to thermal or electrical stimulation for a period of weeks or months. The tooth should be checked at regular intervals until the pulp tests return to normal; root-canal treatment should only be considered in conjunction with a second sign of pulp necrosis and infection, namely, periapical change.
• Reversible pulpitis is pain from an inflamed pulp that can be treated without the removal of the pulp tissue as it is still vital. It is not a disease, but a symptom. Classic clinical symptoms are sharp, quick pain that goes away as soon as the stimulus is removed. Physiologically, it is the A-delta fibers that are firing, not the C-fibers of the pulp.9 A-delta fibers are the myelinated, low-threshold, sharp/pricking pain nerve fibers that reside principally in the pulp-dentin junction. They can be stimulated by cold and the EPT and cannot survive in a hypoxic environment. Reversible pulpitis also does not involve a spontaneous response. Treatment consists of removal of the irritant. The diagnosis is based on subjective and objective findings.10
• Irreversible pulpitis - the pulp is highly inflamed but still vital; it is incapable of recovery. The patient exhibits lingering pain upon thermal stimuli. Endodontic treatment is required.
o Symptomatic irreversible pulpitis is an inflamed pulp that cannot be treated except by the removal of the pulp tissue. Classic clinical symptoms are lingering of cold/hot stimulus greater than 5 seconds and/or patient reporting of spontaneous tooth pain. Physiologically, the A-delta fibers and/or the C-fibers can fire the neural impulses. C-fibers are the unmyelinated, high-threshold, aching-pain nerve fibers. They are distributed throughout the pulp. They are stimulated by heat and can survive in a hypoxic environment. The diagnosis is based on subjective and objective findings.10
o Asymptomatic irreversible pulpitis is a vital pulp that is incapable of healing, and endodontic treatment is consequently indicated. Even though asymptomatic irreversible pulpitis is really a histologic diagnosis to determine the inflammatory extent of the pulp, clinical examples of this diagnosis include a pulp polyp and internal resorption. The diagnosis is based on subjective and objective findings.10
• Pulpal necrosis can result from an untreated irreversible pulpitis or immediately after a traumatic injury that disrupts the vascular system of the pulp. A necrotic pulp does not respond to cold tests, EPT, or heat tests, is partially or totally nonvital and is incapable of recovery. Endodontic treatment is required to keep the tooth. The diagnosis is based on subjective and objective findings.11
• Previously treated - a tooth that has already been endodontically treated is a clinical diagnostic category indicating that the canals are obturated with various filling materials other than intracanal medicaments. The tooth usually does not respond to thermal or electric pulp testing.
• Previously initiated therapy - is a clinical diagnostic category indicating that the tooth has been previously treated by partial endodontic therapy such as pulpotomy or pulpectomy, but not obturated. Depending on the level of therapy, the tooth may or may not respond to pulp testing modalities.
Periradicular Diagnosis
When clinicians perform restorative or endodontic treatment, they do not often obtain a periradicular diagnosis. However, making a periodontal diagnosis is especially helpful when a patient presents with pain. By objectively testing the periradicular tissue, a dentist can best determine its gingival and periradicular status. These are the current periradicular diagnosis terminologies.8
• Normal periodontal tissue - is not sensitive to percussion or palpation testing. Also, radiographically, the lamina dura surrounding the root is intact and the periodontal ligament space is even. As with pulp testing, comparative testing for percussion and palpation should always begin with normal teeth as a baseline for the patient.
• Asymptomatic apical periodontitis - the tooth has no pain on percussion or palpation and is a result of inflammation and destruction of the apical periodontium that is of pulpal origin. Radiography reveals apical radiolucency.
• Symptomatic apical periodontitis - the tooth has a painful response to biting and/or percussion due to inflammation of the apical periodontium. This may or may not be accompanied by radiographic periradicular changes (depending upon the stage of the disease, there may be normal width of the periodontal ligament or there may be a periapical radiolucency). Severe pain to percussion and/or palpation is highly suggestive of a degenerating pulp and root canal therapy is needed.
• Acute apical abscess - is an inflammatory reaction to pulpal infection and necrosis characterized by rapid onset, spontaneous pain, extreme tenderness of the tooth to pressure, pus formation, and swelling of associated tissues. There may be no radiographic signs of destruction, and the patient often experiences malaise, fever and lymphadenopathy.
o Condensing osteitis is a diffuse radiopaque lesion in the trabecular bone in the periapical region and is a variant of chronic apical periodontitis in response to irritation. The opacity represents a localized osseous reaction to a low-grade inflammatory stimulus. Radiographically, a concentric radiopaque area is seen around the offending root. Treatment is only required if symptoms or pulpal diagnosis indicate a need.
• Chronic apical abscess - is an inflammatory reaction to pulpal infection and necrosis characterized by gradual onset, with little or no discomfort and recurrent discharge of infection called exudate through an associated sinus tract. Radiographically, there are typically signs of osseous destruction such as a radiolucency. To identify the source of a draining sinus tract when present, a gutta-percha cone is carefully placed through the stoma or opening until it stops and a radiograph is taken.
• Resporption - is a condition associated with either physiologic or a pathologic process resulting in a loss of dentin, cementum, and/or bone.11 The etiology for resorption initiates from various injuries to the tooth, including thermal, mechanical, and chemical.12 There are two different kinds of resorption - external and internal.
o External resorption is resorption initiated in the periodontium and initially affecting the external surfaces of a tooth - may be further classified as surface, inflammatory, or replacement, or by location as cervical, lateral, or apical; it may or may not invade the dental pulp space.11
o Internal resorption is an inflammation process initiated within the pulp space with loss of dentin and possible invasion of cementum.12 Internal resorption occurs as a result of chronic pulpitis. The tooth is usually symptomless. Diagnosis is made by the appearance of a smooth widening of the pulp on the radiograph. Root-canal therapy should be carried out without delay.
Endodontic diagnosis can be challenging. Understanding both the pulpal and periradicular diagnoses and how to obtain them are crucial.4 Although it can be frustrating for the patient and the provider, sometimes no treatment until the symptoms localize is the best option.4 It is a better alternative than choosing to perform treatment on tooth 3 and then determining several days later that tooth 2 was the true problem.
ENDODONTIC INSTRUMENTS AND MATERIALS
Endodontic treatment and therapy require the use of a variety of special instruments and materials, which are described below.
Dental Dam Armamentarium
The dental dam is an excellent way to isolate the treatment area. The dental dam keeps the area dry, keeps the oral soft tissues away from the treatment area, provides better visibility because of the contrast between the colors of the dam and the tooth, prevents the patient from inhaling or swallowing debris, and protects the patient's mouth from contact with restorative materials such as acid etchant. The dental dam also serves as a means of infection control, protecting the dentist and the assistant. It decreases the amount of contaminated aerosols to which the dental team is exposed. The ADA recommends the use of the dental dam as a means infection control, because it reduces the quantity of contaminated aerosols emanating from the patient's mouth.13
The latex dental dam cannot be used on a patient who is allergic to latex and this can be done by using a non-latex dental dam. Also, a dam may not be able to be used on a patient with breathing difficulties, or on a patient who is claustrophobic. Partially erupted teeth and teeth that are malaligned (out of alignment or position) would also pose problems.
The armamentarium needed includes:
• Dental Dam Material - supplied in different sizes, thicknesses, and colors; choice is operator's preference. Available in latex and non-latex material.
• Dental Dam Napkin - placed under the dam to prevent dam from contacting patient's face and to absorb moisture.
• Dental Dam Frame - stretches and stabilizes the dam over the oral cavity.
• Dental Dam Stamp - used to indicate where the holes for the teeth to be exposed should be punched.
• Dental Dam Punch - used to punch holes in the dam through which the teeth will be exposed; has a wheel that can be adjusted to make different sized holes for the various teeth.
• Dental Dam Clamp - anchors the dental dam to a tooth that is one or two distal to the tooth/teeth being treated; supplied in various sizes and styles (winged or wingless) depending on which tooth is chosen as an anchor tooth. For the anterior teeth, anterior and cervical clamps are used.
• Lower Molars
W3 - flat jawed, wingless, for small molars
3 - flat jawed, small molars
7A - mandibular molar
7 - flat jawed, all-purpose mandibular molars
12A - serrated jaw clamp, left mandibular molars
13A - serrated jaw clamp, right mandibular molars
26 - slightly reversed, festooned, mandibular molar
28 - flat jawed, mandibular molar
• Upper Molars
4 - small maxillary molars, deciduous teeth
5 - slightly festooned jaws for large maxillary molars
8 - general purpose, maxillary molar
26N - maxillary molar
30 - offset jaws for maxillary right molar
31 - offset jaws for maxillary left
201 - slightly festooned jaws for maxillary molars
205 - slightly festooned jaws for large maxillary molars
• Premolars
0 - flat jaws and high bow for longer premolars
1 - general purpose, maxillary premolar
2A - premolars and maxillary incisors
2 - premolars and maxillary incisors
27N - slightly festooned jaws, premolars
29 - flat jawed, mandibular premolars
• Molars
W8A - downward sloped jaws for small, partially erupted maxillary molars, wingless
8A - downward sloped jaws for small, partially erupted molars
10- flat jawed, designed for small maxillary left and mandibular right molars
14 - downward sloped jaws; for large, partially erupted molars or irregularly shaped molars
18 - flat jawed, stiff bow for molars
24 - flat jawed for maxillary right and mandibular left molars
27 - flat jaws for large molars
56 - universal molar clamp
56 - universal molar clamp
W56 - universal molar clamp, wingless
14A - deeply festooned jaws for partially erupted or irregularly shaped molars
• Anterior
00 - for maxillary and mandibular premolar and anterior teeth
1A - deeply festooned jaws for premolars and canines
9 - strictly for anterior teeth
212 - flat jaws for facial caries on anterior teeth
• Dental Dam Forceps - used to place and remove the clamp from the tooth.
• Dental Floss - used to check the contacts of the teeth prior to dam placement; used to ligate (anchor) the dam to the most anterior tooth; used to ease the dam through tight contacts; used to ligate dental dam clamp (a piece about 18" long is tied to clamp before clamp is placed; acts as a "safety line" should clamp become dislodged from tooth).
• Water-Based Lubricant - placed on back side of dam to help the dam slip more easily over the teeth.
• Inverting or Tucking Instrument - used to turn under the edge of the dam that is around the tooth (can use a plastic instrument).
• Scissors - used to cut the interseptal (between the teeth) dam during removal of the dam.
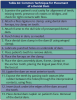
In some states, the dental assistant is allowed to place the dental dam, while in others, she/he is only allowed to assist the dentist in placement. The dam is placed following administration of local anesthetic (Table 2A, Table 2B).
Cutting and Locating Instruments
For many years the standard cutting instruments have been the reamer, K-type file and Hedstrom file. These root canal preparation instruments have been manufactured to a size and type advised by the International Standards Organization (ISO).
The specifications recommended are complex and differ according to the type of instrument. For most standardized instruments the number refers to its diameter at the tip in one-hundredths of a millimeter; a number 10, for example, means that it has a tip diameter of 0.10 mm. Color coding originally denoted the size, but now represents a sequence of sizes.
All these instruments have a standard 2% taper over their working length.
Recent changes in both metallurgy and endodontic concepts have led to the introduction of a range of new instruments which do not conform to these specifications. These instruments have been widely adopted, and appear to give consistently better results in root canal treatment. However, the conventional 2% taper instruments are essential for the initial exploration of most root canals, for difficult procedures such as bypassing separated instruments, and for the apical preparation of some difficult canals.
Conventional ‘standardized' instruments are made of steel, which may wear quickly in dentin, and small size files may be regarded as disposable. Although some hand files are now available in a nickel-titanium alloy, which is more resistant to wear than ordinary steel, the increased cost and inability to pre-curve has not led to their widespread use. The majority of these modern files are manufactured with a modified non-aggressive tip to prevent iatrogenic damage to the canal system, and improve performance of the instrument.
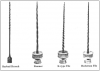
Barbed Broaches (Figure 2)
They are used to remove the pulp tissue from the canal. This instrument has sharp projections or barbs pointing towards the handle. They may be used
to remove the contents of the root canal before beginning the shaping procedures. A vital pulp may be removed when carrying out elective endodontic procedures, or when treating a tooth with an irreversible pulpitis, by introducing the barbed broach deep in the canal, twisting it a quarter to a half turn, and withdrawing. These are disposable and one-time use only.
Files
Files are used to enlarge and smooth the canal. They have long twisted shanks. There are two types: K-type files, and Hedstrom files (Figure 2). Files are available in various lengths and diameters.
• K-type files - These instruments were originally made from a square or triangular blank, machine twisted to form a tight spiral. The angle of the blades or flutes is consequently near a right-angle to the shank, so that either a reaming or a filing action may be used. The K-type file has been subject to continuous development. The K-flex file is made from a rhomboid or diamond shaped blank. The acute angle of this shape provides the instrument with two sharp blades and the narrower diameter allows greater flexibility in the shaft than a conventional K-file. The manufacturers claim that more debris is collected between the blades and therefore removed from the canal than with a standard K-file. The Flex-o-file employs a more flexible type of steel. It does not fracture easily and is so flexible that it is possible to tie a knot in the shank of the smaller sizes.
The latest developments in file design have seen a move away from the ISO standard 2% taper to files with increasing tapers of up to 12%, made in a nickel-titanium alloy. Although most of these new developments are used with an electric motor, hand files of greater taper are available. While most K-type files were originally used with an ‘in-out' circumferential filing technique, the ‘balanced-force' technique is now considered the manipulation method of choice.
• Hedstrom file - is machined from a round tapered blank. A spiral groove is cut into the shank, producing a sharp blade. Only a true filing action should be used with this instrument because of the angle of the blade. There is a strong possibility of fracture if a reaming action is used and the blades are engaged in the dentine. The Hedstrom file is useful for removing gutta-percha root fillings.
Reamers (Figure 2)
Reamers are constructed from a square or triangular blank, machine twisted into a spiral but with fewer cutting flutes than a file. The reamer will only cut dentin when it is rotated in the canal; the mode of action described for its use is a quarter to a half turn to cut dentin, and withdrawal to remove the debris. The stiffness of an instrument increases with each larger size, so that larger reamers in curved canals will tend to cut a wider channel near the apical end of the root canal. Considerable damage may be caused to a root canal by the incorrect use of a reamer, and their routine use is no longer recommended.
Endodontic Explorer
The endodontic explorer has a long, tapered end with a sharp point. It is used to locate the canal openings.
Endodontic Spoon Excavator (Figure 1)
This excavator is similar to other excavators, except that it has a very long shank to allow the dentist to use the instrument deep inside the canal.
Gates-Glidden Drill
Gates-Glidden drills are rotary instruments used with the slow-speed handpiece. They have a long shank and a football-shaped end. They are used for preparation of the opening of the canal.
Peeso Reamer
Peeso reamers are also used on the slow-speed handpiece. They have long shanks and parallel cutting sides, as opposed to the oval shape of the Gates-Glidden drill. They are used to prepare the canal for a post.
Lentulo Spiral
A lentulo spiral is another rotary instrument used with the slow-speed handpiece. It consists of a long, twisted wire. It is used to place root canal sealer or cement in the canal.
Irrigation and lubrication materials
Once the pulp tissue has been removed, the canal(s) are cleaned biomechanically through the use of a solution of sodium hypochlorite (equal parts of water and household bleach), which is injected into the canal with an irrigating syringe. The irrigating syringe has a bevel on the side of the tip so the solution comes out the side rather than directly out of the tip.
• Sodium hypochlorite - is generally accepted in the practice of endodontics that sodium hypochlorite is the most suitable solution for irrigation of the root canal system. Normal household bleach is approximately 5.5% sodium hypochlorite solution, and this may be diluted with purified water up to five times to the operator's preference. Research has shown that the antibacterial effect is the same for a 0.5% and a 5.0% solution.14 Just remember, the greater the dilution the less effective is the solution at dissolving organic debris in the root canal system.15 The irrigating solution acts as a chelating agent when mixed with root canal paste in the canals.
Great care is essential when using sodium hypochlorite, and dental team members must be aware of the risks and dangers involved in its use. Irrigation under pressure may force the solution through the apical foramen into the periradicular tissues, which may result in a rapid, painful, and serious inflammatory response. The patient will be extremely distressed, and little can be done to relieve the situation which may take several days to resolve. Cases have also been reported where excess pressure on the syringe has resulted in the needle coming loose and hypochlorite spraying over the patient, operator and assistant.
Protective goggles are a must for the patient and treating team. The patient's clothing should also be protected. The practitioner must have appropriate risk assessment procedures in place when such materials are incorporated into their clinical practice.
• Chlorhexidine gluconate solution 0.2% - has a similar antibacterial action, but will not dissolve the organic debris found in parts of the canal system inaccessible to hand instrumentation, such as lateral canals, fins and apical deltas. Although chlorhexidine may not be quite as effective as sodium hypochlorite, its use should not be dismissed.
• EDTA paste (Ethylenediamine tetra-acetic acid) - is a chelating agent which softens the dentin of the canal walls and greatly facilitates canal preparation. EDTA solution may be used as an irrigating agent at the end of the canal preparation phase to assist removal of the smear layer prior to placement of a temporary dressing, or obturation.
• Paper Points - Before the canal is filled, it must be completely dry. This is accomplished by placing absorbent paper points in the canal.
• Root Canal Medications - If the root canal cannot be completed in one appointment, a temporary medication, such as formocresol, is placed in the tooth. A cotton pellet is medicated with the solution, and is then placed in the pulp chamber. A temporary filling is placed over the pellet, which remains in place until the next appointment.
• Gutta Percha Points - Gutta percha is the material that is most commonly used to obturate, or fill, the canal after it has been cleaned and dried. It is a thermoplastic material; it is stiff at room temperature, and becomes soft and pliable when heated.
• Endodontic Spreaders and Pluggers - Spreaders and pluggers (condensors) are used to obturate the canal(s) with gutta percha. They have long, tapered working ends, with the spreaders having pointed ends and the pluggers having flat ends. Spreaders are used to condense the gutta percha laterally against the walls of the canal(s), and pluggers are used to condense the gutta percha vertically in the canal(s).
• Root Canal Sealers - Sealers are placed in the canal with the gutta percha in order to provide a seal at the apical foramen. Root canal sealers play an important role in the obturation of the prepared root canal system. Many proprietary products are available, and are divided into three groups, according to their main constituents: eugenol, non-eugenol and medicated.
• Eugenol - the eugenol-containing group may be divided into sealers based on the Rickert's formula (1931) and those based on Grossman's (1958). The essential difference between the two groups is that Rickert's contains precipitated silver and Grossman's has a barium or bismuth salt as the radiopacifier. The disadvantage of Rickert's sealer is that the silver will stain dentine a dark grey. One of the most widely used sealers in this group is Tubliseal, a two-paste system and, consequently, simple to mix; it does not contain silver. Tubliseal EWT (extended working time) is preferred.
• Non-eugenol sealers - some sealers are manufactured with a calcium hydroxide base instead of zinc oxide/eugenol. This is promoted as having a therapeutic effect, although there has been little reported on this in the endodontic literature. It has been shown, however, that the calcium hydroxide is prone to leakage, which may result in unwanted voids in the seal. Other sealers are manufactured that contain a wide variety of chemicals. AH+ is an epoxy resin base with a bisphenoldiglycidyl ether liquid. It has a long working time and seals well to dentine. The original AH26 initially caused a severe inflammatory response, which subsided after some weeks, but AH+ is far more biocompatible. A glass ionomer cement, Ketac-Endo, is available, which has a relatively low toxicity.
• Medicated - the current thinking is that provided the principles of root canal preparation and filling are observed, there is no justification for the use of therapeutic sealers. The active ingredient in the majority of medicated sealers is paraformaldehyde, which is usually accompanied by a corticosteroid.
Rotary Instruments
Handpieces providing a mechanical movement to the root canal cutting instrument have been available since 1964. Their function was primarily a reciprocating action through 90° and/or a vertical movement, according to the design and make. Because steel files do not have the flexibility necessary for rotary movements in a curved canal without damaging the canal shape, these instruments were never really acceptable in the practice of endodontics.
A totally new concept in canal preparation came with the development of sonic and ultra-sonically activated endodontic handpieces. Much research took place into the mode of action and effectiveness of these machines. It was generally agreed that while the sonic machines were more effective at hard tissue removal, the ultrasonic machines were more effective in irrigation. The piezo-electric machines were found to be more effective than the magnetostrictive. The latter also generated more heat, and irrigation with effective quantities of sodium hypochlorite was found to be difficult. The ultrasonic action causes acoustic microstreaming of the irrigating solution, with an intensive circular fluid movement carried right to the tip of the instrument, found to be very effective at canal debridement. This effect is reduced, however, when the file is constrained by the canal wall.
The main use of these instruments today is in irrigation and debridement, using a freely oscillating file in a sodium hypochlorite filled canal, after thorough mechanical canal shaping.16 Though, the development of nickel-titanium alloy for endodontic instruments has allowed the concept of an engine driven endodontic instrument to be fully explored. The total flexibility of this alloy, and the use of radial lands on the cutting flutes to keep the instrument centered in the canal, permit controlled cutting of the dentine walls. Most major manufacturers have developed a nickel-titanium rotary system. Lightspeed, Profiles, GT Rotary files, FlexMaster, Quantec system, Hero, K3, Protaper, to name a few.
The nickel-titanium systems will generally follow to one of three patterns.
• The system may have a standard ISO tip size sequence, with the instruments being manufactured with an increased taper, usually either 4% or 6%.
• The system may be presented with a single tip size, but with the sequence of file sizes having an increased taper of up to 12%. In order to accommodate this taper in a narrow root canal, the diameter of the instrument is usually limited to 1 mm, giving quite a short functional blade in the greater tapers.
• Both of these new developments may be combined into one system.
Burs
Several types of burs may be required for root canal treatment. Although most are provider specific, the general type of bur will be described below.
• Cutting an access cavity - high speed burs should be used to gain access and shape the cavity. A diamond or tungsten carbide tapered fissure bur is used for initial penetration of the roof of the pulp chamber. A tapered safe-ended diamond or tungsten carbide bur is then used to remove the roof of the pulp chamber without damaging the floor. These burs are one-time use.
• Location of canals - burs should only be used as a last resort to locate a calcified canal because of the danger of perforation. Small round burs
are used; the standard length is usually too short but longer shank burs are available. Specially designed ultrasonic tips may also be used to remove secondary dentine, assist in the identification of canal orifices and in shaping the canal orifice during preparation. The use of ultrasonic tips has become more widespread with the introduction of a wider range of fittings to different piezo-electronic machines. As with all instruments and materials, the manufacturer's instructions and guidance should be carefully followed or these delicate diamond tips may be damaged. It is generally wise to use them with a low power setting, and to ensure that they are in contact with dentin before activating the piezo- electric unit.
• Canal preparation - the use of rotary cutting instruments in a standard handpiece is criticized because of the danger of fracture of the instrument or perforation of the root canal. The exception to this rule is the Gates-Glidden bur, which has a safe-ended tip. In addition, the site of fracture, if it does occur, is almost always near the hub so the fractured piece is easily removed. In the past this bur has been recommended for initial flaring of the coronal portion of the canal. This may now be carried out in a more controlled manner with a nickel-titanium orifice shaper. The Gates-Glidden bur may also be used to make post space and to remove gutta-percha from the canal. Gates-Glidden burs are manufactured in six sizes.
Measurement of working length
There are two established methods of assessing the working length of a root canal: one by radiography and the other with the use of an electronic device apex locator. Once the working length has been confirmed, the individual preparation instruments must be accurately marked to length accordingly.
There are also different stops for the instrument, the most popular being rubber or silicone stops. These should always be placed at right angles to the shank of the instrument. Ideally the stops should be either notched, or pear shaped, so that in curved canals the notch or point of the pear may be directed towards the curve placed in the instrument.
• Rubber Stops - Stops are circular rubber discs with a pre-punched hole in the center. They are placed on the reamers and files to mark the length of
the canal.
Root canal filling instruments
• Spreaders - cold lateral compaction using gutta- percha requires either long-handled or finger spreaders. These have a long, tapered shank with a sharp point. The instrument is used to compact gutta-percha laterally against the walls of the root canal and provide a space for the insertion of further gutta-percha points. There are several sizes available, and these are selected according to the canal size and the size of the gutta-percha point. The choice of long-handled spreaders or finger spreaders depends on personal preference. The advantage of finger spreaders is that less force can be used, and this reduces the risk of root fracture.
• Heat carriers - the application of heat to the gutta-percha filling permits improved lateral and vertical compaction of the softened material. Ordinary hand and finger spreaders are not designed for this purpose. They are of various sizes, and have both a pointed tip for lateral spreading, and a flat tip for vertical compaction.
Magnification
There is no doubt that magnification of the pulp chamber greatly assists in finding and accessing narrow canal orifices, and many practitioners now routinely use loupes. This one purchase has made huge improvements in the quality and ease of endodontic treatment for many practitioners. Indeed, the improved vision gained from the use of loupes improves all aspects of general dental practice, not just endodontics.
ENDODONTIC PROCEDURES
Non-Surgical
Indirect Pulp Capping
This procedure is used when the pulp has not been exposed. It consists of removal of the decay, placement of calcium hydroxide in the preparation, and then placement of a zinc oxide eugenol temporary restoration. Indirect pulp capping should heal the pulp and also stimulate the production of reparative dentin.
Direct Pulp Capping
When the pulp becomes slightly exposed during the preparation, a direct pulp capping may be performed. It consists of removal of the decay, and placement of calcium hydroxide directly onto the exposed pulpal tissue. The patient is informed that there may be future problems with the tooth.
Pulpotomy
A pulpotomy is the removal of the coronal pulp, but it leaves the pulp in the root, leaving this portion of the pulp vital. Most commonly, this procedure is performed on primary teeth with pulp exposures.
Pulpectomy
A pulpectomy is also known as a root canal. It consists of the complete removal of all of the pulp tissues from the tooth.
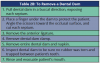
Pulpectomy (Root Canal) Procedure
A root canal usually requires two appointments, though sometimes it can be completed in one, and sometimes it requires more than two appointments. The number of appointments needed will depend on the situation, including the amount of infection and the judgement of the dentist. The basic steps involved in a root canal are described in Table 3.
Surgical Endodontics
A pulpectomy is usually a successful means of treating a tooth with pulpal involvement. Sometimes, however, root canal therapy is not successful or a tooth is not a good candidate for a root canal. In these situations, a surgical procedure may be required. Some common surgical endodontic procedures are described next.
• Incision and Drainage - Emergency treatment of a tooth with a periapical abscess usually consists of drainage of the exudate (pus) through the occlusal surface. Sometimes it is also necessary to make an incision through the alveolar mucosa near the apex of the infected tooth in order to establish drainage. The tooth would be treated with a root canal at a later date.
• Apicoectomy - An apicoectomy involves the surgical removal of the apical portion of the root of the tooth. An incision is made in the alveolar mucosa near the apex of the infected tooth, and the apex of the tooth is removed. The root tip is then filled with a retrograde filling material such as amalgam, gutta percha, zinc oxide eugenol, or composite.
• Root Amputation - A root amputation involves removal of one or more roots of a multirooted tooth, but leaves the crown portion.
• Hemisection - A hemisection involves removal of one root and the overlying crown portion.
• Retreatment - occasionally a tooth that has undergone endodontic treatment fails to heal or pain continues despite therapy. Although rare, sometimes a tooth initially responds to endodontic therapy but becomes painful or infected months or years later. When either of these situations occur, the tooth often can be maintained with a second endodontic treatment. Root canal retreatment is typically completed in two appointments, but the number of visits depends on the patient and diagnosis. Retreating a tooth that has already had endodontic treatment is frequently more difficult than initial root canal treatments. Root canal filling materials need to be removed as well as any material placed in the canals for support such as posts. Previously root canal treated teeth often have obstructions that may need to be overcome to completely clean the root canal system. These obstructions include ledges, calcifications, separated instruments or difficult to remove filling materials.
CONCLUSION
Although the clinical advances and changes in thought within the field of endodontics have been significant in recent years, general dentists and associated professionals who become educated on the changes will remain up-to-date. By explaining currently accepted practices in endodontics regarding diagnosis, local anesthesia, instrumentation/obturation, and pain medications and antibiotics, this course serves as a guide for clinicians to stay updated in the field.
REFERENCES
1. 108. Miyasaki-Ching, Cara M. Chasteen's Essentials of Clinical Dental Assisting. 5th ed., St. Louis: Mosby, 1997.
2. Accessed November 30, 2018.
3. Effects of thermal vitality tests on human dental pulp.https://www.jendodon.com/article/S0099-2399(88)80104-3/ Accessed November30, 2018.
4. Cold testing through full-coverage restorations.https://www.ncbi.nlm.nih.gov/pubmed/1544846. Accessed November 30, 2018.
5. Endodontic diagnostic procedures and classifications.https://www.dentistryiq.com/articles/wdj/print/volume-5/issue-4/you-and-your-practice/endodontic-diagnostic-procedures-and-classifications.html Accessed November 30, 2018.
6. Reliability and validity of a digital pulp tester as a test standard for measuring sensory perception.https://www.sciencedirect.com/science/article/pii/S0099239988801973. Accessed November 30, 2018.
7. Ability of Cone-beam Computed Tomography to Detect Periapical Lesions That Were Not Detected by Periapical Radiography: A Retrospective Assessment According to Tooth Group.https://www.ncbi.nlm.nih.gov/pubmed/27372162 Accessed November 30, 2018.
8. Mattscheck D, Law AS, Nixdorf DR. Diagnosis of nonodontogenic toothache.In: Hargreaves KM, Berman LH, Rotstein I, eds. Cohen's Pathways of the Pulp. 11th ed. St. Louis, MO: Mosby Elsevier; 2016.
9. Glickman GN. AAE Consensus Conference on Diagnostic Terminology: background and perspectives. J Endod. 2009 Dec;35(12):1619-20. doi: 10.1016/j.joen.2009.09.029.
10. Kim S. Neurovascular interactions in the dental pulp in health and inflammation.J Endod. 1990 Feb;16(2):48-53. doi: 10.1016/S0099-2399(06)81563-3. https://www.ncbi.nlm.nih.gov/pubmed/2201743 Accessed November 30, 2018.
11. https://www.aae.org/specialty/wp-content/uploads/sites/2/2017/07/endodonticdiagnosisfall2013.pdf Accessed November 30, 2018.
12. American Association of Endodontics, Glossary of endodontic terms 2015.www.aae.org/glossary
13. Finkbeiner, Betty Ladley, and Johnson, Claudia Sullens. Mosby's Comprehensive Dental Assisting: A Clinical Approach. St. Louis: Mosby, 1995.
14. Nilsson E, Bonte E, Bayet F, Lasfargues J. Management of internal root resorption on permanent teeth.International Journal of Dentistry. https://www.hindawi.com/journals/ijd/2013/929486/ Accessed November 30, 2018.
15. The synergistic relationship between ultrasound and sodium hypochlorite: a scanning electron microscope evaluation.https://www.ncbi.nlm.nih.gov/pubmed/3482099. Accessed November 30, 2018.
16. Bacteriologic evaluation of the effect of 0.5 percent sodium hypochlorite in endodontic therapy.https://www.ncbi.nlm.nih.gov/pubmed/6572884 Accessed November 30, 2018
ABOUT THE AUTHOR
The original author of #613 General Chairside Assisting: A Review for a National General Chairside Examwas:
Antoinette P. Metivier, BS, was an assistant professor in the Dental Assisting Department at the New Hampshire Institute in Concord, NH where she taught dental radiology. She attended the North Carolina's Dental Radiology Institute for Dental Educators and developed and presented radiology review courses for the New Hampshire Dental Assistants Association.
The course was later completely revised by:
Kimberly Bland, CDA, EDDA, MS, has served as ADAA's Fifth District Trustee, national Secretary, national Vice President, national President Elect and twice as ADAA President (2007-2008; 2014-2016). She has held several offices in both the local and state ADAA organizations, having been President of the Florida Dental Assistants Association for three terms and is past president of the Sara-Mana Dental Assistants Society of Florida. She was a founding member of the Professional Dental Assistants Educational Foundation (PDAEF) and continues to remain active with national activities.
Ms. Bland is a member of the Florida Board of Dentistry Dental Assisting Council and has held offices in the Florida Allied Dental Educators Association and as Florida Region V Post-Secondary Advisor of the Florida Health Occupation Students of America (HOSA). Kimberly is a graduate of the University of South Florida, where she majored in Industrial Technical Education. Earlier, she earned her Dental Assisting Certificate at Manatee Technical Institute where she is now the dental assisting program director.
The dental specialties section was removed from the original #613 General Chairside Assisting: A Review for a National General Chairside Examas a standalone course and was reviewed and developed by:
Natalie Kaweckyj, LDA, RF, CDA, CDPMA, COA, COMSA, CPFDA, CRFDA, MADAA, BA- began her dental assisting career over 28 years ago after graduating from the CODA accredited program ConCorde Career Institute. She spent twelve years working in a private practice where she worked clinically nine years and administratively the remaining three. She then moved onto teaching dental assisting and eventually became director of that program. Over lapping with teaching, Natalie began her tenure with Children's Dental Services in 2007 in management and currently serves as clinical coordinator responsible for the day to day operations at over 600 locations where services are provided throughout Minnesota. Natalie enjoys the challenges of the public health sector and is gratified in serving those that are underserved, especially in a hospital setting under general anesthesia. With over a decade of restorative functions experience under her belt, she enjoys working with professionals new to dentistry as her love for teaching comes into play with the utilization of clinicians to the full scope of their licenses. The clinic keeps Natalie busy with billing management when not at the hospital. Natalie also graduated with a BA in Biology and Psychology from Metropolitan State University in 2005.
Ms. Kaweckyj served two terms as ADAA President (2017-2018; 2010-2011). She remains active on several councils, and served as a President of the Professional Dental Assistants Educational Foundation (PDAEF). She served as a three-term president for MnDAA and remains as the state business secretary. Natalie has been recognized with several ADAA awards, was one of the first ADAA Fellows in 1999 and became the first ADAA Master in 2004. She has published numerous continuing education courses, over 250 articles and lectures on a variety of dental subjects locally, nationally and internationally. Organized dentistry gave Natalie the insight that you can make a difference as a dental professional, and she was instrumental in seeing licensure for dental assistants come to fruition in MN in 2009 as well as several expanded functions. Her dream would be to see mandatory credentialing become a reality in all states for protection of the public and maintaining integrity of the dental assisting profession.