You must be signed in to read the rest of this article.
Registration on CDEWorld is free. Sign up today!
Forgot your password? Click Here!
Endosseous osseointegrated implants have gained in popularity among edentulous individuals based on their ability to stabilize, retain, and support full-arch overdentures or full-arch restorations.1-3 By eliminating the disadvantages associated with conventional removable dentures, implant-retained or supported prostheses contribute to many positive life-altering benefits for edentulous individuals, including a better ability to eat the foods they want for enhanced nutritional intake; improved comfort by eliminating movement and sore spots; and greater self-confidence, enhanced facial esthetics, and self-esteem.1,4,5
Success of implant-supported or -retained prostheses, in general, is predicated on meticulous patient selection and preplanning multiple treatment aspects. Patient selection criteria must consider the individual's oral health status, periodontal risk, hygiene habits and ability, and potential occlusal issues. Prosthetic considerations include, but are not limited to, restoration design; implant type, width, and length; implant location and angulation; and abutment/connection type.6,7 Then, employing excellent surgical techniques and controlling conditions that could affect treatment longevity (eg, retained cement, divergent abutment/connection angles, nonpassive fit) will help to ensure clinical success.8
However, despite diligent treatment planning and efforts to mitigate complications, dental implants occasionally fail, without any specific indication or the clinician's ability to determine which implant will fail, if any.8 This situation is particularly troublesome in cases involving late implant failures that occur after implant osseointegration. Late implant failures have been associated with moderate to severe bone loss, a larger number of failed implants per patient, a higher incidence in male patients, and occurrence mostly in posterior areas.9 They have also been associated with functional occlusal overload when implant failure involves fracture of the components of the implant restoration, whether a single restoration or a mandibular overdenture retained by two implants.10
In cases involving full-arch implant-supported restorations, late implant failure can be particularly catastrophic due to the implant failure's impact on the prosthetic component of treatment. For example, the complete loss of an implant in a full-arch prosthesis supported by four implants will render the treatment unstable. Alternatively, the catastrophic loss of an implant may limit the size or extension of the planned or already functioning prosthesis.
Therefore, the quandary that clinicians face is ascertaining whether sufficient implants remain in the appropriate location to support and sustain the original prosthesis. If so, depending on the nature of the failure, the failing implant can be removed or covered,11 and the original prosthesis can be secured to the remaining implants. If not, the challenge becomes determining whether a new implant can be placed, either at or to the mesial or distal aspect of the failed site, in addition to how best to alter the existing prosthesis so it will be acceptable to the patient in consideration of the new implant.
For patients, late implant failure is synonymous with additional costs, procedures, and recovery time.12 Considering that pain, cost, and recovery time are among the three key concerns for patients facing any implant procedure,3 it behooves clinicians to familiarize themselves with simplified, cost-effective chairside procedures for salvaging implant-supported fixed full-arch prostheses for those instances when implant failures occur.
Novel Attachment System for Salvaging a Screw-Retained Prosthesis
LOCATOR removable attachments for retaining implant overdentures have become an increasingly routine, lower-cost alternative to more complex and costly fixed implant prosthetic options.13 Contributing to their routine use are simple, predictable, and efficient chairside processing techniques, in addition to subsequently decreased laboratory fees, appointments, and chair time.13 Building upon the success of the LOCATOR removable attachments, Zest Dental Solutions has developed a new fixed attachment system that does not require the use of screws or cement. The new LOCATOR F-Tx® Fixed Attachment System is indicated for the rigid connection of partial (with cross-arch stabilization) and full-arch restorations on endosseous dental implants in the maxilla or mandible and can be used to stabilize newly fabricated full-arch restorations (eg, PMMA, zirconia) or convert a patient's existing full denture to a temporary fixed bridge. LOCATOR F-Tx abutments demonstrate a spherical coronal geometry that, in conjunction with a Denture Attachment Housing, can be tilted and rotated up to 20 degrees from a common vertical. This allows for positioning in the ideal location and angulation for the prosthesis, without the need for an angled abutment utilized in off-axis implant placement for screw- or cement-retained options.15,16 The LOCATOR F-Tx attachment system eliminates this need for angled abutments and ensures a stress-free, passive fit of the prosthesis.
These characteristics have beneficial implications for salvaging full-arch restorations after implant failure and placement of a new implant in the same site. The following cases demonstrate the treatment planning and chairside protocol involved with using a unique attachment system to salvage full-arch implant-supported restorations after late implant failures.
Case Presentation 1
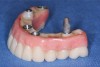
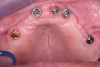
A 61-year-old man residing in Ohio was referred to the author's New Jersey practice for diagnosis and treatment of a failing maxillary hybrid prosthesis (Figure 1). The patient's maxillary teeth had been extracted in June 2011, when five implants were placed. Restoration of the maxillary arch was completed in April 2012. Aside from a sensitivity to aspirin and taking 20 mg of atorvastatin per day, the patient's medical history was negative.
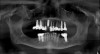
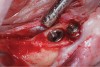
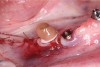
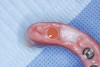
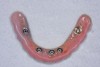
When the patient presented in March 2016, the definitive hybrid (fixed-removable) prosthesis was removed, revealing radiographic and clinical evidence of a failed implant in the area of tooth No. 13 (Figure 2). The patient returned in May, at which time the maxillary prosthesis was removed and the implant at site No. 13 explanted. The site was curetted, and a wider-diameter implant was immediately inserted into the explanted site, producing excellent primary stability. A healing abutment was then placed on the new implant, and the existing framework was modified, allowing the healing abutment to provide an occlusal stop on the underside of the framework (Figure 3 and Figure 4).
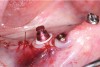
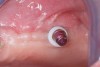
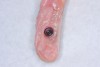
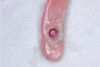
The patient returned in August 2016, when the maxillary prosthesis and healing abutment were removed. A LOCATOR F-Tx abutment was placed into the implant at No. 13 (Figure 5).
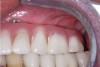
The existing prosthesis framework was then modified, and the system denture attachment housing was luted to the framework using a chairside acrylic material (Figure 6). The underside of the prosthesis was cleaned, adjusted, and polished (Figure 7). The prosthesis was delivered using a medium PEEK retention ball (tan) to secure the prosthesis at this site, snapping into the abutment; the remainder of the prosthesis continued to be retained by prosthetic screws in the sites with screw-retained abutments (Figure 8). A postoperative radiograph confirmed osseointegration (Figure 9), and a left-lateral close-up view illustrated the ideal esthetics and fit achieved with the LOCATOR F-Tx fixed attachment. (Figure 10).
Case Presentation 2
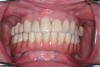
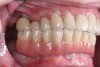
A 74-year-old woman was referred for treatment of extensive and unesthetic wear of her mandibular teeth (Figure 11 and Figure 12). Her left posterior tooth and right posterior and premolar teeth were implants; three different implant systems had been previously placed by the same dentist on the same day. Her maxillary teeth had been previously restored with zirconia full-coverage restorations.
The treatment plan proposed and accepted by the patient involved extracting her remaining mandibular teeth, placing three additional implants, and providing a full-arch implant-supported prosthesis. An alternative that was also presented was completely rehabilitating her lower arch, which would have required endodontic treatment of all remaining teeth, extensive prosthetic work on the existing implants and natural teeth, and substantial cost.
Immediate Load and Provisionalization
An immediate load of the lower arch was performed after three additional implants were placed. The patient wore an immediate provisional for 6 months, but due to her very aggressive grinding and clenching habit and despite wearing an occlusal night guard, the prosthesis was replaced because she wore the occlusal surface down to the metal frame. A second provisional prosthesis was provided that the patient also wore down after approximately 14 months.
Prototype and Zirconia Overdenture Fabrication
Therefore, the patient was advised that a full zirconia screw-retained prosthesis would be best to help prevent continued destruction. A polymethyl methacrylate (PMMA) acrylic prototype screw-retained bridge was first made by the laboratory using a digital scan of the tooth setup, which enabled the patient to function for 2 months and approve the anticipated size, color, and shape of the proposed zirconia definitive prosthesis. Any occlusal adjustments required could also be made.
After it was determined that all aspects of the PMMA prototype were acceptable, the laboratory was instructed to proceed with milling the definitive full-arch zirconia screw-retained bridge using the previously acquired scan file. No occlusal adjustments were necessary.
On completion of the full zirconia screw-retained bridge, the patient returned for the delivery appointment and requested anesthesia during placement. She indicated she had felt a slight “twinge” on the lower right side during previous appointments when checking her bite.
Anesthesia was administered, after which the retaining screws were removed from the PMMA interim screw-retained prosthesis beginning at the distal left. However, the distal right screw could not be removed; the prosthesis and implant came out as one unit after pulling (Figure 13). Based on the distance between where the implant had been and where the next implant was in the front (ie, one of the newly placed implants), engagement of the interim screw-retained prosthesis would now have to occur at the previously placed implant site. However, because the laboratory advised that the implant at that site should be buried, resulting in a potentially large cantilever on the posterior right side, three options were considered:
1. Attempt to place an implant further back, which was contraindicated due to the patient's insufficient bone in that area.
2. Place a new implant at the site of the failed implant if sufficient bone remained, either buccally or lingually.
3. Graft the failed implant site and replace failed implant with a new implant in the same position after healing takes place in the grafted site.
Immediate PMMA Retrofitting
A new computed tomography (CT) scan was taken to ascertain the location and amount of available bone and identify the location of the alveolar nerve. It was determined that the best approach would be curetting the failed implant site and placing a new, larger (ie, wider and longer) implant. All granulation tissue was curetted from the implant site and, without drilling an osteotomy, a new tapered implant was threaded into the site. The new implant must be placed within 20 degrees of the path of insertion of the existing prosthesis. The implant at No. 28 was not compatible with the full-arch zirconia protocol because of its restorative limitations, so the screw-retained abutment was removed and replaced with an implant cover screw to take this implant out of service for the restoration. (Figure 14).
Enabling the patient to continue functioning with the existing PMMA screw-retained prosthesis required “salvaging” or “retrofitting” it to accommodate the new implant arrangement. This was easily accomplished using a LOCATOR F-Tx Fixed Attachment System that supports full-arch restorations on endosseous dental implants without prosthetic screws or cement.
The spherical abutment of the appropriate cuff height was selected and torqued into place using a dedicated abutment driver (Figure 15). Considering the need to immediately retrofit the patient's PMMA screw-retained bridge, as well as anticipate retrofitting the already fabricated full zirconia prosthesis, using an abutment with a spherical geometry that enables the denture attachment housing to pivot in any direction would be significant to ensuring a stress-free, passive fit and proper prosthesis alignment.17,18
After achieving primary closure with a 4.0 chrome gut suture (Figure 16), a denture attachment housing and white spacer were placed onto the LOCATOR F-Tx abutment and pivoted into the correct orientation (Figure 17), creating an easily drawn path of insertion and removal for the PMMA prosthesis. To limit vertical and rotational movement, contribute to stability, and lock the prosthesis into place, the denture attachment housing features grooves and flats that ensure the housings remain locked into place within the prosthesis. Internally threaded to accept polyether ether ketone (PEEK) retention balls and a processing ball that snaps into the abutment, the attachment housing eliminates otherwise intensive chairside procedures to retain the screw-retained prosthesis.
To retrofit and salvage the PMMA prosthesis, a slow-speed handpiece and trephine bur were used to remove the screw-retained metal cylinder embedded in the interim prosthesis at the failed implant site. After removal, CHAIRSIDE Attachment Processing Material was placed into the recess created within the prosthesis and onto the denture attachment housing.
The existing prosthesis was then seated into the patient's mouth, engaging the ball into the abutment and then securing the rest of the prosthesis using the existing prosthetic screws for the screw-retained abutments (Figure 18). The patient closed into light occlusion and held that position while the material set. To accelerate setting, an ultraviolet (UV) light was used for two 20-second cycles each from the buccal and lingual aspects. The screws were then removed, after which the prosthesis was removed. The prosthesis was then disengaged from the LOCATOR F-Tx abutment disconnecting the black processing ball captured in the denture attachment housing, now picked up in the newly hollowed-out recess in the existing prosthesis.
The black processing ball was removed and replaced with a protective polishing cap using the dedicated retention ball hex driver, and any voids present around the denture attachment housing were back-filled with additional material and light-activated. A polishing bur was used to remove any excess material and to polish the intaglio surface. The polishing cap was removed, and green PEEK high retention ball was selected.
The prosthesis was then seated by first engaging the green retention ball in the LOCATOR F-Tx abutment and then maneuvering the prosthesis so the cylinders align over the screw-retained abutments. The prosthetic retaining screws were reattached to the screw-retained abutments securing the prosthesis to the rest of the implants. The patient was dismissed and allowed to heal for 3 months.
Retrofitting a Full Zirconia Restoration
After 3 months, radiographs confirmed that the new rescue implant demonstrated excellent bone up to the platform, so the decision was made to replace the salvaged PMMA overdenture with the definitive full zirconia restoration. However, rather than mill a new restoration without the screw metal cylinder at the failed implant site, the patient agreed to try to salvage the previously fabricated full zirconia prosthesis and the metal screw-retained cylinder was drilled out of the prosthesis creating a recess to accept the denture attachment housing of the LOCATOR F-Tx Fixed Attachment System.
The right distal implant screw cylinder was drilled out, without fracturing the zirconia. To gauge the size required of the new recess hole, a denture attachment housing was placed on an analogue, and attempts to insert it into the recess indicated that a larger hole was required. The recess was enlarged to seat the entire denture attachment housing, and the intaglio surface of the zirconia restoration was adjusted to accommodate the cover screw of the buried implant and allow proper seating.
Intraorally, a new denture attachment housing and white spacer were placed onto the LOCATOR F-Tx abutment and pivoted into the correct position and angulation. To prepare the enlarged recess for the addition of the chairside attachment material, which otherwise could not be bonded to the zirconia restoration, a diamond bur was used to undermine the recess walls, similarly to a 360° undercut. The dual/light-cured material was placed into the recess and allowed to set (Figure 19). Although the UV light would not penetrate the zirconia to cure the material in the recess, it was used for curing any excess flash material.
As in the process followed for the PMMA interim prosthesis, the full zirconia restoration was seated into the patient's mouth, placed onto the denture attachment housing, and secured in place to the remaining screw-retained abutments using the prosthetic retention screws. After 20 minutes, the screws were removed, and the prosthesis was removed by dislodging the black processing ball attachment that was picked up in the denture attachment housing (Figure 20).
Chairside processing of the full zirconia prosthesis continued according to the protocol followed for the PMMA interim fixed prosthesis. The black processing ball was removed and replaced with a protective polishing cap, excess flash material was removed with a laboratory bur and polishing wheel, and the polishing protector was replaced with a high-retentive green PEEK retention ball.
Delivering the Salvaged Full Zirconia Prosthesis
The retrofitted and salvaged full zirconia prosthesis was then reseated; proper and full seating of the green retentive ball was confirmed by an audible clicking sound. The prosthesis was then secured to the screw-retained abutments. The screw access holes were then sealed using polytetrafluoroethylene tape and either pink (eg, in gingival areas) or tooth-colored (eg, premolar area) acrylic material (Figure 21 and Figure 22). Considering the patient's aggressive grinding habit, her occlusal night guard was adjusted to ensure a correct fit to the new prosthesis.
Conclusion
The value, service, and benefits of salvaging implant-supported prostheses cannot be overstated. After patients endure initial extractions and implant placement, along with immediate load and function of their arch(es), and anticipate or undergo delivery of their final prosthesis, a late implant failure after osseointegration can be costly, time-consuming, and disheartening. As demonstrated in the cases presented in this article, the use the LOCATOR F-Tx Fixed Attachment System as a cost-effective, efficient, and predictable approach to salvaging full-arch restorations after late implant failure has promising and beneficial implications.
About the Authors
Alan M. Meltzer, DMD, MScD
Clinical Professor, Division of Post Graduate Periodontics, University of Pennsylvania, Philadelphia, Pennsylvania; Private Practice in Periodontics and Implant Dentistry, Voorhees, New Jersey
Robert Del Castillo, DMD
Private Practice Limited to Periodontics, Implant, and Regenerative Therapies, Miami Lakes, Florida
References
1. Vogel RC. Implant overdentures: a new standard of care for edentulous patients—current concepts and techniques. Compend Contin Educ Dent. 2008;29(5):270-276.
2. Little D, Apparicio T. Aesthetic denture rehabilitation. Dent Today. 2012;31(1):120-123.
3. DiMatteo A. Dentures and implants: bringing them
together for a winning combination. Inside Dentistry. 2009;5(1):97-104.
4. Morais JA, Heydecke G, Pawliuk J, et al. The effects of mandibular two-implant overdentures on nutrition in elderly edentulous individuals. J Dent Res. 2003;82(1):53-58.
5. Heydecke G, Thomason JM, Lund JP, Feine JS. The impact of conventional and implant supported prostheses on social and sexual activities in edentulous adults: results from a randomized trial 2 months after treatment. J Dent. 2005;33(8):649-657.
6. Rossi R, Morales RS, Frascaria M, et al. Planning implants in the esthetic zone using a new implant 3D navigation system. Eur J Esthet Dent. 2010;5(2):172-188.
7. Tischler M. Treatment planning implant dentistry: an overview for the general dentist. Gen Dent. 2010;58(5):368-374.
8. Ashley ET, Covington LL, Bishop BG, Breault LG. Ailing and failing endosseous dental implants: a literature review. J Contemp Dent Pract. 2003;4(2):35-50.
9. Manor Y, Oubaid S, Mardinger O, et al. Characteristics of early versus late implant failure: a retrospective study. J Oral Maxillofac Surg. 2009;67(12):2649-2652.
10. Di Iorio D, Sinjari B, Feragalli B, Murmura G. Biomechanical aspects in late implant failures: scanning electron microscopy analysis of four clinical cases. J Contemp Dent Pract. 2011;12(5):356-360.
11. Yilmaz B, McGlumphy E. A technique to salvage a single implant-supported fixed dental prosthesis having a nonretrievable implant screw fragment. J Oral Implantol. 2013;39(1):
81-83.
12. Levin L. Dealing with dental implant failures. J Appl Oral Sci. 2008;16(3):171-175.
13. Priest G. Efficient placement of implant overdenture attachments. Dent Today. 2011;30(12):58-60, 62.
14. Strong SM. The spare implant overdenture: retrofitting an existing denture to Locator attachments. Gen Dent. 2011;59(1):20-22.
15. Wilson TG Jr. The positive relationship between excess cement and peri-implant disease: a prospective clinical endoscopic study. J Periodontol. 2009;80(9):1388-1392.
16. Linkevicius T, Puisys A, Vindasiute E, et al. Does residual cement around implant-supported restorations cause peri-implant disease? A retrospective case analysis. Clin Oral Implants Res. 2013;24(11):1179-1184.
17. Ferrare N, Leite AF, Caracas HC, et al. Cone-beam computed tomography and microtomography for alveolar bone measurements. Surg Radiol Anat. 2013;35(6):495-502.
18. Van Assche N, van Steenberghe D, Guerrero ME, et al. Accuracy of implant placement based on pre-surgical planning of three-dimensional cone-beam images: a pilot study. J Clin Periodontol. 2007;34(9):816-821.