You must be signed in to read the rest of this article.
Registration on CDEWorld is free. Sign up today!
Forgot your password? Click Here!
Only in dentistry does one get a second chance to make a good first impression. Among the over 600 hundred brands of impression material,1 produced by over 30 manufacturers, one might think that there would be at least one ideal product, which would produce the perfect impression every time. Clinicians spend much of their time trying different materials and methods searching for the right technique. On his instructional videotape “The Perfect Impression,” Gordon Christensen, DDS, MSD, PhD, made the statement, “40,000,000 impressions are taken each year; 90% do not have all margins taken. Therefore, there are 36,000,000 crowns that do not have all margins taken each year.” As a dentist/laboratory technician, I can concur with that statement, although I did not realize the number was that high. Comments from practicing dentists to laboratory technicians as to how to handle voids in impressions have been remarkable and range from, “I pay you the big bucks to find the margins,” to, “Just connect the dots.”
Taking an impression is a craft and, as with any other skill, proficiency comes from practice but first, the technique to practice must be decided upon. Otherwise, we can wander through our entire dental career trying every technique and never achieving sufficient confidence in any one particular one.
History of the Dental Impression
Beeswax, used by a German surgeon,2 is the first referenced material used to make dental impressions. Although a poor impression material by today’s standards, it was capable of being removed from undercut areas in the mouth.3 Other materials were introduced in the 1800s, including gutta percha and plaster of Paris. The name, plaster of Paris, was coined from a large gypsum deposit found at Montmartre in Paris, France.4 It was commonly used up to the 1900s, and was often fractured in order to remove it from undercuts, then reassembled outside the mouth.5 In England in 1857, Charles Stent combined gutta percha with an animal fat (stearine) and talc to develop a modeling compound.6,7 This became a popular impression material, especially when used with copper bands.3
A colloid made from seaweed (agar-agar) was the main ingredient of reversible hydrocolloid, and was patented by an Austrian named Alphons Poller.8 This was the first flexible material that could be removed from undercut areas and retain its memory. It was used only for complete dentures until 1935, when AW Sears advocated its use for impressions for fixed partial dentures.9
Since most of the agar-agar material came from Japan and became scare during World War II, irreversible hydrocolloid, known as alginate (salts of alginic acid), was developed.10 The agar (reversible hydrocolloid) and the alginate (irreversible hydrocolloid) impression materials are both elastic and hydrophilic11 but they have two disadvantages: (1) they must be poured immediately since the loss of water, if left in a dry environment, would cause dimensional instability; and (2) they have poor tear strength, which is a problem when recording thin areas such as the gingival sulcus.12 These two hydrocolloid materials were used exclusively until the introduction of polysulfide material in 1953.13 First developed as an industrial sealant for gaps between sectional concrete structures,14 this polysulfide material gained popularity quickly because it reduced the two main problems associated with the hydrocolloids.12 Some disadvantages remained, however: it was messy to use, had a foul odor, and molds were sensitive to distortion if there was any delay before pouring the model. The setting reaction continued to occur even after removal from the mouth, which resulted in the material shrinking towards the tray causing dies to be wider and shorter than the ideal.
In 1ate 1965, polyether impression material was introduced.15 This material had the necessary feature of being hydrophilic and, therefore, is more forgiving in a wet environment.12 An additional advantage to the polyether material is that it undergoes a cure polymerization reaction upon setting, which has no unstable molecular by-product, resulting in good dimensional stability.12 The elastic modulus of the polyether is high, resulting in a very rigid material, which is why it can be more difficult to remove from the mouth and the stone cast.
In the early 1960s, silicone impression materials that cured through condensation were introduced. These materials also had dimensional changes occurring after removal from the mouth because of the evaporation of the ethyl alcohol by-product, but their use was justified because the changes were less than was seen with alginates. The dimensional stability grew worse the longer the delay in pouring the impression (sufficient stability was maintained only for about 6 hours).14 This created a problem in sending the impression to the laboratory by mail.
A more dimensionally stable impression material (polyvinyl siloxane) that set by an additional cured polymerization reaction was introduced in the 1970s.16 This impression material does have a by-product from the polymerization reaction (hydrogen gas) but has a dimensional change of nearly zero during the reaction.17 Both types of silicones have good elastic properties but were very hydrophobic. Some manufacturers have concentrated on creating a more hydrophilic version with the addition of surfactants.
Impression Techniques
As different impression materials have been developed, numerous impression techniques have evolved. The obvious goal of the impression is to provide a void-free negative representation of a prepared tooth that, when poured with a gypsum product, will produce an accurate model of that prepared tooth and the surrounding tissue. The exactness of the working model die is paramount because even a minimal dimensional change, for example, in the relation to the preparation angle, may lead to significant vertical discrepancies.18 Discrepancies can be caused by the clinician,19 by the impression material,20 or by deformation of the impression tray.21,22 Shrinkage during the polymerization reaction can lead to errors in the impression,23 as can swelling caused by the diffusion of unreacted materials from the high viscosity material into the low viscosity material.24 Samet and colleagues reported a study in which 43 clinicians sent a total of 193 fixed partial denture impressions to 11 commercial laboratories.25 The impressions were evaluated by three examiners. Their findings revealed that 172 of the 193 impressions had at least one or more errors, including defects in material polymerization, retention to tray, tissue contact by the tray, crucial areas beyond tray borders, and heavy-body or putty material exposure through the wash material when the 2-step impression technique was used. Other errors that were documented were retraction cord still embedded in the impression, air bubbles, tears, and voids along the margins.25
The protocol used in studies on the accuracy of impression techniques is not standardized and may explain the contradictory results reported in the literature.26 Impression techniques can be categorized as monophase (using a single-step, medium-viscosity material) or dual-phase (using either a one-step or two-step heavy putty or heavy-bodied material and a light-body wash).26
There are conflicting studies concerning the accuracy of the monophase technique. It has been reported that the monophase technique is inferior in terms of dimensional accuracy and surface voids due to the high viscosity and reduced flow of the material.25, 27, 28 Conversely, Ceyhan and coworkers found monophase material, when compared with rigid impression material, was the most accurate for the occlusogingival and mesiodistal of the working die,29 and Johnson, et al, noted that the monophase technique using polyether or polyvinyl siloxane material produced the best detail under moist conditions.30
The dual-phase technique can be subdivided into 1-step or 2-step methods. The 1-step putty/heavy-bodied and light-bodied technique requires less time because both materials are placed at the same time.26 Even though chair-time is reduced, there are two major concerns with this method. One is that with only one step there is no compensation for errors by using a second step. The other concern is the lack of control of the bulk of the light-bodied material.31 Another problem with this technique is that the heavy-bodied or putty material can push the light-bodied material away from marginal areas of the prepared tooth.26
In the 2-step, dual-phase technique, the details of the prepared tooth or teeth are recorded by the light-bodied material.26 The accuracy of the 2-step dual-phase has been reported to be superior to the 1-step, dual-phase technique.26, 27, 32 All impression materials shrink slightly upon setting.33 Polyvinyl siloxanes show the smallest dimensional change on setting of all elastomeric impression materials.17 The majority of this shrinkage is due to continued polymerization occurring within 3 minutes of removal of the impression from the mouth.34 The increased accuracy of the 2-step, dual-phase technique could be explained by the fact that the light-bodied wash material is used after the putty or heavy-bodied material has already polymerized and contracted. Since the light-body (lower viscosity) material shows greater shrinkage due to lower filler content,35 providing a smaller amount surrounding the preparation would result in minimal dimensional change.31, 36
Light-bodied or wash impression materials have different viscosities, which is determined by the amount of inert filler material.33 The lower the viscosity, the greater the amount of fine detail reproduced but, at the same time, the greater the polymerization shrinkage.30 An ideal scenario would be to use the least amount of the low-viscosity, light-bodied material at a uniform thickness. This would provide a consistent amount of shrinkage throughout the impression.
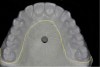
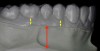
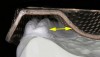
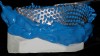
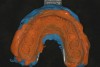
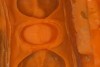
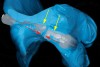
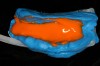
One variation of a full-arch, 2-step, dual-phase technique would be to use a thin (0.20 inch) coping material (eg, Tru-Tain, Rochester, MN), vacuum-formed over the patient’s study model (Figure 1 and Figure 2). It is important that the study model display the buccal vestibule of the entire arch. The vacuum-formed material is cut 1 mm from the gingival margin. For the maxillary arch, a mandibular metal tray can be used. Some studies have shown that a custom tray provides greater accuracy when compared to a stock tray.37–39 In contrast, Thongthammachat, et al, found that using either stock trays or custom trays could produce equally accurate casts.40 Since there are conflicting studies, using a stock mandibular tray provides less space between the lingual aspect of the teeth and the wall of the tray, while a custom tray takes more laboratory time and costs more. In other words, the adaptation of a mandibular tray is better than a stock maxillary tray but less accurate than a custom tray. Eames et al,36 found that elastomeric impressions had greater accuracy when the cross-sectional thickness was approximately 2 mm. For the maxillary full-mouth impression, a mandibular tray is better adapted than a maxillary tray (Figure 3 and Figure 4). It uses less impression material (no palate), no laboratory time is required, and it is more rigid than a plastic tray.
In the study by Cho and colleagues, their results indicated that disposable plastic trays were not sufficiently rigid to resist deformation when used with a high-viscosity putty material.41 They showed that metal stock trays showed significantly less change in cross-arch and cross-sectional dimension than plastic trays.
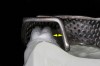
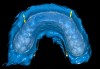
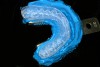
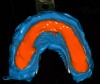
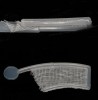
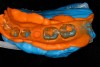
The mandibular metal tray is filled with heavy-bodied material and placed over the study model that has the vacuum-formed plastic spacer (Figure 5). After setting, the tray is separated from the study model (Figure 6) but the vacuum-formed plastic spacer should remain on the study model. If it remains attached to the impression material, then it should be removed (Figure 7). The vacuum-formed plastic spacer provides a uniform amount of space throughout the entire impression and controls the thickness of the wash material. After the tooth preparation is completed, the tray can be filled entirely with the light-bodied material and placed in the mouth (Figure 8). The heavy-bodied material that was in contact with the study model 1 mm beyond the gingival margin and the buccal vestibule now provides the path of insertion that correctly orientates the tray in the mouth exactly as it was on the study model. This technique uses a rigid, well-adapted tray with a uniform amount of spacer, resulting in a uniform amount of light-bodied material with a smaller amount of polymerization shrinkage (Figure 9 and Figure 10).
Dual-Arch Impression Technique
Another popular impression technique is to use the dual-arch impression tray also known as a “triple-tray.” First described by Wilson and Werrin, the closed-mouth impression uses a unilateral tray that allows for the impression of the maxillary arch and the mandibular arch, as well as an interocclusal record in one step.42 They concluded that the accuracy was more likely due to the decreased number of steps required to produce the impression. Rigid, double-arch trays were recommended to brace the impression material and reduce possible distortions of the final impression. The double-arch tray was conceived, designed, and patented by Werrin (US Patent 266269).
Results on the accuracy of the dual-arch impression technique have been mixed, which, as previously mentioned, could arise from different protocols used in the studies.
Lane, et al, compared the accuracy of the double-arch impression technique to the complete-arch impression technique where five clinicians used both techniques for a single indirect restoration on ten patients each.43 The restorations were evaluated clinically and found to be equally accurate. Breeding and Dixon studied the accuracy of the stone casts generated from a dual-arch impression using metal and plastic trays for both polyether and polyvinyl siloxane impression materials.44 They concluded that metal trays produced dies that were smaller than the tooth, while plastic trays produced dies that were larger.
Cox, et al, found that dies fabricated with metal trays and putty-loaded plastic trays were comparable in dimension to those produced with the conventional complete-arch method.45 They also found that plastic trays loaded with heavy-bodied material may not be as clinically reliable due to the flexibility of the tray. Depending on the anatomy of the surrounding tissue, flexure of the tray could occur during maximum intercuspal closure.
Larson, et al, found similar results in their study to determine the accuracy of addition silicone impressions made with custom trays or made with either passive or stressed dual-arch trays.46 They found that tray flexure disrupted the accuracy of the dual-arch impression.
There is an inherent three-dimensional distortion in the steps involved when fabricating an indirect restoration.47 Ceyhan and coworkers investigated the accuracy of working dies made from impressions with metal and plastic trays when two different viscosities of impression tray material was used.29 Their study also included altering which side of the impression tray was poured first. They concluded that the buccal-lingual dimension of the dies made from rigid impression material were slightly larger. The mesial-distal dimension of the dies fabricated from plastic trays was smaller than for dies made from metal trays when a monophase impression material was used. The occlusal-gingival dimension of the dies was larger when rigid impression material was used compared to a monophase impression material. It is important to note that this study was conducted on typodont models and did not incorporate real clinical conditions. Studies conducted on working models that were generated from impressions made on typodont models assume that the articulated casts are the same as those generated from a patient.45 Clinical and technical variables have been reported that affect the accuracy of mounted casts that include mandibular flexion during opening, periodontal ligament compression, and human error.48 Other clinical conditions include interference of the patient’s complete closure due to impingement of a rigid tray on the surrounding tissue anatomy and the affect of anesthesia on the patient’s proprioception of maximum intercuspation. Barzilay and Myers examined the distortion of a dual-arch impression caused by impingement of the tray on the alveolar ridge; however, no data were presented in their report.49
A variation of the 2-step, dual-arch impression technique would be to eliminate the possible interference in closure caused by the tray and to remove any possible distoration due to tray recoil or “memory.”
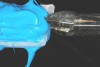
Using a borderless plastic tray (eg, Bite Registration Tray, Kerr Corporation, Orange, CA; Figure 11), a heavy-bodied material is loaded on both sides of the tray. The crossing member of the tray in the distal portion is severed with a small wire-cutting tool (Figure 12). This step will allow both sides of the tray to move independently of each other when the patient closes their mouth, eliminating any possible tray recoil. The separation in the distal portion of the tray prevents impingement on the maxillary tuberosity, thus allowing maximum intercuspation. Once the heavy-bodied material is set, the tray is removed from the mouth (Figure 13). The manufacturer’s recommended set time should be observed with use of a timer. The preparation side of the impression is dried and all interseptal material that may interfere with complete reseating of the tray is removed, then the light-bodied material is syringed into the entire length of the preparation side of the impression (Figure 14). There is the possibility of creating a “stepped” occlusal plane when the light-bodied material is syringed only in the preparation area of the impression.50 After completion of the second step, a detailed impression of the prepared area and a minimal amount of wash material covers the entire length of the impression (Figure 15).
Impression Material Selection
All impression materials that are currently available must meet the American Dental Association specification #19 and must be able to reproduce fine detail of 25 microns or less. That statement is the rule, but what differentiates impression materials is variations of their physical and mechanical properties. These are identified as accuracy, elastic recovery (tear resistance), dimensional stability, flow, flexibility, workability, hydrophilicity, shelf-life, patient comfort, and economics.33 Of all the properties mentioned, the three most important are accuracy, dimensional stability, and elastic recovery or tear strength.51 “Accuracy” refers to reproduction of detail that would be represented by the wettability of the material and would also entail the wetting of dental stone. Dimensional stability refers to the resistance to distortion that would be affected by the amount of polymerization shrinkage, thermal shrinkage, loss of components, and stress relaxation.51 The elastic recovery refers to the tear resistance, elastic deformation and the strain rate sensitivity.52
The elastic recovery of thin sections of impression material is critical, especially when tight interproximal areas and large undercuts are present in the dental arch. The impression material experiences compressive and tensile forces upon removal from the mouth.53 Historically, studies have compared the maximum elongation and tear strength of elastomeric impression materials.51, 54, 55 Lawson and colleagues were the first researchers to report measurements of elastic recovery of impression material from tensile strain.53 Their study demonstrated that elastomeric impression materials permanently deform following 50% and 100% tensile strains. Further, different materials produce greater elastic recovery from tensile strain than others. The components of various polyvinyl siloxane materials, such as base silica, copolymer filler, and chain extenders, are responsible for the variations in elastic recovery.56 They concluded that some impression materials may distort significantly while being used to capture areas of the mouth with large undercuts.
Currently, there is no one ideal impression material that possesses the best values in all of the physical and mechanical property categories. Some impression materials are more hydrophilic, some have remarkable dimensional stability, while others have high tear strengths. One material can excel in one category but not in another. For example, a material with excellent flow but having a low tear strength will be able to record fine detail in subgingival and interdental areas but loses the detail when it tears upon removal. So with all materials there is a certain amount of “give and take.” Trying to find the ideal impression material can be time consuming and expensive.
One approach to selecting an impression material is to look at its versatility. Select an impression material based on different scenarios in which the material provides respectable results. Manufacturers are constantly improving impression materials, either by developing totally new brands or selectively improving existing brands.
Some manufacturers that possess different impression product lines are combining existing products to obtain the attributes of each material into one. For example, Take 1 Advanced (Kerr Corporation) is actually a combination of two of the manufacturer’s previous products: Take 1 (greater dimensional stability and consistency) and StandOut (high hydrophilicity). According to the manufacturer, StandOut works very well in the presence of fluids, and has high tear strength but is dimensionally less stable and elastic than Take 1 for the heavy-bodied and light-bodied versions. Conversely, the hydrophilicity and strength of Take 1 is average but it is very dimensionally stable. The manufacturer decided that the strengths of StandOut were more suited for the light-bodied material and the strengths of Take 1 were more suited for the heavy-bodied material. Hence, to maximize the clinical benefits of these characteristics, the two materials are selectively combined. Therefore, the light-bodied Take 1 Advanced’s high tear strength and hydrophilicity is partnered with a very elastic, and dimensionally stable, heavy-bodied material. It may not possess the highest performance values in each physical property category, but collectively, the results are among the highest. In other words, it is a very “balanced” impression material suitable for all clinical situations.
Conclusion
Innovations in impression materials and techniques provide increasing accuracy, dimensional stability and stronger materials with greater predictability. Researchers constantly test materials in combination with techniques and delivery systems trying to find the ultimate mixture. Due to the array of testing protocols, clinicians should use some caution when selecting an impression material or adopting a technique. Clinical evidence in the hands of each practitioner should weigh heavily in their selection.
Acknowledgment
Special thanks to Ruth Egli for her editorial contribution.
References
1. Radz G. Impression materials. Inside Dentistry. 2008;4(1):76-77.
2. Ward G. Impression materials and impression taking–an historical survey. Brit Dent J. 1961;110(4):118-119.
3. Schulein TM. Significant events in the history of operative dentistry. J History Dent. 2005;53:67.
4. Westcott A. The use of plaster of Paris for taking impressions of the mouth–its history and importance, etc. Dent Cosmos. 1870;12(4):169-181.
5. Prothero JH. Prosthetic dentistry. Chicago; 1904.
6. Starcke ENJ. A historical review of complete denture impression materials. J Am Dent Assoc. 1975;91(5):1037-1041.
7. Mulliken JB, Goldwyn RM. Impressions of Charles Stent. Plastic Reconstructive Surg. 1978;62(2):173-176.
8. Asgar K. Elastic impression materials. Dent Clin N Am. 1971;15(1):81-98.
9. Brecker SC. Crowns–Preparations of the Teeth and Construction of the Various Types of Full Coverage Restorations. Philadelphia, PA; Saunders; 1961.
10. Hansson O, Eklund J. A historical review of hydrocolloids and an investigation of the dimensional accuracy of the new alginates for crown and bridge impressions when using stock trays. Swedish Dent J. 1984;8(2):81-95.
11. Brown D. An update on elastomeric impression materials. Br Dent J. 1981;150:35-40.
12. Wassell RW, Barker D, Walls AWG. Crowns and other extra-coronal restorations: Impression materials and technique. Br Dent J. 2002;192(12):679-690.
13. Coy HD. The selection and purpose of dental restorative materials in operative dentistry. Dent Clin N Am. 1957;1(1):65-80.
14. Craig RG. Restorative Dental Materials. 10th ed. Mosby; London, UK;1997:281-232.
15. Craig RG, Sakaguchi RL. Craig’s Restorative Dental Materials. 12th ed. Elsevier Mosby; St Louis, MO; 2006:283.
16. Mandikos MN. Polyvinyl siloxane impression materials: an update on clinical use. Aust Dent J. 1998;43(6):428-434.
17. Giordano R. Impression materials: basic properties. Gen Dent. 2000;48:510-516.
18. Marxkors R. Abformfehler und deren Vermeidung Zahnärztl. Welt Rdsch. 1985;94:466-473.
19. Lim KC, Chong YH, Soh G. Effect of operator variability on void formation in impressions made with automixed addition silicone. Aust Dent J. 1992;37:35-38.
20. Schwickerath H. Das Formverhalten von Abformmaterialien im Versuch und der Praxis. Dtsch Zahnärztl. 1976;31:680-684.
21. Lehman KM. Methodik und Systematik der Abformung für festsitzenden Zahnersatz. Zahnärztl Mitt. 1980;70:486-491.
22. Shigato N, Murata H, Hamada T. Evaluation of the methods for dislodging the impression tray affecting the dimensional accuracy of the abutments in a complete dental arch cast. J Prosth Dent. 1989;61:54-58.
23. Wichmann M, Borchers L. Bestimmung der Abformgenauigkeit verschiedener elastomere. Dtsch Zahnärztl. 1992;47:88-91.
24. Petersen GF, Asmussen E. Distortion of impression materials used in the double-mix technique. Scand J Dent Res. 1991;99:343-348.
25. Samet N, Shohat M, Livny A, Weiss EI. A clinical evaluation of fixed partial denture impressions. J Prosth Dent. 2005;94:112-127.
26. Caputi S, Varvara G. Dimensional accuracy of resultant casts made by a monophase, one step and two step; and a novel two-step putty/light-body impression technique: an in vitro study. J Prosth Dent. 2008;99(4):274-281.
27. Millar BJ, Dunne SM, Robinson PB. In vitro study of the number of surface defects in monophase and two-phase silicone impressions. J Prosthet Dent. 1998;80:32-35.
28. Millar B. How to make a good impression (crown and bridge). Brit Dent J. 2001;191(7):402-405.
29. Ceyhan JA, Johnson GH, Lepe X. The effect of tray selection, viscosity of impression material, and sequence of pour on the accuracy of dies made from dual-arch impressions. J Prosthet Dent. 2003;90:143-149.
30. Johnson GH, Lepe X, AwTC. The effect of surface moisture on detail reproduction of elastomeric impressions. J Prosthet Dent. 2003;90:354-364.
31. Nissan J, Gross M, Shifman A, Assif D. Effect of wash bulk on the accuracy of polyvinyl siloxane putty-wash impressions. J Oral Rehabil. 2002;29:357-361.
32. Hung SH, Purk JH, Tira DE, Eick JD. Accuracy of one-step versus two-step putty wash addition silicone impression technique. J Prosthet Dent. 1992;67:583-589.
33. Donovan TE, Winston WL, Chee BDS. A review of contemporary impression materials and techniques. Dent Clin N Am. 2004;48;445-470.
34. Chee WWL, Donovan TE. Polyvinyl siloxane impression materials: A review of properties and techniques. J Prosthet Dent. 1992;68:728-732.
35. Tjan AHL, Li T. Effects of reheating on the accuracy of addition silicone putty-wash impressions. J Prosthet Dent. 1991;65:743-748.
36. Eames WB, Sieweke JC, Wallace SW, Rogers LB. Elastomeric impression materials: effect of bulk on the accuracy. J Prosthet Dent. 1979;41:304-307.
37. Boulton JL, Gage JP, Vinvent PF, Basford KE. A laboratory study of dimensional changes for three elastomeric impression materials using custom and stock trays. Austr Dent J. 1996;41:398-404.
38. Gordon GE, Johnson GH, Drennon DG. The effect of tray selection on the accuracy of elastomeric impression materials. J Prosthet Dent. 1992;68:19-28.
39. Rueda LJ, Sy-Munoz JT, Naylor WP, et al. the effect of using custom or stock trays on the accuracy of gypsum casts. Int J Prosthodont. 1996;9:367-373.
40. Thongthammachat S, Moore BK, Barco MT 2nd, et al. Dimensional accuracy of dental casts: influence of tray material, impression material and time. J Prosthodont. 2002;11(2):98-108.
41. Cho G, Chee Winston WL. Distortion of disposable plastic stock trays when used with putty vinyl polysiloxane impression materials. J Prosth Dent. 2004;92(4):354-358.
42. Wilson EG, Werrin SR. Double arch impressions for simplified restorative dentistry. J Prosthet Dent. 1983;49(2):198-202.
43. Lane DA, Randall R, Lane NS, Wilson NHF. A clinical trial to compare double-arch and complete-arch impression techniques in the provision of indirect restorations. J Prosth Dent. 2003;89(2):141-145.
44. Breeding LC, Dixon DL. Accuracy of casts generated from dual-arch impressions. J Prosthet Dent. 2000;84(4):403-407.
45. Cox JR, Brandt RL, Hughes HJ. A clinical pilot study of the dimensional accuracy of double-arch and complete-arch impressions. J Prosthet Dent. 2002;87:510-515.
46. Larson TD, Nielsen MA, Brackett WW. The acuracy of dual-arch impressions: A pilot study. J Prosthet Dent. 2002;87:625-627.
47. Nicholls JI. The measurement of distortion: theoretical considerations. J Prosthet Dent. 1977;37:578-586.
48. Cox JR, Brandt RL, Hughes HJ. The double arch impression technique: a solution to prevent supraocclusion in the indirect restoration. Gen Dent. 2000;48:86-91.
49. Barzilay I, Myers MI. The dual-arch impression. Quintessence Int. 1987;18:293-295.
50. Cowie RR, Boksman L. A philosophical approach to selecting an impression technique. Oral Health. 2007;March:18-22.
51. Hondrum SO. Tear and energy properties of three impression materials. Int J Prosthodont. 1994;7:517-521.
52. Chabrier F, Lloyd CH, Scrimgeour SN. Measurement at low strain rates of the elastic properties of dental polymeric materials. Dent Mater. 1999;15:33-38.
53. Lawson NC, Burgess JO, Litaker MS. Tensile elastic recovery of elastomeric impression material. J Prosthet Dent. 2008; 100:29-33.
54. Sneed WD, Miller R, Olson J. Tear strength of ten elastomeric impression materials. J Prosthet Dent. 1983;49:511-513.
55. Tam LE, Brown JW. The tear resistance of various impression materials with and without modifiers. J Prosthet Dent. 1990;63:282-285.
56. McCabe JF, Wilson HJ. Polymers in dentistry. Int J Prosthodont. 1998;11:219-223.
About the Author
Gregg A. Helvey, DDS, Adjunct Associate Professor, Virginia Commonwealth University School of Dentistry, Richmond, Virginia; Private Practice, Middleburg, Virginia