You must be signed in to read the rest of this article.
Registration on CDEWorld is free. Sign up today!
Forgot your password? Click Here!
Dental rehabilitation of the atrophic maxilla poses surgical and prosthetic challenges. Many patients cannot tolerate an upper denture because of a sensitive gag reflex. Maxillary bone (especially in the posterior maxilla) is softer (less dense) than its mandibular counterpart, presenting challenges for achieving adequate implant insertional torque. Pneumatization of the maxillary sinuses creates obstacles for the placement of dental implants, compromising available ridge height. Furthermore, the resorptive pattern of bone loss in the edentulous maxilla may result in severe knife-edged atrophy of alveolar bone, compromising available ridge width.
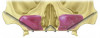
The All-on-X treatment concept, as pioneered by Dr. Paulo Malo, has become a staple of single-stage rehabilitation of the atrophic maxillary arch.1 Further refinements, with the addition of zygomatic implants (Figure 1) have allowed the clinician to bypass the maxillary sinuses and restore function and esthetics. This article will discuss treatment using the All-on-4® modality (Nobel Biocare), and will present important diagnostic and treatment planning principles of this technique for the rehabilitation of the atrophic maxillary arch. Prosthetic concepts, including implant stress distribution and anterior-posterior (A-P) spread, are covered, and an illustrative clinical case presentation is presented.
TREATMENT PLANNING OF A MAXILLARY PROSTHESIS USING THE ALL-ON-4 TREATMENT CONCEPT
The All-on-4 treatment concept has been found to be predictable and safe with regard to long-term outcomes for the rehabilitation of edentulous maxilla.1 The All-on-4 treatment approach was developed for the treatment of edentulous patients to provide an immediately loaded full-arch restoration requiring the placement of only four implants, using straight and angled multi-unit abutments and avoiding or minimizing the need for grafting.2
Treatment planning for atrophic maxillary arch rehabilitation cases in which the All-on-4 treatment approach will be used involves special considerations-in particular, bone quality, ensuring adequate bone reduction, the length of the implants, presence of bone in the maxillary zones, and the length of the cantilever.2
Ensuring Adequate Bone Reduction
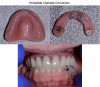
A fixed hybrid prosthesis, which includes both teeth and gingiva, can be made with an underlying titanium bar with teeth fabricated from acrylic or entirely from zirconia. At the time of implant surgery, multi-unit abutments (MUA) are placed on the implants, allowing the clinician to change the angulation of the prosthetic screw axis to orient them in a more parallel relationship to each other. The fixed prosthesis is screwed onto the multi-unit abutments using prosthetic screws. The "transition zone" is the junction where the natural gingiva meets the fixed prosthesis. This interface must not be visible when the patient smiles,3 otherwise the resulting esthetic outcomes can be disastrous.
To avoid this complication, the bone reduction must be adequate to ensure that the transition zone is hidden within the upper lip. The clinician must therefore be wary of the following types of clinical situations, as they will require more than the typical amount of vertical bone reduction:
• Short upper lip.4 The normal length of the female upper lip is 20 mm, and the male upper lip is 22 mm.
• Vertical maxillary excess (VME).4 Vertical hypertrophy of maxilla can result in a "gummy smile" with a normal inci- sor length and normal upper lip length and overbite relat- ionship.
• Super-erupted anterior maxillary teeth.4 Ideally, the in- cisal edge of the maxillary teeth should be 1 to 2 mm from the lower lip margin upon smiling. In a patient with a deep bite or attrition of the lower incisors, the anterior maxillary teeth will super-erupt an bring the alveolar housing infer- iorly, resulting in a "gummy smile."
• Altered passive eruption.4 While the average normal max- illary incisor length is approximately 10 mm, in patients with altered passive eruption, the clinical crown is shorter than 10 mm. In this condition, the free gingival margin does not recede apical to the cervical convexity of the clinical crown, resulting in a shorter clinical crown.5-7 Consequently, there is excessive gingival display due to inadequate clin- ical crown exposure. Patients with altered passive eruption will require more vertical bone reduction to create ideal
proportioned incisors in the final prosthesis.
The clinical examination dictates how many millimeters of vertical bone should be reduced. The minimum prosthetic space recommended for a fixed hybrid with acrylic teeth and titanium bar is 16 mm,8 while for a ceramic (zirconia) prosthesis, the minimum restorative space is 14 mm.8 This distance is measured from the incisal edge of the proposed restoration to the shoulder of the implants.
Inadequate prosthetic space can result in complications such as screw loosening and prosthetic fractures. Furthermore, inadequate prosthetic space may force the clinician to open the bite by increasing the vertical dimension of occlusion (VDO), which may not be tolerated by the patient.
The following preoperative clinical measurements and clinical factors will help guide the clinician in determining how much bone reduction is required3:
• Upper lip length
• Maxillary incisor length
• Gingival display upon maximal smile
• Maxillary incisor tooth visibility at rest
• Degree of overbite and overjet
• Maxillary incisal edge compared with lower lip margin
upon smiling
• Altered passive eruption, VME, highly active upper lip, or super-eruption of maxillary anterior teeth
• Measurement of lower facial height from soft tissue subna- sale to menton (VDO)
• Preoperative photographs of exaggerated smile and video of the patient talking
All the above clinical parameters and measurements will impact how much vertical bone reduction needs to be performed for the case. Inadequate bone reduction is the most common reason for poor outcomes with cases using the All-on-4 treatment concept. The clinician should err on the side of deeper implant placement, as this will leave the proper restorative space ("running room") for the final prosthesis.
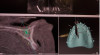
The amount of bone reduction required can easily be measured using the ruler tool provided by the digital planning software from the preoperative CBCT (Figure 2). An analog method for determining how much bone reduction is necessary involves placing an ideal upper denture in the patient's mouth and having the patient bite down in their proper VDO. Using a sterile marker, a line can then be marked on the bone 16 mm apical to the incisal edge to indicate the level to which the bone needs to be reduced.
Evaluating the Maxillary Zones
The concept behind basal implantology is that implants are placed in the dense "facial buttresses" where the bone is currently present and are typically resistant to the effects of perio- dontal disease and the resorption patterns of the maxilla.9 The basal bone is highly resistant to resorption. Even in a patient with long-standing edentulism or chronic periodontal disease, the basal bone is maintained despite compromise of the alveolar bone. The "facial buttresses" (zygomaticomaxillary, nasomaxillary, and pyriform rims and pterygoid regions) are the same areas of bone that are used by maxillofacial surgeons to place titanium plates and screws to reduce and fixate facial fractures.
The dense nature of the basal bone allows cortical engagement of the implants and increases insertional torque values, enabling immediate loading to be possible in most cases. The maxilla is typically classified based on the Zones of Bedrossian Classification (Figure 3): anterior maxilla (zone I), premolar regions (zone II), and molar/tuberosity/pterygoid regions (zone III).10 The zygoma bone (zone IV) provides an additional zone for implant anchorage to increase the anterior-posterior implant spread and allow full-arch rehabilitation. For a traditional All-on-4 case, bone in zones I and II will allow placement of two anterior implants at teeth sites Nos. 7 and 10 and of two posterior tilted implants with angled multi-unit abutments at teeth sites Nos. 4 and 13. However, owing to anterior pneumatization of the sinuses in some patients, zygomatic implants are placed at teeth sites Nos. 4 and 13 to bypass the maxillary sinuses and give adequate anterior-posterior spread to restore function from first molar to first molar.
Digital Software for Implant Planning
When the All-on-4 treatment concept is used, a CBCT is the current standard of care for treatment planning of a maxillary prosthesis. An intraoral scanner can be used to generate stereolithographic (STL) files instead of traditional impressions and bite registrations. Importing these data into digital planning software allows the clinician to plan the implant placement with the final prosthesis in mind.11 If the clinician desires, they can use this plan to fabricate surgical guides for "guided" implant placement or perform mock-surgery for free-handed placement. Digital planning can be used as a case presentation or be sent to other clinicians or laboratories for communication.
If a patient is edentulous and has a complete denture, prosthetic planning can be carried out using the "double-scan technique" (Figure 4). This technique entails the placement of approximately six to eight radiographic markers using gutta-percha placed in small holes in the denture (or commercially available small radio-opaque stickers placed on the denture). The denture is then scanned in the CBCT scanner to generate the first set of DICOM files. Next, the patient wears the modified denture and a second CBCT scan is performed to generate the second DICOM file set. In the digital planning software, the two DICOM sets are matched, and the denture can be seen superimposed over the bone.12This allows the surgeon to plan the placement of the implants with the best anterior-posterior spread and angulations, keeping the final prosthesis in mind.
A good rule of thumb is to use implants that are at least 10 mm in length. The distal-most implants should be prosthetically in the second premolar / first molar locations. Engagement of basal buttresses such as the nasal floor and pyriform rim and zygomatic bone is planned to achieve as much insertional torque as possible to enable immediate loading. Soft tissue thickness is important, and it can be measured with a periodontal probe during surgery. To be adequate for implant placement, vertical soft tissue thickness should be at least 3 to 4 mm. This is typically easily achieved after the vertical bone reduction is performed, allowing adequate biologic width and helping maintain vertical bone levels on the implants. Internal conical hex implants are used to allow 6° of rotation of the multi-unit screw axis and prosthetic flexibility. Platform-switched implant systems are beneficial for bone maintenance around the implants.13Platform switching is a technique in which the cervical size of the abutment placed is smaller than the implant platform. This connection shifts the implant-abutment junction inward towards the central axis of the implant. Thus, any bacteria at the micro-gap will be away from the crestal bone surrounding the implant, resulting in less bone loss after remodeling and implant osseointegration.13
IMPLANT PLACEMENT
The four implants should ideally be placed in the lateral incisor regions and the second premolar / first molar region to maximize anterior-posterior spread.14 Anterior-posterior spread is determined by measuring the distance from the most anterior implant to the most posterior implant in the arch. Finite element analysis shows that placing the two anterior implants too close to each other (at central incisors) increases the strain pattern upon loading of the posterior two implants.15
Placing the posterior two implants as posteriorly as possible (to increase anterior-posterior spread) allows better load distribution.16 If the maxillary sinuses are too anteriorly pneumatized and the posterior two implants, despite angling, cannot be placed in the second premolar / first molar region, then placement of zygomatic implants to bypass the sinuses should be included in the All-on-4 treatment plan. Because the bone in the maxilla is softer than that of its mandibular counterpart, over-engineering of the maxillary prosthesis with six implants (especially against a fixed opposing arch) is beneficial for better load distribution in the less dense maxillary bone. Angled implants must be bone profiled to prevent binding of bone to allow seating of the multi-unit abutment on the implant. All multi-unit abutments must seat passively and be seated fully on the implant before an impression or chairside conversion of the denture can be taken. If the clinician is in doubt as to whether a multi-unit is seated, a periapical radiograph should be taken, and it is recommended that a radiograph be taken to confirm complete mating of the part to the implant.
Finally, it is important to follow proper manufacturer protocols to avoid over-tightening and fracture of the multi-unit or prosthetic screws during placement.
Guided vs Freehand Surgery
Various guided systems exist in the market for implant placement. If the patient has stable existing teeth, then a guided stent that is tooth-borne will yield good accuracy for placing the implants in their correct positions. If the patient has loose teeth, has an inadequate number of teeth, or is edentulous, then a bone-borne stent that fits intimately with bone will be the most accurate stent.17 A bone-borne stent will require extensive flap elevation on the buccal and palatal aspect to allow passive seating of the stent without soft tissue impingement.
Micromotion of soft tissue-borne stents can result in placement of implants in the wrong positions. Soft tissue-borne stents are the most inaccurate of the stents, responsible for linear errors and angular errors much more often than bone- or tooth-borne stents,18 although they are nevertheless considered acceptable for full-arch procedures. Furthermore, implants placed fully guided via a soft tissue stent are often placed using a tissue punch, which may result in tissue punching away the keratinized tissue around the implant site. Lack of adequate keratinized tissue around the multi-unit abutments has been shown to be risk factor leading to peri-implantitis over time.19
Guides are not perfect. Errors in CBCT (motion artifact), errors in matching STL to DICOM files, errors in bone segmentation during CT rendering, and errors in 3D printing fabrication, flexion, or inadequate seating of the stent can all result in incorrect placement of the implants.17 Also, guided systems add further costs to the patient. Ultimately, it is the clinician's decision whether to perform the surgery fully guided or free-handed.
At the end of this article, we present a case study of a free-hand implant placement ("brain-guided"). The implants are placed free-hand, using a duplicate of an upper denture to verify the prosthetic screw axes of the multi-unit abutments to ascertain that they are within the dentoalveolar envelope for screw-retained prosthetics.
Autogenous Grafts and Products
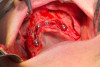
An All-on-4 treatment is typically a "graft-less" solution. However, in cases of severe atrophy, bone augmentation will produce good long-term results and may be needed to achieve the desired clinical results. Autogenous bone is the "gold standard" of bone grafting. It offers the osteoinductive, osteoconductive, and osteogenic properties that are desirable for bone augmentation. Autogenous bone can be obtained from the vertical bone reduction, where it can be removed with a surgical unit or rongeurs and then crunched into smaller pieces manually or in a bone mill. Safe scrapers in the lateral maxillary posterior walls can also be used, as well as bone trap suctions. These are both useful tools to collect the precious autogenous bone. This bone can be repurposed back on the buccal aspect of the ridge, which is generally deficient (Figure 5, left panel).
The bone may be mixed with platelet rich plasma (PRP), which can be made with any of the many commercially available systems using autologous blood. PRP is prepared as per manufacturer recommendations using an anticoagulant so that the platelet concentrate is in liquid form.20 The bone graft is mixed with PRP placed into the recipient site. PRP releases several growth factors quickly (within 1 hour) into the surgical wound.21
Platelet rich fibrin (PRF) membranes are also made and can be placed on top of the autogenous bone graft. Several PRF membrane protocols are reviewed in the literature.22 The protocol that the author uses is 1,300 RPM x 8 minutes using Red Cap, BD glass tubes23(Figure 6). The difference between PRP and PRF is that during PRF processing, a fibrin clot (scaffold/matrix) is allowed to form. Therefore in the "membrane" form, growth factors are released slowly into the surgical site (typically factors are released for up to 7 days).21,24
PRP and PRF both release several growth factors, such as platelet-derived growth factor (PDGF), transforming growth factor-beta (TGF-β), and vascular endothelial growth factor (VEGF).25These growth factors help with angiogenesis, enhanced wound healing, and improved bone grafting results.21
A buccal fat pad graft is often utilized when zygomatic implants are placed. The buccal fat can be taken from the ipsilateral aspect and draped over the midbody of the zygomatic implant (Figure 5, right panel), thus providing an extra barrier of protection to prevent mucosal dehiscence and peri-implantitis and helping to form a seal to prevent the development of any sinus fistulae around the zygomatic implant.26
Criteria for Immediate Loading Using the All-on-4 Treatment Concept
Loading of the implants within the first 48 hours of placement is known as "immediate loading." Patient satisfaction is higher when implants are immediately loaded and temporized.
Success rates of immediate loading are similar to those of delayed conventional loading if proper protocols are followed.27Implants can be immediately loaded if their insertional torque is greater than 45 Ncm.28 In clinical practice, some implants in a particular patient may achieve this minimum torque, while others may not. It is recommended that a cover screw be placed on the implants that do not meet this minimum torque value, and that they be bypassed to have at least four implants with adequate torque and good anterior-posterior spread to restore with an immediate fixed temporary restoration (Figure 7). If the distal-most implants do not meet adequate insertional torque, then a decision must be made to either shorten the temporary prosthesis or not load immediately or to place another implant as a distal stop (pterygoid or zygomatic) to allow immediate loading.
Techniques such as underprepping, having a "bail out" wider implant, osseodensification using either counterclockwise burs or condensing osteotomes and engaging bicortically (nasal floor/sinus floor) can help achieve adequate insertional torque for the majority of cases.
Osseodensification using counterclockwise burs has shown benefit in compacting the alveolar bone and improving the bone density during implant site preparation.29
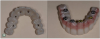
The temporary prosthesis must be screw-retained and all implants must be cross-arch splinted. The temporary prosthesis should also be cleansable, highly polished, and have a convex intaglio surface to avoid trapping food. The prosthesis should not have any distal cantilevers, and it also should not have any buccal flanges that will exert pressure on the buccal plate (Figure 8). Occlusion must be carefully checked to ascertain that there are no interferences upon excursive movements. For patients with a temporary prosthesis, compliance with a mechanical soft diet and good oral hygiene are important success factors.
FINAL PROSTHETIC DESIGN AND MAINTENANCE OF THE FINAL PROSTHESIS
Like the temporary prosthesis, the final prosthesis must be polished and smooth and have a convex intaglio surface to prevent food trapping and chronic inflammation around the implants.3 Also, occlusion must be tightly controlled, with no prematurity in occlusion and no interferences in lateral excursions. A postoperative nightguard on the opposing arch is recommended for patients with bruxism. In the final restoration, the posterior canti- lever must not extend more than 10 mm past the distal-most implant.30 Increasing this distal cantilever will have deleterious effects on the terminal-most implant, resulting in bone loss and eventual failure of the implant.
The patient must be educated on meticulous oral hygiene. A water flosser used on a low setting to clean under the fixed bridge is recommended,31 as is the use of an electric toothbrush. Monitoring of the prosthesis annually with panoramic radio- graphy and an occlusion check twice per year are recommended at a dental office.32
COMPLICATIONS OF FIXED ALL-ON-4 CASES
Fortunately, with the benefit of cross-arch splinting, proper anterior-posterior spread, appropriate hygiene, and occlusal control and restorative space, complications with the full-arch fixed hybrid prosthesis are uncommon. If the above principles are adhered to and proper maintenance protocols are in place, then a compliant, nonsmoking, nonimmunocompromised patient with good oral hygiene will benefit from a long-standing, trouble-free restoration.
Peri-implantitis can occur as a result of occlusal overloading, poor oral hygiene, lack of keratinized tissue, and lack of regular implant maintenance and may progress to the eventual loss of the implant.33 Peri-implantitis is a difficult problem to treat, and therefore prevention is ideal. Some treatments discussed in the literature are improvement in oral hygiene/plaque control, local debridement using plastic curettes, and occlusal control.34
Sinusitis may occur, often caused by chronic oral-antral fistula, and can be treated with amoxicillin/clavulanate (Augmentin) nasal steroids/decongestants, and closure of oroantral fistulas.35,36 The patient may require endoscopic sinus surgery to create a new path for drainage of a blocked sinus by an ENT colleague.
Loss of implant is another possible complication. The failed implant will need to be removed and the case managed by either bypassing the failed implant or placing another future implant at a different site. The prosthesis will need to be remade or shortened because of the failed implant. The benefit of the use of more than four implants is that if one is lost, the prosthesis may not be compromised, allowing its use while a new implant is added.
CASE REPORT
A healthy nonsmoking 65-year-old female patient with no contraindications to implant therapy presented with an edentulous maxilla. She had worn a maxillary complete denture for many years and wished to have fixed teeth.
A CBCT showed an extremely thin knife-edged ridge with preservation of the basal bone. She had an adequate amount of bone in the left posterior aspect (zone II) to allow implant placement with a 30° multi-unit abutment. The anterior aspect of the bone was thin and would require bone augmentation laterally at the time of implant placement. Owing to the anterior pneumatization of the right maxillary sinus (no bone in zone II), a zygomatic implant was planned on the right side (Figure 2). A "double-scan technique" using her maxillary denture with gutta-percha points was utilized to match her CBCT to her denture (Figure 4).
Prosthetic-level planning was carried out, and the surgery was performed free-hand. The plan was to place five endosseous implants and one zygomatic implant and immediately load the case if criteria were met (insertional torque values of each implant greater than 45 Ncm each) (Figure 2).
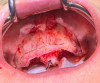
In this patient, a significant vertical bone reduction of about 10 mm had to be performed to allow adequate bone width for implant placement (Figure 9). Two of the six implants (Nos. 6 and 11) did not achieve adequate insertional torque and were buried with cover screws and multi-unit abutments placed 3 months later (Figure 7). Because adequate anterior-posterior spread and insertional torque were achieved for the remaining four implants, it was decided to load the case immediately. A zygomatic implant with a built-in 45° correction was placed on the right side to increase anterior-posterior spread and bypass the maxillary sinus.
Autogenous bone mixed with PRP was used to graft the deficient sites. Then, PRF membranes (Figure 6) were used to cover over the autologous bone graft and a buccal fat pad graft was overlaid on the right zygomatic implant to prevent mucosal dehiscence and mucosa complications (Figure 5, right panel). The patient's existing denture was converted chairside into a temporary hybrid screw-retained prosthesis (Figure 8). Approximately 3 months after the provisional hybrid was placed, the buried implant Nos. 6 and 11 were uncovered and multi-units were placed on them. The prosthodontist was able to incorporate all six implants into the final fixed hybrid zirconia prosthesis.
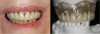
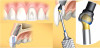
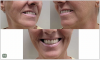
It is noteworthy that on implant No. 11, even with the correction of a 30° multi-unit abutment, the screw axis was too facial. This is where the angulated screw channel (ASC) becomes highly useful (Figure 10), by allowing the prosthodontist a further 25° of rotation so that the screw axis can be "hidden" in the distofacial line angle of tooth No. 11, making it nearly imperceptible when the patient smiles (Figure 11 and Figure 12).
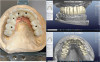
The zirconia bridge as seen in the final prosthesis is an excellent material that offers superior strength and esthetics (Figure 13 and Figure 14). This restorative case exemplifies the incredible results that can be achieved using a fixed zirconia prosthesis.
CONCLUSION
The All-on-4 treatment concept has become a staple in the rehabilitation of the atrophic maxillary arch, as it enables immediate loading of implants and thus greater patient satisfaction. While All-on-4 treatment generally obviates the need for grafting of the edentulous ridges that would otherwise be required for these cases, severe atrophy may warrant bone augmentation with autogenous bone. Careful treatment planning involves determining adequate bone reduction, since inadequate bone reduction is the most common reason for poor outcomes when the All-on-4 treatment approach is used. Implant stress distribution and placement to maximize anterior-posterior spread must also be considered. Finally, the individual clinician should determine whether to perform guided or free-hand surgery. As the case study presented in this article demonstrates, after conscientious prosthetic-level planning was completed, free-hand surgery using the All-on-4 approach yielded excellent results in a patient requiring rehabilitation of an atrophic maxilla.
Acknowledgments
The author would like to thank Dr. Joseph Kelly (Prosthodontist, Private Practice, Clarks Summit, Pennsylvania) who performed the restorative work in the case study presented in this article.
References
1. Maló P. The All-on-4®concept for full-arch rehabilitation of the edentulous maxillae: a longitudinal study with 5-13 years of follow-up. Clin Implant Dent Relat Res. 2019;21(4):538-549.
2. Taruna M, Chittaranjan B, Sudher, N, Tella S, Abusaad Md. Prosthodontic perspective to All-on-4®concept for dental implants. J Clin Diagn Res. 2014;8(10):ZE16-ZE19.
3. Jivraj S, Zarrinkelk H. Diagnosis and treatment planning: a restorative perspective. In: Jivraj S, ed. Graftless Solutions for the Edentulous Patient. BDJ Clinician's Guides. Springer; 2018:1-14.
4. Robbins JW. Differential diagnosis and treatment of excess gingival display. Pract Periodontics Aesthet Dent. 1999;11(2):265-272.
5. Binirja KR, Jnardhanan M, Sunil MM, et al. A combined periodontal - prosthetic treatment approach to manage unusual gingival visibility in resting lip position and inversely inclined upper anterior teeth: a case report with discussion. J Int Oral Health. 2015;7(3):64-67.
6. Padhye NM, Pdhye AM, Pathak TS. Clinical short crowns: a report on perioplastic management of altered passive eruption of three cases. Indian J Dent Sci. 2019;11(1):56-60.
7. Alpiste-Illueca F. Morphology and dimensions of the dentogingival unit in the altered passive eruption. Med Oral Patol Oral Cir Bucal. 2012;17(5):e814-e820.
8. Jivraj S, Chee W, Corrado P. Treatment planning for the edentulous maxilla. Br Dent J. 2006;201(5):261-279.
9. Ghalaut P, Shekhawat H, Meena B. Full-mouth rehabilitation with immediate loading basal implants: a case report. Natl J Maxillofac Surg. 2019;10(1):91-94.
10. Bedrossian E. Implant Treatment Planning in the Edentulous Patient:, A Graft Less Approach. St. Louis: Mosby; 2011.
11. Rosenfeld AL, Mandelaris GA, Tardieu PB. Prosthetically directed implant placement using computer software to ensure precise placement and predictable prosthetic outcomes. Part 1: diagnostics, imaging, and collaborative accountability. Int J Periodontics Restorative Dent. 2006;26(3):215-221.
12. Ritter L, Reiz SD, Rothamel D, et al. Registration accuracy of three-dimensional surface and cone-beam computed tomo- graphy data for virtual implant planning. Clin Oral Implants Res. 2012;23(4):447-452.
13. Gupta S, Sabharwal R, Nazeer J, Taneja L, Choudhury BK, Sahu S. Platform switching technique and crestal bone loss around the dental implants: a systematic review. Ann Afr Med. 2019;18(1):1-6.
14. Sadowsky SJ. The implant-supported prosthesis for the edentulous arch: design considerations. J Prosthet Dent.1997;78(1): 28-33.
15. Bevilacqua M, Tealdo T, Menini M, et al. The influence of cantilever length and implant inclination on stress distribution in maxillary implant supported fixed dentures. J Prosthet Dent. 2011;105: 5-13.
16. Silva GC, Mendonça JA, Lopes LR, Landre J Jr. Stress patterns on implants in prostheses supported by four or six implants: a three-dimensional finite element analysis. Int J Oral Maxillofac Implants. 2010;25(2):239-246.
17. D'haese J, Van D Velde T, Komiyama A, Hultin M, De Bruyn H. Accuracy and complications using computer-designed stereolithographic surgical guides for oral rehabilitation by means of dental implants: a review of the literature. Clin Implant Dent Relat Res. 2010;14(3):321-335.
18. Schiroli G, Angiero F, Zangerl A, Benedicenti S, Ferrante F, Widmann G. Accuracy of flapless protocol for computer-guided zygomatic implant placement in human cadavers: expectations and reality. Int J Med Robot. 2016;12(1):102-108.
19. Monje A, Blasi G. Significance of keratinized mucosa/gingiva on peri-implant and adjacent periodontal conditions in erratic maintenance compliers. J Periodontol. 2019;90(5):445-453.
20. EclipseMed PRP system. Platelet-Rich Plasma (PRP). https://www.eclipsemed.com/prp/introprp. Accessed June 24, 2022.
21. Pavlovic V, Ciric M, Jovanovic V, Stojanovic P. Platelet rich plasma: a short overview of certain bioactive components. Open Med (Wars). 2016;11(1):242-247.
22. Miron RJ, Chai J, Fujioka-Kobayashi M, Sculean A, Zhang Y. Evaluation of 24 protocols for the production of platelet-rich fibrin. BMC Oral Health.2020;20(1):310.
23. Choukroun J, Ghanaati S. Reduction of relative centrifugation force within injectable platelet-rich-fibrin (PRF) concentrates advances patients' own inflammatory cells, platelets and growth factors: the first introduction to the low speed centrifugation concept. Eur J Trauma Emerg Surg. 2018;44(1):87-95.
24. Miron RJ, Zucchelli G, Pikos MA, et al. Use of platelet-rich fibrin in regenerative dentistry: a systematic review. Clin Oral Invest. 2017;21(6):1913-1927.
25. Marx RE. Platelet-rich plasma (PRP): what is PRP and what is not PRP? Implant Dent. 2001;10(4):225-228.
26. Guennal P, Guiol J. Use of buccal fat pads to prevent vestibular gingival recession of zygomatic implants. J Stomatol Oral Maxillofac Surg. 2018;119(2):161-163.
27. Papaspyridakos P, Chen C-J, Chuang S-K, Weber H-P. Implant loading protocols for edentulous patients with fixed prostheses: a systematic review and meta-analysis. Int J Oral Maxillofac Implants. 2014;29(Suppl):256-270.
28. Pawar NN, Karkar PA. Loading protocol in implant dentistry: a review. Int J Appl Dent Sci. 2020;6(3):578-587.
29. Al Ahmari NM. Osseo-densification versus conventional surgical technique in low density jaw bone: a split mouth in vivo study [published online ahead of print May 13, 2022] . Technol Health Care. doi:10.3233/THC-220048.
30. Duyck J, Van Oosterwyck H, Vander Sloten J, De Cooman M, Puers R, Naert I. Magnitude and distribution of occlusal forces on oral implants supporting fixed prosthesis: an in vivo study. Clin Oral Implants Res. 2000;11(5):465-475.
31. Magnuson B, Harsono M, Stark PC, Lyle D, Kugel G, Perry R. Comparison of the effect of two interdental cleaning devices around implants on the reduction of bleeding: a 30-day randomized clinical trial. Compend Contin Educ Dent. 2013;34(Spec No 8):2-7.
32. Gay IC, Tran DT, Weltman R, et al. Role of supportive maintenance therapy on implant survival: a university-based 17 years retrospective analysis. Int J Dent Hyg. 2016;14(4):267-271.
33. Schwarz F, Derks J, Monje A, Wang H-L. Peri-implantitis. J Periodontol.2018;45(Suppl 20):S246-S266.
34. Venkei A, Eördegh G, Turzó K, Urbán E, Ungvári K. A simplified in vitro model for investigation of the antimicrobial efficacy of various antiseptic agents to prevent peri-implantitis. Acta Microbiol Immunol Hung. 2020;67(2):127-132.
35. Psillas G, Papaioannou D, Petsali S, Dimas GG, Constantinidis J. Odontogenic maxillary sinusitis: a comprehensive review. J Dent Sci. 2021;16(1):474-481.
36. Kim SM. Definition and management of odontogenic maxillary sinusitis. Maxillofac Plast Reconstr Surg.2019;41(1):13.