You must be signed in to read the rest of this article.
Registration on CDEWorld is free. Sign up today!
Forgot your password? Click Here!
Successful crown and bridge restoration relies on a meticulously prepared tooth and "capturing" its details in a master impression. Nevertheless, with many indirect definitive restorations, the dental crowns may appear to have a "perfect fit and contact" on the master model, only to require adjustment when tried in the patient's mouth. Likewise, multiple adjacent restorations that may appear to have an accurate fit at try-in may have a slightly altered fit after cementation. Restorations that are placed in an improper position will need to be remade, which can be especially problematic and even potentially disastrous when multiple restorations have been placed (the "multiple cementation technique"), as even one incorrectly placed restoration will affect the correct seating of the remaining units. The purpose of dental cements is not only to retain the restoration, but also to assist in the achievement of a proper fit. By filling even the smallest marginal restorative-tooth gap, bioactive luting materials can help ensure a precise and predictable delivery technique for crown and bridge restorations and an ideal fit for the patient.
DENTAL LUTING CEMENTS - A HISTORICAL PERSPECTIVE
Luting materials are essentially dental cements that are used to fill the microscopic gap between the restoration and the prepared tooth. The most commonly used luting materials have been zinc phosphate cements, polycarboxylate cements, glass ionomer cements, and resin-modified glass ionomer cements.
Once the most widely used luting agent, zinc phosphate cement does not adhere to the tooth structure1 and can "wash out" in the presence of oral fluids when restorations do not fit precisely. Polycarboxylate cements, on the other hand, adhere to enamel by means of chelation; however, the film thickness is greater than with zinc phosphate cements, which can sometimes prevent a restoration from seating fully.2 Glass ionomer cements, which are still widely used as luting cements, offer some distinct advantages over both zinc phosphate and polycarboxylate cements, in that they have an extremely thin film thickness and exhibit release of fluoride ions, which has been shown to have an anticariogenic effect.3 However, glass ionomers are quite soluble in oral fluids. Resin-modified glass ionomer cements, the next stage in the evolution of glass ionomers, are insoluble in oral fluids.4
One commonality of the aforementioned cements is that they do not chemically bond to restorative materials. Unlike these cements, pure resin-only cements evolved out of total etch and dentin adhesive technologies to enhance the luting cements' ability to chemomechanically bond to both restorative substrates and tooth structure. For proper use, they may require pretreatment of the tooth surface with 37% phosphoric acid and application of a dentin-bonding agent before the resin cement is applied.5 Many resin cements also require pretreatment of the restorative substrate to enhance the bond of the cement to the restorative material.6 These cements, which are insoluble in oral fluids, form a micromechanical bond to both tooth structure and restorative material.7
Self-etching resin cements require no pretreatment of the tooth surface and appear to have many of the benefits of resin cement systems, coupled with the ease of use of more traditional types of cements. However, some self-etching resin cements have lesser bond strengths than total-etch resin cements.8Nevertheless, the foremost purpose of all cements is to fill the microgap between the tooth structure and restoration, while enhancing retention of the restoration.
BIOACTIVITY IN DENTAL MATERIALS
Until recently, bioactivity in dentistry has been associated primarily with fluoride release and the conversion of hydroxyapatite to its stronger form, fluorapatite, which helps strengthen tooth enamel and makes it more resistant to acidity.
Today, the definition of bioactivity in dentistry has grown as a result of the many new "smart" (bioactive) dental materials that have recently become available. The bioactivity of a dental material refers to the ability of the material to contribute calcium and phosphate ions to help rebuild demineralized dentin, and the way in which a dental material reacts to pH changes in the oral environment to elicit changes in the both the dental material and the tooth itself.9
Bioactivity also refers to the precipitation of apatite crystals on the surface of the material in the presence of moisture (saliva). "Biomineralization" is used to describe the exchange of calcium and phosphate ions with the tooth substance, forming new apatite or repairing demineralized apatite.9
For crown and bridge restorations, preparation of the margin position and the microenvironment of the gingival sulcus (crevicular fluid) need to be considered when one is selecting a luting agent. For areas of the oral cavity that are difficult to keep moisture-free and where the location of the restorative margins is intracrevicular, a hydrophobic resin may not be the best choice for cementation. Also, the set pH of resins does not help buffer acid attack from bacterial metabolic byproducts, and this can lead to marginal failure due to recurrent decay.10
Some bioactive cements are able to seal marginal gaps between the restoration and the tooth because of the capability of the cement to help precipitate apatite-like crystals on its surface.11,12 Calcium aluminate cement (Ceramir® Crown & Bridge, Doxa Dental) has shown this ability, as have a couple of the newer self-etching resin cements, ie, TheraCem (Bisco Dental Products), which exhibits high bond strengths to both zirconium and metal without the use of additional primers,13 and Activa™ BioACTIVE Cement™ (Pulpdent Corporation).
CASE STUDY: PLACEMENT OF MAXILLARY CENTRAL INCISOR CERAMIC RESTORATIONS
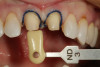
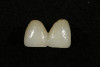
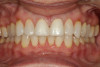
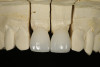
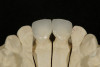
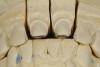
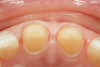
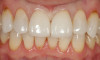
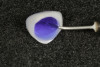
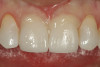
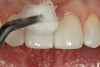
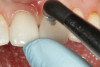
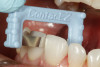
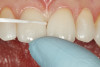
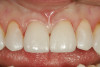
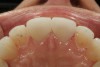
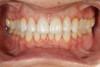
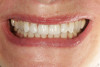
A 55-year-old female patient presented with maxillary central incisors that had extreme wear on the palatal surfaces such that the strength of the remaining facial tooth structure was compromised (Figure 1). It was decided that these teeth should be protected with full coverage porcelain before further catastrophic damage could occur. A preoperative shade was taken and photographed to provide a visual prescription to the dental technician (EyeSpecial II, Shofu Dental) (Figure 2). After preparation for zirconium crowns, the tissue was retracted for the registration of master impressions (Figure 3). A preparation shade was taken to show the value of the preparation (Figure 4), which helped determine the translucency of the material to be selected to make the definitive restoration. Next, the provisional restoration was fabricated at chairside and characterized with acrylic stain (Minute Stain, Taub Products) (Figure 5); this photograph also served as a "visual prescription" to the ceramist.After registration of the master impression, opposing impression, and interocclusal records, the provisional restoration was cemented. Figure 6 shows a full retracted facial view as the patient presented with provisional restorations before the delivery of the finished crowns. Figure 7 and Figure 8 are facial and palatal views, respectively, of the completed restoration on the master dies. It is important to note the concavities on the palatal aspects of the prepared teeth and create space for a noninterfering envelope of function (Figure 9). In Figure 10, an incisal view of the preparations, the provisional restorations have been removed to reveal a healthy periodontal environment for the cementation process. Next, the definitive restorations were tried in and evaluated individually for marginal fit, as well as for collective fit and tightness of proximal contacts(Figure 11). Prior to cementation, the inner surfaces of the restorations were cleaned to remove salivary contaminants (ZirClean, Bisco Dental Products)(Figure 12). The restorations were then rinsed and air dried. An antimicrobial (Consepsis, Ultradent) was used to clean the preparations prior to cementing. Next, a self-etching resin cement (TheraCem) was placed into the restorations and the restorations were seated to place (Figure 13). A large cotton pellet was used to remove cement excess around the margins of the restorations (Figure 14). While the restorations were held in place, a gentle stream of air from the air-water syringe was directed interproximally to help remove excess resin cement from between the teeth (Figure 15). A tacking tip on the curing light was then used to "tack" the restorations in place to allow further clean-up (Figure 16). An interproximal strip (ContacEZ® restorative strips, ContacEZ) was used to remove any excess resin from the contact area (Figure 17), and dental tape was used to clear the last remnants of resin cement from the interproximal embrasure areas (Figure 18). Once clean-up was completed, the restorations were fully cured according to the manufacturer's instructions (Figure 19). Figure 20 through Figure 23 show the completed restorations after final cementation.
CONCLUSION
In crown and bridge restorations, a restorative-tooth margin of approximately 30 to 50 is generally considered to be clinically "closed," as a marginal gap of that size cannot be detected by a sharp dental explorer. However, because bacteria tend to have a diameter of only about 1 , a 30- to 50- margin is clearly "open" to the ingress of bacteria. In addition to contributing to a precise fit, an optimal luting agent will successfully and permanently occlude the marginal gap. In some cases there may be undetectable gaps in the restorative-tooth interface that the luting agent was not able to fill, perhaps due to a "bubble" or a tissue tag. In this scenario, the likelihood of recurrent decay to damage the restoration in that area would be high, particularly if the gap is located in the gingival crevice and not visible on the radiographs. Bioactive luting agents that not only are insoluble but can precipitate apatite for sealing marginal gaps represent the next step in the evolution of dental luting agents for crown and bridge restorations.
REFERENCES
1. Platt JA. Dental materials. In: Dean JA, ed. McDonald and Avery's Dentistry for the Child and Adolescent. 10th ed. Philadelphia, PA: Elsevier; 2016:206-220.
2. Pameijer CH, Glantz PO, von Fraunhofer A. Clinical and technical considerations of luting agents for fixed prosthodontics. Int J Dent. 2012;2012:565303.
3. Powis DR, Follerås T, Merson SA, et al. Improved adhesion of glass ionomer cement to dentin and enamel. J Dent Res. 1982;61(12):1416-1422.
4. Shirazi M, Tamadon M, Izadi M. Effect of addition of bioactive glass to resin modified glass ionomer cement on enamel demineralization under orthodontic brackets. J Clin Exp Dent.2019;11(6):e521-e526.
5. Strassler HE, Levine E. Chapter 23. Cements - Section A: Contemporary dental cements. In: Freedman G, ed. Contemporary Esthetic Dentistry. Elsevier Mosby; 2012:537-546.
6. Friedman G. Chapter 23. Cements - Section B: Dual cure resin cements and esthetic supragingival margins. In: Freedman G, ed. Contemporary Esthetic Dentistry. Elsevier Mosby; 2012:547-559.
7. Sahafi A, Peutzfeldt A, Asmussen E, Gotfredsen K. Bond strength of resin cement to dentin and to surface-treated posts of titanium alloy, glass fiber, and zirconia. J Adhes Dent. 2003;5(2):153-162.
8. Mandava J, Pamidimukkala S, Karumi S, Ravi R, Borugadda R, Afraaz A. Microtensile bond strength evaluation of composite resin to discolored dentin after amalgam removal. Cureus. 2020;12(4):e7536.
9. McCabe JF, Yan Z, Al Naimi OT, Mahmoud G, Rolland SL. Smart materials in dentistry. Aust Dent J. 2011;56(1):3-10.
10. Fuss M, Wicht MJ, Attin T, Derman SHM, Noack MJ. Protective buffering capacity of restorative dental materials in vitro. J Adhes Dent. 2017;19(2):177-183.
11. Jefferies SR. Bioactive and biomimetic restorative materials: a comprehensive review. Part I. J Esthet Restor Dent. 2014;26(1):14-26.
12. Jefferies SR, Fuller AE, Boston DW. Preliminary evidence that bioactive cements occlude artificial marginal gaps. J Esthet Restor Dent. 2015;27(3):155-166.
13. Myung-Jin Lim, Mi-Kyung Yu, Kwang-Won Lee. The effect of continuous application of MDP-containing primer and luting resin cement on bond strength to tribochemical silica-coated Y-TZP. Restor Dent Endod. 2018;43(2):e19.