You must be signed in to read the rest of this article.
Registration on CDEWorld is free. Sign up today!
Forgot your password? Click Here!
Providing endodontic treatments can be a great practice-builder for the general dentist. Rather than referring their patients to an endodontist for procedures such as root canal therapy, general dental practitioners can themselves often perform endodontic treatments. Providing these services can be highly worthwhile for most practices, particularly if practitioners make use of various techniques to shorten procedural time and make the clinical experience a more positive and even enjoyable one.
There are, however, instances where a referral to a specialist would be indicated. Such factors may include tooth position in the arch, canal morphology, and calcified canals. Endodontics is a challenging field, and case selection is key in obtaining a favorable outcome for the patient as well as the practitioner.
The six principles for successful endodontics in the general dental practice are 1) creating access, 2) finding canals, 3) following best practices for irrigation, 4) proper instrumentation, 5) creating a glide path, and 6) obturation. Before endodontic treatment can be undertaken, of course, the practitioner must obtain a pulpal and periapical diagnosis, not only to guide treatment decision making but also for purposes of legal documentation.
Creating Access
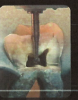
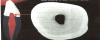
Access creation can be facilitated by the use of appropriate endodontic burs. A No. 4 bur provides exceptional control and allows the practitioner to make an access opening, either conservatively or as much as needed. Often the practitioner will gain a tactile sense of the height of the pulp chamber upon entering the tooth with the chosen bur (Figure 1).
In a study by Deutsch and Muskikant published in the Journal of Endodontics, the researchers noted that the mean distance from the cusp tip to the top of the pulp chamber ceiling in a healthy, non- attritioned tooth is approximately 7 mm.1 Many burs, particularly the No. 4 round bur, start to taper at about 7 mm, giving the practitioner a good sense of depth compared with that provided by radiographs. The surgical round bur, being longer, provides more visual access and offers that measurement on the bur.
Finding Canals
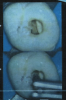
Once an ideal access is achieved, the practitioner should proceed to locate the canals. A diamond shaper is ideal for pushing back and smoothing axial walls, exposing canals, and shaping the pulp chamber to achieve straight-line access. A non-cutting tip helps prevent perforation, making this instrument generally safer and easier to use. Because diamond shapers are not end-cutting, it is necessary to have access large enough to accommodate the instrument. Parallel types are good choices, and there is a wide variety from which to choose. In the tooth shown in Figure 2, the access must be widened with the round bur to remove any obstructions that might be blocking canal visualization. The diamond shaper should then be brushed laterally to open up the canal or coronal aspect of the tooth as needed.
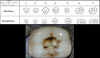
Magnification and illumination are necessary, either via loupes or a microscope; the latter provides greater magnification but also is more expensive and requires further training to master. Cone-beam computed tomography (CBCT) has enabled improved visualization of the anatomy and complexities of teeth.2 Figure 3 shows a mandibular first molar with a distal canal and two mesial canals. Usually the decay will guide access. The practitioner does not need to see all the canals in one visual aspect, and in fact that sometimes leads to over-enlarging, which weakens the overall tooth structure.
Straight-line access is needed, which helps avoid bending the file. The practitioner should be able to see all aspects clearly, but not necessarily on the same axis; the mirror should be rotated as needed. Figure 3 also shows the principle of symmetry; there is a central distal canal, but probably only one. The mesial canals are symmetric, with one on the lingual side and one on the buccal side. Because this tooth is centralized and symmetric, it is unlikely that there is a fourth canal. The practitioner needs to know where these canals should be located in the tooth that is being treated, and if the canals are not located where they are expected, a fourth canal needs to be sought. One should always suspect that there are extra canals until it has been proved that there are not as confirmed by CBCT imaging. If the appearance of the canals seems to be even a little bit odd, the practitioner should continue to look for an extra canal, using the color of dentin as a guide.
With regard to upper first molars, the practition- er may not always find the second mesiobuccal (MB2) canal, but knowing where to look is important. The MB2 usually lies mesially and palatally to the mesial buccal root. It is worthwhile for the practitioner to spend 2 to 5 minutes or more searching for it, using ultrasonics, magnification, and troughing out the area. Often by simply opening up the mesial buccal canal, the practitioner will remove some of the overlying dentin where the canal can be found. He or she can usually safely trough out about 1 to 2 mm and examine with a sharp endodontic explorer, searching mesially and palatally along the line. If an MB2 canal is suspected but not found, a referral to a specialist would be indicated due to the high likelihood of failure if the canal is left untreated.
Best Practices for Irrigation
Irrigation is one of the most important aspects of the root canal process. Because most canals are not round and are very complex, irrigation is an essential component of the cleaning process. Even with filing and instrumentation, the practitioner will miss multiple little offshoot canals. In a study published in the Journal of Endodontics,bench-top micro-computed tomography showed that despite the use of endodontic rotary file systems, 35% to 50% of the root canal system remained untouched and was not cleaned.3
The most popular irrigant is sodium hypochlorite (NaOCl) bleach, which dissolves necrotic tissue, kills bacteria effectively and quickly, and has a proven history of successful disinfection of complex root canal systems.4 NaOCl can, however, cause complications if it is exposed beyond the apex. Such complications could include acute pain, swelling, and redness, along with possible facial bruising as well.5 The practitioner should use a side-vented needle and be very cognizant of the location of the apex, and should never force the NaOCl. Also, NaOCl does not always treat Enterococcus faecalis bacteria, which causes many endodontic reinfections.6
Another disinfectant that may be used for irrigation is chlorhexidine (CHX), which is highly effective in killing E faecalis.7It is available in a 2% solution that can kill bacteria within 30 to 60 seconds. Its disadvantages are that it can form problematic precipitates if not rinsed out thoroughly between the use of other irrigation solutions, and it does not dissolve organic tissue, unlike NaOCl. CHX does not perform well as an irrigant when there are sharp turns and blockages, but NaOCl placed in the canal can help dissolve some tissue to help get around some of the sharper curves and clean out debris causing a blockage.
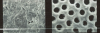
Ethylene diamine tetraacetic acid (EDTA) is another important material that is used in many different irrigants and lubricants for the canals. It is a chelating agent, so it binds to calcium and carries out the debris in the smear layer that forms when the practitioner is cleaning and shaping canals. Figure 4 shows the effectiveness of EDTA in smear layer removal. Rinsing with EDTA, the practitioner will ideally expose any offshoots or lateral canals.
As a finish rinse, an irrigant with CHX may be used8,9; however, because interaction of NaOCl and CHX results in an orange-brown precipitate that has toxic effects and is potentially carcinogenic, an intermediate endodontic irrigating solution (eg, saline) must be used after the use of NaOCl and before a final rinse with CHX.10 The final rinse irrigant should be allowed to settle in the canal for about 30 seconds. The canal should never be dry. An active irrigation system, such as the EndoActivator® system (Dentsply Siron) or another proprietary system, that has interchangeable plastic tips of different sizes can be used to remove debris. After the tips are placed in the canal 3 to 4 mm short of the apex, they will vibrate and eject smear layer debris out of the canal. The practitioner can also use ultrasonic activation for debris removal (Figure 5). Studies have shown that active irrigation not only improves the cleanliness of the canals but also has the benefit of reducing postoperative pain commonly associated with root canal therapy.11
Ultrasonic units have long metal tips, but the EndoActivators require plastic tips, as these provide more control, are more robust, and are unlikely to break. There are, however, a variety of flexible metal tips currently available on the market that offer the ability to be pre-bent, unlike the plastic tips (Irrisafe Tips™, Acteon).
Proper Instrumentation
The most important aspect of instrumentation and systems is safety. Instruments are required that will not separate and are fracture-free, and that will allow the practitioner to work quickly and effectively. The instruments must be sufficiently wide and tapered, but not overly tapered, which can otherwise create a danger of canal distortion. Instrumentation must also be cost effective.
With canals oval-shaped and not round (Figure 6), it is sometimes challenging to find the correct file, but effective shaping is critical. Although the canals may appear round at first, the middle third in a mandibular central incisor is generally oval-shaped. The practitioner must be highly aware of what taper he or she is using in small areas where cavities are located, and must be careful with regard to root fractures; the strength and integrity of the tooth need to be maintained as much as possible. Even the mesial roots of some molars have concavities, so those must be watched for, as well. A reamer with a helical flat offers safe and efficient rotary root canal treatment, but there are many endodontic systems available, and the practitioner should use what works best in his or her own hands. Spirals on files often have channels full of debris. Instruments should always be wiped clean, because if they are not clean they will not cut effectively, and such files should never be forced.
Creating a Glide Path
Another important aspect of endodontics is the creation of a glide path-a "slip and slide" for files down to the apex. A glide path should be reproducible, meaning that it should have a predetermined length. Once the practitioner uses apex locators, a glide path is necessary before cleaning and shaping with instrumentation can be begun. The glide path will help with fracture resistance, as well.
K-files, which feature 32 horizontal flutes used in a watch-winding motion, are commonly used to create glide paths. The file compacts debris apically on the downstroke and shaves on the upstroke, straightening curved canals. Use of K-files can result in excessive engagement with the canal walls, and sometimes offers poor tactile sense, potentially producing ledges.12 Figure 7 shows the differences between a K-file and a reamer. Reamers offer more benefits. The number of flutes is far fewer and they are more vertically oriented, resulting in less engagement on the canal walls. They also glide down smoother, helping the practitioner more readily achieve the proper length. Figure 8 illustrates an improved reamer, flat on one end, which produces an excellent cutting edge but is more flexible. In a study conducted in 2010, this type of improved reamer demonstrated a greater cutting efficiency than K-files or the standard reamer.13
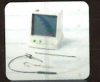
An apex locator is recommended to determine working length (Figure 9). Several different apex locators are available on the market, so the practitioner should determine which one he or she is most comfortable using. Apex locators have been shown to be more accurate than radiographs in determination of working length,14 although the latter are still indicated when there is a curve or if the practitioner is not certain where the instrumentation is in the canal. Figure 10 depicts the difference between a radiographic apex and anatomic apex, with the latter being measured with the apex locator.
Patience is required when using an apex locator. Using a .08 or .10 hand instrument, the practitioner should extend the file 0.5 to 1.0 mm beyond the apex, then after hooking the apex locator up to the file, he or she should feel and observe. The practitioner should take a long reading and then pull back to determine where the apex is located.
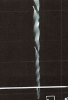
To achieve a glide path, some practitioners use .10 or .15 hand files, feeling that this gives them greater control over the use of a rotary handpiece. For several years, there has been a push in endodontics to favor reciprocation over rotary shaping, but recently many major systems have returned to the use of rotary shaping or have developed different types of rotary files, including the helical flat. As shown in Figure 11, the helical flat runs around the long axis of the file. It actually cuts dentin and will compact debris without resulting in the "sucked down" feeling that would occur with some older rotary systems.
Many systems have their own glide path files, which offer an excellent way to open up the canal to 20-02, which is more difficult to achieve with a hand file. The practitioner will usually find that the use of the glide path instrument 20-02 should be followed by finisher shaper instruments 30-02 and 30-04. Because of the design of the files, the practitioner can seamlessly, efficiently, and effectively transition from a glide path instrument to a shaper. The setting should be selected according to the manufacturer's recommendation, as different systems will have varying advisable speed and torque settings.
The practitioner should carefully advance the file in 2- to 3-mm increments while using light pressure, cleaning the file after each pass. It is important that the clinician takes his or her time, taking a couple of passes to make certain the canal is free of debris and blockages, as this will help maintain the safety of the procedure and limit the possibility of file breakage. The practitioner also needs to keep the canals patent to ensure that he or she does not become "blocked out" of the canal. A .10 file should be used every so often and placed approximately 0.5 mm beyond the apex to ensure that debris is not being packed. The 2-mm "pecking" motions will help prevent blockage. The instrument should fit loosely in the canal. By moving smaller-diameter instruments laterally, the practitioner is not making bigger, rounder holes, widening the canal; he or she is performing internal routing, maintaining the integrity of the tooth structure and cleaning against the walls, and avoiding the use of the massive taper instruments that were formerly employed in endodontics. The practitioner should also be careful about mid-root concavity.
Obturation
Obturation promotes hermetic sealing of canals to prevent reinfection. Thermosensitive techniques such as warm vertical condensation are commonly used. This method requires the use of a heat carrier as well as injectable gutta-percha to seal the canals; a non-eugenol epoxy root canal cement that is radiopaque and is compatible with all bonding agents and composites and that offers exceptional control may be used with this method. It can be used in a bidirectional spiral, put in the rotary at approximately 3 to 4 mm short of the apex, and will perform the sealing. Even complex canals can be sealed with the bidirectional sealer and a single-cone gutta-percha technique. However, because not every canal can be filled in this way, other techniques may be required on occasion.
All obturation techniques require the use of a sealer. Sealers have a variety of functions, such as acting as a lubricant for the gutta-percha and filling discrepancies in the canals, and some have anti- microbial properties as well. Some bioceramic-based sealers have also shown promising results. Their biocompatibility and biomineralization effects have been demonstrated to have excellent sealer-to-root dentin-bonding properties.15
A study published in the Journal of Endodonticsexamined four brands of thermosensitive gutta- percha fillers.16 All were found to expand as the temperature was elevated and shrink during cooling, and all continued to exhibit shrinkage up to 10 hours later before stabilizing. Such expressed thermoplastic materials may shrink up to 4%. Shrinkage produces gaps and is an inherent property of all thermoplastic techniques (carrier based, the expressed thermoplastic technique, or heated spreaders).
The following are desirable qualities in obturation material: sealing ability; radiopacity; no shrinkage; no tendency to extrude over the apex, especially for lower molars or near the mandibular nerve; and thorough coating of the walls of the canal without going over the apex.
The obturation sequence for the single-cone gutta-percha technique consists of the following steps: 1) fitting a 30-04 gutta-percha point, 2) placing the root canal cement with the bi- directional spiral, 3) repeating the application of cement, 4) sealing the point and burning off the coronal excess, and 5) tapping the coronal opening with the warm instrument.
Conclusion
The six steps for successful endodontics in the general practice are creating access, finding canals, following best practices for irrigation, using proper instrumentation, creating a glide path, and performing obturation. Providing endodontic treatments allows the general dental practitioner to expand the services of the practice, resulting in a more successful practice and better oral healthcare for patients.
References
1. Deutsch AS, Muskikant BL. Morphological measurements of anatomic landmarks in human maxillary and mandibular molar pulp chambers. J Endod.2004;30(6):388-390.
2. Metzger Z, Solomonov M, Kfir A. The role of mechan- ical instrumentation in the cleaning of root canals. Endodontic Topics.2013:28(1);87-109.
3. Peters OA, Laib AL, Gohring TN, Barbakaw F. Changes in root canal geometry after preparation assessed by high- resolution computed tomography. J Endod. 2001;27(1):1-6.
4. Baumgartner JC, Cuenin PR. Efficacy of several con- centrations of sodium hypochlorite for root canal irrigation. J Endod. 1992;18(12):605-612.
5. Faras F, Abo-Alhassan F, Sadeq A, Burezq H. Complica- tion of improper management of sodium hypochlorite acci- dent during root canal treatment. J Int Soc Prev Community Dent. 2016;6(5):493-496.
6. Estrela C, Silva JA, de Alencar AH, Leles CR, Decurcio DA. Efficacy of sodium hypochlorite and chlorhexidine against Eterocococcus faecalis-a systematic review. J Appl Oral Sci. 2008;16(6):364-368.
7. Kim H-S, Chang SW, Baek S-H, et al. Antimicrobial effect of alexidine and chlorhexidine against Enterococcus faecalis infection. Int J Oral Sci. 2013;5(1):26-31.
8.Miçoogullari KS, Çaliskan MK. Efficacy of chlorhexidine as a final irrigant in one-visit root canal treatment a prospective comparative study. Int Endod J.2018;51(10): 1069-1076.
9. Mohammadi Z, Girdino L, Palazzi F, Asgary S. Agonistic and antagonistic interactions between chlorhexidine and other endodontic agents: a critical review. Iran Endod J. 2015;10(1):1-5.
10. Chhabra N, Gangaramani S, Singbal KP, Desai K, Gupta K. Efficacy of various solutions in preventing orange-brown precipitate formed during alternate use of sodium hypochlorite and chlorhexidine: an in vitro study. J Conserv Dent. 2018;21(4):428-432.
11. Susila A, Minu J. Activated irrigation vs conventional non-activated irrigation in endodontics - a systematic review. Eur Endod J. 2019;4(3):96-110.
12. Pettiette MT, Metzger Z, Phillips C, Trope M. Endodontic complications of root canal therapy performed by dental students with stainless-steel K-files and nickel-titanium hand files. J Endod. 1999;25(4):230-234.
13.Wan J, Rasimick BJ, Musikant BL, Deutsch AS. Cutting efficiency of 3 different instrument designs used in reciprocation. Oral Surg Oral Med Oral Pathol Oral Radiol Endod.2010;109(5):e82-e85.
14. Vieyra JP, Acosta J, Mondaca JM. Comparison of working length determination with radiographs and two electronic apex locators. Int Endod J. 2010;43(1)16-20.
15. Al-Haddad A, Che Ab Aziz ZA. Bioceramic-based root canal sealers: a review. Int J Biomater. 2016;2016:9753210.
16. Lee QL, Chang Y, Cobb CM, Robinson S, Hellmuth EM. Dimensional stability of thermosensitive gutta-percha. J Endod.1997;13(9):579-582.