You must be signed in to read the rest of this article.
Registration on CDEWorld is free. Sign up today!
Forgot your password? Click Here!
The life of an edentulous patient may be challenging both functionally and emotionally. The emotional effects of tooth loss include bereavement, lowered self-confidence, altered self-image and dislike of appearance, inability to discuss this "taboo" subject, behaving in a way that keeps the tooth loss a secret, altered behavior in socializing and forming close relationships, and premature aging.1
As a treatment option, traditional dentures are time tested, least costly, and the quickest noninvasive option available for rehabilitating an edentulous patient. However, dentures further the tooth bone loss. They are tissue-supported, which may lead to frequent occurrence of sore spots and complaints associated with nerve impingement. Patients who wear dentures not only lose bone but also muscle, leading to the development of wrinkles and "old" appearance. The expense of maintaining dentures is ongoing due to the need for frequent relines, denture adhesives, and cleaners. Routine functional activities such as eating and speaking may be difficult for denture wearers, resulting in a lower nutritional state, loss of self-confidence, and poor quality of life.2-5
Functional performance may be assessed by determining the pound-force per square inch (psi). For a dentate person, average force is 150 to 250 psi, with clenching or grinding at 1,000 psi. In contrast, for an edentulous person wearing dentures, the force is 50 psi, and after dentures are worn for more than 15 years, it drops to 5.6 psi.6 Therefore, the denture-wearing patient may be considered as being far from functioning at maximum capacity.
Implant Solutions
Implants have drastically helped improve the quality of life of the edentulous patient.3 Treatment options available for an edentulous patient include implant-retained and implant- and soft-tissue-supported prostheses; implant-retained and implant-supported removable prostheses; fixed screw-retained prostheses; and additional innovative options (Figure 1).7-11 Various materials may be used for fabrication of the prostheses, including zirconia, titanium, acrylic resin, porcelain, or their combinations. When implementing implant solutions, a variety of factors should be considered.
Initial Considerations
A team approach is crucial to successfully place and restore implants.12 The restorative dentist, the oral/implant surgeon, and the laboratory technician should all work together for achieving a predictable end result.12 Thorough diagnosis and treatment planning should be carried out, including assessing the condition of the soft and hard tissues, examining the temporomandibular joints and mouth opening, and evaluating the contour of bone and its proximity to vital structures.13,14 The patient's medical history and dental history should be recorded, and radiography, photography, and imaging should be performed.13,14 Diagnostic casts should be mounted in the articulator and used for treatment planning and also be available during the presentation of the treatment plan to the patient. It is also important to assess the available restorative space and esthetic space.15-17 A lip ruler may be used to quickly determine the available vertical esthetic space. This process can be accomplished digitally using cone-beam computed tomography (CBCT), facial scans, and intraoral digital impressions. Gathering as much information as possible at the beginning helps the practitioner visualize the entire process and helps reassure the patient.
When determining the type of prosthesis to fabricate, the practitioner should ask the patient several questions, such as: What do you want to eat? Do you want to eat just what you can or what you want? Do you want to go to a restaurant and order anything on the menu? It is important to determine exactly what the patient wants.18 The practitioner should also understand the patient's esthetic needs and treat the patient as a whole and notjust his or her mouth.14 Patients' ability to maintain proper oral hygiene is critical; this information should be used to determine the type of restoration best suited for the patient. It is important to bring this factor up while discussing the treatment options with the patient19-21; it should be explained to the patient that regular maintenance is critical for achieving a long-lasting result. Gathering as much information as possible at the beginning helps the practitioner visualize the entire process and helps ensure patient satisfaction.12-14
The practitioner should have predetermined case fees for the different types of implant solutions before presenting the treatment options to the patient. In this author's experience, for an overdenture, an average cost for each implant part is approximately two times the cost of a crown; two implants would cost approximately four times the cost of a crown. The average denture costs approximately twice as much as a crown for retrofitting the attachment and placement. The cost of a two-implant-supported overdenture would be approximately six times the cost of a single crown. The price would increase accordingly if more implants were planned or needed.
Treatment Planning the Position of Implants Using 3D Imaging and 3D Guides
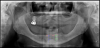
Traditionally, panoramic radiographs/2D images were used for planning the position of implants.22 The patient's existing denture or a duplicate of the existing denture was used as a radiographic guide (by incorporating radiographic markers), and then the denture or duplicate was converted to a surgical guide (Figure 2) and used for placing implants.23 Much information about the dentition, jaws, and joints may be acquired with a small amount of radiation dose from panoramic radiographs (Figure 3).24 However, the panoramic i ages are distorted and magnified. Patient positioning and technical errors further affect the image accuracy.25 It is almost impossible to determine the available bone width and the exact relationships of the neighboring anatomical structures with 2D radiographic images.25,263D radiography provides more accurate representation of the available bone and the surrounding anatomic structures compared with 2D radiography.27 It is critical to assess the position of the inferior alveolar nerve/sinuses while planning the location of implants to prevent injury to vital anatomic structures.28
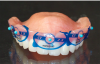
The use of CBCT (3D radiography) for presurgical planning of implants has made a huge impact on the success of implants and implant restorations.27 A dual-scan protocol is generally used.29 Radiographic markers are placed on the denture (Figure 4).29 A scan is made of the patient wearing the denture, and another scan is made of the denture itself. The data from the two scans are merged to optimally plan implant locations. 3D technology also permits the practitioner to perform an intraoral scan and merge the files acquired from the CBCT scan with those acquired from the intraoral scan (Figure 5).30 The detailed information provided with 3D technology permits the most accurate diagnosis and treatment planning.31 The planning data are sent to the production facility to generate 3D surgical guides.31
Implants placed too far facially or lingually may not be restorable.32 The restorative dentist should decide the type and the design of the definitive prosthesis before implant placement and plan the implants based on the design of the final prosthesis.6 Optimal positioning of the implants can be most predictably achieved through 3D-guided planning and 3D-guided implant surgery.31 Anchor pins may be included in the planning software to stabilize the surgical guide during implant surgery.33 Anchor pins help fixate the surgical guide to the ridge and prevent its movement during implant placement (Figure 6).33
For an edentulous patient, surgical guides may be mucosa-supported or bone-supported.31
When teeth are present, extractions and alveoloplasty may be required to gain additional vertical restorative space. A bone reduction guide may be used to guide the bone reduction, and another surgical guide may be planned to fit over the reduction guide to guide the implant placement (Figure 7).34
Implant placement through a 3D surgical guide is exactly as planned in the software.31 It is so accurate that a cast may be retro-engineered, and a transitional polymethyl methacrylate (PMMA) screw-retained restoration may be fabricated before the implant surgery and placed in the patient's mouth immediately after the placement of implants.35
Further Considerations
Implants help maintain and preserve the jaw bone.36 Implants provide superior retention, stability, and support to the restorations, which aids in improving the chewing force and efficiency, speech, esthetics and patient comfort.37 Complaints of poor prosthesis retention and stability or visible metal caps may be resolved by planning an implant-supported prosthesis.38
When treatment planning a patient for an implant-supported prosthesis, incorporating more than two implants permits a change in the type of the prosthesis and precludes the need for a subsequent surgical procedure.39 For a medically compromised patient or a patient with a narrow alveolar ridge, small-diameter implants may be selected.40 Rather than a traditional mini-implant with a ball-head joint attached, a system that permits flexibility in selecting the retention attachments and angle correction (thereby improving ease of denture placement and removal) should be chosen.41 Over time, the fit of the prosthesis may be compromised due to bone resorption or wear of implant overdenture attachments. The bone resorption will be minimal in areas where the implants are placed, but other parts of the residual ridge may continue with the resorption process.42 This situation would affect the fit of the prosthesis, necessitating a reline procedure or remake of the prosthesis. The overdenture attachments may get worn out with time or due to parafunction, necessitating their replacement.43
Prosthetic Implant Options for the Edentulous Patient
Implant- and Mucosa-Supported Digital Overdentures
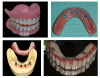
In the case depicted in Figure 8, the patient was restored with implant- and mucosa-supported digital overdentures.44 The patient approached the practitioner with a transitional implant-supported mandibular overdenture and a maxillary complete denture. The mandibular prosthesis had fractured a few months earlier and the patient had used commercially available adhesive to keep the fractured segments together. The patient desired an implant-supported restoration for the maxilla. A new mandibular prosthesis was also indicated to permit the development of optimal occlusion and proper positioning of the maxillary and mandibular prosthetic teeth.44 Digital dentures were fabricated for the patient and placed in the patient's mouth. To further improve the esthetics and occlusion, the prosthetic teeth that were incorporated in the digital dentures were ground down and replaced with acrylic teeth in wax. The acrylic teeth were repositioned to achieve optimal esthetics and function. The trial dentures with acrylic teeth were scanned, and the subsequent set of digital dentures was used as a transitional restoration and for planning maxillary implant positions.
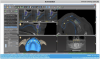
A dual scan protocol was used.29 The implant planning was accomplished on the implant-planning software (Figure 9).29,45The maxillary prosthesis was outlined (blue in the scan) to enable easy identification of the position of the denture and the prosthetic teeth. Four implants were planned, not only based on the available bone but also on the position of the prosthetic teeth, while maintaining the recommended distance from the maxillary sinuses. A surgical guide was ordered for guiding the pilot drills.46
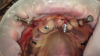
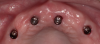
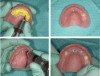
Pilot drill osteotomies were performed using the surgical guide46 (Figure 10), subsequent osteotomies were performed freehand, and the implants were placed as planned in the maxillary arch. A laser or a tissue punch can be used for removing the excess tissue to place healing abutments. The transitional maxillary digital denture was relieved around the implants, and a soft liner was placed on the intaglio surface of the prosthesis.
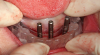
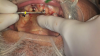
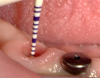
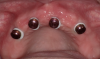
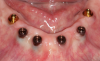
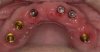
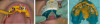
Four months later, overdenture attachments that permitted angle correction up to 60 degrees were attached to the implants by using a hex driver and were torqued per the manufacturer's recommendation (Figure 11).41 The attachments had a small screw-access hole that prevented food entrapment. Attachments are available in various heights.41 The height of each attachment should be predetermined by measuring the distance between the platform of the implant and the crest of the peri-implant tissue (Figure 12).47
If a new denture is to be made, scan bodies may be snapped over the attachments and impressions may be made, with records registered and then sent to the laboratory for fabrication of a new prosthesis.41 To convert the digital/existing dentures to implant-supported overdentures, the dentures were relieved in the location of the implants and the denture caps were picked up chairside in the dentures.41 An interocclusal record was made with a bite registration material and placed in the mouth to guide the patient in centric closure during the relieving of the denture and the chairside pickup of denture caps. The occlusal vertical dimension was recorded before relieving the dentures and kept constant during the pickup of the denture caps.41
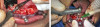
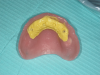
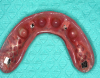
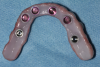
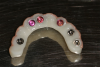
To adequately relieve the denture in the area of the implants, an impression and bite registration material was placed on the intaglio surface of the prosthesis, and then the prosthesis was placed over the overdenture abutments.41 The prosthesis was removed from the mouth after the polymerization of the impression material. The indentations of the denture caps were registered in the impression material (Figure 13). A vent hole bur was used to drill straight through the center of the indentations (Figure 14, top).41 A recess bur that fitted right in the hole was used to open the spaces (Figure 14, bottom). Next, retention was created by using an inverted cone retention bur.41 Then a round bur, football-shaped bur, and polisher were used to finish and polish the recesses.41
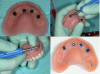
Block-out rings were placed around the denture caps in the mouth (Figure 15), and more than one was used where required. Block-out rings are used to block out the undercuts between the caps and the tissue and thereby prevent locking of the denture.41 Attachment pickup material was placed around the attachments in the mouth and in the recesses of the prosthesis (Figure 16). The prosthesis was placed in the mouth.41 After the polymerization of the pickup material, the prosthesis was removed from the mouth, finished, and polished.41 The black nylon processing inserts present within the denture caps were removed and replaced with the retentive inserts (Figure 17).41 The amount of retention can be increased by using inserts that provide an added degree of retention, if needed.41
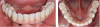
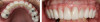
The implant-retained, soft-tissue-supported prosthesis was placed in the patient's mouth. The patient was informed that the retentive inserts within the denture caps may need to be replaced every year, the overdenture may require a laboratory hard reline after 3 years, and a new prosthesis may need to be made after 7 to 10 years.48 During the maintenance visits, the overdenture attachments and the caps with the inserts should be checked to ensure they are not worn down; if they are, they should be replaced.43
Implant-Retained and Implant-Supported Removable Prostheses
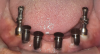
An implant-retained and implant-supported removable prosthesis may be fabricated by using a bar or a conical, titanium abutment with a 5-degree taper (Figure 18).49 In the next case, a fixture-level impression was made and records were registered and sent to the laboratory with the abutments (preselected based on the height of the mucosal cuff) for framework and prosthesis fabrication.49 The prosthesis had recesses on its intaglio surface to permit pickup of the abutment caps (Figure 19).49 The abutments were attached to the implants in the mouth (Figure 20). A jig/index provided by the laboratory (Figure 21) was used to seat the abutments intraorally so that they were positioned exactly as they were on the master cast. Gold caps were placed over the abutments and were picked up in the prosthesis intraorally (Figure 22).49 (Gold caps that fit over the abutments provide excellent retention, which improves over time.)50 The prosthesis was adjusted, finished, polished, and placed in the mouth (Figure 23). The prosthesis was entirely supported by the implant abutments.49 It had excellent retention and stability (almost like a fixed restoration) because it was entirely implant-supported; yet, it was removable.49
Fixed Zirconia Restoration
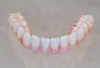
Figure 24 through Figure 31 depict a case of an elderly patient rehabilitated with a mandibular CAD/CAM full-arch fixed zirconia restoration.51 The patient had a removable partial denture in the mandibular arch; the remaining mandibular teeth were deemed non-restorable and had to be removed. A transitional complete denture was fabricated for the patient; however, he was not pleased with it because of the poor retention, masticatory efficiency, and function. The patient was treatment planned for an implant-supported mandibular restoration.
Dual-scan protocol was followed,29 and six implants were planned in the mandibular arch using the implant planning software.52 A 3D surgical guide was used to place two angled and four vertical implants; they were immediately loaded with a retro-engineered fixed transitional acrylic prosthesis.53 The patient was very pleased with the fixed prosthesis.
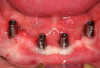
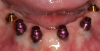
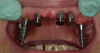
A fixed all-zirconia combination screw- and abutment-retained prosthesis was planned for the mandibular arch. Multiunit abutments were used to correct the angulation of the tilted distal implants54 and were torqued per the manufacturer specifications. Novel retentive abutments that would preclude the need for screws and cements were attached to the four anterior implants, rotated to ensure they were parallel to each other, and torqued per the manufacturer specifications (Figure 24).41
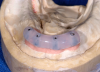
Impression copings were attached to the abutments (Figure 25); an abutment-level impression was made (Figure 26), and records were registered and sent to the laboratory for fabrication of the definitive prosthesis. A CAD/CAM all-zirconia prosthesis was planned (Figure 27, left) and fabricated by the laboratory. The prosthesis would have recesses on its intaglio surface in the location of the four anterior implants to provide space for the pickup of the attachment housings (Figure 27, right).41
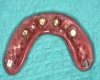
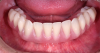
The denture attachment housings were placed over the four anterior abutments (Figure 28).41 The prosthesis (Figure 29) was tried and adjusted as needed, and the occlusal vertical dimension was verified.41 Block-out rings were placed around the abutments in the mouth to block out the undercuts below the abutments.41 Attachment pickup material was placed around the four anterior abutments in the mouth and in the recesses of the prosthesis, and the prosthesis was placed in the mouth.41 It was attached posteriorly to the distal-most implants with screws. After the polymerization of the pickup material, the screws of the multiunit abutments were loosened, and the prosthesis was removed from the mouth. The denture attachment housings were picked up in the zirconia prosthesis (Figure 30).41 The black nylon processing inserts present within the attachment housings were removed and replaced with new ones.41 The prosthesis was adjusted, finished, and polished. Then the black inserts were replaced with the retentive inserts.41 The amount of retention can be increased by using inserts that provide an added degree of retention, if needed.41 The prosthesis was placed in the patient's mouth, and the distal screws used to attach the multiunit abutments to the prosthesis were tightened and torqued per the manufacturer's recommendation (Figure 31). The screw-access holes were packed with polytetrafluoroethylene and composite resin.
In the case demonstrated in Figure 32 through Figure 37, a maxillary prosthesis retained by six implants, three screw-retained and three retained with the novel fixed abutments, with no screws (to avoid screw-access holes emerging from the facial surface of the prosthesis) was fabricated for the patient. The novel fixed retentive abutments make it easier to maintain the prosthesis.41 The retentive inserts within the attachment housing should be replaced every time the prosthesis is removed. However, the procedure is quick and simple to accomplish.
Patient Follow-up
The initial maintenance visit should occur shortly (approximately 2 weeks) after the prosthesis is placed to make sure that the patient is comfortable with the prosthesis and also is able to maintain proper oral hygiene.55 The patient should be encouraged to make an appointment every year for a checkup; regular maintenance visits will help identify problems early and permit easy and economical solutions.55 During every maintenance appointment, oral and prosthesis hygiene should be evaluated, the fixed prosthesis should be professionally cleaned, and an oral cancer screening should be performed.
The patient should be educated and motivated to maintain proper oral and prosthesis hygiene.55,56 The patient should be provided with all the cleaning aids to maintain adequate oral and prosthesis hygiene.55,56 Implant-supported restorations are more challenging to clean; patients with these restorations may benefit from using electric toothbrushes, interdental flosses, and oral irrigators.55,56The practitioner can provide the cleaning aids and include them in the case fee. Antibacterial rinses may be prescribed to the patient as required.55,56
Conclusion
A variety of solutions are available for the edentulous patient. Advanced imaging and novel techniques have permitted accomplishing bone reduction surgeries, implant placement, and placement of a fixed or removable provisional restoration in one appointment. This situation has helped increase patient satisfaction and patient acceptance of the procedures. All implant solutions aid in improving patient esthetics, masticatory force, and masticatory efficiency, thereby improving and enriching the patient's quality of life.
References
1. Fiske J, Davis DM, Frances C, Gelbier S. The emotional effects of tooth loss in edentulous people. Br Dent J. 1998;184(2)90-93.
2. Possebon APDR, Marcello-Machado RM, Bielemann AM, et al. Masticatory function of conventional complete denture wearers changing to 2-implant retained mandibular overdentures: clinical factor influences after 1 year of function. J Prosthodont Res. 2018;62(4):479-484.
3. McCord JF, Grant AA. Identification of complete denture problems: a summary. Br Dent J. 2000;189(3):128-134.
4. Runte C, Lawerino M, Dirksen D, et al. The influence of maxillary central incisor position in complete denture on /s/ sound production. J Prosthet Dent. 2001;85(5):485-495.
5. Mahross HZ, Baroudi K. Spectrogram analysis of complete dentures with different thickness and palatal rugae materials on speech production. Int J Dent. 2015;606834:1-5.
6. Misch CE. Dental Implant Prosthetics. 2nd ed. St. Louis, MO: Mosby; 2014.
7. Zarb GA, Schmitt A. Implant prosthodontic treatment options for the edentulous patient. J Oral Rehabil. 1995;22(8):661-671.
8. López CS, Saka CH, Rada G, Valenzuela DD. Impact of fixed implant supported prostheses in edentulous patients: protocol for a systematic review. BMJ Open. 2016;6(2):e009288.
9. Soto-Penaloza D, Zaragozí-Alonso R, Penarrocha-Diago M, Penarrocha-Diago M. The all-on-four treatment concept: systematic review. J Clin Exp Dent. 2017;9(3):e474-e488.
10. Srinivasan M, Kalberer N, Maniewicz S, Müller F. Implant overdentures retained by self-aligning stud-type attachments: a clinical report. J Prosthet Dent. 2020;123(1):6-14.
11. Abdulmajeed AA, Lim KG, Närhi TO, Cooper LF. Complete-arch implant-supported monolithic zirconia fixed dental prostheses: a systematic review. J Prosthet Dent. 2016;115(6):672-677.e1.
12. Ng DY, Wong AYC, Liston PN. Multidisciplinary approach to implants: a review. N Z Dent J. 2012;108(4):123-128.
13. Drago C. Diagnosis and treatment planning in implant restorative dentistry. In: Implant Restorations: A Step-By-Step Guide. 3rd ed. John Wiley & Sons; 2015:57-90.
14. Zitzmann NU, Margolin MD, Filippi A, et al. Patient assessment and diagnosis in implant treatment. Aust Dent J. 2008;53(suppl 1):S3-S10.
15. Ahuja S, Cagna DR. Classification and management of restorative space in edentulous implant overdenture patients. J Prosthet Dent.2011;105(5):332-337.
16. Ahuja S, Cagna DR. Defining available restorative space for implant overdentures. J Prosthet Dent. 2010;104(2):133-136.
17. Massad JJ, Ahuja S, Cagna DR. Implant overdentures: selections for attachment systems. Dent Today. 2013;32(2):128-132.
18. Marachlioglou CRMZ, Dos Santos JFF, Cunha VPP, Marchini L. Expectations and final evaluation of complete dentures by patients, dentist and dental technician. J Oral Rehabil. 2010;37(7):518-524.
19. Heydecke G, Boudrias P, Awad MA, et al. Within-subject comparisons of maxillary fixed and removable implant prostheses: patient satisfaction and choice of prosthesis. Clin Oral Implants Res.2003;14(1):125-130.
20. Feine JS, de Grandmont P, Boudrias P, et al. Within-subject comparisons of implant-supported mandibular prostheses: choice of prosthesis. J Dent Res. 1994;73(5):1105-1111.
21. Ahuja S, Wicks R, Selecman A. Fabrication of new restorations with a consideration of oral hygiene. J Indian Prosthodont Soc.2016;16(3):307-310.
22. Garg AK, Vicari A. Radiographic modalities for diagnosis and treatment planning in implant dentistry. Implant Soc. 1995;5(5):7-11.
23. Lecomber AR, Yoneyama Y, Lovelock DJ, et al. Comparison of patient dose from imaging protocols for dental implant planning using conventional radiography and computed tomography. Dentomaxillofac Radiol. 2001;30(5):255-259.
24. Wulfman C, Hadida A, Rignon-Bret C. Radiographic and surgical guide fabrication for implant-retained mandibular overdenture. J Prosthet Dent. 2010;103(1):53-57.
25. Monsour PA, Dudhia R. Implant radiography and radiology. Aust Dent J. 2008;53(suppl 1):S11-S25.
26. Jacobs R, Quirynen M. Dental cone beam computed tomography: justification for use in planning oral implant placement. Periodontol 2000. 2014;66(1):203-213.
27. Fortes JH, de Oliveira-Santos C, Matsumoto W, et al. Influence of 2D vs 3D imaging and professional experience on dental implant treatment planning. Clin Oral Investig. 2019;23(2):929-936.
28. Özalp Ö, Tezerişener HA, Kocabalkan B, et al. Comparing the precision of panoramic radiography and cone-beam computed tomography in avoiding anatomical structures critical to dental implant surgery: a retrospective study. Imaging Sci Dent. 2018;48(4):269-275.
29. Juodzbalys G, Wang HL, Sabalys G. Injury of the inferior alveolar nerve during implant placement: a literature review. J Oral Maxillofac Res. 2011;2(1):e1.
30. Spinelli D, Ottria L, De Vico G, et al. Full rehabilitation with Nobel clinician and Procera implant bridge: case report. Oral Implantology (Rome). 2013;6(2):25-36.
31. Hassan B, Gimenez Gonzalez B, Tahmaseb A, et al. A digital approach integrating facial scanning in a CAD-CAM workflow for complete-mouth implant-supported rehabilitation of patients with edentulism: a pilot clinical study. J Prosthet Dent. 2017;117(4):486-492.
32. Ramasamy M, Giri, Raja R, et al. Implant surgical guides: from the past to the present. J Pharm Bioallied Sci. 2013;5(suppl 1):S98-S102.
33. Massad JJ, Wong D, Wicks RA, et al. Prospectively engineered implant placement. Dent Today. 2017;36:110-118.
34. Massoomi NS. Guided bone reduction to facilitate immediate implant placement using CAD/CAM surgical guides after full-mouth extractions. J Oral Maxillofac Surg. 74(9):e32-e33.
35. Giordano M, Ausiello P, Martorelli M. Accuracy evaluation of surgical guides in implant dentistry by non-contact reverse engineering techniques. Dent Mater. 2012;28(9):e178-e185.
36. Khalifa AK, Wada M, Ikebe K, Maeda Y. To what extent residual alveolar ridge can be preserved by implant? A systematic review. Int J Implant Dent. 2016;2(1):22.
37. Sharma AJ, Nagrath R, Lahori M. A comparative evaluation of chewing efficiency, masticatory bite force, and patient satisfaction between conventional denture and implant-supported mandibular overdenture: an in vivo study. J Indian Prosthodont Soc. 2017;17(4):361-372.
38. Kumar L, Sehgal K. Removable partial denture supported by implants with prefabricated telescopic abutments - a case report. J Clin Diagn Res. 2014;8(6):ZD04-ZD06.
39. Daudt Polido W, Aghaloo T, Emmett TW, et al. Number of implants placed for complete-arch fixed prostheses: a systematic review and meta-analysis. Clin Oral Implants Res. 2018;29(suppl 16):154-183.
40. Mohamed JB, Alam MN, Salman A, Chandrasekaran SC. Narrow diameter implant in posterior region. J Indian Soc Periodontol.2012;16(4):610-613.
41. Zest Dental Solutions. From partially to fully edentulous. Zest Dental Solutions website. www.zestdent.com. Accessed September 22, 2020.
42. Eckert SE. Sequelae of partial edentulism. Int J Prosthodont.2007;20(4):356.
43. Marin DOM, Leite ARP, de Oliveira NM Jr, et al. Retention force and wear characteristics of three attachment systems after dislodging cycles. Braz Dent J. 2018;29(6):576-582.
44. Han W, Li Y, Zhang Y, et al. Design and fabrication of complete dentures using CAD/CAM technology [published correction appears in Medicine (Baltimore). 2017;96(3):e6030]. Medicine (Baltimore). 2017;96(1):e5435.
45. Albiero AM, Benato R, Momic S, Degidi M. Implementation of computer-guided implant planning using digital scanning technology for restorations supported by conical abutments: a dental technique. J Prosthet Dent. 2018;119(5):720-726.
46. Vercruyssen M, Coucke W, Naert I, et al. Depth and lateral deviations in guided implant surgery: an RCT comparing guided surgery with mental navigation or the use of a pilot-drill template. Clin Oral Implants Res. 2015;26(11):1315-1320.
47. Massad J, Wicks R, Ahuja S, Cagna DR. Subcrestal implant placement and recontouring soft tissue using the erbium YAG laser to manage restorative space in implant overdentures. J Prosthodont.2019;28(4):e909-e911.
48. American Dental Association. Dentures. American Dental Association website. https://www.ada.org/~/media/ADA/Publications/Files/ADA_PatientSmart_Dentures.pdf?la=en. Accessed September 20, 2020.
49. Dentsply Sirona. Discover by category. Dentsply Sirona website. www.dentsplysirona.com. Accessed September 20, 2020.
50. Prasad DK, Prasad DA, Buch M. Selection of attachment systems in fabricating an implant supported overdenture. J Dent Implant.2014;4(2):176-181.
51. Pozzi A, Holst S, Fabbri G, Tallarico M. Clinical reliability of CAD/CAM cross-arch zirconia bridges on immediately loaded implants placed with computer-assisted/template-guided surgery: a retrospective study with a follow-up between 3 and 5 years. Clin Implant Dent Relat Res. 2015;17(suppl 1):e86-96.
52. Fortin T, Bosson JL, Coudert JL, Isidori M. Reliability of preoperative planning of an image-guided system for oral implant placement based on 3-dimensional images: an in vivo study. Int J Oral Maxillofac Implants. 2003;18(6):886-893.
53. Asawa N, Bulbule N, Kakade D, Shah R. Angulated implants: an alternative to bone augmentation and sinus lift procedure: systematic review. J Clin Diagn Res. 2015;9(3):ZE10-ZE13.
54. Maló P, Rangert B, Nobre M. "All-on-Four" immediate-function concept with Brånemark system implants for completely edentulous mandibles: a retrospective clinical study. Clin Implant Dent Relat Res.2003;5(suppl 1):2-9.
55. Bidra AS, Daubert DM, Garcia LT, et al. Clinical practice guidelines for recall and maintenance of patients with tooth-borne and implant-borne dental restorations. J Prosthodont. 2016;25(suppl 1):S32-S40.
56. Massad J, Verma M, Ahuja S. Improving implant survival by implementing the use of an electric toothbrush. Dent Today. 2019;38:68-77.