You must be signed in to read the rest of this article.
Registration on CDEWorld is free. Sign up today!
Forgot your password? Click Here!
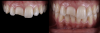
When dealing with complex tooth fractures and extensive restorations, some practitioners choose to perform traditional indirect restoration procedures, starting with a wax-up and a silicone index, and in a second appointment the practitioner would layer the restorative material. A third appointment might even be required. However, sometimes such treatments, such as in Figure 1, can be performed with simpler and faster techniques such as direct restoration. This type of restoration requires specific clinician skills of managing the composite, anatomy, and textures, which sometimes might lead the dentist not to perform it. While direct procedures are highly dependent on the dentist, indirect restorations are highly dependent on the laboratory technician.
Composites as a Reliable and Safe Option
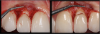
Instead, to perform a direct composite one-day restoration, the clinician can make the impression of the fracture with silicone (Figure 2) without a wax-up, cut the frontal/buccal part of the silicone, and then create the palatal surface for a modified silicone index, creating the anatomy of the palatal surface in a technique called BRB (Bertholdo/Ricci/Barrotte).1 In the same appointment, after the impression of the fracture and the new design of the palatal anatomy are made, the practitioner can create the composite restoration, shaping it and layering it step-by-step (Figure 3), completing the procedure with finishing and polishing. Total appointment time would be approximately 1.5 hours.
The Stage of Excess Intervention and Indirect Restorations
In the last few years, esthetic dentistry has passed through a period of excess of interventions and treatments; practitioners have been over-restoring,2 with procedures that are mostly irreversible. Composite restorations are reversible procedures when done without tooth preparation and can be employed to solve this problem.
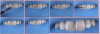
The patient in Figure 4 was referred by an orthodontist not for surgery or orthodontic treatment, but for dental rehabilitation, which the practitioner completed in three appointments. In the past, a practitioner might have made several sets of provisionals over a 6- to 7-month period approximately. Nowadays practitioners are able to rehabilitate faster using conservative preparations, veneer, and overlay preparations, avoiding crowns and endodontic treatment, but risking rehabilitating and restoring too much.2
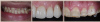
Figure 5 shows a 20-year-old patient with no-preparation veneers; 3 months after cementation there was inflammation because of over-contour of ceramics. This was a case of too much restoration, indicative of a general trend in recent years of too much restoration in too many young patients.2
Practitioners also have been getting too excited about technology, such as CAD/CAM and milling machines, and have sometimes used these tools too much as well.3 Simpler procedures using composite restorations can also be indicated.
In another case, a 22-year-old female patient had one ceramic veneer on tooth No. 9 with the volume of veneer too large and an unsatisfactory color and shape. A practitioner suggested replacing it with another veneer and an additional one on the adjacent central incisor, potentially compromising a perfect tooth. Instead, a different treatment option was performed, by removing the ceramic veneer of tooth No. 9; after it was removed the preparation could be seen, and the patient presented as ideal for a composite restoration in one appointment. By observing the natural tooth, the practitioner could reproduce the tooth's proper shade and color and even a natural white spot and could copy the anatomy and texture. Replacing ceramic with composite was a fast and esthetically pleasing solution.
Concerning technique, a rubber dam is not mandatory and is not always needed for composite. It can be useful and simple for the practitioner, but it is not always required. Research by Wang et al states there is "no evidence evaluating the effects of rubber dam usage on the quality of the restorations."4
A modified use of a rubber dam may be indicated, with multiple perforations of the rubber dam side-by-side for modified isolation, resulting in less time needed for the restoration.5 Also, a polytetrafluoroethylene (PTFE) tape plus cord can be used, or a lip separator plus PTFE tape and a retraction cord. Such small and simple solutions make working with composite easier and quicker.
Considerations on Anterior Composite Approach
When making canine-to-canine composite veneers, one can do eight perforations side-by-side, putting the rubber dam from premolar to premolar. A PTFE or retraction cord may be used.
A handmade technique may also be indicated and is very simple. A dentin composite shade A1 is taken; it is always performed with A1 shade, and the shade should not be changed. An incisal edge and palatal surface are created, and after that the buccal surface is finished with an enamel shade based on the color and shade of the patient's teeth. One can use A1 dentin plus A1 enamel-two shades, no wax-up, and good results. Doing composite veneers one-by-one in a situation like this is the preferred method, allowing better control of the shade, finishing and polishing with a diamond bur at low speed (5,000 to 6,000 rpm) with high pressure, and polishing without water.6After completion, the occlusion, protrusion, lateral guidance, and veneers should be checked. Time requirement is about 2.5 hours.
Universal Composites: A Trend
Available to practitioners now in a variety of brands are universal composites that allow the practitioner to use fewer layers. They can be used on anterior teeth similar to the way bulk-fill composites are used on posterior teeth.
Dr. Hirata and colleagues tested four universal composites for color matching with several tooth colors (A1, A2 and A3 tooth shades), with a score of 0 being an excellent match, 1 being a good match but with some restoration visible, 2 being a good match with the border line of the composite visible, 3 with the restoration visible and not matching with the tooth; and 4 being completely different and gray. A regular composite was used as a control. Dr. Hirata and colleagues discovered that a well-known universal composite had the worst result, whereas two others and even the regular composite matched with the tooth very well. This showed that at least one regular composite has technology based on that of bulk-fill and universal composites, even if the manufacturer does not advertise it as such. At a 2-mm thickness, using even just one shade, the practitioner may get very good results. In a dental practice, it means that one must know which composite he or she is using because different composites have different capacities of mimicking with the surrounding tooth tissue.7
Diastema
A diastema case may also be performed using one shade.8 The practitioner may use a traditional rubber dam tooth-by-tooth and sandblast the surface; when there is a prismatic enamel on the surface on which a diamond bur has not been used, sandblasting is required. A regular sandblaster or a microetcher with water and different pressures may be used.
After sandblasting, a transparent matrix can be used for diastemas. Different matrix sizes are available to facilitate a perfect contour of the cervical portion. An acid adhesive, a transparent regular composite, and a flowable composite can be used. The regular composite should be pushed by adding a bit of flowable, and the flowable should be pressed with the regular composite. Then the whole set should be polymerized together. This is a similar technique to that used for posterior teeth.9The result is a perfect adaptation of the composite (Figure 6). Using newer composites and using a regular composite with some attributes of a universal composite are simple means of restoring with just one shade.
Black Spaces
Black spaces can also be closed with composite. The black spaces should be measured and filled. Transparent matrices can be used, along with the same technique featuring regular-consistency composite plus flowable. Both consistencies should be combined to produce a good adaptation of the composite on the interproximal in a process similar to that for the diastema, filling with just one shade of the regular composite plus flowable. Not much layering is needed; the space can simply be bulk filled with a composite and finish. Polishing cups and discs should be used for finishing and polishing procedures at a low speed, 5,000 to 6,000 rpm with no water pressure. Thus, using composites, the practitioner can complete a variety of anterior restorations employing one shade, using techniques that are not complex, in one appointment.10
Composites: Can They Be Trusted?
Conventional layering techniques may result in practitioners using too many layers to control shrinking and thickness, requiring polymerization by a maximum thickness of 1.5 to 2 mm of composite. Required steps are an A3 dentin shade, polymerization, an A3 enamel shade, polymerization, and then a transparent layer. For posterior teeth, it is too many steps, requiring too much time and too much control, managing cuspid-by-cuspid to control shrinkage, with potential problems with adaptation. Instead, there is a simple way to restore using bulk-fill composites, resulting in increases in restoration production, predictability, and success. Also, decreased gap formation and a faster procedure can be obtained with bulk-fill composites instead of using an incremental technique.9
Bulk-Fill Composites: What Is the State of the Art?
The first advantage of bulk-fill composites is eliminating the problems inherent in the too many layers required in conventional techniques.11 Among the problems in performing a technique on posterior teeth, step-by-step, bicuspid-by-bicuspid, is the formation of voids and bubbles inside the composite. Bulk filling avoids this issue, thus resulting in fewer failings.
The second advantage of bulk-fill composites is fewer steps-usually one or two. If there are fewer steps, the procedure is faster and more reliable.12Many bulk-fill composites are available in a flowable consistency. Everything should be filled with a universal shade such as IVA until a 4-mm thickness is achieved; enough should be inserted into the cavity to leave just the top surface or thickness for the final composite. There is no resistance for the composite to be used in an occlusal surface, so just 1.3 mm of thickness should be left for the final layer of any composite-usually an A1 shade of any regular composite. Just two layers are required instead of several.
The third advantage is that there is less shrinkage in the bulk-fill flowable composites in the interface compared with conventional composites because of the monomers and different chemistry in the newer flowable composites.13The practitioner can polymerize deeper, and there is better maintenance of the internal interface with some of the brands of bulk fill.14
For composite restorations for posterior teeth using bulk fill, the selective enamel etching technique should be used.15 The enamel should be etched for 20 seconds, washed, and dried; the dentin should not be etched. Universal adhesives should be applied, rubbing the surface for 20 to 30 seconds to allow penetration of the monomers on the dentin surface (Figure 7). By not etching the dentin, common postoperative sensitivity the patient feels when he or she bites can be avoided. Another point that plays a role in determining the outcome of postoperative sensitivity is operator skill.16,17 In the COVID-19 era, this technique is particularly desirable because it eliminates the need for a follow-up appointment.
After polymerization for 10 to 20 seconds using universal adhesive, the cavity should be filled with bulk-fill composite up to 4 mm, leaving a top surface for the final layer of regular, A1 composite. Then the restoration should be finished by polymerizing again. Often there is darkness in the dentin in the bottom of the cavity. Some bulk-fill flowables allow the practitioner to polymerize until 4 mm but result in a grayish color because they are too transparent; therefore, one that becomes opaque should be chosen.18
One new bulk fill is available for use with a specific light-curing unit, allowing light-curing for only 3 seconds rather than 20, with little shrinkage.19 Three-second polymerization in the regular consistency technique may be indicated in certain cases: when the patient presents with a small, Class I cavity; when performing a procedure on a pediatric patient; and when unable to use a rubber dam for posterior teeth.
Direct vs Indirect
Many inlays and onlays require scanning, milling, sending impressions to a laboratory technician, and CAD/CAM. However, there is an alternative solution that eliminates the need for those steps and requires only regular composite.
A patient presented with two cavities needing onlays. Instead of sending an impression to the laboratory or scanning or milling, the practitioner performed the restorations himself with a regular composite in a model, doing the cementation of the onlays with a regular composite, all in one appointment, a technique known as semi-direct restoration.
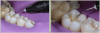
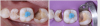
In a second case a patient had caries, fractures, and a very deep cervical margin in the second molar that would typically require surgery to recover the biological width (Figure 8). The technique indicated is called deep elevation margin, or DEM, which allows the practitioner to create a new margin with a composite.20 The practitioner placed a rubber dam and installed a perfect matrix band with a circle wall, then elevated the margin with a composite. After the preparation, the practitioner performed two onlays with a new composite DEM and then made an alginate impression of the case. The margin was composite, perfectly adapted. In the same appointment, the practitioner created a silicone model and asked the patient to wait in the waiting room for his restoration. The setting time for the silicone model was just 3 minutes, at which time the practitioner had a working model. The practitioner then restored the silicone model using a regular composite, applying the layering. The practitioner also restored the opposite tooth by silicone, allowing him to check adaptation on the model and occlusion, resulting in an optimal fit. The practitioner called the patient back from the waiting room and cemented two regular composite onlays in the same appointment, taking only 40 minutes and avoiding surgical steps, impressions, a provisional, laboratory work, and a second appointment.
Conclusion
New ceramics and technologies often result in the practitioner performing restorations that are too elaborate, when instead, simpler direct composite solutions may be preferable, requiring less chairtime and resulting in happier patients. This is particularly important in the age of COVID-19, when both practitioner and patient may desire only the minimum amount of contact possible. Practitioners should aim for completing direct composite restorations in one day.
About the Authors
Ronaldo Hirata, DDS, MS, PhD
Private Practice
Curitiba, Brazil
Assistant Professor of Biomaterials and Biomimetics
New York University
New York, New York
Camila Sobral Sampaio, DDS, MS, PhD
Private Practice
Santiago, Chile
Assistant Professor of Biomaterials
Universidad de los Andes
Santiago, Chile
References
1. Bertholdo G, Barrotte Albino LG, Ricci WA. Matriz Bertholdo/Ricci/Barrotte (BRB): uma simplificação de técnica para obtenção de guia de estratificação com compósitos. Clínica, International Journal of Brazilian Dentistry. 2014;10(2):204-213.
2. Lobo M, de Andrade OS, Barbosa JM, Hirata R. Periodontal considerations for adhesive ceramic dental restorations: key points to avoid gingival problems. Int J Esthet Dent.2019;14(4):444-457.
3. Barbosa JM, Tovar N, Tuesta PA, et al. Scan-layered reconstructions: a pilot study of a nondestructive dental histoanatomical analysis method and digital workflow to create restorations driven by natural dentin and enamel morphology. J Esthet Restor Dent.2017;29(4):256-263.
4. Wang Y, Li C, Yuan H, et al. Rubber dam isolation for restorative treatment in dental patients. Cochrane Database Syst Rev. 2016;9(9):CD009858.
5. Pontons-Melo JC, Atzeri G, Collares FM, Hirata R. Cosmetic recontouring for achieving anterior esthetics. Int J Esthet Dent.2019;14(2):134-146.
6. Rigo LC, Bordin D, Fardin VP, et al. Influence of polishing system on the surface roughness of flowable and regular-viscosity bulk fill composites. Int J Periodontics Restorative Dent. 2018;38(4):e79-e86.
7. Abreu J, Sampaio CS, Benalcázar Jalkh EB, Hirata R. Analysis of color matching of universal resin composites in anterior restorations. Manuscript accepted in Journal of Esthetic and Restorative Dentistry (JERD).
8. Kabbach W, Sampaio CS, Hirata R. Diastema closures: a novel technique to ensure dental proportion. J Esthet Restor Dent.2018;30(4):275-280.
9. Sampaio CS, Garcés GA, Kolakarnprasert N, et al. External marginal gap evaluation of different resin-filling techniques for class II restorations-A micro-CT and SEM analysis. Oper Dent. 2020;45(4):E167-E175.
10. Hirata R. Shortcuts in Esthetic Dentistry.Batavia, IL: Quintessence Publishing Co., 2017.
11. Hirata R, Pacheco RR, Caceres E, et al. Effect of sonic resin composite delivery on void formation assessed by micro-computed tomography. Oper Dent.2018;43(2):144-150.
12. Hirata R, Kabbach W, de Andrade OS, Bonfante EA. Traditional layering versus modified bulk filling: two techniques for posterior composite restorations. J Cosmet Dent.2015;30(4):120-133.
13. Sampaio CS, Arias JF, Atria PJ, et al. Volumetric polymerization shrinkage and its comparison to internal adaptation in bulk fill and conventional composites: a μCT and OCT in vitro analysis. Dent Mater.2019;35(11):1568-1575.
14. Hirata R, Clozza E, Giannini M, et al. Shrinkage assessment of low shrinkage composites using micro-computed tomography. J Biomed Mater Res B Appl Biomater.2015;103(4):798-806.
15. Frankenberger R, Lohbauer U, Roggendorf MJ, et al. Selective enamel etching reconsidered: better than etch-and-rinse and self-etch? J Adhes Dent. 2008;10(5):339-344.
16. Sancakli HS, Yildiz E, Bayrak I, Ozel S. Effect of different adhesive strategies on the post-operative sensitivity of class I composite restorations. Eur J Dent. 2014;8(1):15-22.
17. Scotti N, Comba A, Gambino A, et al. Influence of operator experience on non-carious cervical lesion restorations: clinical evaluation with different adhesive systems. Am J Dent. 2016;29(1):33-38.
18. Kolakarnprasert N, Sampaio CS, Hirata R. Masking color irregularities in bulk-fill composite restorations. Dental Economics. https://www.dentaleconomics.com/sponsored/ivovlar-vivadent/article/16395275/masking-color-irregularities-in-bulkfill-composite-restorations. Published May 25, 2017. Accessed September 8, 2020.
19. Sampaio CS, Pizarro PG, Atria PJ, et al. Effect of shortened light-curing modes on bulk-fill resin composites. Oper Dent.2020. doi: 10.2341/19-101-L.
20. Roggendorf MJ, Kramer N, Dippold C, et al. Effect of proximal box elevation with resin composite on marginal quality of resin composite inlays in vitro. J Dent.2012;40(12):1068-1073.