You must be signed in to read the rest of this article.
Registration on CDEWorld is free. Sign up today!
Forgot your password? Click Here!
In the world of dentistry today, most procedures are taught in dental schools and then performed the same way by clinicians throughout the rest of their career. However, a few routine treatments should be revisited, including the Class II restoration procedure. The materials and methods that have been common in the industry for years have been modernized to the point where the typical posterior composite restorations are evolving and improving.
As the Class II restoration undergoes significant reinventions, practical tips must be followed to achieve successful results. The author created a list called the Seven Deadly Sins of Traditional Class II Composites (Table 1). This list is composed of techniques to avoid and solutions that are designed to help with preparation design, matrix placement, material adaptation, and finishing and polishing to create durable, long-lasting, esthetic posterior composites.
Seven Deadly Sins of Traditional Class II Composites
Below are the "seven deadly sins" the author has identified as affecting traditional class II composites, along with alternative solutions for each of the topics outlined.
Tired or Weak Separators
To ensure proper contact on the teeth, it is crucial to have 4 pounds of separation as an absolute minimum. Some separators today begin with good force; however, they can lose nearly half of that strength after heavy use.1 After the initial strength of the force is weakened, the separators must be replaced to meet the pressure needed for solid contact. Separators that are designed with an ideal shape, including a double-spring design that will not be stressed beyond the yield point, are the most likely to provide the proper contact.1
Weak Tooth Separation
The second of the seven deadly sins of traditional Class II composites is weak tooth separation as a result of flimsy wedges and a lack of anatomic adaptation from traditional solid wedges. The solution to this is to only use anatomically accurate variably hollow wedges. In a clinical study on interdental separation techniques, it was determined that when separation is required for restorative procedures, such as placement of a Class II resin composite restoration, special separation rings may be more useful than wooden wedges.2
These results were concluded by clinically evaluating two separation techniques, including the effect of interdental separation of a special separation ring and a wooden wedge. The conclusion that was found is that the traditional "pre-wedging" technique, where a wedge is pushed firmly into the proximal area, resulted in relatively little interdental separation when compared with the use of a separation ring or the combination of a separation ring with a wedge.2
Burnishing
Most dentists have been burnishing metal matrices their entire careers—that day is over. The time has come for this commonplace practice to fade into the past and for dentistry to move forward. The solution is to utilize aggressively curved matrices when indicated.1
The main issue with burnishing metal matrices is that it can result in unhealthy and unnatural occlusal embrasures. If there is not a true infinity edge present, microleakage may occur and over time, there may be chipping of the marginal ridges.1 To avoid this chipping, it is crucial to have rounded contact, which is created by strong tooth separation. The combination of tooth separation and a modern wedge with an aggressive separator leads to healthy and natural occlusal embrasure and a drastically improved final result.
As this new era of the end of burnishing begins, it is important to become familiar with modern cavity preparations. Engineered restorations can be achieved using true and esthetic bulk-fill composites in tandem with technologically advanced instruments.1
Lack of Problem Solving
Another deadly sin of posterior restorations is lack of problem solving, which has become far too common. It is critical to continuously think about how to develop, evolve, and improve the procedures and techniques performed on a daily basis. Modernizing the approach to Class II composite restorations is a constant obligation of all clinicians in continuing to provide the best treatments possible.
To summarize, never forget to study, learn, be creative, and be relentless.1
Boxy Preparations
A few practices involved in G.V. Black's cavity preparations can leave the final restorations prone to leaking, chipping, wholesale fracture, recurrent decay, and higher failure rates.3 One of the techniques that is now outdated is the practice of applying several separately cured layers of composite in a boxy preparation, which can create risks for voids, gaps, and seaming between layers. When the composite in the restorations is repeatedly layered, it can shrink as the stress increases, and marginal gapping or enamel microfracturing may eventually appear.3
The overall configuration of the cavity plays an extremely important role in the long-term durability of the restoration. The traditional boxy shape of a Class II preparation can result in sharp line angles, can promote cracking, and may leave the restoration vulnerable to fracture. The solution to this issue is a non-retentive infinity edge saucer preparation. The saucer preparation is great for injection molding and for keeping the strength in the tooth. With a redesigned preparation that is flat and shallow, the typical C-factor problems are greatly reduced. A saucer-shaped preparation with feather edges reduces the sharp angles found in traditional preparations and allows the composite to be injected in one phase, which eliminates the need to layer the composite in increments, saving time and eliminating the risk of gapping between the layers.1
Inattention to Removal of Biofilm in Infinity Edge Zone
In order to ensure the biofilm is completely removed in the infinity edge zone, it is mandatory to disclose and blast the surface. Use of disclosing solution is helpful to ensure complete biofilm removal.1 Blasting with aluminum trihydroxide will ensure all of the biofilm is removed and will leave the tooth ready to bond.1
Excess Layering and Needless Composite Manipulation
The final of the seven deadly sins is the excess layering and needless composite manipulation. When composites are examined under a microscope after they have been placed, it is clear that the more the composites are manipulated and layered, the worse they look.1 Therefore, the less the material is able to be manipulated, the better the outcome will be. A clear matrix plus bulk-fill composite allows the minimum amount of layering while providing a strong and reliable final restoration.1
In Summary
The seven deadly sins of traditional Class II restorations outline many of the common mistakes that are frequently made during posterior restorations. It is important to continue adjusting techniques to improve as clinicians and provide the best results possible.
Case Study: Class II Restoration
Below is a detailed clinical case to showcase the proper techniques that should be used to achieve efficient and durable posterior restorations. This clinical application highlights a Class II restoration and includes step-by-step images and comprehensive guidance to allow clinicians to follow along closely and perform this procedure successfully on their own patients.
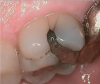
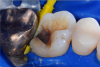
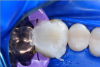
In this case, a female patient presented with an asymptomatic tooth that had an incomplete fracture on the distal palatal cusp and potentially the distal buccal cusp.1 The patient was highly motivated to avoid extensive dentistry and had "dead jaw syndrome" from a history of using bisphosphonate medication (Figure 1 through Figure 4). The solution was to perform a composite overlay on the tooth.
Cavity Preparation
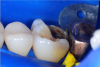
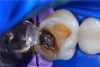
To begin this Class II restoration, the first step was to completely remove the old restoration and properly prepare the overlay. In this case, there was an incomplete fracture of the distal buccal cusp and underneath the distal palatal cusp. Although the tooth structure was cracked, it was not desirable to amputate the fracture because the tooth structure itself was good, so the plan was to treat it as buildup material.1 Building a good contact is one of the most crucial steps to ensuring the final restoration is successful.
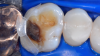
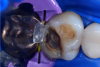
Throughout this restoration, an infinity edge was placed that would cover most of the tooth and create a crown-like outcome. Even though the dentin in the tooth was healthy, it was also dark, which means there was concern that it might show through the translucent nature of most traditional bulk fills (Figure 5). However, the bulk-fill restorative used was designed for posterior restorations and featured increased opacity for improved esthetics. The B1 shade was brighter and significantly more opaque than the previous bulk-fill materials on the market. Adverse solutions that may have been used in the past, such as applying an opaquer or cutting away the healthy dentin, were no longer required to achieve a more esthetic final restoration (Figure 6).
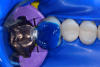
Etching and Bonding
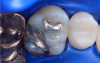
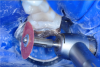
After the cavity was prepared (Figure 7), it was important to manage the matrix to optimize the contact area (Figure 8 through Figure 10). After placing the matrix, it was time to etch and bond. The etch should encapsulate as much of the tooth as possible as the cuspal overlay is performed. In general, the goal is to have a 70:30 ratio of etched enamel to the modern composite.1 In this specific case, close to 70% of the surface area was in enamel and 30% was in dentin (Figure 11). Modern restorations are very enamel-centric.1
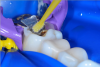
After the etching was completed, the next step was to apply adhesive (Figure 12) and light-cure (Figure 13). The author prefers to use a one-step adhesive that can be placed in one coat to save time and money. After the adhesive was cured, it was time to injection mold.
Injection Molding
The injection molding process is simple and can be completed in just three simple steps:
1. The adhesive was applied (Figure 12).
2. The bulk-fill flowable was injected (Figure 14).
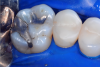
3. Regular paste composite was placed on top of the flowable. If the cavity is 5 mm deep or less, the paste composite can be placed in one increment rather than layering.1 Adding paste composite on top of the flowable connects the materials together and fills in any remaining openings in the restoration (Figure 15).
Finishing and Polishing
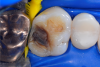
After the bulk-fill paste composite was placed, the final steps were to finish and polish the tooth. It is beneficial to leave intentional excess of composite past the tooth restoration interface and to not manipulate the composite too much (Figure 16). The next step was to sculpt and finish the occlusal anatomy (Figure 17). A disc is preferred because discs provide a safe tool that is less likely to tear open the enamel composite interface, whereas carbides can damage the restoration.1 Finally, the restoration needed to be polished; a diamond-impregnated polisher was used on this restoration, which created an esthetic final result (Figure 6).
The goal of any posterior restoration is to create a monolithic restoration that lasts for a long time and is able to handle the daily wear and tear that is required by molars.
Conclusion
Class II restorations can be drastically improved and simplified with a few revisions that help to modernize the typical approach. From removing certain steps from the process, such as burnishing, to improving other techniques, such as outdated matrix systems, it is easy to become familiar with a restoration procedure that is efficient and superior.
If the seven deadly sins of traditional Class II composites are avoided, the process known today can be drastically improved. As long as problem solving is always considered and creative solutions are being found, dentists can ensure that all Class II restorations create long-lasting, durable, esthetic results that keep patients satisfied.
About the Author
David Clark, DDS
Founder of the Bioclear Matrix System and Learning Center
Tacoma, Washington
References
1. Clark D. Amalgam management and the seven deadly sins of posterior composites [video webinar]. Viva Learning. 2017. https://www.vivalearning.com/member/classroom.asp?x_classID=3278. Accessed December 13, 2018.
2. Loomans BA, Opdam NJ, Bronkhorst EM, et al. A clinical study on interdental separation techniques. Oper Dent. 2007;32(3):207-211.
3. Clark DJ, Sheets CG, Paquette JM. Definitive diagnosis of early enamel and dentin cracks based on microscopic evaluation. J Esthet Restor Dent. 2003;15(7):391-401.
Additional Resources
1. Clark D. The injection-molded technique for strong, esthetic Class II restorations. Inside Dentistry. 2010;6(1):68-76.
2. Clark D. Instructions for use & technique guide. Bioclear. http://www.bioclearmatrix.com/media/8015/instructions.pdf. Accessed December 13, 2018.