You must be signed in to read the rest of this article.
Registration on CDEWorld is free. Sign up today!
Forgot your password? Click Here!
Bulk-fill resin composites provide an effective way to simplify procedures and save time in a dental practice. In the oral care industry, these materials are still relatively new to many clinicians. A basic, general definition of a bulk fill is as follows: a light-cured resin-composite material that can be placed in single larger increments of about 4 to 5 mm in depth.1 Historically, 2-mm increments have been the norm for light-cured composite materials.1 Recently, bulk-fill resins have made greater depths possible, with manufacturers introducing products that can be polymerized up to 5 mm.2
Types of Bulk Fills
There are two distinct categories of bulk-fill composites: (1) regular viscosity and (2) flowable. When using one type or the other, the clinician will experience differences in filler content, mechanical properties, sculptability, and other factors.
Regular Viscosity
Regular-viscosity bulk fills are characterized by higher mechanical properties and sculptability. Sculptability allows the clinician to give the material shape when building a box or working on the occlusal portion. It also allows easier manipulation of the material when building the slopes or cusps. Compared with flowable bulk fill, regular-viscosity materials generally have higher filler content, experience less wear, and do not require capping.2
Flowable
The other type, flowable bulk-fill resins, usually have lower filler content and lower mechanical properties than regular-viscosity bulk-fill materials. Flowables are typically more difficult, if not impossible, to sculpt. However, they are more adaptable than regular-viscosity materials. Because flowable bulk-fill resins tend to have less filler content and lower physical properties, they are more susceptible to wear. Because they are more vulnerable to wearing and chipping, placements done using flowable materials typically require capping at the top of Class I or Class II restorations.1
Addressing Common Clinical Concerns in Using Bulk Fills
With the introduction of any new methods or products, the clinician naturally has questions. The clinician wants to ensure best practices are maintained to give patients the best possible care. Consequently, questions and concerns exist regarding bulk fills. These concerns mostly stem from historical practice: for the last 20 years, clinicians have been applying resin composites in 2-mm increments.1 Increasing from 2 mm to 4 or 5 mm is a dramatic change when considering that in dental school, future clinicians may have been strictly told by instructors, "never more than 2 mm."1
Now, thanks to the advancements of bulk-fill resins, clinicians can fill preparations that are 5 mm in depth in one increment, instead of sticking with the conventional technique, which required several layers.2 Some steps may now be eliminated, saving time in the long run. Figure 1 contrasts the traditional method with that of bulk fills, illustrating the several layers that would need to be applied with the former method.
Can They Be Fully Polymerized to 5 mm?
Because the increment with bulk-fill composites more than doubles in depth, the question of whether they can be fully polymerized to 5 mm was among the questions this author had when first presented with these materials. Results of research indicate that although no manufacturer necessarily yields a better cure than another, the clinician can certainly achieve the complete curing in 5 mm with some materials.3 Depending on the specific material being used, there may be variations in cures from 4 mm for one to 5 mm for another. Additionally, some manufacturers recommend additional light exposure from the buccal and lingual aspects,2 so it is critical to read the manufacturer's instructions.
What About Shrinkage, as Well as Shrinkage Stress?
What is the relationship between polymeric shrinkage and shrinkage stress? This is another question that is frequently asked regarding bulk fills. Light-curing will produce shrinkage, which may cause the material to lose volume. This loss may possibly create a gap. However, several factors may determine whether a gap is created, including configuration (C-factor), adhesive, material composition, and elastic modulus.3 If there are no opposing walls that restrict contraction, materials may freely shrink. When there are walls, the shrinkage goes toward the center when polymerized. A good adhesive will ensure the material is completely sealed against the walls. Elastic modulus relates to the stiffness of the material. The stiffer the material, the higher the possibility that shrinkage stress will occur.
Today's bulk-fill materials typically incorporate stress relief into their resin chemistries. Therefore, the stress from newer materials may be equal to or even lower than the stress that occurs from the incrementally placed alternatives.2
Is There Proper Adaptation and
Elimination of Voids?
The advantage of the conventional method with multiple increments was that each layer could be adapted as necessary. However, voids may occur for multiple reasons, such as the material being too viscous or having poor adaptation. If there is a void between increments and the clinician cannot detect it in the margin, then the void may be left in place because it will not affect the longevity of the restoration. However, if a void is in a margin, it will affect the longevity of the restoration and may lead to recurring decay and staining.2
Are They Esthetic?
Even though esthetics may not be the top priority for restorations in the back of the mouth that have very little visibility, offering patients a material with good esthetics is a benefit. The primary reason bulk fills can be polymerized to 5 mm is that in general they are more translucent.4 The greater translucency is necessary so the light can go through the entire increment. Higher translucency can lead to restorations that look slightly gray.2 However, as illustrated in the following case, esthetics of bulk-fill composites have improved dramatically.
Clinical Application: Class II Restoration
An example of a real-life application is the best way to understand how a bulk fill can enhance posterior restorations and work into preparations. Below is a step-by-step example of a Class II restoration. Tips are included throughout the description to assist the clinician in providing the best results for patients.
A patient came into the dental office and said her tooth was broken. The affected tooth was a second premolar, which had advanced decay, and the diagnosis was reversible pulpitis. The author performed standard cavity preparation for resin-composite restoration.
Matrix Sequence
After the caries removal was complete, the author placed a sectional matrix, a wooden wedge, and a wide ring (Figure 2). The wide ring was selected due to the partial loss of the lingual cusp; the use of other conventional rings would cave the sectional matrix into the preparation. The silicone tips on the green ring seat the sectional matrix against sound tooth structure, which will allow a good shape and adaptation of the matrix to the tooth.
The first step was to place the matrix. A good rule of thumb is to choose the smallest matrix that will fit; the bigger the matrix, the more complicated it becomes. The concave portion should be up (occlusally), and the convex portion should be placed gingivally-all matrices should be placed this way. The clinician must match the height of the matrix with the height of the adjacent marginal ridge, ensuring that the convexity of the matrix is not higher or lower than the marginal ridge. If it is higher, it will lead to cavity overfill and occlusal adjustments. If the matrix is too low, the clinician will end up with under-filled restorations and difficulty removing the matrix.
The second step was placing the wedge. The matrix must always be placed first, with the clinician holding it with one's hands and then pushing the wedge into place so it is secure. The clinician may choose to use a wood wedge, plastic wedge, or other type. The function of the wedge is to hold the matrix and to close the gingival embrasure. As with the matrix, it is best to choose the largest wedge that fits; it should not wobble or move at all. The correct-size wedge will be positioned a couple mm into the other side to ensure there is proper pressure against the matrix and the tooth, so that no material will go underneath and fill the gingival embrasure. Sometimes the clinician may need to place multiple wedges, one from the facial and one from lingual direction, to achieve a proper seal. The wedge will then close the space gingivally and will adapt the matrix to the tooth. Polytetrafluoroethylene tape can also be used to help in adapting the matrix against the tooth.
Lastly, the ring was placed to compensate for the thickness of the band to create proper proximal contact. The author prefers to place the ring last because it fits well over the wedge while creating separation for the matrix and composite itself without pushing the matrix out of place. Various brands of rings work well for this purpose. In Figure 2, the green rubber pushed the matrix against the tooth to close it and prevent excess proximally, buccally, and lingually. The wedge prevented excess gingivally.
After all the implements are placed, the clinician must burnish the matrix to have proper contact with the tooth. If the clinician does not see contact of the matrix with the adjacent tooth, the clinician will likely end up with an open contact. Composite resins, no matter the viscosity, are not able to push the band against the tooth the way amalgam can. Before the increment is injected, the clinician must ensure the band is touching the adjacent tooth, verifying with the mirror that the matrix is in contact with the adjacent tooth.
The next step after the matrix is to measure cavity depth. It should be measured at the deepest area, on the occlusal portion and in the proximal box. This is important because the depth will determine the number of increments. As previously mentioned, the clinician must read the manufacturer's instructions for the material being used; every material indicates different maximum depths.
Bulk-Fill Material
For the example case, a regular-viscosity material was used. The material was very sculptable, making it well-suited for Class I and II, allowing the formation of anatomy before polymerization. The manufacturer's instructions for the material used recommended 4-mm increments for Class I and 5-mm increments for Class II boxes.
The polymerization time of the material could vary depending on the curing light. With a 1,000 mW/cm2, a Class II restoration would receive a 10-second occlusal, 10-second buccal, and 10-second occlusal cure.2 A Class I restoration would receive only a 20-second occlusal cure.2 As dentists, we need to know our own light-curing output-this is crucial. The manufacturer of the bulk-fill material used in the example offers a service where representatives will come and measure the unit for free at the dental office. The representative can explain how much light the unit is emitting. For more details, a representative should be contacted.
The material used is available in multiple shades, including A1, A2, A3, B1, and C2. The author was not as concerned with having the exact shade in the practice for posterior restorations; he uses A2 on all patients. A2 has enamel-like opacity, and it blends well, with good physical properties.
The importance of reading the instructions for use must again be emphasized. Factors such as restoration type, depth, and light may alter the steps to take with any given material.
The next step was adhesive application; a universal adhesive was used in selective enamel-etch mode. The author placed etch onto the enamel, waited 15 seconds; next, the etch was thoroughly rinsed, and the adhesive was placed. The adhesive was rubbed into the dentin for 20 seconds to facilitate the infiltration and evaporation of solvents. Then the adhesive was dried until there was no movement in the surface. The step was completed by finishing with light-curing for 10 seconds.
It was then time to add the bulk-fill material. Possible situations that may be encountered at this stage:
1. The preparation is small, and the compule doesn't fit. In this case, gloves are cleaned, the material is rolled in one's fingers, and a condenser is used to insert material.
2. If the preparation is larger, the tip should be put all the way in the bottom before injecting while keeping it pushed down. The clinician should proceed slowly so the ma- terial adapts to the walls. While injecting, the clinician should ensure there is pressure against the walls. The author prefers to fill the entire proximal box, contour it, polymerize it, and then perform the remaining Class I.
When dispensing the material, the author prefers to use compules rather than syringes. The compule should be placed all the way into the preparation; the material should not be squirted while one hovers above. One is not adapting every 2 mm anymore, so when injecting, the clinician should be sure to create pressure against the walls so the material adapts and prevents voids.
Finishing Steps
The contouring instrument used was a thin-bladed interproximal carver, allowing contouring of the marginal ridge. The thin blade was swiped toward the facial and the lingual, allowing good adaptation to create the marginal ridge. Then, using a microbrush, the surface was smoothed against the margin. The author used this step to shape the anatomy of the slopes with the microbrush (some clinicians use a burnisher for this part).
Contouring was followed with light-curing, for 10 seconds, from the occlusal, and the matrix was removed. Light-curing was then performed from the buccal and the lingual for 10 seconds each, achieving a thorough cure of the material. It is important to keep in mind that this is a bulk fill material, not bulk cure.
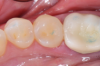
Polishing was the finishing step. Given the anatomy and smoothed-out surface, a small brush sufficed. Posteriors do not necessarily call for the same amount of polishing as an anterior restoration, but polishing is nevertheless a good step to take at the end. Figure 3 shows the final result of the restoration. It was a highly esthetic match.
Conclusion
To deliver the best patient care possible, staying up-to-date on the latest trends and integrating the newest advancements is beneficial for dental professionals. Using modern practices can also allow work to be performed more smoothly, saving time in the long run. Bulk-fill posterior dental composites are one such method that can streamline and simplify placements and allow faster seating times.
Bulk fills continue to be innovated and improved. Posterior restorative materials offer strong wear resistance, enhanced esthetics, and ease of use. These materials can be fully polymerized up to 5 mm, eliminating the extra steps of creating multiple 2-mm increments, saving crucial time for both the dentist and patients.
References
1. Vargas M. Saving time and simplifying placement using a bulk fill posterior dental composite [video webinar]. Viva Learning. 2017. https://www.vivalearning.com/member/classroom.asp?x_classID=3332. Accessed April 17, 2018.
2. Alrahlah A, Silikas N, Watts DC. Post-cure depth of cure of bulk fill dental resin-composites. Dent Mater. 2014;30(2):149-154.
3. Van Ende A, De Munck J, Lise DP, Van Meerbeek B. Bulk-fill composites: a review of the current literature. J Adhes Dent. 2017;19(2):95-109.
4. Price R. Consensus statements on bulk fill resin composites. Canadian Dental Association. http://oasisdiscussions.ca/2017/06/07/csbf/. Published June 7, 2017. Accessed April 17, 2018.