You must be signed in to read the rest of this article.
Registration on CDEWorld is free. Sign up today!
Forgot your password? Click Here!
There are few materials in the history of dentistry that has undergone as much of an evolution as composite resin. The face of restorative dentistry changed forever when successful bonding to enamel and dentin was achieved. Since then, the goal of clinical and material science has been to find a simple predictable approach to the composite restorative process.
Amalgam vs. Composite
Compared to dental amalgam, the patrician of direct restoratives, the placement of composite requires many more steps and exacting technique to achieve the best results. The process of adhesion, conditioning the tooth surface, and application of primers and adhesives, which is followed by the layering of composite resins to complete the restorative process, involves many independent steps that must be properly executed to ensure good results.
For posterior composite restorations in particular, the clinician must also manage challenges related to operator access and moisture control, as well as soft-tissue–related problems that often arise with Class II cavities due to subgingival margin placement. Because composites are traditionally placed in layers, there are numerous steps and materials required to complete the restorative process and, with them, the potential for problems such as voids and marginal leakage, which can ultimately lead to restoration failure.
The complexity of performing the steps required to place composite contrasts sharply with those required for amalgam, although both necessitate the use of a matrix system to restore anatomic proximal contours and contact areas and prevent proximal gingival overhangs.
For amalgam placement, a Class II procedure typically involves using a Tofflemire matrix to contain the restorative material, which is then condensed into the preparation. Using an appropriate carving instrument, the restoration is carved into proper anatomic form. Finally, the occlusion is checked with articulating paper, and the restoration is adjusted as necessary.
However, with composites, the clinician must first control the clinical environment using isolation techniques. After isolating the operative area to control moisture contamination and using a specially designed matrix system—ie, a sectional matrix—each increment of composite placement typically requires: (1) etching; (2) rinsing; (3) drying; (4) desensitizing; (5) placement of adhesive; (6) light-curing; (7) placing a base or liner, if needed (8) light-curing; (9) placing the increment of composite; and (9) light-curing. Several increments may be placed and cured before final sculpting of the occlusal surface of the restoration, checking and adjusting the bite, then placing an optional surface sealant to protect the marginal areas of the composite restoration.
Composite Material Selection
Amalgam is a material that can be condensed. In other words, when placing amalgam, the act of condensation actually pushes the lathe-cut particles of alloy closer together. Condensing amalgam against a matrix can actually cause deformation of the matrix, helping to create a contact with the adjacent tooth surface.
In contrast, composite, as a class of materials, cannot be condensed. The material is pushed around the preparation with the placement instrument, but it is not condensed in any way. This makes contact placement and cavosurface marginal adaptation more of a challenge to the dentist. Unfortunately, many dentists treat composite as if it were amalgam, and that is where problems can begin. They must choose from among a wide variety of materials with varying viscosities and consistencies. Some are very moldable and sculptable. Others, such as composites designed for anterior areas and esthetics, can be more “paste-like” and less stiff. Composite resins come in many types—flowables, packables, hybrids, microhybrids, nano microhybrids, and microfills. In addition, new chemistries are being introduced as an alternative to the traditional bis-GMA–based composites, reducing the problems of shrinkage, sensitivity, and strength in the posterior region. Among them, a unique product with nano-dimer conversion technology (ie, Septodont N’Durance®, Septodont, www.septodontusa.com) is said to offer a monomer-to-polymer conversion rate that is significantly higher than traditional bis-GMA composites, as well as high radiopacity, low polymerization shrinkage, and low polymerization stress.1
Main Challenges with Composites
Establishing tight proximal contacts and eliminating voids between layers, while improving predictability and time efficiency in placement, remain significant challenges when placing composite restorations.
Voids
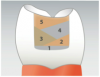
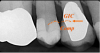
Recurrent decay—the primary cause of composite failure—is often traced to voids in the floor of the proximal box at the cavosurface margin of a Class II cavity, which is most vulnerable to incomplete filling (Figure 1).2 While good marginal adaptation can be verified visually, the incremental placement process, plus the etching and bonding between layers, relies largely on “blind faith” that the area has been completely filled. These areas often cannot be seen radiographically unless placed in the same directional plane as the actual x-ray beam.
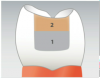
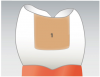
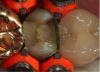
The traditional method of placing composite in increments of no more than 2 mm (Figure 2) was meant to facilitate curing and to avoid polymerization shrinkage, which research suggests is no longer a major concern with many of today’s advanced materials.3 The technique of layering, however, carries a greater potential to introduce voids into the restoration. Bulk-fill flowables, which are meant to serve as “dentin replacements,” can be cured in increments of up to 4 mm (Figure 3). While these materials do have the potential to eliminate many of the voids by decreasing the number of layers in the restoration, they are typically not designed with the physical properties required to withstand forces of occlusion and, therefore, an additional capping (enamel layer) is required.4 There are also bulk-fill packables that can be placed in 5-mm increments (Figure 4); among them is a sonically placed bulk-fill composite system (ie, SonicFill®, Kerr, www.sonicfill.kerrdental.com) that provides sufficient physical properties to withstand functional forces without the need for a capping layer.5
Replicating Proximal Contact and Contour
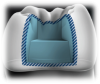
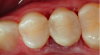
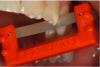
In most instances, the Tofflemire universal matrix used for amalgam is not appropriate for use with composites (Figure 5). There are now a variety of sectional matrices designed specifically to replicate not just the proximal contact but also the proximal contour (Figure 6). They are positioned between the restoring surface and adjacent proximal surface and use a ring to gently push the teeth apart, creating proximal contact and allowing for ideal anatomic placement of a sectional band, which is concave on the inside and convex on outside, and can replicate the convex contour of the natural proximal tooth surface. They include Composi-Tight 3D XR™ (Garrison Dental Solutions, www.garrisondental.com), V4 ClearMetal Matrix System (Triodent, www.triodent.com), and Palodent® Plus EZ Coat (DENTSPLY Caulk, www.dentsply.com). When a sectional matrix is placed correctly, very little finishing with rotary instruments is required.
Depth of Cure
According to a study by Campodonico et al, depth of cure, less than filling technique, is the main issue for practitioners using today’s materials.3 Various methods for achieving this are discussed in the section on “Bulk Fill Technologies in Composite Materials.”
Solutions Using New Methods and Materials
Given the time and care involved, a bulk-filling material that can be placed more easily and predictably and that requires fewer steps is clearly desirable, as long as it does not compromise the quality of the final result. Although a material that offers clinicians the esthetics their patients want combined with the ease of placement and predictability of amalgam is still in the future, dentists can still get the desired results in a timely and cost-efficient manner by using recommended materials and techniques and understanding how to use them properly.
Additive Placement of Composite Materials
The traditional layering method used by the author for many years includes the use of a flowable composite—no more than 0.5-mm thick—covering the entire cavity preparation. The flowable layer will adapt to the intricate geometry of the Class II preparation, including all of the line and point angles, so that those areas that are hard to condense are adequately covered and protected with resin. The flowable material also uniformly wets the surface of the adhesive, lessening the chance for voids between the adhesive layer and the composite. Next, a nano microhybrid is placed in 2-mm increments, as described above, until the final increment is sculpted into the proper anatomic form and the occlusion is checked and adjusted as needed. Sculpting and shaping composites using instruments that can impart a convexity and not decimate the occlusal anatomy, such as a “needle” interproximal finishing diamond, are recommended. This means not using an elliptical or round bur that imparts concavities that destroy the anatomic form of the occlusal surface.
Finishing and polishing the placed composite involves more steps, including the use of rubber abrasives and a bristle brush with an impregnated polishing medium or diamond paste. After polishing, marginal areas are re-etched for a few seconds to make sure the surface is clean, then a surface sealant is applied to fill minor remaining discrepancies between the composite and the tooth that cannot be seen or felt with an explorer but may still exist.
Alternative Approach to Incipient Caries
Clinicians commonly approach treatment of incipient lesions by treating them either aggressively upon detection or by waiting until it is deemed “necessary.” A new type of resin material (ie, Icon®, DMG America, www.dmg-america.com) is a resin infiltrate that provides a barrier to prevent acid infiltration and progression of proximal decay, which could later require the need for more aggressive treatment methods. Icon resin infiltrate works by blocking the influx of hydrogen ions, a byproduct of bacterial metabolism that prevents calcium and phosphate ions from leaching out of the tooth. This material, which is virtually a sealant/protectant, is placed via a membrane device after etching and drying the proximal surface of the tooth. According to the manufacturer, Icon reinforces and stabilizes demineralized enamel without drilling or sacrificing healthy tooth structure.
After isolating the tooth and placing wedges to separate the teeth, the affected tooth surface is prepared with a 15% hydrochloric acid gel to etch the decalcified surface of the lesion. Next, the surface is rinsed, dried with ethanol (drying agent), and further dried with air. The Icon resin infiltrate, which has a high penetration coefficient, is applied onto the lesion, the excess is removed as necessary, and the material is light-cured. The manufacturer recommends applying a second layer of the infiltrate, followed by additional light-curing, to ensure maximal protection.
Minimally Invasive Dentistry using “Smart” Materials
Class II Slot Preparation and Restoration Using Giomer Composites
A minimally invasive approach for the restoration of small Class II carious lesions on patients with suboptimal hygiene may include slot preparation with a fissurotomy bur or hard-tissue laser, which is followed by the placement of “smart materials” to help compensate for inadequate hygiene by providing additional marginal protection through the release of fluoride ions, which are then available to help recalcify decalcified tooth structure. Giomer composites contain glass filler particles covered with a glass-ionomer material. A surface-modified layer that covers the glass-ionomer layer protects it and allows for ion release over time. This ion release at the margins of the restoration can help to protect the area from acid attack and promote remineralization as needed.6-10
Open Sandwich Technique Using Glass-Ionomer Cement for Dentin Replacement in Deeply Excavated Lesions
For more deeply excavated lesions whose dentin will have more tubules exposed and less peritubular dentin to which to bond, glass-ionomer cement forms a “chemically fused seal,” and its high fluoride release and internal remineralization help to prevent future decay. Therefore, this material can serve well as a base or liner in deeply excavated lesions (Figure 6).11-15
Open Sandwich Technique for Root Caries
In the case of a patient requiring a Class II cavity preparation whose margins may be on root surface, glass-ionomer cement can be placed as a liner or base followed by a “composite cap” to complete the restoration (Figure 7). For the “open sandwich” technique, the glass-ionomer cement base extends to the internal surface of the matrix and will be in contact with the intracrevicular environment for purposes of ion exchange.11,16
Bioactive Liners and Foundation Materials
Modification of “Closed Sandwich Technique” using a “Smart” Dentin Substitute
In what might be called “heroadontia,” as an alternative to an extraction and bridge or implant, the clinician can attempt to restore a tooth using a tri-calcium silicate dentin substitute—ie, bulk dentin replacement (eg, Biodentine®, Septodont). This type of product can be used for the following types of situations: pulp exposure, dentin caries, pulpotomies, performation, internal/external resorption, apical surgery, and apexification. In this modification of the “closed sandwich” technique, which traditionally uses glass-ionomer cement, the tri-calcium silicate dentin replacement procedure begins with deep carious excavation, followed by tooth isolation and disinfection using a product that can include a desensitizer (eg, GLUMA® Desensitizer, Kulzer, kulzer-us.com; AcQuaseal B Dentin Desensitizer, AcQuamed Technologies www.stopsensitivity.com). The cavity is then filled to the cement-enamel junction with Biodentine. After it is set, the material is shaped and smoothed with an end-cutting bur; afterward, a composite restoration is placed as the enamel increment, completing the restoration.
Bioactive Cavity Lining Agents
Cavities with deep carious excavations, which can potentially lead to pulp exposure, can be excavated less invasively by using a “smart” round polymer bur (ie, SmartBur® II, SS White, www.sswhitedental.com) (Figure 8) to selectively remove affected dentin, followed by placement of a “smart material”—ie, a bioactive cavity lining agent designed for indirect and direct pulp exposure (ie, Theracal LC®, Bisco, www.bisco.com). To get a good gingival seal in situations where excavations are deep in the apical direction, it is essential to control the moisture and bleeding in the operative area. Therefore, a diode laser is critical for controlling soft tissue, because when caries goes below the gingival crest, the surrounding tissue is often inflamed. As an adjunct, a hemostatic agent can be used to help control residual bleeding after use of the diode laser to get the tissue out of the way, so the matrix can be effectively placed, sealing the gingival margin. Next, the cavity is disinfected, and steps are completed to place the restorative material. Clinical and radiographic follow-up are important to determine the success of the procedure.
Bulk-Fill Technologies in Composite Materials
Although the search for a tooth-colored “amalgam-like” material continues, the author describes his approach to bulk filling using flowable resins and bulk-fill composites, respectively.
Bulk-Fill Flowable Composite as a Dentin Replacement
After the caries is removed, the tooth is isolated. The placement of the band using a sectional matrix to restore the proximal contour and contacts is critical. After application of the adhesive, the bulk-fill flowable and composite capping layers are placed and light-cured, and the matrix band is removed. The contact is so tight when using a sectional matrix that removal often requires a hemostat. Note the identical height of the restored marginal ridge as compared to adjacent tooth (Figure 9). This accuracy is due to the careful placement of the matrix to limit the amount of finishing and polishing that will need to be done to complete the restoration.
Prior to placement of the bulk-fill flowable resin, the clinician may apply either a self-etch or total-etch bonding adhesive to the enamel and dentin surfaces, which are then light-cured. The dentin replacement is achieved using increments of up to 4 mm of one of the bulk-fill flowable materials (eg, Surefil® SDR®; DENTSPLY Caulk; Venus® Bulk Fill, Kulzer; Filtek™ Bulk Fill, 3M ESPE, solutions.3m.com; X-tra Base, VOCO, www.voco.com; Beautifil-Bulk Flow, Shofu, www.shofu.com) and light-cured, followed by placement of a nanohybrid enamel layer (eg, Venus® Pearl, Kulzer). Each layer is polymerized, then finished and polished. It is common to have large overhangs using conventional matrices rather than sectional matrices. Interproximal finishing is achieved using specially designed diamond strips, which can also be used to clear the contact when teeth are accidentally bonded together without affecting the contact of restorative material (Figure 10).17
There is evidence in the literature that benzelkonium chloride, when present in the etching material, helps increase the durability of the resin bond by inhibiting the release of matrix metalloproteases.18
Composite Restorations Using Bulk-Fill Composite Materials
There are now conventional composites on the market with altered chemistry to allow for 4-mm or 5-mm bulk filling without the need for an additional capping layer. They include Tetric EvoCeram® Bulk Fill (Ivoclar Vivadent, www.ivoclarviavdent.us); X-tra Fil (VOCO); Aura Bulk Fill (SDI North America, www.sdi.com.au); and Beautifil-Bulk. In addition, as mentioned above, there is the bulk-fill packable, SonicFill, which uses a unique handpiece to deliver sonic energy to the composite material, changing its viscosity during placement. Although these bulk-fill products can be placed in a single step, the author still prefers to use a flowable composite as a liner because of the “lack of condensation” issue, the exception being SonicFill because of the viscosity change during placement. After light-curing the flowable layer, up to 4 mm of the bulk-fill packable material can be used to fill the remainder of the cavity preparation. After being sculpted into proper form, the occlusal surface is light-cured, with no need for an additional capping layer.19-21
Conclusion
A wide variety of materials have been created in response to dentists’ desire for products that can simplify the placement of esthetic Class II composite restorations, whose placement can be highly stressful due to the technique-sensitive and time-consuming layering process. Although there is not yet a bulk-fill material comparable to amalgam in terms of ease of placement, composite restorations, as a rule, can be placed far more conservatively. “Smart” materials designed to combat demineralization and recurrent decay are welcome advances, as are bulk-fill products that enable the clinician to more quickly and easily complete the posterior restorations that are such a significant part of the general restorative dental practice.
References
1. Bracho-Troconis C, Trujilio-Lemon M, Wong N, et al. Characterization of N’Durance: a nanohybrid composite based on new nano-dimer technology. Compend Contin Educ Dent. 2010;31(Sepc No 2):5-9.
2. Patras M, Doukoudakis S. Class II composite restorations and proximal concavities: clinical implications and management. Oper Dent. 2013;38(2):119-124.
3. Campodonico CE, Tantbirojn D, Olin PS, Versluis A. Cuspal deflection and depth of cure in resin-based composite restorations filled by using bulk, incremental and transtooth-illumination techniques. J Am Dent Assoc. 2011;142(10):1176-1182.
4. Leprince JG, Palin WM, Vanacker J, et al. Physico-mechanical characteristics of commercially available bulk-fill composites. J Dent. 2014;42(8):993-1000.
5. Goracci C, Cadenaro M, Fontanive L, et al. Polymerization efficiency and flexural strength of low-stress restorative composites. Dent Mater. 2014;30(6):688-694.
6. Naoum S, Ellakwa A, Martin F, Swain M. Fluoride release, recharge and mechanical property stability of various fluoride-containing resin composites. Oper Dent. 2011;36(4):422-432.
7. Nakamura N, Yamada A, Iwamoto T, et al. Two-year clinical evaluation of flowable composite resin containing pre-reacted glass-ionomer. Pediatr Dent J. 2009;19(1):89-97.
8. Daisuke T, Seitaro S, Koji Y, Masato H. Saliva protein which adsorbs to composite resin containing S-PRG filler. The Japanese Society of Conservative Dentistry. 2010;53(2):191-206.
9. Saku S, Kotake H, Scougall-Vilchis RJ, et al. Antibacterial activity of composite resin with glass-ionomer filler particles. Dent Mater J. 2010;29(2):193-198.
10. Taizou I, Seitaro S, Koji Y. Application to the tooth coating material of the glass filler containing acid reactive fluoride. The Japanese Society of Conservative Dentistry. 2009;52(3):237-247.
11. Francisconi LF, Scaffa PM, de Barros VR, et al. Glass ionomer cements and their role in the restoration of non-carious cervical lesions. J Appl Oral Sci. 2009;17(5):364-369.
12. McLean JW, Powis DR, Prosser HJ, Wilson AD. The use of glass-ionomer cements in bonding composite resins to dentin. Br Dem J. 1985;158:410-414.
13. Mount GJ. Clinical placement of modern glass ionomer cements. Quintessence Int. 1993;24(2):99-107.
14. Christensen G. Glass-ionomer-resin restorations. CRA Newsletter.1992;16(3):l-2.
15. Mount GJ. Clinical requirements for a successful “sandwich”—dentine to glass ionomer cement to composite resin. Aust Dent J. 1989:34(3):259-265.
16. Sawani S, Arora V, Jaiswal S, Nikhil V. Comparative evaluation of microleakage in Class II restorations using open vs. closed centripetal build-up techniques with different lining materials. J Conserv Dent. 2014;17(4):344-348.
17. Roggendorf MJ, Krämer N, Appelt A, et al. Marginal quality of flowable 4-mm base vs. conventionally layered resin composite. J Dent. 2011;39(10):643-647.
18. Pashley DH, Tay FR, Imazato S. How to increase the durability of resin-dentin bonds. Compend Contin Educ Dent. 2011;32(7):60-66.
19. Ilie N, Bucuta S, Draenert M. Bulk-fill resin-based composites: an in vitro assessment of their mechanical performance. Oper Dent. 2013;38(6):618-625.
20. Juloski J, Carrabba M, Aragoneses JM, et al. Microleakage of Class II restorations and microtensile bond strength to dentin of low-shrinkage composites. Am J Dent. 2013;26(5):271-277.
21. Van Ende A, De Munck J, Van Landuyt KL, et al. Bulk-filling of high C-factor posterior cavities: effect on adhesion to cavity-bottom dentin. Dent Mater. 2013;29(3):269-277.
Disclosure
The author received an honorarium from Kulzer for this article.
About the Author
Robert A. Lowe, DDS
Private Practice
Charlotte, North Carolina