You must be signed in to read the rest of this article.
Registration on CDEWorld is free. Sign up today!
Forgot your password? Click Here!
To complete a successful restoration, the goals are to master techniques and materials that create an environment in which tissue can regenerate or heal instead of being sensitive or irritated. The basic categories of regenerative materials include liners, restorative materials, and cements. It is desirable to use techniques and materials that replicate nature, reproduce tooth esthetics, and function well. When creating an environment for tissue to heal, it is important to be cognizant of how the tooth is prepared, how much decay is removed, what materials are used, and what is sent home with the patient. It is also important to preserve as much tooth structure as possible so that any repairs needed in the future will be more effective. This article will now describe examples to better illustrate these goals.
Example 1: Soft-Tissue Recontouring and Esthetics
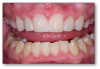
The first example is of a mouth that needed soft-tissue recontouring with better esthetics (Figure 1). A diode laser is important for debridement, soft-tissue engineering, and better cleaning afterwards. The diode laser is popular in dentistry due to its small size and ease of use for minor soft-tissue surgery.1 It is a minimally invasive technology that offers advantages superior to those of the conventional scalpel, such as reduction of bleeding and inflammation and the lower probability of scars.2 Its effectiveness is comparable with that of other types of lasers, and it is an option of lower cost and greater ease of use. Based on its photothermal effect, the diode laser is used for the removal of small lesions of the oral mucosa by excision or vaporization procedures.3
In this example, the laser assisted in removing some soft tissue. Decay was then removed from the teeth, and the restorative procedures followed. Matrices were used to enable an etching technique. The etch was then rinsed off, and a bonding agent was massaged onto the moist surface. With a selective etch, the enamel was etched for 15 seconds and then rinsed off, not intentionally etching the dentin. After a thin layer of the bonding agent was applied, a Giomer flowable was placed on the tooth, covering the entire dentin.
A Giomer is a unique class of restorative materials that have the distinguishing feature of a stable glass-ionomer core in a protective resin matrix.4 This arrangement allows protection of the glass core from moisture, providing long-term esthetics and the durability of conventional composites with ion release and recharge.5 The Giomer releases six different ions, including fluoride, that may assist in regeneration and decrease sensitivity. Given the ion release and anti-plaque nature, Giomers are good choices for placement at the margins and on the dentin before the bulk restorative material is placed. This allows regenerative activity to occur where it matters most.6
After the dentin is sealed with the Giomer, crevicular leakage is a major cause of brown staining at the gingival margins for restorations at the gum line. A subgingival matrix that goes into the sulcus can help prevent this staining. In this case, a Giomer hybrid was used, and neighboring teeth were shaped and polished. After the final layering, the author recommends tray therapy. Tray therapy is very effective with new regenerative-type materials.
When a patient is sent home with a bleaching tray and given medicaments to put in it, these items can recharge the Giomer material to rerelease some of the ions. For example, if a patient wears it four to five times a week with a material high in fluoride inserted, the materials can be recharged and rereleased. The use of fluoride-releasing materials for restoring cavities and buildup cores has increased rapidly in recent years.7 Several fluoride-containing hybrid restorative materials available in the market are resin-modified glass-ionomers, compomers, Giomers, and bioactive resin composites. These hybrid materials were introduced to overcome the problem associated with conventional glass-ionomers and composite resins while maintaining their clinical advantages.7 Giomers employ the use of prereacted glass-ionomer technology to form the glass-ionomer phase.8 Aside from the ability to release fluoride and inhibit recurrent caries, fluoride-releasing materials have the advantage of natural shade and are less expensive than cast-gold and ceramic restorations.
Many dental procedures can be performed with a variety of options rather than a single scientific method; ie, it is possible for dentists to try different techniques to determine how much to drill, how much to scrape, and how much tooth structure to remove. In 1972, a technique using a basic fuchsin red stain was developed to aid in the differentiation of two layers of carious dentin.9,10 Because of potential carcinogenicity, the basic fuchsin stain was subsequently replaced by another dye, acid-red solution.11 Since then, various protein dyes have been marketed as caries-detection agents intended to enhance complete removal of infected carious dentin without over-reduction of sound dentin. Many options are available. Light-cured materials stimulate secondary dentin formation that assists in decreasing the sensitivity that sometimes occurs with deep fillings. Continuing with Example 1, a thin layer of the Giomer hybrid was used to seal the dentin, it was light-cured, and the rest of the filling material was applied and also light-cured. Then, on the same patient and on the same day, posterior composites were implemented.
Problems with posterior composites are common. The processes are sensitive, and the average life of a posterior composite is less than half that of an amalgam. Regarding posterior permanent teeth, many retrospective studies have reported a longer survival time for amalgam.12A 17-year longitudinal study published in 2003 found a significantly higher survival time for extensive amalgam restorations than for extensive composite restorations.13 Other problems include difficulty in getting contacts, shrinkage of the material, sensitivity afterwards, and lack of longevity. However, for permanent teeth, dentists commonly use resin-based composites, a heterogeneous blend of organic resin and inorganic filler.14 Again, the type of filler and technique used should be evaluated on a case-by-case basis. It is important to be aware of and comfortable with the many processes, materials, and systems available.
The ring system offers a variety of options, both plastic and metal, although the metal provides better contacts. Rings fatigue over time from use, abuse, and maintenance procedures such as cold sterilization and a run through the autoclave. As the rings fatigue, the amount of force they apply to separate the teeth drops off, and they become less and less effective at overcoming the thickness of the sectional matrix and the inherent polymerization shrinkage of the composite. The net result is that over time, the dentist will find it increasingly challenging with older fatigued rings to create tight interproximal contacts.15
There are also a variety of matrix systems. Matrices that are curved in both directions, both facial to lingual and occlusal to gingival, are more in line with how teeth and gingival surfaces appear in nature. Using a matrix with a wedge that is also soft and curved is important. The ring slips right over the wedge, with a small groove in the bottom. Most rings on the market today are made out of some type of metal and nickel-titanium or stainless steel. The ring is what separates the teeth and makes contacts good. The purpose of the wedge is to hold the sectionals to the box.
Back to the example, the same process was applied to the posterior as in the anterior. First the etch technique was applied, then the etch was rinsed off and the dentin left moist. The dentin bonding agent was then massaged on, air-thinned, and cured. About half a millimeter of Giomer flowable was placed to cover the entire dentin and the bottom of the box and then light-cured. It is important to be meticulous with the layer that touches the dentin to minimize the likelihood of sensitivity. After the dentin was sealed, the rest of the filling material was placed. A variety of posterior-type composites are available for use. The goal is to have contacts that are broad and deep, both occlusal-gingivally and facial-lingually. Figure 2 shows the original patient 5 weeks after this work. The patient has experienced eight fluoride applications, moderate brushing, and the use of a bleach-type tray at home. Tissue is regenerating.
Example 2: Red Gingiva
Burs are another example of a dentistry tool that may cause an issue. Dentists are constantly fighting against heat buildup resulting in pulpal irritation. This may or may not be reversible, depending on the case. When using a dental bur, two things should be avoided: sharp corners and cross-cut fissures. Although there is great variety on the market, the author typically does not use a bur larger than the 330 bur, but those who think that is too small may prefer a 331 or 332 for more aggressive preparations. The selection of appropriate dental instruments, such as a high-speed handpiece and a bur, is imperative for the safe and effective removal of dental hard tissues and caries in an efficient manner that also maximizes ergonomics for the dentist.16
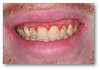
Red gingiva, as seen in Figure 3, may be caused by a variety of factors, including a lack of brushing, allergies, or drug abuse. Before making a treatment plan, it is important to talk with the patient to try to understand the cause of red gingiva, worn dentition, or erosion.
To make a bleach-type tray, the first step is to make an impression. The bleach tray should be scalloped at the height of the gingival to avoid prolonged contact between the bleach at the gingival. If a regular fluoride will be used with the bleach tray, the dentist should ensure that it is not too acidic because a low pH will not work well with, or in fact will counteract, the regeneration.
Example 3: Broken Tooth
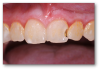
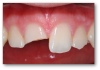
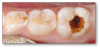
Examples of broken-tooth situations can be seen in Figure 4 and Figure 5. Figure 4 was an emergency because the tooth broke, and there was also much decay. In determining when to stop drilling, the caries indicator is very important. Because in this case there was no preoperative pain, spontaneous pain, or periapical radiolucency, and bleeding was easily controlled, a direct pulp cap was performed.
In Figure 5, part of a tooth was knocked off by a Frisbee. The patient brought in the tooth part, which approximated back onto the tooth well. First, it was hollow-ground with a 330 bur to provide relief for liner. Then the piece that was broken off was etched, and the bonding agent was applied to it. The piece in the mouth was also etched, bonding agent was applied, and it was light-cured. Giomer flowable was placed over the bonded surface as it was held in place by the dentist. The assistant shined light at it and connected the piece that broke off to the tooth. To make the tooth stronger, a diamond or a bur is used to make an irregular bevel all over the facial surface and on the lingual. The strengthening comes mostly from the latter, and some esthetic improvement comes from the former. Bevels are kept all the way in enamel whenever possible. A total-etch technique was completed over the surface and then rinsed off. The bonding agent was then applied air-thin, and the flowable was squirted onto the tooth after each layer of composite, followed by a viscous hybrid applied over the flowable. The hybrid pushed the uncured flowable out to decrease the chances of voids that cause sensitivity and weaken the restoration. The tooth was then polished.
Moving forward, the patient and dentist should be on the lookout for a cold sensation, darkening of the tooth, swelling, and periapical radiolucencies, which will be checked with the radiograph once a year for the next few years. The tooth may need work again in the future. The result at 32 months is shown in Figure 6.
Example 4: Posterior Decay
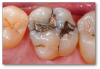
Posterior composites face the same kinds of issues. For example, a patient complained of something moving months after a restoration. The restoration had become dislodged from the tooth. Perhaps some decay was left in there or it was improperly bonded. The teeth were pre-wedged, which put pressure on the teeth while removing the decay so that the sectional matrices were easier to place. This case differed slightly in that only selective etching on the enamel was performed. One common cause of posterior tooth pain is open contacts or contacts that are not broad or tight enough. The patient then packs food in those spaces, which leads to periodontal disease and decay.
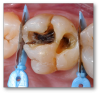
When decay presents deep in a child's molar (Figure 7), how does a dentist know when to stop drilling? The first step is to start scraping and peel out all the very leathery-like decay. Usually that task is performed with a spoon and then followed with some caries indicator and a round bur. Often in the pediatric world, a wedge guard is used, which is a wedge with a matrix built into it. However, the matrix used on this child's tooth was flat, which works well only for very small preparations, not, for example, a large Class II in an adult patient. Next, the etching and bonding were performed. The bonding agent was applied air-thin and then a layer of Giomer flowable was placed over the deepest part, which was then light-cured, and then the rest of the material was placed. In this example, a bulk-fill material was used in a couple of layers, shaped, and polished.
Example 5: Cracked-Tooth Syndrome
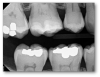
A patient with an example of cracked-tooth syndrome, seen in Figure 8, presented with thermal sensitivity, pain to bite, no periapical radiolucency, and no spontaneous pain. In general, the dentist should drill until there is no leakage around the crack: no ring or stain around the crack inside the dentin, no separation of the pieces, and no decay (Figure 9). Caries indicators may be used to guide by highlighting elements such as horizontal and vertical cracks in teeth that may otherwise go unnoticed. The preparation and procedural steps were essentially the same as in the previous examples: etching, rinsing, bonding, a layer of Giomer flow, light-curing, and then remaining materials were placed. All the materials were radiopaque and thus could easily be seen on a radiograph (Figure 10).
Conclusion
Most importantly, a dentist should be cognizant of the materials being used and should strive to be as conservative as possible, preserving as much tooth structure as possible. Bioactive regenerative materials release ions that may provide an environment where regeneration of tissue will happen. Providing this environment for tissue to heal allows dentists to perform therapy instead of just fixing problems. Materials such as Giomers and calcium silicate liners may provide a more successful environment for healing, with less sensitivity and longer-lasting restorations. Preserving tooth structure allows a scenario in which, perhaps years later when another dentist replaces the restoration, more restorative options will be available because there will be more tooth structure with which to work. Thus, both the right materials and the right techniques are key to successful restorations.
References
1.Azma E, Safavi N. Diode laser application in soft tissue oral surgery. J Lasers Med Sci. 2013;4(4):206-211.
2.Amaral MB, de Ávila JM, Abreu MH, Mesquita RA. Diode laser surgery versus scalpel surgery in the treatment of fibrous hyperplasia: a randomized clinical trial. Int J Oral Maxillofac Surg. 2015;44(11):1383-1389.
3.Sotoode SM, Azimi S, Taheri SA, et al. Diode laser in minor oral surgery: a case series of laser removal of different benign exophytic lesions. J Lasers Med Sci. 2015;6(3):133-138.
4. Tech profile. Beautifil Flow Plus. Inside Dentistry. 2011;2:108.
5. Itota T, Carrick TE, Yoshiyama M, McCabe JF. Fluoride release and recharge in Giomer, compomer and resin composite. Dent Mater. 2004;20(9):789-795.
6. Gordan VV, Mondragon E, Watson RE, et al. A clinical evaluation of a self-etching primer and a Giomer restorative material: results at eight years. J Am Dent Assoc. 2007;138(5):621-627.
7.McCabe JF. Resin-modified glass-ionomers. Biomaterials. 1998;19(6):521-527.
8. Yap AU, Wang X, Wu X, Chung SM. Comparative hardness and modulus of tooth-colored restoratives: a depth-sensing microindentation study. Biomaterials. 2004;25(11):2179-2185.
9. Fusayama T, Okuse K, Hosoda H. Relationship between hardness, discoloration, and microbial invasion in carious dentin. J Dent Res.1966;45(4):1033-1046.
10. Fusayama T. Two layers of carious dentin: diagnosis and treatment. Oper Dent.1979;4(2):63-70.
11. Fusayama T. Clinical guide for removing caries using a caries-detecting solution. Quintessence Int. 1988;19(6):397-401.
12. Downer MC, Azli NA, Bedi R, et al. How long do routine dental restorations last? A systematic review. Br Dent J.1999;187(8):432-439.
13. Van Nieuwenhuysen JP, D'Hoore W, Carvalho J, Qvist V. Long-term evaluation of extensive restorations in permanent teeth. J Dent. 2003;31(6):395-405.
14. ADA Division of Science, ADA Council on Scientific Affairs. Resin-based composites. J Am Dent Assoc.2003;134(4):510-512.
15.Brady LA. Creating interproximal contacts-separation ring fatigue. https://leeannbrady.com/dental-materials/creating-interproximal-contacts-separation-ring-fatigue. Published July 19, 2011. Accessed April 19, 2018.
16. Hailu K, Lawoyin D, Glascoe A, Jackson A. Unexpected hazards with dental high speed drill. Dent J. 2017;5(1):10.