You must be signed in to read the rest of this article.
Registration on CDEWorld is free. Sign up today!
Forgot your password? Click Here!
An atrophic maxillary posterior region of the mouth requires bone augmentation to facilitate dental implant placement. The osseous ridge may need augmentation bucco-lingually and/or apico-coronally prior to implant placement. The former requires a guided bone regeneration (GBR) procedure; the latter is usually achieved with a sinus lift (lateral wall sinus augmentation) or with a transcrestal sinus floor elevation (typically accomplished with osteotomes). A sinus floor augmentation is a technique that facilitates placement of an implant subantrally, which is longer (eg, 10 mm) than the amount of residual native bone (eg, 4 mm). The procedure is accomplished by intruding the floor of the maxillary sinus and elevating the Schneiderian membrane. It may or may not involve placing a bone graft through the osteotomy into the sinus.1 Two systematic reviews recently reported high survival rates after implant placement done in conjunction with a transcrestal sinus floor elevation: 90.9%2 and 92.8%.1 In addition, a transcrestal sinus floor elevation typically results in less morbidity, cost, and time needed for healing than a lateral wall sinus lift.3,4 Numerous techniques for sinus floor elevation appear in the literature and provide a diversity of methods that can be employed. Many require special drills with stops or other equipment.5,6
This article describes a simplified technique to perform a transcrestal sinus floor elevation to attain vertical augmentation when there is medium dense bone beneath the maxillary sinus.7 The procedure, which employs routinely used twist drills and osteotomes to create an osteotomy, requires no special armamentarium and underscores that a minimum amount of malleting is needed to successfully place an implant in conjunction with a sinus floor elevation. In addition, management of various scenarios that may be encountered is described.
Anatomy of the Maxillary Sinus Region
The maxillary sinus is a pyramidal shaped structure. Its dimensions are as follows: 25-mm to 35-mm wide, 36-mm to 45-mm high, and 35-mm to 45-mm long anterior-posteriorly.8 The ostium is the opening from the sinus above the first molar into the middle meatus of the nose. The distance from the most inferior point of the antral floor to the ostium is, on average, 28.5 mm.9 Sinus floor elevations with attendant bone grafts should not encroach upon the ostium, because blockage of the ostium can result in a sinusitis. The Schneiderian membrane that lines the sinus cavity is usually 0.97-mm +/- 0.36-mm thick.10 It may appear thicker if chronic inflammation results in hyperplasia of the membrane. In the authors' opinion, if the membrane is very thick (20% of the sinus height), it is advisable to obtain an ENT consult before proceeding with a sinus floor elevation. The thickness of the membrane can be measured on a CT scan or on conventional radiographs with a periodontal probe, but this dimension should be adjusted for radiographic error. Septa are found in 31.7% of maxillary sinuses in the premolar area and usually do not fully compartmentalize the antrum.11 They are a concern if a transcrestal sinus floor elevation procedure is planned, because it may not be possible to infracture the subantral floor under septa if they extend across the floor of the sinus.
After tooth loss the sinus may become larger due to pneumatization. A recent radiographic study by Sharan and Madjar12 quantitated the amount of sinus expansion that occurs after tooth extractions by location and number of teeth extracted: second molar: 2.91 mm; first molar: 1.14 mm; multiple teeth: 2.22 mm; and removal of one tooth between two teeth: 0.54 mm. This process usually occurs within 6 months after tooth extraction.12
Criteria for Sinus Floor Elevation
Various clinicians have suggested criteria to delineate whether a lateral window sinus lift or transcrestal sinus floor elevation would be the most predictable approach to regenerate bone in the sinus for implant placement. It has been recommended that if there is < 4 mm of bone, a lateral wall sinus lift is a superior method to create bone to support dental implants.3,13 This is particularly true if multiple implants are to be placed. In contrast, others suggested that > 5 mm of native bone is needed to place an implant reliably in conjunction with a transcrestal sinus floor elevation.3,4,14-17 Some experienced clinicians demonstrated that it is possible to perform a transcrestal sinus floor elevation with 3 mm of residual subantral bone.18-20
The authors' experiences indicate that it is usually advantageous to have 4 mm of bone prior to initiating a sinus floor elevation. This amount helps stabilize the implant.21 Furthermore, the authors recommend that if there is only 4 mm of bone present when the implant is inserted, it should be submerged beneath the soft tissues for protection during the healing process. In this regard, Rosen et al22 found that patients requiring a sinus floor elevation with < 4 mm of subantral bone had a reduced success rate compared to sites that had > 4 mm of bone (96% survival rate when bone height was > 5 mm, and 85.7% when bone was < 4 mm).
Previous Techniques for Sinus Floor Elevation
Previously, clinicians suggested employing osteotomes with increasing diameters to create an osteotomy. This procedure was often accomplished with osteotomes without any initial drilling.14 Ostensibly, this was done to preserve bone, because drilling removes osseous structure, whereas osteotomes push the bone laterally and/or apically to preserve it. Others advocated initiating the osteotomy with a 2-mm twist drill and penetrating to within 1 mm of the sinus floor to facilitate osteotome placement.4 Then, either of two methods could be used to create an osteotomy. With the first method, the smallest osteotome is malleted to penetrate to the border of the sinus, thereby uplifiting the floor of the sinus and elevating the sinus membrane. This is followed by increased sizes of osteotomes that are malleted to depth until the final desired osteotomy size is attained.14 The second method utilizes increased sizes of osteotomes, which are malleted to within 1 mm of the sinus floor until the desired osteotomy size is created.4 The sinus floor is then up-fractured with an osteotome that is one size less than the planned implant size.
With respect to both techniques, bone-graft material is typically inserted within the osteotomy prior to intrusion of the subantral bone to provide a cushion and reduce tearing of the membrane. The authors feel that both of these techniques require too much malleting of the osteotome, which is disconcerting for the patient and time-consuming. Therefore, the authors propose a simpler, gentler procedure for patients.
Simplified Osteotome Technique
Subantrally, typically either medium or soft dense bone is present (Table 1).7 If tactile feedback from the initial 2-mm twist drill, which penetrates to within 1 mm of the sinus floor, is interpreted to indicate that the bone is very soft, then a transcrestal sinus floor elevation can be completed with only osteotomes to preserve the bone. If it is medium dense bone then the simplified technique, to be described, which uses minimum malleting of osteotomes, can be employed.
The following detailed description of a simplified technique for a transcrestal sinus floor elevation assumes there is only 4 mm of subantral bone. This technique could be modified (ie, drill within 1 mm of the sinus floor) based on the amount of bone that is actually present. The following example pertains to an implant system (Straumann USA, www.straumann.us) where drill widths are 2.1, 2.8, 3.5, 4.1, and 4.8 mm; osteotomes correspond to these sizes; and implant sizes by width are 3.3, 4.1, and 4.8 mm. However, the concept can be applied generically to other implant systems. For instance, many companies provide osteotome kits containing osteotomes of different diameters calibrated to standard-sized implants, including Nobel Biocare (www.nobelbiocare.com) (mm: 2.5, 3, 3.5, 4, 4.5, 5), ACE Surgical Supply (www.acesurgical.com) (mm: 2.8, 3.3, 4, 4.35, 5), and Biohorizons (www.biohorizons.com) (mm: 2, 3, 3.3, 4).
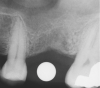
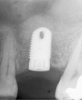
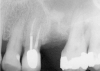
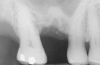
First, a periapical radiograph is taken to determine the amount of bone subantrally. It should be noted that a periapical film has an average error of 14%.23 Therefore, it is advantageous to take the radiograph in a manner that includes a marker (5-mm wide ball bearing) in order to be able to calculate the magnitude of radiographic error (Figure 1).
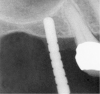
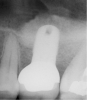
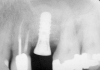
The 2-mm twist drill is used to create an osteotomy 1 mm short of the subantral floor. If any resistance is detected prior to reaching the 3-mm depth, drill penetration must be stopped, because the subantral cortical bone has possibly been reached. Any uncontrolled "push" would penetrate the bone and likely perforate the sinus membrane. A guide pin is then inserted and a radiograph taken to determine if drill penetration has terminated within 1 mm of the subantral floor (Figure 2). If the radiograph indicates that more than 1 mm of bone is present subantrally, the twist drill is used again to penetrate within 1 mm of the sinus floor. Alternately, an osteotomy tip for a piezosurgery unit can be used for this purpose. The final depth of penetration should be verified with another periapical film.
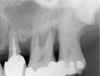
Once it is determined that the twist drill (2.1-mm diameter) is within 1 mm of the sinus floor, the second drill (2.8-mm diameter) and third drill (3.5-mm diameter), if desired, are used to penetrate to within 1 mm of the sinus floor (Figure 3). The amount of osteotomy widening is dependent upon tactilely perceived bone quality.
Then the osteotome corresponding in size to the last drill used, which is smaller than the implant to be placed, is employed to up-fracture the sinus floor. For instance, a 3.5-mm wide osteotome would be used to up-fracture the subantral floor in anticipation of placing a 4.1-mm or larger implant. Prior to using the osteotome, a metal stop should be placed on it to prevent the osteotome from entering the sinus. Therefore, if there is 4 mm of bone subantrally, the stop should be placed at 4 mm on the osteotome. The osteotome should be dipped in saline and can be rotated as it is inserted into the osteotomy to depth. If the twist drills penetrate close to the sinus, hand pressure may infracture the sinus floor. A slight give will be felt as the bone is up-fractured.
If osteotome penetration is stopped more than 1 mm from the desired depth, the osteotome should be gently malleted until the stop on the osteotome touches the alveolar crest. If a few gentle taps do not facilitate the osteotome penetrating the floor of the sinus, deliver a few more taps with the mallet. If the bone does not infracture, do not mallet harder. Instead, take the twist drill or a round bur and just touch the bone at the apex of the osteotomy. Then re-mallet the site with the osteotome. Once the floor of the sinus is penetrated there may be some minor hemorrhaging. This is normal, as the membrane has been elevated and disturbed.
The authors prefer not to place bone within the osteotomy prior to infracturing the sinus floor, because it reduces tactile perception as to when the sinus floor up-fractures. Others favor placing bone into the osteotomy prior to malleting, because it is believed that the bone acts as a cushion and reduces the chance of tearing the membrane.4,16
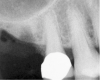
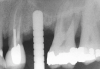
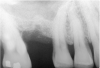
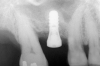
After penetration into the sinus is achieved, a sterile amalgam carrier is used two times to deliver a radiopaque bone substitute into the osteotomy. Then the osteotome used to infracture the subantral floor is lubricated with saline and inserted into the osteotomy until the stop on the osteotome reaches the alveolar crest. This pushes the bone substitute up under the sinus membrane and elevates it. Two more carriers of bone substitute are delivered in the same manner. This will provide around 2 mm of bone height in the sinus (four carriers provide around 2 mm of bone height). A radiograph is then taken to verify that the membrane was elevated, and the bone graft should appear as a dome (Figure 4). If the sinus floor has not been penetrated despite the impression that it was, the bone-graft material may have been pushed laterally. If this occurs, there will be no dome on the radiograph, but, rather, increased osseous density on the lateral aspect of the osteotomy. If this occurs the osteotomy needs to be deepened.
Once creation of a dome is verified, the amalgam carrier is usually used an additional four to six times to deliver bone. The amount of times may vary, depending on how tall an implant is going to be placed. The implant acts as the final osteotome and pushes the bone-graft material apically.
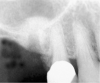
If the final osteotome employed was 3.5 mm, the size of the implant that can be placed should be 4.1-mm diameter or larger depending on the width of the ridge. Several factors should be considered when selecting the width of the inserted implant. If the height is relatively short (eg, 8 mm), a wider implant such as a 4.8-mm diameter will provide 30% more surface area than a 4.1-mm diameter implant (Figure 5).24 In addition, the wider implant will provide additional stability, especially if hand use of osteotomes caused some irregularities of the osteotomy site.
The implant motor is usually set to deliver a 35-Ncm insertion torque force. If the implant does not fully seat, a hand ratchet can be used. A tapered implant should penetrate through the subantral wall without difficulty. However, sometimes when a paralleled walled implant is inserted that is larger than the final osteotome, it may not penetrate easily through the subantral cortical wall. For example, if the final osteotome is 3.5 mm, and the implant being placed is 4.8-mm diameter and it does not penetrate, additional seating pressure can be applied to the handpiece, or a larger osteotome (eg, 4.1 mm) can be malleted into place to provide additional access into the sinus.
An internal screw is inserted within the implant and the flap is replaced, thereby submerging the implant. The implant should be permitted to achieve osseointegration for 4 to 6 months, which will allow for mineralization of the bone graft.
If the amount of subantral bone is > 5 mm or the primary stability with 4 mm of native bone is substantial, it may not be necessary to submerge the implant under the tissue. A healing abutment or cover screw could be placed flush with the tissue.
Facts and Various Possible Scenarios
Healing of Sinus Grafted Bone
Bone grafts placed in the maxillary sinus are vascularized by blood vessels from bony walls of the sinus.25 Albrektsson's study26 of bone-graft healing showed a revascularization rate of 0.2 mm to 0.4 mm per day in rabbits. Bone formation from the sinus floor occurs at a rate of about 1 mm per month.27,28 Maxillary sinus grafts calcify at around 1 mm per month. This statement is based on trephine specimens of human sinus-lift biopsies that were double-labeled with tetracycline, according to a personal e-mail communication the authors had with Eugene Roberts in April 2010. Therefore, maturation of bone grafts may take 6 months, depending on how much bone was added.
Placement of Bone into the Sinus
When sinus floor elevations are executed, some clinicians do not advocate placing bone through the osteotomy site to tent the membrane.29,30 In contrast, Tan et al1 in their recent systematic review indicated that, in 16 of 19 studies included in their assessment, the investigators did augment bone when performing a sinus floor elevation. In this regard, Pjetursson et al31 reported more bone formed when bone was added to the sinus through the osteotomy. They noted that insertion of graft material resulted in a dome-like configuration that was reduced after remodeling but still yielded a mean bone gain of 4.1 mm after at least 1 year.
Recently, Jung et al20 indicated the total mean reduction in the grafted bone height was 1.9 mm 5 years after a transcrestal sinus floor elevation. It is not uncommon to detect that bone remodeling occurs over time (Figure 6 and Figure 7). In particular, bone that initially appears apical to the inserted implant resorbs and, subsequently, the osseous crest is found at the apex of the implant.
Sinus Floor Elevation in a Socket
The sinus floor elevation technique can be used when a tooth is extracted and there is not enough bone height to support an immediate implant (Figure 8, Figure 9 and Figure 10, Figure 11).32
Slanted Sinus Floor
At the site where the implant is to be placed, if the subantral floor is on a slant as opposed to being flat, the osteotomy should be drilled 1 mm short of the most inferior wall of the sinus (Figure 9). The twist drill size should be increased to what would normally be used prior to implant placement. Then, a small osteotome can be angled towards the section of bone that was thicker to try to break through with a narrow osteotome. The osteotome size is then increased to accommodate the planned implant. It should be noted that sloped areas of the sinus floor as well as septa are risk factors for perforating the membrane upon up-fracturing the subantral floor.
Accidental Penetration of Sinus Membrane with First Twist Drill
When using a 2-mm twist drill, the sinus could inadvertently be entered. This incursion can be verified by occluding the patient's nostrils and having the patient blow (Valsalva maneuver). If the membrane has been perforated, air bubbles will appear in the osteotomy. Some clinicans indicate that if a perforation has occurred, the sinus floor elevation procedure should be aborted and the site should be allowed to heal for 4 weeks and then redone.4 However, the situation may be salvageable (Figure 12, Figure 13, Figure 14, Figure 15). The amount of bone that is subantral can be re-evaluated, and then the second drill (eg, 2.8-mm wide) used, making sure not to enter the sinus. Similarly, the third drill (3.5-mm wide) can be used to proceed 1 mm short of the sinus floor. The initial sequence should be followed with respect to adding bone; whether or not a dome has formed should be verified radiographically. If the graft material is contained, then the procedure can be brought to conclusion as if a perforation had not occurred. On the other hand, if the material was not contained, it may appear on the radiograph as a "trail of smoke." In this case the procedure needs to be aborted or a lateral wall sinus lift needs to be performed to complete the task and repair the perforated membrane. In general, the ostium is 2.4-mm wide;33 it ranges from 2.14 mm to 6.77 mm.34 Therefore, particles that have escaped through the membrane will probably be swept through the ostium by the ciliated columnar epithelium without any untoward occurrence. Other authors have also noted that a perforation of the membrane does not necessarily result in failure of an implant that penetrates into the sinus.35
Supracrestal Versus Subcrestal Implant Placement
In the posterior maxilla, the bone type is usually medium dense (Table 1). Therefore, if a paucity of subantral bone exists, it would be advantageous to retain as much cortical bone as possible after implant placement. Accordingly, thought should be given to keeping the implant platform surpracrestally (Figure 11). Positioning the implant platform coronal to the crest of bone facilitates formation of a supracrestal biologic width with less bone loss. In contrast, placement of the implant platform crestally or subcrestally will result in bone loss and development of a subcrestal biologic width.36
Failed Sinus Floor Elevation Can Be Redone
If an implant fails that was initially placed with a simultaneous sinus floor elevation, the bone added to the sinus may mineralize and provide additional osseous support when it heals. Subsequently, this amount of additional bone may be adequate to place an implant after the socket heals, or the sinus floor elevation can be redone.
Complications
As a consequence of transalveolar sinus floor elevations, Schneiderian membrane perforation has been identified as the most frequently encountered complication (3.8%), and infections were rare (0.8 %).1 If the osteotome technique requires extensive malleting during the sinus floor elevation, it may cause postsurgery sequelae such as a headache or benign paroxysmal positional vertigo (BPPV).37,38
Conclusion
A simplified technique to perform sinus floor elevation in medium dense bone has been presented. It enhances patient comfort and reduces the need to mallet osteotomes. These modifications add to the potential benefit of using a transcrestal sinus floor elevation to facilitate placing implants at sites that have a paucity of native subantral bone.
About the Authors
Gary Greenstein, DDS, MS
Clinical Professor
Department of Periodontology
School of Dental Medicine
Columbia University
New York, New York
Private Practice
Surgical Implantology and Periodontics
Freehold, New York
John Cavallaro, DDS
Clinical Director of Dental Implant Fellowship
Clinical Associate Professor
Department of Prosthodontics
School of Dental Medicine, Columbia University
New York, New York
Private Practice
Surgical Implantology and Prosthodontics
Brooklyn, New York
References
1. Tan WC, Lang NP, Zwahlen M, Pjetursson BE. A systematic review of the success of sinus floor elevation and survival of implants inserted in combination with sinus floor elevation. Part II: transalveolar technique. J Clin Periodontol. 2008;35(8 suppl):241-254.
2. Emmerich D, Att W, Stappert C. Sinus floor elevation using osteotomes: a systematic review and meta-analysis. J Periodontol. 2005;76(8):1237-1251.
3. Zitzmann NU, Schaerer P. Sinus elevation procedures in the resorbed posterior maxilla. Comparison of the crestal and lateral approaches. Oral Surg Oral Med Oral Pathol Oral Radiol Endod. 1998;85(1):8-17.
4. Davarpanah M, Martinez H, Tecucianu JF, et al. The modified osteotome technique. Int J Periodontics Restorative Dent. 2001;21(6):599-607.
5. Trombelli L, Minenna P, Franceschetti G, et al. Transcrestal sinus floor elevation with a minimally invasive technique. J Periodontol. 2010;81(1):158-166.
6. Toffler M. Site development in the posterior maxilla using osteocompression and apical alveolar displacement. Compend Contin Educ Dent. 2001;22(9):775-784.
7. Cavallaro J Jr, Greenstein B, Greenstein G. Clinical methodologies for achieving primary dental implant stability: the effects of alveolar bone density. J Am Dent Assoc. 2009;140(11):1366-1372.
8. van den Bergh JP, ten Bruggenkate CM, Disch FJ, Tuinzing DB. Anatomical aspects of sinus floor elevations. Clin Oral Implants Res. 2000;11(3):256-265.
9. Uchida Y, Goto M, Katsuki T, Akiyoshi T. A cadaveric study of maxillary sinus size as an aid in bone grafting of the maxillary sinus floor. J Oral Maxillofac Surg. 1998;56(10):1158-1163.
10. Aimetti M, Massei G, Morra M, et al. Correlation between gingival phenotype and Schneiderian membrane thickness. Int J Oral Maxillofac Implants. 2008;23(6):1128-1132.
11. Ulm CW, Solar P, Krennmair G, et al. Incidence and suggested surgical management of septa in sinus-lift procedures. Int J Oral Maxillofac Implants. 1995;10(4):462-465.
12. Sharan A, Madjar D. Maxillary sinus pneumatization following extractions: a radiographic study. Int J Oral Maxillofac Implants. 2008;23(1):48-56.
13. Fugazzotto PA. Augmentation of the posterior maxilla: a proposed hierarchy of treatment selection. J Periodontol. 2003;74(11):1682-1691.
14. Summers RB. Sinus floor elevation with osteotomes. J Esthet Dent. 1998;10(3):164-171.
15. Summers RB. The osteotome technique: Part 4—Future site development. Compend Contin Educ Dent. 1995;16(11):1090-1098.
16. Summers RB. The osteotome technique: Part 3—Less invasive methods of elevating the sinus floor. Compend Contin Educ Dent. 1994;15(6):698-704.
17. Summers RB. A new concept in maxillary implant surgery: the osteotome technique. Compend Contin Educ Dent. 1994;15(2):152-156.
18. Wallace SS, Froum SJ. Effect of maxillary sinus augmentation on the survival of endosseous dental implants. A systematic review. Ann Periodontol. 2003;8(1):328-343.
19. Deporter D, Todescan R, Caudry S. Simplifying management of the posterior maxilla using short, porous-surfaced dental implants and simultaneous indirect sinus elevation. Int J Periodontics Restorative Dent. 2000;20(5):476-485.
20. Jung JH, Choi SH, Cho KS, Kim CS. Bone-added osteotome sinus floor elevation with simultaneous placement of non-submerged sand blasted with large grit and acid etched implants: a 5-year radiographic evaluation. J Periodontal Implant Sci. 2010;40(2):69-75.
21. Jensen OT, Schulman LB, Block MS, Iacono VJ. Report of the Sinus Consensus Conference of 1996. Int J Oral Maxillofac Implants. 1998;13(suppl):11-45.
22. Rosen PS, Summers R, Mellado JR, et al. The bone-added osteotome sinus floor elevation technique: multicenter retrospective report of consecutively treated patients. Int J Oral Maxillofac Implants. 1999;14(6):853-858.
23. Sonick M, Abrahams J, Faiella RA. A comparison of the accuracy of periapical, panoramic, and computerized tomographic radiographs in locating the mandibular canal. Int J Oral Maxillofac Implants. 1994;9:455-460.
24. Curtis DA, Sharma A, Finzen FC, Kao RT. Occlusal considerations for implant restorations in the partially edentulous patient. J Calif Dent Assoc. 2000;28(10):771-779.
25. Misch CE, Resnik RR, Misch-Dietsh F. Maxillary Sinus Anatomy, Pathology and Graft Surgery. In: Misch CE, ed. Contemporary Implant Dentistry. 3rd ed. St. Louis, MO: Mosby; 2008:948.
26. Albrektsson T. Repair of bone grafts. A vital microscopic and histological investigation in the rabbit. Scand J Plast Reconstr Surg. 1980;14(1):1-12.
27. Smiler DC, Johnson PW, Lozada JL, et al. Sinus lift grafts and endosseous implants. Treatment of the posterior atrophic maxilla. Dent Clin North Am. 1992:36(1):151-186.
28. Davies JE, Hosseini MM. Histodynamics of endosseous wound healing. In: Davies JE, ed. Bone Engineering. Toronto, ON: em squared Inc; 2001:1-13.
29. Schmidlin P, Muller J, Bindl A, Imfeld H. Sinus floor elevation using an osteotome technique without grafting materials and membranes. Int J Periodontics Restorative Dent. 2008;28(4):401-409.
30. Leblebicioglu B, Ersanli S, Karabuda C, et al. Radiographic evaluation of dental implants placed using an osteotome technique. J Periodontol. 2005;76(3):385-390.
31. Pjetursson BE, Rast C, Brägger U, et al. Maxillary sinus floor elevation using the (transalveolar) osteotome technique with or without grafting material. Part I: Implant survival and patients' perception. Clin Oral Implants Res. 2009;20(7):667-676.
32. Barone A, Cornelini R, Ciaglia R, Covani U. Implant placement in fresh extraction sockets and simultaneous osteotome sinus floor elevation: a case series. Int J Periodontics Restorative Dent. 2008;28(3):283-289.
33. Misch CE. Density of bone: effects on surgical approach and healing. In: Misch CE, ed. Contemporary Implant Dentistry. 3rd ed. St. Louis, MO: Mosby; 2008:645-667.
34. Lee KC, Lee SS, Lee JK, Lee SH. Medial fracturing of the inferior turbinate: effect on the ostiomeatal unit and the uncinate process. Eur Arch Otorhinolaryngol. 2009;266(6):857-861.
35. Brånemark PI, Adell R, Albrektsson T, et al. An experimental and clinical study of osseointegrated implants penetrating the nasal cavity and maxillary sinus. J Oral Maxillofac Surg. 1984;42(8):497-505.
36. Piattelli A, Vrespa G, Petrone G, et al. Role of the microgap between implant and abutment: a retrospective histologic evaluation in monkeys. J Periodontol. 2003;74(3):346-352.
37. Penarrocha-Diago M, Rambla-Ferrer J, Perez V, Perez-Garrigues H. Benign paroxysmal vertigo secondary to placement of maxillary implants using the alveolar expansion technique with osteotomes: a study of 4 cases. Int J Oral Maxillofac Implants. 2008;23(1):129-132.
38. Galli M, Petracca T, Minozzi F, Gallottini L. Complications in implant surgery by Summer's technique: benign paroxysmal positional vertigo (BPPV). Minerva Stomatol. 2004;53(9):535-541.