You must be signed in to read the rest of this article.
Registration on CDEWorld is free. Sign up today!
Forgot your password? Click Here!
Technology plays an important role in dentistry today. This article will discuss how to utilize digital scanning when providing implants. After discussing the steps involved in this process, a specific case will be related to demonstrate the process. The article will also cover key factors to consider throughout the implant process. As always, having a plan is vital.
After an implant is placed, one of the next things to determine is the type of abutment to use. Will the abutment be stock or custom? A standard abutment is one that is provided by the implant manufacturer and is typically used when there are no concerns about angulation of the implant; a custom abutment is considered when implant positioning or interocclusal space is a concern.1 With either stock or custom abutments, a digital impression allows a more accurate and streamlined process. The use of digital surgical guides has been shown to provide an increased level of accuracy over "freehand" implant placement and even conventional surgical guides.2
Another decision is determining which implant biomaterial to use. The biologic environment does not fully accept any material, so to optimize biologic performance, implants should be selected to reduce the negative biologic response while maintaining adequate function.3 Materials available for dental implants have improved over the years.4 In the modern era, implant research has focused on discovering tooth-colored implant materials that improve the esthetic appearance of dental implants and that, at the same time, are highly biocompatible and able to withstand the forces present in the oral cavity.5 Today, with modern dentistry utilizing the benefits of biotechnology in healthcare, there are a variety of options.6
Digital Scanning
As dentistry continues to move forward, using a digital scanner for impressions is increasingly important. Digitally scanning crown-and-bridge implants, orthodontics, partials, and other entities makes processes easier and faster.7 If a mistake is made or a change is needed when using a digital scanner, one can simply erase and start over. This eliminates the risk of distortions, bubbles, and voids. When a digital scanner is used, there are far fewer remakes of crowns and bridges. Furthermore, marking margins is easier. However, although many studies demonstrate a significant improvement in the accuracy of CAD/CAM compared with conventional case frameworks, it is not without error.8 In a conventional implant case, one that uses molds and casts, the chance of error is split about evenly between the dentist's work and the manufacturing; half of the errors occur during the impression procedure and production of the stone cast and the other half while manufacturing the prosthesis.9,10 Digital scanning improves the accuracy of both the former and the latter, but not without the possibility of error. This article offers tips and warnings to mitigate any possible errors.
When a scanner is chosen, price point should not be the only factor. A data plan or dongle fees should be factored in also to determine the true cost of ownership. Nevertheless, although there is a difference in systems on the market, they produce comparable results. The case study in this article will demonstrate the ease of using a digital scanner for an implant.
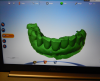
A typical scanner prescription (Figure 1) allows a clinician to choose the crown, or whatever else is needed, directly on the screen. After taking an initial scan, one may find that some data is missing or some areas were not covered. This problem is easily fixed by rescanning those areas to complete the data. After that, the second scan, called a scan body, is the equivalent of impression coping. A scan body is usually system specific, but a laboratory may have compatibles to work with. The laboratory can read the library of the implant system and match it by seeing exactly in which space the implant is located because all the necessary data is collected through scanning.
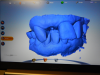
The next step is to scan the counter model, which, in turn, allows the following step to be performed: the fourth scan, which is a bite registration scan. A bite registration scan determines the buccal bite. After the buccal bite is confirmed to be correct, a model match is done by overlaying the scans to confirm every detail is accurate (Figure 2).
Laboratory Work
After the scans are completed, a laboratory form is filled out and a laboratory is assigned. There are also areas on the form to ask for a cement-retained, screw-retained, or custom abutment. If a stock abutment is chosen, the request must be mailed in separately because everything else is sent digitally. After the digital send, it takes just a few minutes before confirmation is received that the upload is complete.
At the laboratory, software is used to formulate the emergence profile of the crown and the basic esthetics. From the incisal view, the laboratory gets a sense of thickness. The laboratory can observe how thick the crown is versus the abutment and know what must be done to make everything fit together. Laboratories can send updates with screenshots, but that may not prove necessary after one is familiarized and confident with the laboratory's products. However, if there is any issue seen in a screenshot, the laboratory can be called and changes made before they proceed to milling.
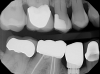
After the parts are received from the laboratory, they should be placed and checked for basic fit and correct index. The author will usually tighten down the screw, take an x-ray to confirm everything looks right, and then torque. The final step is cementation.
Cementation
Cementing crowns onto implants has become increasingly popular, but it is not foolproof. Dental cement has been shown to be a possible cause of local tissue inflammation associated with dental implants; cements have been linked to peri-implant diseases, bone loss, and implant failure.11 When using cement, dentists must be clear on the difference between implants and teeth; the appropriate cementation techniques, suitable cement selections, and even the procedures for the cleanup of excess cement are different for each.11 A cement should be used that is gentle on the tissue and that will allow the crown to be removed without having to cut it off entirely, thus destroying the crown. Although this may happen on occasion, with the right cement, crowns can generally be tapped off with a tapper so that any adjustments can be made, whether it be tightening a screw or examining tissue around it, and then cemented again. If one is working with a subgingival margin, as most abutments in the anterior tend to have, the clinician must be careful to remove all excess cement from the abutment-crown interface. Using the appropriate amount of cement is vital because there is just room for a thin cement layer between the abutment and crown-about equivalent to two coats of nail polish.12 In many cases, excess dental cement is associated with signs of peri-implant disease.13
Implant Parts
As the use of implants continues to grow, the FDA has taken a closer look at the laboratories manufacturing them. Ultimately, the FDA has decided that anyone making the implant-abutment interface is no longer a "dental laboratory" from a regulatory perspective, but rather a "manufacturer" of a class II medical device and thus, per the applicable regulations, must obtain 510(k) clearance to do so.14 Therefore, for a custom abutment, digital scans must be sent to laboratories with 510(k) clearance. This can be determined by asking for their 510(k) clearance number or a facility registration number under their name. (The FDA's website can be used to search for laboratories with 510(k) clearance: https://www.accessdata.fda.gov/scripts/cdrh/cfdocs/cfrl/rl.cfm.) Alternatively, a stock abutment is from a manufacturer and has thus already been cleared for 510(k) by the FDA.
In addition to ensuring a laboratory is certified, it is important to make sure that all the parts from the implant company are authentic. This can be determined by asking to see the packaging for verification. Figure 3 shows a part on tooth No. 29 that is definitely not authentic. This piece may have been cheaper because it was not of verifiable quality. The dentist must ensure the quality of the products chosen. CAD/CAM has significantly altered the dental industry's approach to restorative treatment.15 The market and availability of products have increased, but consequently, the importance of FDA regulation has increased.
Case Study
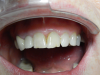
A woman required an implant on tooth No. 7. Her case presented a challenge for a variety of reasons. She had a crown on No. 6, a class II division 2 orthodontic, and centrals that were slightly ragged and rotated; additionally, tooth No. 7 was never evaluated because she came from another practice with a failing implant in that area. The first step was to remove the failing implant and graft it (Figure 4). As shown, some bone was lost in the buccal, but overall the tissue looked good. A decision needed to be made about whether to make it an ideal occlusion or to leave it as the class II division 2. After the patient was consulted, she chose the former option of an ideal orientation. In addition to determining the potential emergence profile, other decisions that needed to be made involved factors such as tissue height, contours, and smile line. The patient's expectations needed to be factored in as well.
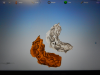
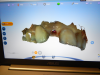
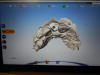
The first scan was of only the emergence profile of the implant buried in the tissue (Figure 5). The second scan enabled the scan body, the model (Figure 6). The third step was to scan the counter model. The counter model showed, from the incisal wear, that the patient was very tough on her teeth: her centrals were chipped and grooved (Figure 7). In addition to the restorative dental work, changes needed to be made in her parafunctional habits. The next step was a bite registration scan (Figure 8). The scans were confirmed with a model match and, after verification, were uploaded and sent to the laboratory.
The laboratory returned a gold screw, the abutment, and the crown itself (Figure 9). The first step now was to try the abutment in place, checking for basic fit and ensuring the index was correct. The screw was snugged down slightly, although no torquing had yet been performed. Before torquing, the crown was tried on and an x-ray was taken to confirm that everything was satisfactory. After confirmation, the abutment was torqued to the proper setting, which is dependent on the implant system being used. The next step was cementation. A cement that is retrievable and not damaging to tissue, as well as a cement with excess that is easy to clean off, is desirable.
Figure 10 shows the final result. This case involved compromise; because of the patient's occlusion, the case had to be ramped out slightly; however, it is still more ideal than No. 10. The visual contour could have been tweaked more with a CO2 laser, but the patient declined. She was tired of the flipper and thus didn't want any more site work around the healing cap. She was ready for the process to be over. The implant was somewhat lighter than the surrounding teeth, but that was intentional because the patient planned to bleach her front teeth. Although some of her decisions were not what every dentist may necessarily agree with, the patient's happiness was the ultimate goal, and the result was fairly pleasing.
The accuracy of digital intraoral impressions has been established in the literature.16-18 A digital scanner is chosen, a laboratory to work with is chosen that has 510(k) clearance, and the technology is incorporated into the practice.
References
1.Wadhwani C, Piñeyro A. Implant cementation, step by step. Nobel Biocare. https://www.nobelbiocare.com/ca/en/home/company/media---news/articles/tips-and-tricks/implant-cementation-step-by-step.html. Published March 9, 2016. Accessed January 5, 2018.
2.Thorn E. FDA sharpens focus on implant abutments. J Dent Technol. 2016;33(1):10-11.
3. Shim C. Various factors affect quality of CAD/CAM custom abutments. Inside Dental Technology. 2015;6(10):48-49.
4. Mehta V. Five ways to improve implant crown cementation. Spear. http://www.speareducation.com/spear-review/2013/06/five-ways-to-improve-implant-crown-cementation. Published June 20, 2013. Accessed January 5, 2018.
5. Wilson TG. The positive relationship between excess cement and peri-implant disease: a prospective clinical endoscopic study. J Periodontol. 2009;80(9):1388-1392.
6. Karl M, Holst S. Strain development of screw-retained implant-supported fixed restorations: procera implant bridge versus conventionally cast restoration. Int J Prosthodont. 2012;25(2):166-169.
7. Heckmann SM, Karl M, Wichmann MG, et al. Cement fixation and screw retention: parameters of passive fit. An in vitro study of three-unit implant-supported fixed partial dentures. Clin Oral Implants Res. 2004;15(4):466-473.
8. Schneider A, Kurtzman GM, Silverstein LH. Improving implant framework passive fit and accuracy through the use of verification stents and casts. J Dent Technol. 2001;18(4):23-25.
9. Joda T, Lenherr P, Dedem P, et al. Time efficiency, difficulty, and operator's preference comparing digital and conventional implant impressions: a randomized controlled trial. Clin Oral Implants Res. 2016;28(10):1318-1323.
10. Silverman B. Using digital impression for implants. Dental Economics. http://www.dentaleconomics.com/articles/print/volume-105/issue-6/science-tech/using-digital-impressions-for-implants.html. Published June 25, 2015. Accessed January 5, 2018.
11. Farley NE, Kennedy K, McGlumphy EA, Clelland NL. Split-mouth comparison of the accuracy of computer-generated and conventional surgical guides. Int J Oral Maxillofac Implants. 2013;28(2):563-572.
12. Saini M, Singh Y, Arora P, et al. Implant biomaterials: a comprehensive review. World J Clin Cases. 2015;3(1):52-57.
13. Hulbert SF, Bennett JT. State of the art in dental implants. J Dent Res. 1975;54(spec no. B):B153-B157.
14. Kohal RJ, Weng D, Bächle M, Strub JR. Loaded custom-made zirconia and titanium implants show similar osseointegration: an animal experiment. J Periodontol. 2004;75(9):1262-1268.
15. Smith DC. Dental implants: materials and design considerations. Int J Prosthodont. 1993;6(2):106-117.
16. Karl M, Graef F, Schubinski P, Taylor T. Effect of intraoral scanning on the passivity of fit of implant-supported fixed dental prostheses. Quintessence Int. 2012;43(7):555-562.
17. Lee CY, Wong N, Ganz SD, et al. Use of an intraoral laser scanner during the prosthetic phase of implant dentistry: a pilot study. J Oral Implantol. 2015;41(4):e126-e132.
18. Ahrberg D, Lauer HC, Ahrberg M, Weigl P. Evaluation of fit and efficiency of CAD/CAM fabricated all-ceramic restorations based on direct and indirect digitalization: a double-blinded, randomized clinical trial. Clin Oral Investig. 2016;20(2):291-300.