You must be signed in to read the rest of this article.
Registration on CDEWorld is free. Sign up today!
Forgot your password? Click Here!
The ADAA has an obligation to disseminate knowledge in the field of dentistry. Sponsorship of a continuing education program by the ADAA does not necessarily imply endorsement of a particular philosophy, product, or technique.
The days of being “just” a dental assistant are gone. As we continually strive to learn new things and improve our skills, the role of a dental assistant changes. In many states, laws concerning dental assistants are changing and the dental assistant is now able to perform more, such as fabricating provisional crowns and bridges. With this growth come new responsibilities. As dentistry changes, so do products, materials, and techniques.
This course is designed to teach dental assistants how to fabricate provisional crowns or bridges using traditional provisional materials. The term provisional also can refer to an interim or temporary restoration. Learning the techniques, materials, and procedures should give the dental assistant a better understanding of what it takes to fabricate a provisional restoration that will make the patient happy.
Laws and regulations concerning dental assistant duties vary from state to state. In many states fabricating and seating provisional crowns or bridges could be considered an expanded function and additional state approved education may be required. Always refer to the State Dental Practice Act before performing any of these functions and if you have questions about the functions, please refer to your state board of dentistry or board of dental examiners.
Importance and Purpose
Provisional restorations are used as a short-term or interim (medium-term) step. They aid in diagnosis, treatment planning, and communication to the laboratory for the clinical success of definitive fixed restorations. They may also provide coverage and support during periodontal treatment including implant therapy in developing the morphology of perio-implant periodontal tissues, over strategic extraction sites, during grafting techniques, furcation and endodontic treatment, and serve as a guide for the final restoration. Changes can be made during this phase to correct esthetics, phonetics, and function. The provisional may only be required for two to six weeks, or in some situations, must remain in a satisfactory condition in the oral cavity for twelve to eighteen months.
It is important to provide protection for the teeth during these times. The provisional must be properly fabricated and cemented. The treatment performed reflects the entire dental practice. Therefore, when a provisional is esthetically pleasing, remains intact, cemented and is comfortable, the gain is much more than a well-fitting provisional.
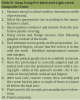
There are five basic purposes for a provisional. Each purpose relates both to the individual tooth or teeth and the patient as a whole.
| 1. | Protection of tooth and/or restoration - The provisional provides protection for the tooth from the time of preparation until the final crown is cemented. |
| 2. | Tissue conditioning and healing - The provisional restoration can be used to assist the gingival tissue in establishing good contour, and with the healing process. Ideally, the tooth should not be prepared more than 1/2 mm under the gingiva unless it is necessary for retention, esthetics, or function. |
| 3. | Esthetics - The provisional crown can act as a "rough draft" for the dentist and patient to discuss the appearance of the permanent crown. After wearing the provisional for some time, the patient may request changes to the final crown. Changes may include color, shape, length, embrasure, and many others. Provisional crowns allow the patient to become accustomed to the new shape, contour, and length if these were altered for cosmetic or functional purposes. |
| 4. | Maintaining Space for New Restoration -The provisional restoration is responsible for maintaining space for the final restoration. The provisional must touch the tooth to the mesial and distal of the prepared tooth as well as the opposing tooth. This contact will help reduce, and hopefully prevent, the adjacent teeth from moving. If the provisional is too small and does not provide adequate contact, the adjacent teeth will move into the open space. When the final restoration is ready to be seated, it may be too tight or not fit at all. An accurately sized provisional, both mesially and distally, will also prevent food from being trapped between the teeth. Trapped food can cause gingival inflammation, pain, and infection. |
| 5. | Function - Function is one of the most basic purposes of a provisional crown. The patient needs to be able to eat (on a modified diet) during the period of time he/she is waiting for the permanent crown. Occlusion should be slightly lighter than traditional occlusion to allow the pulp and periodontal ligament (PDL) to heal after the procedure. |
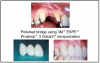
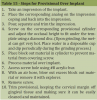
With these five primary purposes in mind, evaluate the tooth, surrounding tissues and teeth, and identify any special circumstances. Use this knowledge to determine the best material, fabrication technique, necessary adjustments, cementation, and post operative instructions for the patient’s provisional restoration. (Table 1, Figure 1)
Provisional Crown and Bridge Materials
Today, we have many choices of materials to fabricate a provisional crown and bridge. We can choose from the traditional self-cured acrylic polymers, or the more advanced light-cured or dual-cured resins, as well as pre-fabricated provisional crowns.
Provisional materials can be categorized as follows:
I. Bis-acrylic
a. Dimethacrylate- identified as:
i. bisphenol A-glycidyl methacrylate (BIS-GMA)
ii. urethane dimethacrylate (UDMA)
II. Acrylics
c. Methyl Methacrylate (MMA)
d. Ethyl Methacrylate (EMA)
e. Polymethyl methacrylate (PMMA)
f. Polyethyl methacrylate (PEMA)
III. Pre-Fabricated
a. Metal (Ion)
i. stainless steel
ii. aluminum
iii. anodized gold
iv. tin
v. tin-silver
b. Polycarbonate
c. Light-cured methacrylate composite crown
There are many advantages and disadvantages to each of these common materials. A decent investigation of the brands already in use should be conducted before discussing using a new material with the dentist. Be ready to discuss the pros and cons of using different materials and/or techniques.
Bis-acrylics
Among the possible materials available are composite fillers such as dimethacrylate, identified as bisphenol A-glycidyl methacrylate (BIS-GMA), or urethane dimethacrylate (UDMA). These materials are classified as Bis-acrylics.
Bis-acrylics are multi-functional methacrylate esters filled with glass and/or silica particles. Bis-acrylic materials are popular because of their easy manipulation and comfort for the patient. They produce minimal odor, heat and shrinkage during the polymerization process. Shade variations are somewhat limited, ranging from two to five shade options.
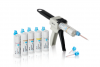
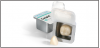
Materials that are compatible with composite resins, such as Integrity® by Dentsply Caulk or Protemp™ Plus by 3M ESPE, are available in an automix cartridge. (Figure 2) This can open up the door to an almost perfect color match. These materials are polymerized either by being chemically activated or visible-light activated. Chemically activated materials are packaged as a catalyst and base. They must be stored in two separate containers and mixed just prior to use. Many of these materials are dispensed in an automix cartridge. The automix cartridge prevents operator error, allows for easy clean up, and avoids unnecessary waste.
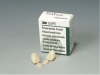
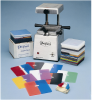
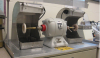
Directions for some chemically activated bis-acrylic materials recommend utilizing a pressure pot for the final cure. (Figure 3) Examples of these chemically cured materials are Ultra Trim® by The Bosworth Company and BIS-Jet® by Lang Dental Manufacturer. Provipoint® by Ivoclar Vivadent is a dual-cured material and so is TCB Dual Cure® by SciCan. Radica® by Dentsply also uses a Triad® oven to fully cure the material.
The final stage of curing using a dual-cured material can be achieved by self-cure or light-cure. Light curing the material will reduce setting time by half. Initial polymerization is achieved by mixing the catalyst and base together. When ready for the final set, expose the material to a visible-light curing machine. Light-activated materials must be stored in a light-proof container to prevent the material from polymerizing prematurely. An example of this type of material is Revotek LC® from GC America.
Acrylics
Traditional acrylic resins are also known as methyl methacrylate (MMA), Ethyl methacrylate (EMA), Polymethyl methacrylate (PMMA), and Polyethyl methacrylate (PEMA). These materials have been used in dentistry for many years. Self-cured acrylic polymers, which are chemically activated, require a liquid (monomer) and powder (polymer) that are mixed to a fluid consistency.
Exothermic reactions are part of the polymerization process of polymethyl methacrylate. The larger the amount of this material used, the larger the exothermic reaction. Completion of the curing process is increased by this temperature rise and explains why frail, thin areas of cold-curing acrylic do not reach maximal hardness.
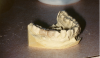
Polyethyl methacrylate materials have a longer working time between the initial and final set. They also produce a lower exothermic reaction. This material lacks resistance to abrasion, hardness and color stability. Using a pressure pot at 20 to 25 p.s.i. for 5 minutes will alleviate the hardness and color stability problem. Trim® from The Bosworth Company is an example of a polyethyl methacrylate acrylic resin. (Figure 4)
Both of these acrylics are affected by the eugenol in provisional cements. This makes repair of the acrylic difficult. To overcome this, lubricate the outer surface of the provisional before placing the cement inside. Different materials have different shrinkage rates. When acrylic polymerizes, the crown undergoes shrinkage of approximately seven percent. If the final curing takes place without a supporting form, there will be distortion and a less optimal fit. A study of the marginal adaptation of provisional restorations found that the marginal fit of ethyl methacrylate provisional restorations can be improved by nearly 70 percent by fabricating them using the indirect technique. (See Technique Section)
When using acrylics, it is recommended to submerge the provisional in water if it is kept outside the mouth for an extended length of time.
Pre-fabricated
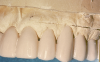
Prefabricated provisionals come in a variety of materials. They can be used for anterior or posterior, and are often used when a preliminary impression is not possible. Metal pre-fabricated crowns are used in the posterior. They provide good coverage, strength, and fit best when the interior is customized. Stainless steel as a provisional crown will last longer (in most cases) than the other materials. Metal crowns come in a variety of sizes and are grouped by type of tooth. For a slightly more esthetic posterior provisional, the tooth colored methacrylate composite crown should be used. Polycarbonates are anterior prefabricated anterior crowns. They may be used alone, with acrylic to customize the interior, or as a template to create a preliminary impression.
All characteristics of a material should be acknowledged and proper steps taken to prevent any undesirable post-operative sensitivity or pulp pathology. With the proper knowledge, an assistant can safely utilize these materials.
Techniques
There are many techniques available to provide provisional coverage for teeth while fabricating permanent restorations. The type of provisional needed, condition of the gingiva, desired outcome, and any special circumstances all should influence which technique is chosen. There are three basic techniques we will explore in this text: direct, indirect, and a combination of the two.
The direct provisional technique is where a provisional restoration is made inside the patient's mouth. The indirect technique uses a model to fabricate the provisional (outside of the patient's mouth). The indirect/direct technique utilizes both techniques.
Advantages/Disadvantages
The indirect technique has advantages and disadvantages. When a patient reports a previous history of tissue irritation after a provisional crown was fabricated directly, the possibility of sensitivity can be decreased by utilizing the indirect technique. This indirect technique can also be used to fabricate a multiple unit bridge. This allows the patient to be comfortable while the bridge is being constructed. It also allows better visibility of margins, contours, and contacts. By using this technique, the material is allowed to completely set on the prepared model. The indirect technique does, however, require several additional steps. These additional steps result in increased chair time and materials. The indirect technique is preferred over the direct technique for pulpal protection and accuracy. The use of acrylic monomers and polymers on a freshly cut tooth can be an irritant. The tooth has probably already had a large restoration, may have additional caries, and has been subjected to the trauma of a high-speed handpiece.
The direct technique decreases chair time and material, however the patient is more uncomfortable because the mouth has to stay open while the provisional is being fabricated. The patient may be subjected to the unpleasant aroma from the materials and to the injurious effects of the placement and removal of the provisional until final set is achieved. If the restoration is not removed from the tooth during the curing process, it may be necessary to destroy the provisional in order to remove it from the preparation.
The indirect-direct technique is usually chosen when multiple units are involved. This allows for relining at the chair with minimal contouring and improved esthetics. This technique requires preliminary work, additional chair time, and lab costs.
All three techniques described have advantages and disadvantages. In consultation with the dentist, an assistant who knows these procedures and the associated effects can choose an appropriate technique to meet the needs of the patient.
Direct Techniques
The direct technique is performed by making the provisional directly in the mouth. It is usually chosen when a single unit or small span bridge is being fabricated. It is cost-effective to fabricate the provisional directly and requires less chair time.
Using the direct technique can be quite simple. For instance, choosing a polycarbonate crown form for an anterior tooth and relining it with acrylic will save time since it is not necessary to take impressions, pour models or make a template. There are numerous ways to fabricate a provisional utilizing the direct technique. The most common ones are the polycarbonate crown forms, alginate impressions, preformed crowns, clear matrices, and baseplate wax.
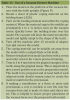
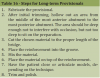
Polycarbonate Crown Form Technique. A polycarbonate crown is a tooth-colored plastic form that comes in a variety of sizes. This technique may only be used for single units. The technique described does not involve using the crown form by itself, but requires relining it with acrylic. However, a preformed acrylic crown can be used without relining, if it is properly trimmed and cemented with provisional cement. (Figure 5, Table 2)
Hints:
| • | Keep the plastic tab on the polycarbonate crown form until it is ready to be trimmed. This will aid in the steps of crown form insertion and removal during fitting. |
| • | Do not allow the acrylic to completely set on the model or prepared tooth. This will cause the provisional to lock onto the preparation. |
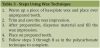
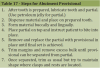
Wax Technique. This technique can be used to easily fabricate all single-unit provisionals. No crown forms or alginate impressions are necessary, which make this technique fairly inexpensive. (Table 3)
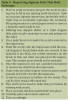
Alginate Paint Thin Shell Technique. This technique utilizes an alginate impression prior to the tooth preparation. If an impression cannot be obtained, this technique cannot be used. (Table 4)
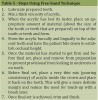
Free-hand (Block) Technique. The free-hand technique can be chosen when the assistant has become more skilled at making a provisional. No matrices or impressions are used with this technique. It allows for good marginal adaptation and proper occlusion. (Table 5)
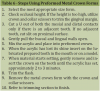
Preformed Metal Crown Technique. Aluminum, gold anodized, and stainless steel crown forms all fall into this category. They come in a variety of sizes for premolars and molars. They can be used by themselves, relined with acrylic or a combination of both. These crown forms cannot be utilized for multiple units. They can provide all the requirements of a well-made provisional when prepared properly. The technique utilized for these crowns is a bit different than what the dental team may be used to. The gold anodized forms seem to work the best for this technique because of the softness of the material. (Figure 6, Table 6)
Aluminum Shell Technique. A posterior tooth can be protected by an aluminum provisional crown. These are available in a wide range of sizes. Always remember that crowns tried and not used must be sterilized before reuse. A millimeter ruler can be used to determine the size, measuring the mesial-to-distal distance. (Table 7)
Hint:
| • | If the aluminum crown is not relined with acrylic, cement it using IRM or Zinc Oxide Eugenol (ZOE). |
Pre-fabricated Light-cured Composite Crown Technique. These crowns are malleable, light cured, preformed, and are available in a variety of shapes and sizes. They are a simple and esthetic solution for posterior provisionals. These types of tooth-colored pre-fabricated crowns can be quickly adjusted prior to light curing. With no impression or matrix needed, fabrication is quick and relatively easy. (Figure 7, Table 8)
Hints:
| • | Start with the smaller size crown, as it can easily be contoured to modify to a slightly larger size. |
| • | Trim the crown short, rather that leaving it too long. |
| • | The tack cure should be no longer than 2-3 seconds per surface. |
Acrylic Preliminary Impression Technique. This procedure requires an accurate impression prior to and after the tooth preparation. If the tooth is broken down, or a bridge is being constructed to replace a missing tooth, this technique may not be effective without adding wax to those areas. (Table 9)
Hints:
| • | Always remember to place the provisional on and off during setting to prevent locking provisional on the tooth. |
Composite Resin Preliminary Impression Technique. This procedure requires an accurate impression prior to and after the tooth preparation. If the tooth is broken down, or a bridge is being constructed to replace a missing tooth, this technique may not be effective without adding wax to those areas. (Table 10)
Hint:
| • | Select the provisional material that is the closest to the natural tooth color. The color can be adjusted by mixing colors or by adding a veneer of flowable composite to the exterior of the provisional after adjusting. |
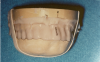
Vacuum Form Acetate Shell Technique. This procedure utilizes the vacuum forming machine. It allows for the duplication of existing teeth prior to preparation. However, it also duplicates broken or missing portions of the teeth. Therefore, after the alginate is taken and poured, repair any existing discrepancies prior to using the vacuum former. If a tooth is missing, there are many ways to fill the space prior to making the template. They include: use of an acrylic tooth (denture tooth), use of a mix of acrylic formed using opposing model to establish occlusion, and the use of light-cured resin to form a tooth (Figure 8). (Table 11, Table 12, Figure 9)
The clear matrix has the following advantages:
| • | allows easy access and visibility throughout the procedure |
| • | can serve as a tooth preparation/reduction guide |
| • | provides a smooth, void-free surface that gives a better finish to the surface of the provisional |
| • | can be used with self- or light-cured materials |
| • | is inexpensive to produce |
Reline Previous Crown Technique. An existing crown can be used as a provisional if it remains intact upon removal and is smooth and aesthetically pleasing. When a crown is removed or remade, keep in mind the reasons for replacement. If it is for esthetics, a new provisional should be created. If it is because of poor fit, it can be relined with acrylic to serve as a provisional. In most cases, it is best to make a new, well-fitting provisional.
Celluloid Crown Form Technique. A celluloid crown form can be used to fabricate a single-unit provisional. It is extremely helpful when using light-cured materials because the material can be cured through the clear form. (Table 13)
Indirect Techniques
The indirect fabrication of provisional restorations has several advantages over the direct technique. The main advantage is that the patient does not have to keep their mouth open during the fabrication of the provisional. In addition, if acrylic material is used in fabrication, injurious effects of applying acrylic monomer to the tooth are eliminated, the patient is not subjected to the unpleasant odor and taste of the acrylic resin materials, and the resin is allowed to completely cure under pressure on a cast of the prepared teeth. This results in a well-fitting, nonporous provisional restoration. The indirect technique is the most effective technique to fabricate a large, multiple-unit provisional. (Table 14, Figure 10, Figure 11)
Hints:
| • | Use separating mediums to prevent the provisional material from sticking to the tooth or model. In most cases, a tooth moist with saliva will not allow the acrylic to adhere. It is a good idea to use the air/water syringe and, using the air, blow the excess separating medium off the tooth. |
| • | When taking an alginate, apply a small amount of impression material to the critical areas before placing the tray. Make sure the teeth remain moist. If the teeth are too dry, the alginate will remain on the preparation and the impression will not be accurate. It is important to obtain an accurate impression so that the secondary retentive features, such as grooves, box forms and the gingival third of the perforations are accurately reproduced. |
| • | Slurry water: To facilitate the setting time of the stone, slurry water can be used. Sometimes slurry water can be obtained from the water residue of the model trimmer. Some model trimmers are set up in such a way that it is impossible to obtain slurry water. In such cases, a solution of slurry water can be made. A plastic jug can be used to save such water so it is on hand when needed. Always shake the bottle of slurry water before adding the water to stone. From start to finish, the setting time should be about 5 minutes. Work fast when using slurry water or the stone will start to set. |
| • | Take care to avoid incorporating air bubbles into the acrylic, as air bubbles can cause voids in the restoration. When using vacuum formed acetate templates, air bubbles should not be seen. Air bubbles can be eliminated by penetrating the template with a sharp instrument, such as an explorer. |
| • | To ensure proper alignment of the core, index marks can be made using a permanent marker (Figure 10). |
Indirect/Direct
When the dentist chooses to use the indirect/direct technique, he/she has chosen to have the laboratory fabricate a thin acrylic shell over mocked preparations that were done on a study model of the patient. This provisional shell will then be relined in the patient's mouth. The laboratory indirectly fabricates the provisional on the model and the dentist or assistant relines it directly in the mouth, giving the technique its name. Refer to steps 3 through 8 in the polycarbonate technique.
Advanced Techniques
Once an assistant has mastered the single unit and multiple units, he/she can move on to more challenges, such as fabricating a provisional over an implant or fabricating a provisional as an abutment for an existing partial. The following are a few advanced techniques.
Inlay and Onlay Provisional Technique. An inlay and onlay should be fabricated by a proficient assistant. This technique requires skill to achieve good marginal adaptation. The small size and intricate margins require precise fabrication and trimming. This technique closely relates to the free-hand technique discussed earlier. The only difference with this technique is that the whole clinical crown is not covered.
Provisional Coverage for Implants
To fabricate a provisional over an implant, the assistant must be familiar with implants and their coordinating parts. We suggest using the indirect technique. (Table 15)
Long-term Provisional Technique. Provisional crowns may have to be fabricated to last several months. In such instances, metal bars or a mesh material may be used to help provide durability. For an anterior provisional, the material should be placed on the lingual surface; for posterior teeth, the material should be placed on the occlusal surface.
Hint:
| • | Before placing the material over a metal bar reinforcement, make sure the bar will not interfere with the patient's occlusion. |
Abutment for Partial
When making a provisional as an abutment for an existing partial, use a free-hand or custom-made technique. This will allow for proper clasp placement, rests and correct size. This technique requires some practice. It also requires a skillful eye to know how much and where to trim. (Table 17)
Laminate Provisional Technique
Depending upon the length of time between preparation and cementation appointments, a provisional may be placed. If the laboratory can process the laminate within a week, a provisional might not be necessary.
For multiple units, the provisional is made using a matrix and acrylic. However, laminate provisionals tend to come off frequently and the final restoration should be cemented as soon as possible.
For single units, the dentist can etch a few spots on the facial and the composite can be formed and placed temporarily. This technique is rather simple, but does tend to stain around the edges over time. Make sure to tell the patient that this can happen. When a patient is aware of what to expect, there will be no phone calls to ask questions later.
Finishing Procedures
Finishing a provisional crown or bridge takes skill using materials and a proper slow speed technique. This entails correct positioning of the handpiece in relation to the area being trimmed. A well-finished provisional will provide a smooth and an esthetically pleasing appearance.
Trimming
An operator must have general knowledge of proper handpiece operation, including how to correctly position the handpiece in relation to the area to be trimmed. Check state regulations for laws or rules regarding assistant permitted duties to verify permission to adjust intraorally.
When trimming margins, place the cone-shaped acrylic bur parallel to the crown, but avoid disturbing contact points. A cone-shaped bur has a sharp point for definition and a large base for bulk reduction. A larger bur will be easier to maneuver since it requires less revolutions and/or vibrations.
Recommended Materials. Straight handpiece using the following attachments.
| • | diamond disc for separating teeth and opening the embrasure areas |
| • | #8 bur for hollowing out prior to relining or removing any internal imperfections and reduction in occlusal height |
| • | #35 bur to help define anatomy on the occlusal surface |
| • | long, pointed acrylic bur to define embrasure areas and final contours |
| • | carbide egg-shaped bur to adjust occlusion |
| • | cone-shaped acrylic bur for bulk reduction and initial trimming of margins |
Initial Trimming.
| 1. | Determine the margins first. Pencil can be used to clearly identify them. Start with a cone-shaped bur and trim close to margins. Continue until all margins are clearly trimmed. Margins should be trimmed to 1 mm. The margins must remain thin and intact. |
| 2. | When constructing a multiple unit provisional |
| • | change burs to a separating disc, such as a diamond disc; start by separating the teeth following the original lines on the provisional |
| • | separate and open the embrasure areas |
| • | to shape further, switch to a cone-shaped bur |
| • | use the long, pointed acrylic bur to further open the embrasure areas from the buccal and lingual; this is best done on the prepared model and will aid in detecting any additional trimming and shaping that is still needed to do |
Try-In Stage. Try the provisional in the mouth at this point. It may be necessary to remove additional undercuts internally, which may prevent the provisional from seating properly. It should seat without force and must not be high in the occlusal plane. A #8 acrylic bur is sometimes used to hollow out the inside of the crown. Close marginal discrepancies by using a small brush, powder, and liquid to fill the deficient areas when using acrylic.
Final Trimming. Trim excess again and adjust occlusion using articulating paper. At this point check:
| • | margins to make sure they are closed and there are no overhangs |
| • | for proper contours |
| • | occlusion with articulating paper; confirm fit by asking patient how it feels; if it feels strange, make adjustments |
| • | for any irregularities that might make the provisional uncomfortable |
Polishing
The polishing of a provisional crown is an important step. A non-polished crown will have a rough surface which can cause plaque to build up. This is especially dangerous around gingival margins. Periodontal problems can result from a non-polished crown. Because of the constant movement of the tongue, the patient may also become uncomfortable if the surface is rough. A sterile rag wheel and pumice is necessary.
To use the dental lathe (Figure 12):
| 1. | Moisten the sterilized rag wheel and place it on the lathe mandrel. |
| 2. | Cover the tray with aluminum foil and place the pumice on top. |
| 3. | Mix a small amount of water with the pumice in a dappen dish or small paper cup to make a thick consistency. |
| 4. | Make sure the protective plastic shield is in position and the operator is wearing personal protective equipment (PPE) and turn the machine on low. |
| 5. | Using gloves, coat the provisional with pumice, and secure grasp on the crown. Use care because a rag wheel can cause overheating and warpage during polishing. |
| 6. | The incisal edge or occlusal surface should be facing toward the operator. With a back-to-front motion, run the provisional along the bottom side of the rag wheel. Carefully turn provisional to polish all sides except the contact areas. When using all acrylic resins, take care when polishing so as not to buff away margin areas. |
| 7. | Replenish the provisional with pumice when necessary. |
| 8. | Once the provisional is completely polished with pumice, place a dry rag wheel on the lathe and add polishing compound to the turning rag wheel. Completely polish the provisional with the compound. |
The same technique can be done utilizing the slow speed and laboratory handpiece. This also provides a high shine. A glaze can also be applied to provide a high gloss. If the provisional restoration is on an anterior tooth, the patient may insist on a close color match. This can be accomplished with stains and glazes after the provisional has been polished. Minute stains cure and bond to all dental resins, including ethyl and methyl methacrylates, polycarbonates, vinyl methacrylate copolymers, resin crowns, and laminates.
To Use Sandpaper Discs:
| 1. | This technique is typically only used for tooth color composite resin based materials, but can be used in with other materials |
| 2. | Beginning with the most coarse disc, attach the disc to a mandrel. (Figure 13) |
| 3. | Using the slow speed handpiece, lightly polish any areas of the provisional that were rough or had been adjusted with a handpiece. |
| 4. | Continue polishing using increasingly less coarse discs until the provisional is smooth. |
| 5. | Using a gloved finger to feel for any sharp edges, and look closely to observe any significant texture change. |
| 6. | For an ultra smooth finish, follow the sandpaper discs up with a composite polishing cup or disc without polishing compound. |
| 7. | For an extra touch, brush on a light glaze (such as Luxa Glaze) and light cure. |
Cementation
Remember that eugenol containing cements can interfere with the setting of acrylic and prevent bonding of the final restoration. This may become important if repairs are needed. Cements that are light-cured and dual-cured are also available.
| • | Isolate the area with cotton rolls and/or 2 x2 gauze to keep area dry. Continue to dry the tooth using air from the air/water syringe. |
| • | Mix the cement according to directions. |
| • | Coat the inside of the crown with cement. (Be careful not to overfill the crown. This could result in improper placement and the need for excessive cement to be removed). |
| • | Request patient to bite down for stabilization and complete seating. |
Excess Cement Removal. Insuring that all excess cement is removed is important to the health of the gingiva. If all the cement is not removed, the gingiva can become irritated and inflamed.
| • | When the cement has set, use an explorer to remove the excess along the margins and contacts. |
| • | Use the air/water syringe to keep the area clean and allow a visual of the gingival sulcus. |
| • | Take a piece of floss and pass it down through the occlusal contact and out the buccal or lingual. Do not remove the floss through the contact area. If cementing a bridge, floss threaders will be needed. |
| • | Take a wet cotton roll and wipe the crown clean. |
| • | Instruct the patient to bite down to affirm proper seating. |
Hints:
| • | If it feels high, the provisional may not be seated correctly or the occlusion may not have been adjusted properly during try in. To verify which is the case, check the margins. If they are open, the provisional is not seated correctly. In this case, remove the provisional, clean out the cement and repeat the process. If the margins are closed, the provisional is seated properly, but the occlusion is high. Mark it with articulating paper and have the dentist adjust the height. This should only take a few minutes to do. It should, however, be avoided by checking the occlusion several times before cementation. Make sure to have the patient bite down several times and slide teeth from side to side to check for proper occlusion. |
| • | Coat the outside of the crowns with petroleum jelly before placing the cement internally. |
| • | Tie knots in the floss. This will help remove large pieces of cement interproximally. |
| • | Tie floss around the pontic of a bridge and make a loop prior to cementation. This will avoid the need for floss threaders. Make sure to tie the floss loosely and have the ends easily accessible so it can be untied and manipulated for cleaning cement under the pontic areas of a bridge. |
Post Operative Instructions
Instruct the patient to continue brushing the area as usual. Good home care is essential. Flossing is necessary, but the floss should be pulled through the buccal or lingual. The patient should use a floss threader to floss under a bridge. Pulling the floss through the contact can help prevent the crown from dislodging. The patient should also avoid chewing on the side of the provisional for a few hours. This will allow some materials, such as cements, to fully set. During the time the provisional is in place, the patient should avoid sticky foods, such as gum, caramel, and taffy. Instruct the patient to contact the office as soon as possible if the provisional becomes dislodged. In the meantime, the patient can place a little petroleum jelly in the crown and place it back on the prepared tooth. It is always important to give post operative instructions to the patient both verbally and in written form.
Arranging Appointments
It is important to establish a routine technique for provisionals so the dental professional can determine how long to make appointments. To achieve the desired results in provisional therapy, the dentist must allot adequate time to fabricate the interim restoration. Adequate time must be allowed to prepare the teeth and make a final impression.
A properly trained assistant can take over the role of fabricating and cementing the provisional restoration. Appointment times must be altered to accommodate these changes in staff and roles. The dentist/assistant time with the patient must be shortened and assistant-only time be lengthened. This time will include time for final cementation and clean up after fabrication of provisional.
Once a routine has been established, a designated amount of time should be allotted for each unit of the provisional. During this time, utilizing an assistant, the dentist can be performing another procedure, making full use of his/her talents.
Summary
The provisional restoration is an important stage in the prosthetic treatment. It must provide a suitable means for a provisional restoration. It is the responsibility of the dentist and dental assistant to provide the best possible coverage with the minimal amount of discomfort, and to meet the criteria for a well fitting provisional.
Glossary
abutment — tooth, root, or implant used for the support or retention in a fixed or removable prosthesis
acrylic — organic resin from which various types of dental restorations, prostheses and appliances are constructed
bridge — fixed prosthetic device consisting of artificial teeth (pontics) that are supported by attaching them to abutment teeth
buccal — of, or pertaining to, the cheek
contact — point on the tooth's proximal surface where it touches an adjacent tooth
contour — shape, form, or surface configuration of an object
copolymers — two or more different monomers
crown, clinical — portion of the tooth visible in the mouth beyond the gingiva
cure, dual — hardening of a material brought about by both self-curing and light curing
cure, light — hardening of a material when exposed to a curing light
cure, self — hardening of a material in response to mixing two chemicals
curing — the act of polymerization of a chemical compound
distal — away from the midline
embrasure — V-shaped space between two adjacent teeth
exothermic — a chemical reaction that gives off heat
facial — of, or pertaining to, both the labial and buccal surfaces of the teeth
flash — excess material extruding beyond the intended margins of a restoration or mold
gingival margin — the most coronal portion of the gingiva surrounding the tooth
gingival sulcus — shallow space between the tooth and free gingiva
homogenous — having a uniform quality and consistency throughout
hypertrophy — abnormally large growth
incisal — of, or pertaining to, the biting edge of an anterior tooth
labial — of, or pertaining to, the lip
lingual — of, or pertaining to, the tongue
mesial — toward the midline
monomer — one molecule that when combined with other molecules becomes a polymer
occlusion — the contact of the posterior maxillary and mandibular teeth when brought together
polymerization — process of changing a simple chemical into another substance that contains the same elements
phonetics — pertaining to speech
polymer — compound of many molecules
pumice — ground volcanic ash that is used for polishing
undercut — the portion of a tooth that lies between the height of contour and the gingiva. Also, recessed areas in the surface cast
viscosity — the property of a liquid that causes it not to flow easily
About the Author
Revising Author 2014:
Niki Henson, RDA
Niki Henson, RDA, is the President of Cornerstone Dental Academy where she authors curriculum and provides continuing education. Ms. Henson is a National and International Speaker, holds a degree in science, and is a Registered Dental Assistant with over 20 years experience in the dental field. Ms. Henson is a member of the American Dental Assistants Association, having served on the ADAA's Council on Education. Ms. Henson has authored numerous articles, dental assistant books, and is published in many dental journals. Ms. Henson received the "Woman of Distinction" award for her passion, ethics, and commitment to dental education.
The editor thanks Ellen Neuenfeldt of 3M ESPE for her expertise in editing parts of this manuscript.
References
Anusavice, K. J., Phillips Science of Dental Materials, 11th Edition. W. B. Saunders, (2003)
Bird, Doni; and Robinson, Debbie. Modern Dental Assisting. 10th ed. St. Louis: Elsevier Saunders, (2012): 877-886.
Berry, Thomas, D.D.S. and Troendle, Karen, D.D.S., "Provisional Restoration Guidelines for Proper Selection Placement," Dental Teamwork, (1995) November - December: 25-31.
Craig, Robert G., Ph.D., O'Brien, William, Ph.D., and Powers, John, Ph.D., Dental Materials. Missouri: Mosby-Year Book Inc., 6th Edition, (1996): 60-69, 267-277, 286-289.
Clinical Research Associates Newsletter, Provo, Utah, February 1997, Pg. 3.
Dietz-Bourguignon, Ellen. Materials and Procedures for Today's Dental Assistant. Thomson/Delmar Learning, 2006.
Dofka, Charline. Dental Terminology. Thomson/Delmar Learning, 2000.
Frederick, David R., D.M.D., and George Taub Products & Fusion Company, Pamphlet on Stains and Glazes.
Miyasaki-Ching, Cara. Essentials of Clinical Dental Assisting. Missouri: Mosby-Year Book Inc., (1997): 290-298, 304-311.
Pendleton, Alice E. and Anderson, Pauline C. The Dental Assistant. 7 ed. Thomson/Delmar Learning, 2001.
Phinney, D. and Halstead, Judy H. Delmar's Dental Assisting: A Comprehensive Approach. 3rd ed. Albany, NY: Delmar Learning/A part of Thomson Corp., 2008.
Reisback, M. H., Dental Materials in Clinical Dentistry. Massachusetts: PSG Publishing Co., (1982): 259-279.
Robinson, Debbie S. and Bird, Doni L. Ehrlich and Torres Essentials of Dental Assisting. 4th ed. Philadelphia: Elsevier/Saunders Publishing Company, 2007.