You must be signed in to read the rest of this article.
Registration on CDEWorld is free. Sign up today!
Forgot your password? Click Here!
Occlusion is often perceived as challenging because of the high variability of success or failure depending on patient needs. When the patient's adaptive range is broad, occlusion provides enhanced freedom for altering the top of teeth while ensuring a comfortable bite and feel. Otherwise, the process is far less simple; some patients have such extreme levels of awareness that they can even detect the thickness of articulating ink left behind on their teeth. This article reviews the challenges of creating an organized occlusion for the subset of patients at high occlusal risk who require more consideration for minimizing risk and maximizing comfort.
Analyzing High-Risk Signs in Addition to Symptoms
One of the primary difficulties of occlusion is that it requires more preliminary analysis than the basic detection of risk normally applied in a patient examination. It is critical to seek out the signs, rather than solely the symptoms, of a patient who could have a higher occlusal risk.1-3 For example, some patients may seem to present with low risk around their function, but on carrying out any level of dentistry that changes how their teeth touch, it becomes apparent they will quickly transition into low adaptability and high risk.
After high risk is realized, additional challenges to setting up the occlusion and minimizing risk occur. A key fear in this case is that dental work will disrupt the system to which the patient has already become adapted. For successful occlusion, the dentist must have a mental image of the occlusal adjustments that will stabilize the patient and a thought process that accurately examines how a patient's teeth touch. Organizing occlusion can manage functional risk factors because the mechanics of teeth touching are an aggravating agent.
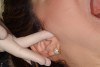
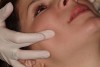
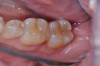
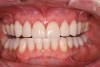
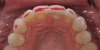
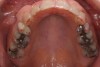
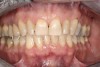
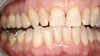
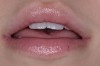
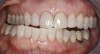
There are a multitude of symptoms of occlusal risk, including joint problems (Figure 1), muscle problems (Figure 2), wearing (Figure 3), crack, and fracture of teeth (Figure 4). The cause of these symptoms is not that the teeth are touching, but the degree of that interaction. Parafunction is the definitive term for when patients touch their teeth outside the scope of normal function. One causative factor of joint and muscles problems, as well as damage or deterioration, is a combination of both the time spent and amount of force applied during parafunction.4-8
To ensure minimization of damage, the immediate desire is to reduce the duration of time a patient parafunctions. Ideally, predictable methods should be enacted, but there are no highly predictable methods. Because it is impossible to eradicate the behavior that causes parafunction and to reduce the amount of time spent parafunctioning, the remaining option is to minimize the force applied in parafunction.4-13 Minimizing force will decrease damage to joints, muscles, and tops of teeth. It will also decrease possible damage to restorative dentistry.
Two Methods That Minimize Damage in Parafunction
At the dentist's disposal are two ways to minimize force: (1) minimize the force applied or (2) distribute that force over a larger surface area. The latter method minimizes the force per square millimeter, thereby reducing damage to the tops of the teeth. To better understand how force can be reduced, the activity of the elevator muscles must be taken into consideration. The masseter, anterior temporalis, and medial pterygoid produce neurologic feedback that starts from contact of the posterior teeth and the compression against the periodontal ligament when teeth bite together and back teeth touch. Nerve cells in the periodontal ligament communicate with the brain. The brain then communicates back to the elevator muscles to increase their activity. When back teeth touch, activity in the elevator muscles is increased or a larger portion of the muscle is engaged.8,14,15
Reducing the force produced across joints requires the reduction of elevator muscle activity. One method for enacting this is to reduce the contact of the posterior teeth (Figure 5). The success of canine guidance is determined not by the inclusion of the canine, but by the elimination of contacts on all teeth behind the canine.10,16 If the activity of the elevator muscles is observed on an electromyogram (EMG) when teeth are limited to touching between the canine and canine, compared with when a premolar is also in contact, the activity could be roughly double. If this EMG activity were compared with a different EMG where a contact is added onto the second molar, an increase of five to ten times in the elevator muscles could be observed. The amount of force exerted would depend on the size of the muscles and the unique musculature of the human being. Tooth contacts are eliminated on the premolars and molars as a means of reducing the activity of the elevator muscles. This consequently reduces the force a patient can create across the system.
After force reduction, the occlusion can then be organized by distributing force across a larger surface area. Analogies for this method are the science behind snowshoes and why massive 18-wheeler trucks require so many tires. The central factor in both examples is force per square millimeter. To calculate applied force, essential variables must be accounted for, such as weight, force, and surface area. Reducing force per square millimeter necessitates increasing surface area. This distributes the total force and reduces the force to a level where tooth wear and damage are nondestructive. Fundamentally, the overall force in the system and how joints are loaded contributes to the ability to protect joints while reducing visible damage.17-20
Muscle challenges for patients such as headaches, muscles sprains and strains, and muscle fatigue from eating can be improved by reducing the activity of the elevator muscles. This returns them to their adaptive capacity, protecting both the teeth and restorative materials. Removing posterior tooth contacts in excursive and end-to-end positions reduces overall force. Increasing the size of the end-to-end contacts decreases the force per square millimeter on specific teeth (Figure 6). Methods to enact these changes are described below.
Materials, Tools, and Processes for Designing Occlusion
Equilibration in Centric Relation to Reshape and Reposition
The term equilibration, as it is used in this article, is defined as a reductive process or reshaping of teeth, normally referred to as enameloplasty or odontoplasty. It can also include restorations as conservative as a minor direct composite or inlays, onlays, and full coverage. Equilibration includes repositioning, which is defined in orthodontics as moving teeth, putting teeth in a different position relative to one another, or performing an advanced procedure such as orthognathic surgery. In the author's opinion, determining which level of repositioning to use should always be based on the most conservative and effective way to organize the patient's occlusion.
The first step is to use mounted models in centric relation (also referred to as seated condylar position) (Figure 7). Centric relation is preferred because it enables evaluation of how the mandibular teeth touch the maxillary with the condyle seated.17,21,22 Additionally, it enables unlocking of the articulator for viewing how the mandibular teeth meet the maxillary teeth starting at the patient's intercuspal position and all excursive positions. The aforementioned method is used because many patients parafunction with their condyles seated. Seated condyles mimic how patients seat while eating and sleeping. This process must be done once on the articulator and then repeated on the tops of the teeth.
An ideal tool for the latter process is articulating film of varying thickness, including a true film of 20- to 24-µm thickness as well as a variety ranging from 90 to 200 µm. These varied thicknesses help determine subtleties regarding a patient's occlusion. As shown in Figure 8, red marks all excursive movements, and green, black, or blue mark intercuspal stops. Inkier paper ensures less-frequent paper changes for most adjustments, but a foil-like material is best for very fine adjustments.
Equilibrations can be done with a red stripe or a fine diamond. For close refining, a White Stone or Arkansas Stone is more conservative. Alternatively, use of esthetic trimming burs or multi-fluid trimming burs is preferred by some clinicians. Either way, the teeth must be polished, which can be done with a polishing kit for ceramics and a diamond polishing paste in either a brush or rubber cup as the final stage. One simple and predictable inexpensive tool that can be used for the patient to show seated condylar position or centric relation is the leaf gauge. A leaf gauge is a collection of one-tenth of a millimeter plastic shims held together with a polytetrafluoroethylene screw. To identify first point of contact, enough leaves should be placed between the front teeth to create posterior disclusion; then the patient should be directed to move forward, move back, and squeeze (Figure 9). Leaf gauges prevent the need for bilateral manipulation, guidance, or bonding composite at the back of a patient's front teeth to create a Lucia jig.23,24
Treatment Planning and Adjustments for Three Occlusal Relationships
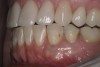
Designing an occlusion relies on three variables: (1) minimizing applied force, (2) minimizing activity of the elevator muscles, and (3) creating force distribution on the anterior teeth. Bottom teeth touch top teeth in three ways. These occlusal relationships are (1) maximum intercuspal position (Figure 10), (2) end-to-end (Figure 11), and (3) excursive pathways (Figure 12). The classic approach is to start with maximum intercuspal position, but in cases such as the one discussed in this article, favorable results are best ensured by starting with end-to-end position. First, all the back teeth should be made to touch, then the excursion should be worked on, and the process should be completed with edge-to-edge position.
When treatment planning an esthetic case to create maximum esthetics, the position of the upper anterior teeth is driven by incisal edge position in the face (Figure 13). The patient's lower anterior teeth are then adjusted to create edge-to-edge position. If the patient's anterior teeth will be lengthened, that should be done first to make the adjustments required for maximum intercuspal position and the excursion more conservative. Esthetic changes should be made beginning in the front, and then edge-to-edge or end-to-end occlusion should be created.25,26The goal is to create broad, flat contacts when the upper and lower teeth touch on their edges or the pitch of the incisal edge in protrusive position, as well as in right and left crossover (Figure 14). Maintaining incisal embrasures allows the lower teeth to clear through in excursion (Figure 15). Creating immediate posterior disclusion reduces the force the patient can apply. Red articulating paper can be used and either a 40- or 90-µm paper between the front teeth, with as much of the incisal edge covered as possible.
After the edge-to-edge occlusion is complete, the next step is maximum intercuspal position. All the teeth need to touch evenly in the chosen condylar position. Working from centric relation allows one to see and adjust the occlusion in all mandibular positions. Adjusting an occlusion from intercuspal position leaves a risk that the patient can still put the mandible in another position that damages joints, muscle, or teeth. When significant damage has been done to the temporomandibular joint (TMJ) and the condyles cannot be seated, the occlusion can be organized from a treatment position. Desired outcomes are even posterior stops and having the teeth touch evenly both in a light touch and heavy clench. Those teeth should be loaded down the long axis. Single inclined contacts are not desired. Teeth should not be tipped or pushed out of the way where the patient can break cusps. Classically, seating condyles means there is no slide; thus, between a light touch and clench, neither the patient's lower jaw nor teeth need to move out of the way to bring all teeth into contact.17,21
Condylar Positions and Contact Design Methods
There are three choices for condylar position. The choice should be based on knowledge of the patient, including joints, muscles, tops of teeth, and the restorative treatment plan. Where the condyle-disc assembly is relative to the fossa is unknown in intercuspal position. The assumption about the patient's bite is that the patient consistently bites into the same position and can adapt to a small amount of change to the occlusal tables of teeth. Intercuspal position can be predictable when the dental treatment plan involves a very limited number of teeth, specifically teeth that are not higher risk, and the patient does not present with many risk patterns. The patient in the case described in this article did not have obvious wear. If the patient is higher risk, signs of disease are present, a significant number of units are being completed, or the units are at risk of unraveling the patient's occlusion (example: the tooth that is the first point of contact when the condyle is seated), centric relation (seated condylar position) can be used. The dentist must ascertain that the condyle-disc assembly is stable from an anatomic and inflammatory perspective. This is the go-to position used by the author when altering or opening vertical dimension.
A treatment position can also be used for specific patients on whom there is enough TMJ and anatomical damage to the joint. This type of patient is only going to be comfortable and stable in a different position, a position that must be found and worked from. In maximum intercuspal position, the teeth are trusted to create predictability, whereas in centric relation, the condyle-disc assembly against the fossa is trusted. In a treatment position, the muscles are trusted to create predictability with the assistance of the teeth because all the teeth are made to touch in that position. Centric relation and muscle brace share the challenge that teeth do not normally all touch, thereby obligating the dentist to create a new occlusion and the maximum number of contacts in those positions.24
When these positions are used, the dentist equilibrates, restores, or repositions, ranging from the very conservative option of a minor reshaping to the patient needing multiple units of restoration. With maximum intercuspal position, the process starts from where the patient's teeth already touch. The sole factor that must be considered is the occlusion on the tooth or teeth that the dentist is planning to restore at that point. The goal is for posterior contacts to look like contacts on the mandibular teeth out on the buccal cusp tips and on the distal marginal ridges, representing where those contacts would be in an ideal class I occlusion. Patients in class II or class III half-steps will move into slightly different positions, necessitating tripoding contacts or cusp-to-fossa relationship to create long-axis loads.22
To design contacts with the cusp-to-fossa approach, at least one cusp tip and one fossa per tooth are required—two marks per tooth. The contacts should be up on the cusp tip and the receiving area should be on a flat surface (Figure 16). Inclined contacts are eliminated. When the patient bites, there should be long-axis loading on the tooth as opposed to giving lateral force information to the periodontal ligament. When the teeth, occlusal planes, and the curves of Spee and Wilson look “right,” the teeth tend to work well and look esthetically pleasing. When two teeth touch, the contact is created by both the top and bottom tooth. They are reduced equally unless one tooth is already set up and scheduled for an onlay, crown, or restoration. In that case, all adjustments are done on that tooth because the occlusal table will be cut anyway. A trial (diagnostic) equilibration is done when an articulator is used.
Before the models are worked on, the treatment plan should determine which teeth are going to be extracted. Then with a marker, an X should be drawn on the buccal of the model on that tooth. If the tooth is going to have a crown or an onlay and the dentist knows the entire occlusal table will be covered, the dentist should put a C on the buccal of that tooth. If an onlay is planned but covering all the cusps is not, DOB or MODB should be written on the buccal. When the letter used is C, a large, flat-wheeled diamond (KS7 or KS5) should be placed in a handpiece to cut the occlusal table of that tooth off the model, along with any others that have the letter. During equilibration, when the marks on the cusps are MOD or MODB, the dentist can get them out of the way. C or MOD/MODB are used instead of the X because it tells the dentist that those teeth need to be waxed back by the laboratory if the models are used for provisional matrices.
Contact Adjustments and Management of Postural Shift
One important point when considering adjusting the teeth or the model (or the teeth on the model) is that intercuspal position adjustments will affect disclusion in excursive movements as well. Two teeth should be marked, one on top and one on bottom. One becomes the cusp-tip contact and the other becomes the receiving area or fossa contact. If the cusp tip is shortened, the dentist is also working to eliminate excursive interferences, and posterior disclusion becomes easier.27 If the dentist grinds the receiving area to deepen the fossa, the job is made more difficult when excursive or lateral movements are examined to achieve posterior disclusion. One way to determine this information is to take protrusive (lateral) bite records and customize a semi-adjustable articulator so that the condylar angle can be set on it to mimic the angle of eminence on the patient. The dentist can then see how far back teeth disclude and how much space there is. This method errs on the side of shortening or moving cusp tips versus deepening or adjusting the fossae or receiving areas.
The process should be repeated, with continuation of marking and adjusting the contacts until there is even intensity, and then posterior contacts should be long-axis loaded on all teeth.The question of whether to carry on until all the anterior teeth have contact depends on a few factors. If the patient's centrals couple, it is best to recouple the centrals. If the patient has an anterior open bite, the stability must be assessed. If the patient recently came out of orthodontics and the anterior teeth are not touching, then teeth may move to seek occlusal contact. That position is unstable. Other questions to answer are: (1) Should adjustments continue until there is canine contact if canine guidance is the goal and the patient's canine teeth did not touch in intercuspal position? (2) Is restorative room needed in the anterior, or is the plan to restore the incisal edges of the lower anteriors or the labial incisal thirds of the lower anterior? (3) Is the plan to restore the lingual of an upper anterior tooth because of attrition, erosion, or abrasion? (4) Does the patient have old restorations where there was not enough clearance?
In cases where additional restorative room is needed during equilibration and the dentist is going from first point of contact to a stable stop, the dentist may decide to stop and leave anterior teeth uncoupled at this phase because of planned restorations to the anterior canines, laterals, or centrals. Stable stops should be on all posterior teeth down the long axis. If canine guidance is planned, a stable stop should be on the canine tooth. Anterior teeth can have intercuspal stops that are lighter in intensity or be slightly out of occlusion in maximum intercuspal position.22
Postural shift (the forces of gravity) must also be managed. Most equilibrations are done with patients lying down with their head back for the dentist's ease. The patient can be sat back up and directed to lean forward to re-verify that there is even-intensity long-axis posterior contact and that the patient has not developed a heavy anterior contact from the gravitational change in the relative position of the mandible to maxilla. Fremitus can be used to detect heavy anterior contacts. With a glove, a fingernail can be placed on the labial of an anterior tooth, and the patient can be instructed to “tap, tap, tap.” Where a vibration is felt in those front teeth can be observed. The patient can be directed to “power wiggle” (clench and move excessively) to observe if a vibration is felt in the front teeth. If a vibration exists, the anterior contacts can be lightened. Fremitus—as opposed to methods involving shim stock or foil articulating paper used to examine premolars and canines—allows customization to the patient's exact postural shift.28
Adjusting Excursive Movements: Canine Guidance or Group Function
The final occlusal position that needs to be adjusted is the excursive movement (right, left, and protrusive). The guidance scheme should be diagnosed by determining which teeth should be in contact in excursive movements. These contacts become the working guidance contacts. All other teeth must disclude because they would interfere with the smoothness of the movements and increase muscle activity. There are two ways to set up excursive. One is canine guidance, which refers to the canine being the only tooth that touches when the patient moves the mandible right and left and no posterior teeth touch on either the working or the balancing side.29 That canine hands off to the incisal edges of the centrals in the edge-to-edge crossover position. The benefit of canine guidance is that the activity of the elevator muscles is minimized because the posterior teeth are separated on both the working and nonworking side. The downside is that it puts all the force the patient can generate on two teeth, a maxillary and a mandibular canine. Patients missing the canine are a concern. Occasionally a canine implant is fine for guidance, but not always. Patients may also have a weakened canine that has had endodontic work and a post-core.
If canine guidance isn't achievable or desirable (often seen in class II occlusion patients), group function can be used. Group function only involves the teeth on the working side. The term “balanced occlusion” is used when the dentist intentionally makes teeth on both working and nonworking sides touch. Group function is when there is more than one tooth working at the same time on the working side, which could be as simple as a premolar and a canine or as complex as both premolars and a canine or all the teeth on the working side back to a first or second molar. The further back a tooth is included, the more active the elevator muscles and the more force generated. Group function does increase the force, but it simultaneously distributes that force over multiple teeth and potentially changes the load across the joint space.29
Next, the protrusive movements must be dealt with. Protrusive refers to the movement of the mandibles forward, with the desired outcome being balance across the midline. The contacts should look the same on the right and left side of the midline. With protrusive movement, the dentist can choose to start and end on the centrals so they are the only guiding teeth and all others are discluded. Alternatively, the dentist can start the movement on a canine and transition it to a central incisor, with all other teeth besides central and canines being discluded. In rare cases, the dentist starts on a premolar, but this is typically done when a patient has class II occlusion.28
In the author's technique, to create a smooth, balanced outcome, red articulating paper can be used for marking excursive right, left, and protrusive. The intercuspal stop should be marked again before starting adjustments because darker colors (green, blue, black) cover the red. Any place where the red has not been covered by a darker color is excursive. Interferences where the teeth touch should be adjusted out. Excursive movements can be marked with 200 µm so that the dentist is aware those contacts can be eliminated. A number between 40 and 90 µm can be used to mark intercuspal contacts. When refining intercuspal contacts, foil should be used in the range of 20 to 24 µm and 90 µm to determine what part touches in both cases. The use of different thicknesses and colors enables the dentist to differentiate the subtlety of all contacts. After the adjustments, a diamond polishing paste in a rubber cup or a bristle brush should be used.
Conclusion
The thought processes laid out in this article can be applied whether the dentist is adjusting an occlusion on a single restoration, organizing an entire occlusion for a patient with a TMJ disorder, organizing occlusion at the end of orthodontics, or organizing occlusion after doing multiple units of dentistry. The principles of reducing and distributing muscle force in edge-to-edge positions, maximum intercuspal position, and excursive movements should be used any time occlusion is adjusted. An organized occlusion can be accomplished using all the methods outlined above, including foundational reasoning, optional approaches for organization purposes, precision tactics, visualization, and ideal armamentarium.
About the Author
Lee Ann Brady, DMD
Private Practice
Glendale, Arizona
References
1. Dworkin SF, Huggins KH, LeResche L, et al. Epidemiology of signs and symptoms in temporomandibular disorders: clinical signs in cases and controls. J Am Dent Assoc. 1990;120(3):273-281.
2. Pow EH, Leung KC, McMillan AS. Prevalence of symptoms associated with temporomandibular disorders in Hong Kong Chinese. J Orofac Pain. 2001;15(3):228-234.
3. Magnusson T, Egermark I, Carlsson GE. A longitudinal epidemiologic study of signs and symptoms of temporomandibular disorders from 15 to 35 years of age. J Orofac Pain. 2000;14(4):310-319.
4. Riise C, Sheikholeslam A. The influence of experimental interfering occlusal contacts on the postural activity of the anterior temporal and masseter muscles in young adults.
J Oral Rehab. 1982;9(5):419-425.
5. Schaerer P, Stallard RE, Zander HA. Occlusal interferences and mastication: an electromyographic study. J Prosthet Dent. 1967;17(5):438-449.
6. Christensen LV, Rassouli NM. Experimental occlusal interferences. Part II. Masseteric EMG responses to an intercuspal interference. J Oral Rehabil. 1995;22(7):521-531.
7. Hannam AG, Wood WW, De Cou RE, Scott JD. The effects of working-side occlusal interferences on muscle activity and associated jaw movements in man. Archs Oral Biol. 1981;26(5):387-392.
8. MacDonald JW, Hannam AG. Relationship between occlusal contacts and jaw-closing muscle activity during tooth clenching: Part I. J Prosthet Dent. 1984;52(5):718-728.
9. Wood WW. A review of masticatory muscle function.
J Prosthet Dent. 1987;57(2):222-232.
10. Belser UC, Hannam AG. The influence of altered working-side occlusal guidance on masticatory muscles and related jaw movement. J Prosthet Dent. 1985;53(3):406-413.
11. Hannam AG, McMillan AS. Internal organization in the human jaw muscles. Crit Rev Oral Biol Med. 1994;5(1):55-89.
12. Hannam AG, De Cou RE, Scott JD, Wood WW. The relationship between dental occlusion, muscle activity, and associated jaw movement in man. Arch Oral Biol. 1977;22(1):25-32.
13. Bakke M, Møller E. Distortion of maximal elevator activity by unilateral premature tooth contact. Scan J Dent Res.1980;88(1):67-75.
14. Silvestri AR, Cohen SN, Connolly RJ. Muscle physiology during functional activities and parafunctional habits. J Prosthet Dent. 1980;44(1):64-67.
15. Williamson EH, Lundquist DO. Anterior guidance: its effect on electromyographic activity of the temporal and masseter muscles. J Prosthet Dent. 1983;49(6):816-823.
16. Shupe RJ, Mohamed SE, Christensen LV, et al. Effects of occlusal guidance on jaw muscle activity. J Prosthet Dent. 1984;51(6):811-818.
17. McNeill C. The optimum temporomandibular joint condyle position in clinical practice. Int J Periodontics Restorative Dent. 1985;5(6):52-76.
18. Hatcher DC, Faulkner MG, Hay A. Development of mathematic models to study temporomandibular loading. J Prosthet Dent. 1986;55(3):377-384.
19. Naeije M, Hofman M. Biomechanics of the human temporomandibular joint during chewing. J Dent Res. 2003;82(7):528-531.
20. Faulkner MG, Hatcher DC, Hay A. A three-dimensional investigation of temporomandibular joint loading. J Biomech.1987;20(10):997-1002.
21. Dawson PE. Optimum TMJ condyle position in clinical practice. Int J Periodontics Restorative Dent. 1985;5(3):10-31.
22. Dawson PE. A classification system for occlusions that relates maximal intercuspation to the position and condition of the temporomandibular joints. J Prosthet Dent. 1996;75(1):60-66.
23. Campbell S. Technique tips - a simplified method of recording centric relation contact position (CRCP) using the leaf gauge. Dent Update. 2013;40(9):780.
24. Hartzell DH, Maskeroni AJ, Certosimo FC. Techniques in recording centric relation. Oper Dent. 2000;25(3):234-236.
25. Ford RT, Douglas W. The use of composite resin for creating anterior guidance during occlusal therapy. Quintessence Int. 1988;19(5):331-337.
26. Thayer KE, Doukoudakis A. Acid-etch canine riser occlusal treatment. J Prosthet Dent. 1981;46(2):149-152.
27. Kerstein RB, Radke J. The effect of disclusion time reduction on maximal clench muscle activity levels. Cranio. 2006;24(3):156-165.
28. Rosenstiel SF, Land MF, Fujimoto J. Contemporary Fixed Prosthodontics. St. Louis, MO: Mosby; 2015.
29. Standlee JP, Caputo AA, Ralph JP. Stress transfer to the mandible during anterior guidance and group function eccentric movements. J Prosthet Dent. 1979;41(4):35-39.