You must be signed in to read the rest of this article.
Registration on CDEWorld is free. Sign up today!
Forgot your password? Click Here!
Accurate, reproducible endodontic testing is essential for determining the proper diagnosis of an injured tooth. Several types of tests can be used to help evaluate the vitality of a tooth. Equally important, other tests are also available that assist dentists in determining the source of a patient’s pain. However, the starting point should reflect the famous words of Sir William Osler, MD: “Listen to your patient, he is telling you the diagnosis.”1
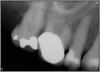
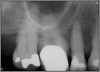
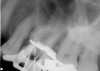
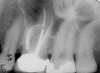
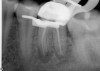
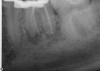
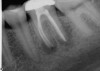
Excellent diagnosis essentially begins with two fundamental components: a doctor willing to listen to the patient’s chief complaint, and proper diagnostic tools. Among the most important tools are a precise periapical radiograph (PA) and bitewing (BW). Although a PA is often enough to provide an accurate portrayal of the patient’s condition, sometimes it alone does not suffice. Figure 1, Figure 2, and Figure 3 demonstrate a case that illustrates this point clearly. Despite two acceptable PAs (Figure 1 and Figure 2), it is difficult to assess the source of the patient’s pain to temperature. However, the BW radiograph Figure 3 provides significantly more clarity than either of the two PAs. The BW depicts localized bone loss (around tooth No. 2), a pulp stone (No. 2), a flat occlusion, numerous calcified canals, multiple restorations in tooth No. 30, and gross decay especially on tooth No. 3, which is the source of the patient’s pain to temperature. In this instance these images depict how much more useful a BW can be than just a conventional PA.
Evaluating the Health of a Tooth
Having established the importance of taking meticulous PAs and BWs, testing should be done to evaluate the health of a tooth. An array of tests could be performed, ranging from hot, cold, electric pulp testing (EPT), percussion, palpation, mobility, probing, biting, and anesthesia. All of these tests are useful, but depending on the patient’s chief complaint, some are more valuable than others. Hot and cold testing are generally considered to be the best for determining the responsiveness of pulpal, sensory neurons.2
Hot testing can be performed with a heated gutta-percha or compound stick, friction, or—the most superior method—isolating the tooth with rubber dam and rinsing with a syringe filled with hot water.2 Cold can be tested using ice, frozen carbon dioxide, or, the most prudent alternative, a can of cold refrigerant spray, ie, 1,1,1,2 tetrofluoroethane (eg, Frigi-Dent™, Ellman International Inc., www.ellman.com).2 The latter is a simple way to elicit a response. When using this method, the clinician sprays the refrigerant spray on a piece of cotton and applies it to the tooth. In the author’s experience, using a loosely wound cotton ball held with a college pliar will produce a more accurate result than using a cotton tip applicator or a tightly wound cotton ball.
EPT can also be an effective test. However, responsiveness of the pulp to EPT does not reflect the histologic health or disease status of the pulp.3 Rather, a response only denotes that viable nerve fibers are present in the pulp. Moreover, the numerical figures associated with EPT readings are less relevant than numbers that appear to be outliers.2 EPT can be a highly useful adjunct for testing a tooth; however, it, too, has limitations as performing the test can be difficult or even impossible when the tooth has a full-coverage restoration.
Percussion and palpation can offer insight into acute pain that is occurring. While percussion alone cannot indicate that a tooth needs root canal therapy, this type of pain is often accompanied by an unhealthy, diseased pulp. Thermal testing must be done in tandem with this method to ensure that the discomfort does not stem from some parafunctional habit (clenching, grinding, etc) or for some other reason (such as placement of a recent restoration). A bitestick test can also be helpful in testing to see what is acute.2 However, the author prefers to have the patient bite on a smaller saliva ejector tip.
Mobility can often suggest improper occlusion, parafunctional habits, or possibly purulence underneath an infected tooth. Meanwhile, probing can provide an effective assessment of the periodontal health and whether any fractures exist.
It should be noted that not all of these tests need to be performed for every tooth examined. However, cold, percussion, mobility, and probing should be done most frequently, because they are usually the most reliable and helpful tests to enable proper diagnosis and restorability of the tooth.2 The author performs all four of these tests on more than 90% of the teeth that he routinely evaluates.
Some clinicians prefer to assess the source of the pain by testing the likely tooth in question first, either by percussion or cold. However, a different method, which the author prefers, is to test what appears to be a healthy tooth first. This provides two primary benefits: it allows the clinician to ascertain the patient’s baseline to cold or percussion, and it encourages further rapport with the patient. Eliciting pain from patients immediately after meeting and greeting them is not conducive to developing a relationship of trust with them. If the clinician is a specialist, some patients may be meeting him or her for the first time.
Once a proper diagnosis is obtained, and informed consent is attained and reviewed, treatment can typically begin. While access is essential, preservation of the tooth should always be the highest goal in root canal therapy. Removing excessive tooth structure to perform a beautiful root canal will likely lead to the tooth’s eventual demise.4 Therefore, it is crucial to keep accesses conservative. Unfortunately, practitioners often master the delicate art of access only after they have learned how to properly perform successful root canal therapy, which is ironic because access is usually the first thing a practitioner learns and is how root canal therapy begins on every tooth.
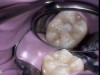
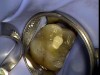
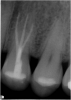
Figure 4 through Figure 10 depict several teeth that have conservative accesses while still allowing the clinician to adequately instrument and clean each tooth to achieve effective root canal therapy. The success of these cases still hinges on the proper cleaning and shaping of the root canal system, and while conservative accesses are desirable, too small of an access can lead to missed canals, poor instrumentation, improper cleaning, and, ultimately, a failed procedure.
Limitations of Radiographs
Once the access is performed and canals have been located, the length of the canals need to be determined. This can be achieved by taking a working film radiograph or by using an apex locator. Radiographs have been used for many years to determine proper length, but this method is rather arbitrary. An examination into the research performed by various authors, including Kuttler,5 Pineda and Kuttler,6 and Dummer et al,7 demonstrated that canal length can vary greatly. One reason is that the anatomy of the apex changes with age, which is often due to hard-tissue deposition. Additionally, the apical foramen (or major foramen) often does not lie at the anatomical apex of the tooth, and, moreover, the apical constriction (or minor foramen) itself can vary greatly in its appearance.5
For all tooth types, it was determined that the distance from the apical foramen to the apical constriction was 0.5 mm in younger individuals and 0.8 mm in older adults.6,7 This variability could be due to many factors, including caries, apical disease, genetics, etc. However, it illustrates that there is a difference in anatomical considerations due to the age of the person. Furthermore, early anatomical studies are what really fostered the common teaching practice of determining working length to be approximately 1 mm short of the anatomical apex.7 While this proved to be a good starting point for properly finding canal length, today far superior methods of obtaining accurate lengths exist, due primarily to the innovation of apex locators.8
Radiographs were not without their limitations. They were 2-dimensional while the images they were capturing were, of course, 3-dimensional. They were technique-sensitive and open to subjective interpretation. At times, analyzing them was impaired by existing anatomy. Superimposition of the zygomatic arch could interfere with maxillary first molar apices 20% of the time.9 The zygoma, a torus, or natural root bifurcation could all contribute to increasing a clinician’s inaccuracy in locating the correct working length. Additionally, prior to digital radiography, radiation was an even greater concern.
Progression of Apex Locators
Using the earlier work of Custer and Suzuki, Sunada was able to develop a device that used direct current to measure canal length.10 However, using direct current led to some instability with measurement and elicited more pain for the patient. Second-generation apex locators began to use impedance measurements instead of resistance to locate working length. Inoue developed a change in frequency method, which allowed for beeping sounds when the apex was reached. Still, most second-generation apex locators failed to give accurate readings in both dry and wet canals.11
Third-generation apex locators improved upon their predecessors by generating multiple frequencies to determine accurate canal length. Finally, with Kobayashi’s efforts, erroneous readings with electrolytes were solved.12 He used a ratio method that worked based on the principle that two electrical currents with different sine wave frequencies would have measurable impedances. These impedances could be measured and compared as a ratio, regardless of the type of electrolyte in the canal.12
Yet despite these advances, newer fourth-generation apex locators still have limitations. Inflammation has been demonstrated to adversely affect an apex locator’s readings.13 Intact tissue, blood, and exudate can all cause inaccurate readings by conducting electrical current. Caries and metal restorations can also lead to inaccurate readings. Additionally, some apex locators have demonstrated that they are more accurate when readings are attempted in the presence of sodium hypochlorite.13
Dentin debris or lack of patency can also affect an apex locator’s readings. While small or larger files both can be used to accurately determine working length, often clinicians will achieve a better result by using a larger-diameter hand file. Constant recapitulation and irrigation are both necessary to achieve optimal readings.
Overcoming Pitfalls
There are ways, of course, to eliminate some of these pitfalls. Clinicians should bear in mind that as a tooth is shaped, especially through use of rotary instruments, canal length will get shorter.14 Therefore, rechecking one’s measurements is usually beneficial. Apical debris is a major hindrance to achieving both accurate readings and overall clinical success. Thus, removal of debris via recapitulation and active irrigation is often necessary. If an amalgam restoration is interfering with the readings, it should be removed entirely if possible. If it is not feasible to do so, the file should be held away from the amalgam until an accurate reading can be achieved. Some burs come with plastic sleeves that can also be placed over a file so that the metal restoration does not contact the hand file itself. Similarly, this can also be achieved by coating the coronal aspect of a file, even with nail polish.
If the desired reading cannot be attained using a small file, the clinician can increase the file size by one or two sizes. It should be noted that readings are effectively attained when the canal, not the chamber, is wet. If a reading seems to be obviously inaccurate, other methods of determining working length should be used.
Other means for locating working length include use of radiographs or paper points. Although radiographic evaluation can be subjective, paper point confirmation can be very helpful. If a paper point is consistently “wet” at 19 mm, then that is likely the proper working length. If a working length radiograph is taken and the file looks significantly short, it may be due to a lateral canal, resorbed apex, or some other anatomical anomaly.
Working With Both Apex Locators and Radiographs
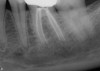
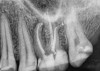
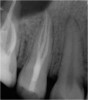
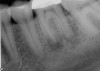
The question remains: how often should clinicians use apex locators, and are they really necessary? Because studies have shown them to be up to 96% accurate,8 it stands to reason that they could be used in every case possible. In some instances, the apex cannot even be seen radiographically. In these cases, using an apex locator is imperative to finding the true working length of the canals. The question remains: how often should clinicians use apex locators, and are they really necessary? Because studies have shown them to be up to 96% accurate,8 it stands to reason that they could be used in every case possible. In some instances, the apex cannot even be seen radiographically. In these cases, using an apex locator is imperative to finding the true working length of the canals. Figure 10 and Figure 11 through Figure 14 demonstrate two such cases; they likely would not have been successfully completed without the use of an apex locator. Even the final PA (Figure 14) does not clearly depict where the canals end.
Working films or radiographs, however, should not be completely eliminated from the clinician’s armamentarium. While practitioners may legally only be required to depict a preoperative and postoperative radiograph, from an endodontic point of view at least one working radiograph should always be taken. This does not mean that a master file radiograph has to be taken; however, it is prudent to take one in cases in which the anatomy is challenging, and the author recommends always taking a master cone radiograph (Figure 11 through Figure 14).
The master cone PA is the last indicator clinicians have in assessing whether or not their working lengths were truly accurate. This radiograph is crucial in affording the practitioner the opportunity to make adjustments to properly complete the procedure to the desirable lengths. An example is presented in Figure 15 through Figure 18. Figure 16 and Figure 17 show a master cone PA that demonstrates two of four canals to proper length. After adjusting the length of the other two master cones, the clinician was able to correct the lengths to produce a more appropriate result, as seen in Figure 18.
Having the opportunity to make adjustments prior to completing treatment should not be merely an option; rather, it is imperative to enable the clinician to perform the best possible endodontic therapy for the patient. In a discipline where 1 mm can determine success or failure, this cannot be overemphasized.
Conclusion
It is crucial for clinicians to learn how to manage endodontic tests to better achieve successful diagnoses and, ultimately, offer optimal treatment to patients. Apex locators have become instrumental in helping dentists perform high-quality endodontic care by eliminating guesswork in achieving accurate working lengths. Nevertheless, practitioners should always use supplementary methods, such as radiographic analysis of master cone PAs or paper point inspection, to confirm working lengths.
ABOUT THE AUTHOR
Joseph Chikvashvili, DDS
Director of Endodontics, Newark Beth Israel Medical Center, Newark, New Jersey; Private Practice specializing in Endodontics, West Orange, New Jersey
REFERENCES
1. Sir William Osler & His Inspirational Words. The Osler Symposia website. http://www.oslersymposia.org/about-Sir-William-Osler.html. Accessed December 8, 2016.
2. Cohen S, Burns R. Pathways of the Pulp. 8th ed. Philadelphia, PA: Mosby; 2002.
3. Seltzer S. Endodontology: Biologic Considerations in Endodontic Procedures. 2nd ed. Philadelphia, PA: Lea & Febiger; 1988.
4. Larson TD, Douglas WH, Geistfeld RE. Effect of prepared cavities on the strength of teeth. Oper Dent. 1981;6(1);2-5.
5. Kuttler Y. Microscopic investigation of root apexes. J Am Dent Assoc. 1955;50(5):544-552.
6. Pineda F, Kuttler Y. Mesiodistal and buccolingual roentgenographic investigation of 7,275 root canals. Oral Surg Oral Med Oral Pathol. 1972;33(1):101-110.
7. Dummer PM, McGinn JH, Rees DG. The position and topography of the apical canal constriction and apical foramen. Int Endod J. 1984;17(4):192-198.
8. Shabahang S, Goon WW, Gluskin AH. An in vivo evaluation of Root ZX electronic apex locator. J Endod. 1996;22(11):616-618.
9. Tamse A, Kaffe I, Fishel D. Zygomatic arch interference with correct radiographic diagnosis in maxillary molar endodontics. Oral Surg Oral Med Oral Pathol. 1980;50(6):563-566.
10. Sunada I. New method for measuring the length of the root canal. J Dent Res. 1962;41(2):375-387.
11. Inoue N. An audiometric method for determining the length of root canals. J Can Dent Assoc. 1973;39(9):630-636.
12. Kobayashi C, Okiji T, Kawashima N, et al. A basic study on the electronic root canal length measurement: Part 3. Newly designed electronic root canal length measuring device using division method. Jpn J Conserv Dent. 1991;34:1442-1448.
13. Meares WA, Steiman HR. The influence of sodium hypochlorite irrigation on the accuracy of the Root ZX electronic apex locator. J Endod. 2002;28(8):595-598.
14. Khurana P, Nainan MT, Sodhi KK, Padda BK. Change of working length in curved molar root canals after preparation with different rotary nickel-titanium instruments. J Conserv Dent. 2011;14(3):264-268.