You must be signed in to read the rest of this article.
Registration on CDEWorld is free. Sign up today!
Forgot your password? Click Here!
Among the factors affecting the long-term success and predictability of crown and veneer treatments are the clinical protocols performed prior to restoration fabrication. These include tooth preparation, impression-taking, and creation of temporary restorations. Additionally, the cementation protocol undertaken when definitively seating the final restoration, as well as the cement and/or adhesive selected, also impacts the longevity of crown and veneer restorations.
Achieving Optimal Crown and Veneer Preparations
Tooth preparation quality contributes to ideal impression-taking and, ultimately, significantly impacts the marginal integrity of crown restorations.1 Therefore, it is important that clinicians spend a little extra time on their preparations so they can more ably achieve uncomplicated impression-taking and, most importantly, accurately fitting restorations.
Paramount to this endeavor is envisioning the restorative outcome prior to initiating preparation protocol. This enables selection of the necessary burs and armamentarium (eg, short shank bur for shoulder/chamfer blending; red-striped soft diamond for finishing) to facilitate trouble-free tooth reduction.
According to the literature, crown-and-bridge preparation characteristics include 10- to 20-degree angles of occlusal convergence, a minimum of 4 mm of occluso-cervical dimension for molars and 3 mm for other teeth, and a 0.4 mm or higher occluso-cervical to buccal-lingual dimension. Buccal-proximal and linguo-proximal line angles should be preserved whenever possible.2 Depending upon the esthetic requirements of the case, margins and finish lines should be clearly placed supragingival or slightly subgingival; vertical margins should be even to ensure proper resistance form.3 Sharp line angles should be removed in favor of rounded and smooth surfaces.2,3
Sample Single-Unit Crown Preparation Technique
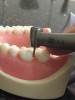
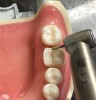
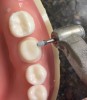
The following describes an effective single-unit crown preparation technique: Begin by breaking the contact interproximally (Figure 1). Once this is accomplished, the remaining preparation becomes easier. Continue the preparation by laying the bur at the desired angle, being sure to envision the final preparation while removing the tooth structure (eg, between 1 mm to 1.2 mm of axial reduction in the occlusal central groove) (Figure 2). This entails reducing the lingual cusp approximately 1 mm to 1.5 mm, burying the bur tip into the middle of the tooth; then repeat the process on the buccal aspect.
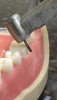
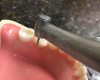
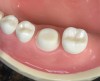
Then, use a short shank bur to place the buccal margin, which can be a shoulder/chamfer preparation that extends barely subgingival (eg, 0.5 mm below the tissue crest) (Figure 3). Continue with a second planar reduction on the lingual, after which the lingual margin can be placed (Figure 4). Next, use a red-striped diamond bur to smooth and round off any sharp line angles and/or undercuts on the preparation (Figure 5); this is because the presence of sharp line angles has been associated with porcelain restoration failure.4,5 Finally, examine the preparation (Figure 6).
Sample Conservative Slice Preparation Technique
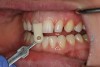
An ideal case requiring only facial surface preparation can be characterized by ideal midline location and good tissue height symmetry and is one that requires a traditional veneer preparation. However, a conservative slice preparation enables dentists to achieve a better emergence profile interproximally. The following protocol is appropriate for cases involving an uncentered midline, disproportionate teeth, and/or when a canting requires modification (Figure 7 and Figure 8): First, reduce the facial aspect by 0.5 mm. Then, slightly reduce the incisal edge. Lastly, break through the contact interproximally to establish room mesially or distally around the smile for diastema closure or to address size discrepancies.
Obtaining Accurate Impressions
Obtaining accurate impressions is predicated on capturing the exact details of the preparations, margins, and soft tissue.6 Fortunately, today’s newer impression materials demonstrate improved properties for more precise and predictable impressions.7 Although variations exist among available materials, these materials can typically be categorized based on their viscosity, hydrophilicity, setting/working time, elasticity/tear strength, and stability.
Ease of use and predictability may often be affected by working time and automix capabilities.1 However, impression accuracy and, therefore, restoration predictability can be affected by an impression material’s elasticity and tear strength, which are characteristics relative to the material when it is removed from the mouth. To reduce the likelihood of deformation and tearing, impressions should be pulled from the mouth rapidly once set.6,7 Therefore, using a fast-setting impression material can enable dentists to work quickly while avoiding the pulling and tearing that can contribute to distortions.
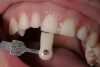
The impressions, ideally, can then be scored down below the sulcus to reveal perfect margin details and location (Figure 9). This can be achieved by selecting and properly placing cord during the impression-taking process. A single-cord technique is advantageous when tooth preparation margins are supragingival or tissue height.8 When more intricate details of the margin area are required, a double-cord technique can be used.9 The initial cord reveals the marginal area of the preparation, while the second cord displaces the tissue to provide sufficient room for impression material to fill the sulcus.10,11 Alternatively, a laser can be used to trough around the sulcus, thereby helping to avoid potential tissue recession and patient discomfort while simultaneously providing hemostasis.12 Hemostatic agents (eg, ViscoStat® Clear, Ultradent Products, Inc, www.ultradent.com; Hemostasyl™, Kerr Dental, www.kerrdental.com; Racegel™, Septodont, www.septodontusa.com) can also be used.
Obtaining an accurate impression affects the quality of the models that are then created (Figure 10) and, ultimately, the accuracy of the definitive restorations. In between, impressions play a significant role in creating necessary temporary restorations.
Creating Functional and Esthetic Temporaries
Provisional restorations are an essential component of the esthetic restorative process and are dependent upon high-quality impressions. Temporary restorations enable dentists and patients to preview the anticipated final restorations for evaluation of form, color, fit, phonetics, and function.13,14 More importantly, however, temporary restorations protect the preparations, enhance the diagnostic and esthetic evaluation process, and present a resemblance of the form and function of the final restorations.13,14
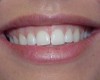
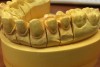
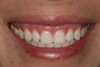
Improvements in the physical and esthetic properties of provisional materials have enabled dentists to create temporaries that provide patients with a highly appealing look and enhanced functionality (Figure 11). Temporaries now blend well with natural teeth shades (Figure 12), mimic natural tooth structure, appear translucent and fluorescent, and demonstrate sufficient strength and modulus of elasticity for enhanced functionality.13
Additionally, their ease of use chairside enables efficient creation of temporary restorations using a shrink-to-fit technique.15 Based on the wax-up made from the initial model, a putty matrix is constructed, into which the provisional material is loaded. The matrix is placed into the patient’s mouth, onto the preparations, and allowed to fully set for 3 minutes. Once the provisional material has hardened, the matrix and provisional material are removed.
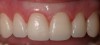
The provisional restorations must then be adjusted, trimmed, finished, and polished. A small mosquito diamond or small, very fine point diamond bur can be used to trim the temporary all the way around the margins.16 This contributes to minimal tissue damage upon reinsertion and cementation of the temporaries and less plaque retention or gingival irritation. The margins can be carved at an angle, taking into consideration how the facial embrasures and natural contours are defined. Depending on the provisional material used, some restorations may be polished by simply wiping with an alcohol gauze or by using a series of polishers to achieve the desired surface luster and then provisionally cemented (Figure 13).17
Selecting Cementation Options
When it is time to definitively cement the final restorations, dentists frequently encounter challenges when selecting from among the multiple cementation and adhesive options available. The luting material eventually selected, and the necessary protocol required, ultimately depends on the case and the type of material from which the restorations were fabricated.
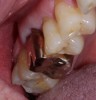
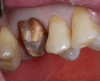
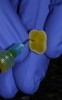
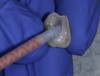
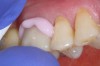
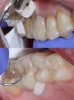
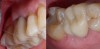
Self-etch, self-adhesive resins (eg, Maxcem Elite™ Chroma, Kerr Dental; BisCem®, Bisco, www.bisco.com; BeautiCem SA, Shofu, www.shofu.com). These cements are appropriate for preparations that will provide good mechanical retention. Demonstrating adequate bond strengths, they offer such advantages as ease of use due to the elimination of the need to treat the tooth surface and because easy clean-up of excess cement is facilitated when the resin reaches a gel state. However, self-etch, self-adhesive resin cements are not recommended for use with weaker ceramic restorations. They are ideal for zirconia or metal, in which light cannot penetrate.18,19 They are also well suited for high-strength ceramic restorations, including crowns milled from lithium disilicate (Figure 14 through Figure 20).
Total-etch systems (eg, RelyX™ Ultimate, 3M ESPE, www.3MESPE.com; Variolink®, Ivoclar Vivadent, www.ivoclarvivadent.com; OptiBond™, Kerr Dental). For cosmetic cases and restorations, total-etch systems can be used whereby the preparations are acid-etched, rinsed, and dried, followed by an adhesive bonding agent being applied (ie, agitated by quickly brushing on the adhesive and moving back and forth for enhanced bonding outcomes), air-thinned, and light-cured. Additionally, the internal surface of the restoration is also treated.20 While the multiple steps make this cementation option more technique-sensitive and likely to contribute to postoperative sensitivity, it produces the highest bond strengths. Complete isolation from fluids and contamination is necessary.20-22
Dual-cure cements (eg, Multilink® Automix, Ivoclar Vivadent; PANAVIA™ SA Cement Plus, Kuraray, www.kuraraydental.com; NX3 Nexus™, Kerr Dental). These cements can cure on their own, or when initially polymerized with light, facilitating easy clean-up of excess cement from the margins (ie, tack-cure cement, peel-off excess). They require the internal aspects of restorations to be etched and conditioned before cementation, after which the cement can be placed and cured. Ideal in situations where isolation is not an issue, they contribute to less postoperative sensitivity. Although more technique-sensitive, dual-cure cements demonstrate higher bond strengths than self-etch/self-adhesive cements, but they are not as strong as total-etch systems.21,22
CONCLUSION
The key to achieving predictable crown and veneer restorations is beginning with a well-executed preparation, replicating it in an accurate impression and model, and protecting the tooth structure provisionally with a well-crafted temporary restoration. Envisioning the final results prior to initiating clinical procedures can help ensure success. Then, at the cementation appointment, understanding the options available in consideration of the case and the restorative materials used will enhance the long-term functionality of treatment.
ABOUT THE AUTHOR
Brian Harris, DDS
Private Practice, Phoenix, Arizona
REFERENCES
1. Renne W, McGill ST, Forshee KV, et al. Predicting marginal fit of CAD/CAM crowns based on the presence or absence of common preparation errors. J Prosthet Dent. 2012;108(5):310-315.
2. Goodacre CJ, Campagni WV, Aquilino SA. Tooth preparations for complete crowns: an art form based on scientific principles. J Prosthet Dent. 2001;85(4):363-376.
3. Bowley JF, Sun AF, Barouch KK. Effect of margin location on crown preparation resistance form. J Prosthet Dent. 2004;92(6):546-550.
4. Shillingburg HT Jr, Jacobi R, Brackett SE. Fundamentals of Tooth Preparation for Cast Metal and Porcelain Restorations. Chicago, IL: Quintessence Publishing; 1987:83-92.
5. Verma R. Simple Techniques of Tooth Preparation: A Step-by-Step Guide to Tooth Preparation. 2006:195-222.
6. Terry DA, Leinfelder KF, Lee EA, et al. The impression: a blueprint to restorative success. Inside Dentistry. 2006;2(5):66-71.
7. Burgess JO. Impression material basics. Inside Dentistry. 2005;1(1):30-33.
8 . Laufer BZ, Baharav H, Cardash HS. The linear accuracy of impressions and stone dies as affected by the thickness of the impression margin. Int J Prosthodont. 1994;7(3):247-252.
9. Radz GM. Soft-tissue management. The key to the perfect impression. Compend Contin Educ Dent. 2010;31(6):463-465.
10. Perakis N, Belser UC, Magne P. Final impressions: a review of material properties and description of a current technique. Int J Periodontics Restorative Dent. 2004;24(2):109-117.
11. Paquette JM, Sheets CG. An impression technique for repeated success. Inside Dentistry. 2012;8(2):70-80.
12. Scott A. Use of an erbium laser in lieu of retraction cord: a modern technique. Gen Dent. 2005;53(2):116-119.
13. Helvey GA. Provisional material considerations: creating a blueprint of the final restorations. Compend Contin Educ Dent. 2014;35(1):56-60.
14. McLaren EA. Bonded functional esthetic prototype: an alternative pre-treatment mock-up technique and cost-effective medium-term esthetic solution. Compend Contin Educ Dent. 2013;34(8):596-607.
15. Schwedhelm ER. Direct technique for the fabrication of acrylic provisional restorations. J Contemp Dent Pract. 2006;7(1):157-173.
16. Guler AU, Kurt S, Kulunk T. Effects of various finishing procedures on the staining of provisional restorative materials. J Prosthet Dent. 2005;93(5):453-458.
17. Maalhagh-Fard A, Wagner WC, Pink FE, Neme AM. Evaluation of surface finish and polish of eight provisional restorative materials using acrylic bur and abrasive disk with and without pumice. Oper Dent. 2003;28(6):734-739.
18. Pegoraro TA, da Silva NR, Carvalho RM. Cements for use in esthetic dentistry. Dent Clin North Am. 2007;51(2):453-471.
19. Zhang C, Degrange M. Shear bond strengths of self-adhesive luting resins fixing dentine to different restorative materials. J Biomater Sci Polym Ed. 2010;21(5):593-608.
20. Kugel G, Ferrari M. The science of bonding: from first to sixth generation. J Am Dent Assoc. 2000;131 suppl:20S-25S.
21. McComb D. Adhesive luting cements – classes, criteria, and usage. Compend Contin Educ Dent. 1996;17(8):759-764.
22. Powers JM, Sakaguchi RL, Craig RG. Craig’s Restorative Dental Materials. 12th ed. St. Louis, MO: Mosby Elsevier; 2006.