You must be signed in to read the rest of this article.
Registration on CDEWorld is free. Sign up today!
Forgot your password? Click Here!
The denture-making process can be frustrating and time-consuming, and results are not always satisfactory. However, introducing a digital approach to denture creation provides a way to open up new revenue channels in the dental practice or enhance existing ones. This article examines how and why a digital workflow for fabricating dentures can save time. It also explains how all the records needed for denture fabrication can be captured in a single visit.
According to the National Institutes of Health, the average life expectancy for Americans will approach 80 by the year 2020.1 Today, 20.5% of all adults over 65 have lost all of their teeth, and almost 40 million people are expected to be fully edentulous by 2020. The current denture market is valued at $2.6 billion and is projected to grow to $3.6 billion by 2019.2 Dentures, thus, will increasingly be needed by more and more people.
The Denture Reinvented
Dentures are said to date back to the Etruscans, who fashioned them 700 years BCE.3 Over the centuries, many means of denture fabrication have been developed. The newest processes are those that employ tools developed for modern computer-aided design and computer-aided manufacturing (CAD/CAM). First used in the aerospace, automotive, and other manufacturing industries, CAD/CAM software was extended to dentistry in the 1980s,4 and since has become well-established in the production of crown-and-bridge and implant-supported prostheses.5,6 Almost 70% of all bridge work is currently estimated to be created digitally.7 CAD/CAM prostheses are associated with significantly better fit, better function, and reduced chairtime. Yet, even though analog processes for fabricating dentures are very time-consuming and require techniques that are not used elsewhere in dentistry, so-called digital dentures are only just beginning to move into the mainstream.
A digital denture uses 3-dimensional (3D) computer software to model the dentures, rather than relying on manual fabrication of a base plate and occlusion rims into which a dental technician manually sets denture teeth. The information needed for the digital denture design can be captured in a single office visit and is stored in a digital format. The process enables dentures to be made that are extremely precise and accurate, and it allows for a quick turn-around. When using traditional denture-fabrication methods, typically at least five visits are required to: (1) obtain the initial impression; (2) get the custom tray impression; (3) obtain the vertical dimension and centric relation information necessary for mounting and setting up the teeth; (4) try in a prototype denture and make any adjustments; and (5) deliver the final denture. Additional appointments often are required to adjust problems with fit.
In a digital denture workflow, preliminary impressions are made at the initial visit. The dentist need not invest in expensive scanning equipment but instead can use traditional impression-making techniques. Additional information is recorded, and the package is sent to the laboratory for scanning, computer-based design of the denture, and computer-driven fabrication of a denture prototype. The prototype is tried in at a second patient visit and adjusted as necessary. Once the prototype is judged satisfactory, the definitive denture is fabricated and delivered to the patient.
Based on the author’s experience, this approach to denture fabrication results in fewer visits, less chairtime, and less labor, along with other savings. Furthermore, the digital data is retained. If the denture is lost or damaged, it can be replaced with an exact replica in a short amount of time and with no office visits required. Similarly, digital dentures can easily be modified.
The Digital Denture Workflow
The process of fabricating a denture digitally begins with an initial patient visit at which maxillary and mandibular impressions are taken, and the vertical dimension, centric relations, and smile line are recorded.
Within traditional denture-making, over the years many different approaches have been used to record all the diagnostic information that is needed to create an esthetic and functional denture. For digital diagnostics, a unique tray system has been developed that is fitted almost like a custom tray. This is used along with other diagnostic aids, including a vertical dimension of occlusion (VDO) gauge and a lip line gauge. These tools make digital denture fabrication a speedy and definable process.
Today dentists can choose from a number of digital denture systems on the market, such as Pala, AvaDent, and Dentca. Most systems have unique tray designs that come in various sizes and are moldable by heat. Similar to custom trays, they are specifically designed and made for scanning. Dentists should not attempt to fabricate their own trays for digital denture fabrication; rather, they must work with scannable trays that are part of the particular system they are using.
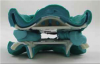
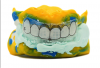
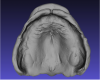
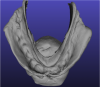
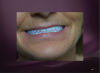
As Figure 1 and Figure 2 illustrate, both the upper and lower impressions are captured together. A device that functions like a Coble Balancer then snaps into the lower denture to enable capture of the vertical dimension and Gothic arch tracing for the centric relations record. Use of such a central bearing device is a well-proven method for obtaining centric relation bite records.8,9
Either regular vinyl or scannable vinyl impression material can be used for making the maxillary and mandibular impressions. Some companies offer scannable vinyl polysiloxane in a two-part system. First, heavy-body impression material is injected inside the tray, and the patient is directed to make a series of border-molding movements. Patients are asked to move their jaws back and forth, swallow, cough, pucker up, and carry out similar movements. The goal is to capture all the significant landmarks—the frenum areas, hamular notch, palatine fovea, incisive foramen, and post-dam area. After the impression material sets, the tray is adjusted. If it shows through the heavy-body material in any areas, an acrylic bur is used to eliminate the pressure points. This effectively customizes the tray.
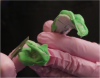
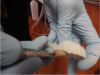
A wash material is then injected into the tray, which is reseated, and more border molding is carried out to capture the illusive flanges that are needed. The trays are then cleaned up. Some digital denture systems require the posterior portion of the tray to be separated to eliminate any obstruction to obtaining an accurate vertical dimension. Using a scalpel, the vinyl is cut, and the tray comes apart (Figure 3). The separated portion is retained, to be sent to the laboratory, where it will be rejoined before the impression is scanned.
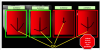
To capture the vertical dimension and record the centric relations, a central bearing device is attached to the impression trays, which are then reinserted into the patient’s mouth. The device has a mandibular adjustable guide pin that is used to establish VDO and act as a stylus against the fixed plate built into the upper tray. The pin is set at the desired vertical dimension, which is established by comparison with the preexisting VDO and evaluation of lip posture and facial profile. The patient then is directed to move through protrusive and lateral excursions, and the pin creates the distinctive “crow’s foot” range of mandibular motion on a self-adhesive inked sheet included in the kit. The point of the crow’s foot marks the arch centric relation (Figure 4).
Using a small round bur, a dimple is created at the point of the arrow. Thereafter, when the patient bites down, he or she will find the dimple with the pin in the lower denture or in the lower rim. The bite is registered by having the patient sit upright and positioning him or her in 90 degrees, then injecting bite-registration material between the two rims. Typically, it takes 30 to 90 seconds for the material to set up. It is important to inject sufficient impression material so that both of the rims can be captured in their prospective positions.
The assembly is then removed from the mouth. The final step is to measure the lip length. This is accomplished by placing the lip ruler up against the maxillary ridge; a small cut-out accounts for the incisive papilla and frenum. The ruler is tipped out at the desired final angle of the central incisor, and the lip length is recorded.
Laboratory Procedures
At this point, all the necessary information has been collected and can be sent to the laboratory. There the impressions are scanned and converted to digital files. Figure 5 and Figure 6 show typical scans of a maxillary and mandibular arch, respectively, including all vestibular areas as well as anatomic landmarks.
The digital impressions are digitally articulated to the bite, using automatic impression- recognition software. In the next step, 3D modeling software is used to design the new software. This software takes into account 26 anatomic landmarks captured in the impressions, and using specialized algorithms and anthropometric data gathered from a large cross-section of patients,10 the software calculates the optimal occlusal plane, curve of Spee, curve of Wilson, articulation, and posterior palatal dam. It also places the teeth and identifies the hamular notch and frenum to achieve an excellent seal and fit. Figure 7 shows a 3D model of a typical set-up. Basically, everything that has been considered in the traditional denture-fabrication process is accomplished with the 3D modeling software.
In the next step, the digital model of the denture is customized and adjusted to reflect any requests sent in by the dentist on the prescription form. The final step involves loading the completed digital denture model into a 3D printer for printing. The denture prototype is then shipped back to the dentist for try-in. Alternatively, dentists who are experienced with the process and confident in the patient records may choose to skip the prototype printing and try-in and have the final denture fabricated immediately.
When a prototype denture is tried in at the patient’s second appointment, both function and esthetics are evaluated. The patient’s abilities to speak and chew are confirmed, and the retention, fit, midline, occlusion, vertical dimension, smile line, lip support, and set-up all are carefully assessed. Typically, digitally fabricated denture prototypes fit better than traditionally fabricated try-in dentures, which often are nonretentive and frustrate patients, leaving them fearful that the final dentures will be similarly unsatisfactory. In contrast, the 3D printed prototypes are usually very close to the final denture in form, fit, and function.
If any adjustments are needed, they can be made directly to the prototype, which is fabricated from polymethyl methacrylate (PMMA) and can be ground easily. For example, if the bite is open, the posteriors are reduced until anterior incisal guidance is achieved (Figure 8). Impression material is then injected into the opening in the back to lock in that configuration, after which the prototype is returned to the laboratory for rescanning and adjustment.
If the midline is malpositioned, a black marking pen can be used to draw the actual midline on the prototype. If more lip support is needed, hash marks can be drawn on the flanges to indicate what is desired, with any additional clarification added using the comment section of the software prescription pad.
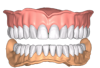
After making any necessary adjustments, the design center then fabricates the final denture. This can be done either using a proprietary injection process or by milling the denture from a plastic puck, using a computer-aided manufacturing process. The denture is then shipped back to the dentist for final delivery to the patient (Figure 9). All digital dentures available today have teeth set in premium acrylic, representing an impeccable blend of new technology with the reliability of the traditional methods. In the author’s experience, dentures fabricated with the digital workflow process have consistently required very few adjustments after delivery.
Discussion
Conventional dentures alleviate some of the many problems associated with complete edentulism.11 However, fabricating them is a technically challenging and error-prone process12 that is so time-consuming that current reimbursement schedules sometimes inadequately compensate for the time involved. Moreover, the traditional fabrication process is inherently inaccurate, often resulting in a poor fit, a porous composition prone to staining and odor, improper occlusal schemes, and unesthetic tooth shapes and arrangements.13
Fabrication of dentures using a digital workflow holds the promise of eliminating those disadvantages.14 Complete dentures can be created for patients in a compressed timeframe, and the reduced chairtime means that this can be accomplished profitably. The digital workflow enables the dentist and the dental laboratory to begin collaborating earlier in the fabrication process. The technician can respond more immediately and specifically to concerns of the dentist, addressing these as the denture teeth are set and moved on the virtual wax-up. Because the prototype denture is milled from the digital model of the virtual wax-up, no polymerization shrinkage occurs. The prototype usually closely approximates how the definitive denture will feel and function. This, in turn, makes the try-in process easier, more accurate, and less time-consuming.
DISCLOSURE
The author has received an honorarium for the presentation on which this article is based.
ABOUT THE AUTHOR
David Burt, DDS
Private Practice, Allentown, Pennsylvania
REFERENCES
1. Health & Aging – Can we prevent aging? National Institute on Aging website. https://www.nia.nih.gov/health/publication/can-we-prevent-aging. Accessed August 19, 2016.
2. Johnson P. Rapid growth for denture market. Inside Dental Technology. 2015;6(spec iss 1):1.
3. Dunn CW. Artificial Dentistry Among the Etruscans. Florence, Italy: G Barbera; 1894.
4. Duret F, et al. La realisation d’une couronne par ordinateur. Congres A.D.F. Paris: 25 November 1985.
5. Fuster-Torres MA, Albalat-Estela S, Alcaniz-Raya M, Penarrocha-Diago M. CAD/CAM dental systems in implant dentistry: update. Med Oral Patol Oral Cir Bucal. 2009;14(3):E141-E145.
6. Cohen A. Digital technology and the future of dentistry. Inside Dental Technology. 2013;4(9):72-73.
7. National Association of Dental Laboratories. NADL 2015 materials and equipment survey: report of findings. Ventura, CA: Valmont Research, LLC; November 2015.
8. El-Gheriani AS, Winstanley RB. The value of the Gothic arch tracing in the positioning of denture teeth. J Oral Rehabil. 1988;15(4):367-371.
9. Massad JJ, Connelly ME, Rudd KD, Cagna DR. Occlusal device for diagnostic evaluation of maxillomandibular relationships in edentulous patients: a clinical technique. J Prosthet Dent. 2004;91(6):586-590.
10. Sawiris MM. The role of anthropometric measurements in the design of complete dentures. J Dent. 1977;5(2):141-148.
11. Fiske J, Davis DM, Frances C, Gelbier S. The emotional effects of tooth loss in edentulous people. Br Dent J. 1998;184(2):90-93.
12. Rudd RW, Rudd KD. A review of 243 errors possible during the fabrication of a removable partial denture: part I. J Prosthet Dent. 2001;86(3):251-261.
13. Li W, Yuan F, Lv P, et al. Evaluation of the quantitative accuracy of 3D reconstruction of edentulous jaw models with jaw relation based on reference point system alignment. PLoS One. 2015;10(2):e0117320.
14. Infante L, Yilmaz B, McGlumphy E, Finger L. Fabricating complete dentures with CAD/CAM technology. J Prosthet Dent. 2014;111(5):351-355.