You must be signed in to read the rest of this article.
Registration on CDEWorld is free. Sign up today!
Forgot your password? Click Here!
Historically, available bone was the primary factor used to develop a treatment plan for the completely edentulous patient. Today, primary factors to consider in treatment planning edentulous arches are not only bone quantity but also quality of bone density, which can be improved using regeneration methods. This means edentulous patients and their doctors can together consider a wider range of fixed and removable prosthetic options than in the past.
Primary Factors in Treatment Planning Edentulous Arches
Bone Density and Location
As the Misch Bone Density Classification Scheme makes clear, the quality of bone density is often dependent on the bone’s location in the arch. Misch has described four bone density categories from the most dense to the least dense.1 D1, the densest bone, which is found in the anterior mandible, is analogous to a hardwood, like oak or maple. The coarse D2 cortical trabecular bone found in the anterior and posterior mandible and the anterior maxilla is analogous to white pine or spruce. D3 describes the coarse cortical and fine trabecular bone found in the anterior and posterior maxilla and in the posterior mandible, and it is analogous to balsa wood. D4 is the fine trabecular bone found in the posterior maxilla and is analogous to Styrofoam.1
Understandably, the edentulous maxilla has the highest incidence of early implant failure, 19% for overdentures and 10% for fixed prostheses, compared to 3% early implant failure for mandibular fixed or overdenture prostheses.2
Cortical Plate Resorption and Bone Loss Progression
In the premaxilla, the facial cortical plate is thin over the roots of the teeth and may rapidly resorb during the initial bone remodeling from periodontal disease or bone fracturing during extraction; this typically occurs in the maxillary anterior region.3 The anterior ridge loses 25% of its width within the first year after tooth loss and 40% to 50% over 1 year, which comes at the expense of the labial plate.4
Bone loss progression after extraction is a significant factor in treatment planning for the completely edentulous maxilla and mandible. It occurs as a decrease first in the width and then the height.3,5
Assessing the Completely Edentulous Arch
Bone classifications, such as the Misch Bone Density Classification Scheme are helpful in determining whether and where to place implants to improve their chance of survival. A more specific method of classifying bone that is especially helpful for assessment and treatment is classifying bone by division, which describes the nature of the bone, and type, which describes the location of the bone.1
Bone divisions A-C, are as follows. Division A is abundant bone, with width greater than 6 mm, height greater than 12 mm, medial distal length greater than 7 mm, and crown height space less than 15 mm; its angulation of occlusal load can be less than 25 degrees. Division B, barely sufficient bone, is 2.5 mm to 6 mm wide (B+ would be 4 mm to 6 mm); height would be greater than 12 mm, medial distal length greater than 6 mm, and angulation must be 20% or 20 degrees; crown height space would be less than 15 mm. In Division C bone, compromised bone, width is 0 to 2.5; height is less than 12 mm, angulation is greater than 30 degrees, and the crown height is greater than 15 mm in the posterior, and anterior ridges have completely resorbed and require that the implants be angled lingually.1
Bone classifications Type I-III are followed by division letters—usually two—with the first letter describing the anterior region, which usually determines the overall treatment plan, followed by the second letter describing the posterior region. In Type 1, the bone is similar in all three regions, and various implant root forms can usually be placed without limitation on locations. An example of Type II, where the posterior segments of bone are similar to one another but different from the anterior segments, would be Type II A, C (A is between the foramina and C is distal to the foramen); this is common in the mandible because the posterior regions resorb four times faster than the anterior regions. In Type III, the posterior segments differ from one another. For example, in Type III A, B, and C, the anterior segment is listed first with abundant bone followed by one posterior side with adequate bone (B) followed by inadequate bone (C) on the other side. (This condition is less common than the first two types and is found more in the maxilla than the mandible.)1
Treatment Planning for the Completely Edentulous Maxilla and Mandible
Treatment planning should therefore begin with a determination of initial bone density and classification, followed by a decision between whether to treatment plan based on existing bone or to change the bone classification via surgical intervention, as ultimately the restoration decision will involve matching restoration and bone types. The treatment plan is based on the location, size, and especially the angulation of the implants.
Angulation Considerations
The angulation of the implants determines the amount of retention the denture caps should provide. The more parallel the implants are, the more they require stronger retentive caps to provide a greater amount of the retention in the denture. The more the angles differ from one another, the more they require a lighter retentive cap inside the denture to enable a complete denture fit.
Major Restoration Types
The major types of implant-supported overdentures may be either fixed or removable. All have their respective advantages and disadvantages and indications.
Fixed
Among full-arch fixed prosthetic options are: all-zirconia screw-retained overdentures; bilayered porcelain-to-metal or zirconia crown and bridge “roundhouse” types of restorations; and hybrid screw-retained prostheses with denture teeth and acrylic joined to a metal substructure, which includes a labial flange. The greatest advantage of fixed prostheses is that they feel and function similarly to natural teeth and require less maintenance than the removables. However, their disadvantage is they are the most costly type of restoration. Among them, screw-retained fixed restorations are appropriate for Type I Division A and/or B scenarios.
Removable
Full-arch removable prostheses may be either attachment retained or bar retained. Their greatest advantage is that they are more affordable than fixed options, but they are associated with a higher incidence of prosthetic complications; there are three times more maintenance and adjustments for removal prostheses compared to fixed restorations.6 Removable restorations are more commonly used in Type II AC situations
The bar-retained systems connect implants from one side to the other and have built-in attachments that must be replicated in the fabricated denture. They provide the greatest amount of retention, but they require more precision and more appointments to achieve a passive fit and are more costly than dentures retained by individual attachments.
With the individual attachment-retained denture, such as is described below, there is more flexibility because there are more forgiving aspects to the attachment method, which requires less precision than the bar-retained method.
Treatment Planning Components for Attachment-Retained Overdentures
Depending on the restoration option chosen, there are different steps and timetables involved. However, in all cases, the construction of the prosthesis can begin only after successful integration of the implant fixture is confirmed. This is the case for attachment-retained overdentures, which may be either fabricated by the laboratory or in the office by the clinician.
Prosthesis Fabrication
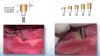
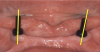
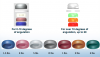
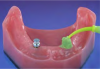
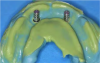
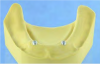
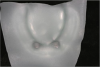
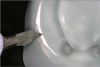
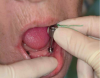
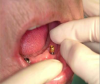
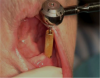
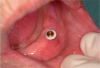
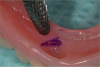
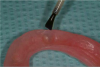
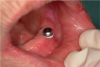
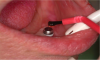
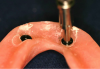
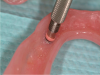
Before performing the impression, the clinician must first determine the soft tissue height (Figure 1) and the amount of angulation (Figure 2), which in turn, determines the type of male nylon retention inserts that will be used (Figure 3). The impression copings are then placed over the abutments by the clinician (Figure 4).
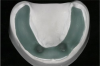
Impression—Light-body impression material is injected around the coping (Figure 5). Firm-body material is used in the tray. Once set, the impression is removed. Note the black processing copings (Figure 6).
Wax bite rim fabrication—After taking the impression, the clinician can either send it to the laboratory for fabrication of the wax bite rim or fabricate it in the office, as described below.
Office fabrication
The clinician should follow these steps:
1. Snap an analog implant onto each coping (Figure 7)
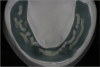
2. Pour the model with a fast-setting gypsum material (Figure 8)
3. Light-cure the baseplate material (Figure 9)
4. Adapt the baseplate material to the model (Figure 10 and Figure 11)
5. Trim excess material (Figure 12)
6. Light-cure with the baseplate on the model (Figure 13)
7. Polymerize the baseplate (Figure 14)
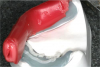
8. Add beads of old filling material for retention of the wax rim (Figure 15)
9. Roll a softened piece of baseplate wax and apply it to the bite rim (Figure 16). (Note finished bite rim using this method [Figure 17]).
Laboratory fabrication
If the bite rim will be fabricated in the laboratory, the clinician should send the lab a prescription including the shade and mold of the teeth. There are a number of manufacturers that have denture tooth selection systems to aid in choosing the right tooth for the patient. The lab should also be sent the impression, bite registration, face-bow transfer, and opposing model.
Prosthesis Evaluation and Finalization
At the try-in appointment, the esthetics, phonetics, and occlusion are evaluated. After the patient approves the denture set-up, everything is then sent back to the laboratory with instructions to process the denture. It is advisable to have patients sign the chart stating their approval; there should also be a witness signature.
Prosthesis Delivery
Placing/Checking Attachments
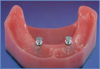
If the female attachments have already been placed by the laboratory, the clinician places the abutment again in the patient’s mouth to fit the denture, making sure the bite is correct and that there are no pressure points. However, if attachments are being placed chairside, according to the steps below, the female portions are placed on the male portions that are secured to the implant fixture. In either case, a radiograph can be taken to confirm the complete seating of the attachments.
Chairside placement of the attachments
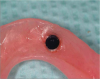
After removal of healing abutments (Figure 18), the implant abutments are placed (Figure 19) and torqued to the correct level (Figure 20). Next, a white block-out ring is placed over the abutment so that neither the abutment nor attachment material will be visible after denture caps are removed (Figure 21), and a denture cap with a black processing male part is placed on the implant attachment (Figure 22). After placing pressure on the indicating paste on the tops of the denture caps to show the areas inside the denture that need to be relieved, the areas for denture caps are relieved (Figure 23).
Passive Fit Confirmation
With the attachments in place, the denture is placed in the mouth, confirming a passive seating without interference from the attachments. The patient should be able to verify that the bit feels normal. After confirming the passive fit of the denture, the female attachments are removed from the male portion.
To aid visual inspection, some clinicians choose to place a small access hole on the lingual side of the denture just prior to securing. These access holes also prevent pressure build-up when securing the attachments to the denture with acrylic. The type of direct pickup material will dictate whether vent holes are required.
Securing and Seating the Denture
To secure the denture caps to the denture, the clinician can choose one of three different types of material—cold-cure acrylic, self-cure resin, or light-cure resin—each of which has advantages and disadvantages. The traditional method for this was the cold cure, which required ascertaining precisely when the material has set while it was still possible to remove the denture with the caps in place. Now, light-cure material enables the clinician to place the denture, light curing it only once the denture is clearly in proper position. Self-curing resin offers the advantage of being faster than cold cure, with the ability to use a light cure add-on if there are any voids on the underside of the denture.
After cleaning the receptor sites on the denture with alcohol—and ensuring that they are dry—the clinician should apply a resin-curing primer bonding agent to the receptor site—eg, light-cured resin (Figure 24). The female attachments are then placed on the corresponding male parts (Figure 25).
When using cold-cure acrylic, the author prefers to place relief holes on the lingual side of the denture to allow for the escape of the excess. The male housing that holds the nylon retention caps can be sandblasted to increase the bond with cold curing acrylic. A metal primer can also be placed to further increase the adhesion.
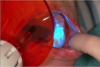
If using a light-cured resin, it should be brush onto the denture cap (Figure 26) before filling the retentive holes in the denture with the material (Figure 27). Next, the clinician should place the denture in the patient’s mouth to fit it and confirm the occlusion (Figure 28). The clinician should have the patient open his/her mouth, then light cure through the denture (Figure 29). After removing the denture, the clinician should inspect for voids, and fill if necessary, and final cure for 1 minute (Figure 30).
Next the black-processing males should be removed (Figure 31), and the final male attachments—which are based on the angulation—are attached (Figure 32).
Verification and Patient Instruction
After the bite is confirmed, the patient must demonstrate the ability to remove and place the denture.
Conclusion
Compared to traditional dentures, implant-retained dentures are more like natural teeth. They offer greater efficiency in chewing plus improved speech, comfort, and confidence, without the need for glues, cushions, and other methods of attempting to improve retention and comfort.
The ability to improve bone quality and quantity means this option is now available even to patients not previously considered candidates, as well as those who are unhappy with the traditional dentures they have.
References
1. Misch CE. The Misch bone density classification scheme. Contemporary Implant Dentistry. 3rd ed. St Louis, MO: Mosby, 2008.
2. Goodacre CJ, Bernal G, Rungcharassaeng K, Kan JY. Clinical complications with implants and implant prostheses. J Prosthet Dent. 2003;90(2):121-132.
3. Schropp L, Wenzel A, Kostopoulos L, Karring T. Bone healing and soft tissue contour changes following single-tooth extraction: a clinical and radiographic 12-month prospective study. Int J Periodontics Restorative Dent. 2003;23(4):313-323.)
4. Wen SC. Full Maxillary arch implant reconstruction. 34th Asia Pacific Dental Congress (APDC); June14-18, 2012; Taipei, Taiwan, China:54.
5. Pietrokovski J. The bony residual ridge in man. J Prosthet Dent. 1975;34(4):456-462.
6. Walton JN, MacEntee MI. Problems with prostheses on implants: a retrospective study. J Prosth Dent. 1994;71(3):283-288.