You must be signed in to read the rest of this article.
Registration on CDEWorld is free. Sign up today!
Forgot your password? Click Here!
Glossary:
abutment—a tooth, root, or implant used for support and retention for a fixed or removable prosthesis
Arnica Montana—a raw herb used in the homeopathic treatment of bruises and inflammation; also known as mountain tobacco and wolf’s bane
atrophy—a wasting or loss of tissue
blade form dental implant—type of endosseous implant; shaped like a flat plate
endosseous implant—positioned within the jaw bone, which gains support by osseointegration into the bone
homeopathy—nontraditional system for treating patients; minute amounts of a substance that in larger amounts causes disease symptoms are given to healthy individuals
hydroxyapatite—(HA) calcium phosphate complex that is a primary mineral component of bone; sprayed-on coating used on early dental implants
intrude—forceful change to tooth position, driving further into the tooth sulcus resulting in less crown visibility
ligature—piece of floss attached to small components that acts as a safety feature for ease of retrieval
muscles of mastication—four pairs of muscles that aid in chewing; masseter, temporalis, and the internal and external pterygoid
open bite—lack of vertical overlap of the maxillary centrals resulting in an opening of the anterior teeth
osseointegration—biological concept where a direct connection exists between the living bone and metal
osteotomy—a hole in the alveolar bone made by a dental surgeon using an implant drill for the placement of a dental implant
peri-implantitis—the equivalent to periodontitis manifesting around dental implants; bone loss around implants due to bacterial pathogens
pneumatize—formation of air cells or cavities in tissue; in this case, when the sinus spaces are increased due to bone resorption
pontic—artificial tooth that replaces a missing tooth
roundhouse bridge—fixed partial denture for an entire arch
subperiosteal implant—cast-metal frame which rests on bone, under the gingiva, to support an overdenture; may be fixed with screws to the bone; used for fully edentulous patients in the mandibular arch
tachycardia—fast heart beat
titanium—metal (chemical symbol Ti) having low density, good strength, and corrosive resistant properties
transosseous implant—machined implant consisting of a lower plate fixated under the mandible with pins projecting through the mandible which penetrate into the oral cavity
trephine—a surgical instrument used for cutting out circular sections
Vitalium®—trademark name for a dental alloy comprised of cobalt, chromium, and molybdenum
HISTORY OF DENTAL IMPLANTS
Pre-osseointegration
Human skulls dating from 600 A.D. show that man attempted to implant carved shells into the anterior mandible. However, the first documented dental implant did not appear until 1809, and had a poor success rate.2,3
Teeth are anchored into the alveolar bone by the periodontal ligament (PDL). This ligament is a muscle attachment that acts as a shock-absorbing mechanism. Researchers are spending numerous hours and resources to artificially developing a periodontal ligament that would anchor dental implants into the alveolar bone, but to date have not been successful (Figure 1).4
Prior to the era of osseointegration, there were various designs of dental implants and frameworks used to support full and partial dentures. Some of these functioned well for several years, but most designs had an unpredictable success rate. The first of this type, the subperiosteal implant framework, was described in 1949 by Drs. Goldberg and Gershkoff.5 This framework could be used in the maxilla or mandible. It was placed underneath a gingival flap and in direct contact with the bone; it was not implanted directly into the bone. An impression was made of the edentulous jaw from which the framework was cast in Vitalium®, with posts projecting through the mucosa into the oral cavity. A full or partial denture was then fabricated to fit the posts. There were a few complications associated with this method. Exfoliation of the bone connecting the screws, and the exposure of the frame through mucosal perforation were problems. Twenty-year studies showed a failure rate of 34% in the mandible.6 A 10-year study reported a 60% survival rate, and an even lower survival rate of 50% after 15 years.7 Because of these low success rates, this implant framework is no longer used today.
Almost 25 years later in 1968, a new dental implant concept called the transosseous implant was introduced by Small. The name was derived from the fact that it transversed the mandible from the bottom to the top.8 This implant was inserted underneath the chin. A flat bone plate was fixed under the skin against the inferior border of the mandible. Several threaded posts projected into the anterior mandible from the plate. Two to four of the posts went completely through the mucosa and into the oral cavity to help fixate the denture prosthesis. Transosseous implants were machined from titanium, or a gold alloy. There were several disadvantages to this implant system. This procedure was performed under general anesthesia in a hospital setting and was quite invasive. Another downside was frequent bone loss around the posts with bleeding on probing. Studies showed that this design had a success rate of 91% after 10 to 16 years of function, but it was not a healthy environment.9 This implant design is no longer used today and was replaced by the endosseous implant.
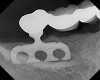
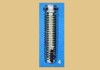
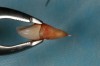
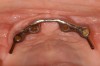
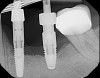
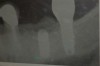
In 1966, Linkow presented the “blade implant” around the same time as the transosseous implant.10 This is now known as an endosseous implant (Figure 2 and Figure 3). This implant is inserted intraorally in the bone by making a groove in the alveolar bone. One or more posts were attached to the fin-shaped plate, which anchored the restoration. The success rate for this implant was less than 50%, and is no longer used today.11,12 The problem with this type of implant was that it became loose, infected, and had to be removed.
DISCOVERY OF OSSEOINTEGRATION
The concept of osseointegration was an accidental discovery in the early 1960s by physician and professor Per-Ingvar Brånemark. Brånemark was working on his thesis, studying bone regeneration in rabbits.13 He developed a titanium chamber to study wound healing. This device was implanted in the bone of a rabbit. At the end of the study, when he wanted to remove the chamber from the bone, it could not be removed because the bone had fused (osseointegrated) to the titanium surface. The bond was so strong that it could not be broken (Figure 4).14 He conducted several other experiments to confirm that titanium could indeed integrate and become part of the bone. After this discovery, dental applications were the first that came to mind.
Brånemark’s first patient, Gӧsta Larson (Figure 5), was born in 1931 with severe chin and jaw deformities. Larson had several congenitally missing teeth and the teeth he had were misaligned. He was not able to chew properly. Larson was treated in 1965 with the first implant-supported bridge, in Gothenburg, Sweden. Four implants were inserted in the mandible, which integrated within 6 months, and the prosthesis was then attached. Forty years later, that prosthesis was still in place.14
Following this first implant, Brånemark did extensive clinical research and placed more implants with regular recheck appointments. In the beginning, he only worked with fully edentulous patients. In 1977, Brånemark presented his data to the Swedish government for its aid.15 He received the support needed to collect a large amount of data. The American Dental Association gave “full acceptance” to his dental implants for a variety of uses, including: single-tooth replacement, partial and fully edentulous bridges, and implant-supported overdentures.
POST-OSSEOINTEGRATION
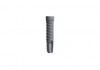
The Brånemark system was introduced into the United States in 1982. These implants were machine-surfaced to be a cylindrical screw (Figure 6). Since then, other endosseous implant designs have been introduced. Cylindrical implants are tapped into the osteotomy. Vented cylinders, expansive screws, and hollow posts are also available.
In order to improve the attachment of the bone cells to the implant surface, some manufacturers placed coatings on the implant surface. These coatings consisted of hydroxyapatite (HA) with a titanium plasma spray. HA was shown to attract bone cells, especially in areas where bone density was compromised.16,17 A main problem with this type of implant was that the coating could separate from the implant once it was inserted into the alveolar bone. That separation caused the implant to become loose, resulted in failure, and required removal.18,19 HA-coated implants are no longer manufactured.
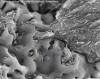
It was discovered that one way to increase the rate and success of osseointegration was to increase the surface area of the implant. This was accomplished by spraying the machined implant surface with liquid titanium or by dipping the implant in an acid that created microporosities (Figure 7). Due to this discovery, the majority of the implants available today have a porous surface that allows the bone cells to better attach to the implant surface (Figure 8).20
Many implant studies were conducted in the 1980s. Since then, more than 100 implant companies have been established. To sell implants in the United States, a manufacturer must submit research and documentation, known as a 510(k), to the Food and Drug Administration (FDA) for approval. Clinical testing is currently not required by the FDA for endosseous implants.
The American Dental Association (ADA) has a seal of acceptance given to products used in dentistry, including dental implants. The ADA seal is not a requirement to sell implants, but companies voluntarily submit to receive the seal. The ADA has stricter guidelines than the FDA, requiring clinical testing for at least 5 years. Among the implant companies with ADA Seal of Acceptance are Astra Tech, Nobel Biocare, and Straumann.21
RATIONALE FOR DENTAL IMPLANTS
As the baby boomer generation ages, the need for dental implants increases. Implants offer several advantages over bridges and dentures. People who are missing teeth have compromised chewing ability and speech, facial appearance, and self-confidence. When a tooth is lost, the surrounding bone starts to atrophy as a result of lack of use (Figure 9). Dental implants help maintain the bone profile and volume when chewing, by applying direct forces on the bone during mastication.22 These forces are essential in maintaining strong muscles and bone. Dentures or partial dentures have the opposite effect on the maxilla and mandible. Poorly fitted removable prosthetics allow the bone to resorb because they only regain approximately 10% of chewing capability. This is not enough to maintain the bone and results in a gradual loss of bone.23
Because chewing ability is reduced with dentures, atrophy is also noted in the muscles of mastication, giving the patient’s cheeks a sunken appearance. Implants also maintain facial muscles, aiding in improved mastication and muscle tone. After receiving dental implants, many patients who had been missing teeth for a long time notice a natural “face-lift” effect when the muscles of mastication are once again used properly.
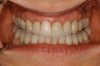
Patients who are rehabilitating their oral cavity with dental implants gain a priceless new self-confidence. Replacing missing teeth with implants is the best and closest thing to natural teeth (Figure 10). Many patients forget that they have implants because they feel so natural due to osseointegration. Recipients are able to smile with confidence, without worry of denture displacement or showing gaps when smiling.
Dental implants can last a lifetime. The crown work cemented to the exposed tip of the implant may need to be replaced for esthetic reasons, but the osseointegrated implant becomes a part of the patient’s body.
ENDOSSEOUS IMPLANTS
There are several designs of root-form implants. The original Brånemark implant was designed as a cylindrical implant. In the 1980s, a tapered implant became available. The advantage of this shape was its “wedging effect” into the bone. This allowed for better initial stability, especially in less dense bone. However, if too much pressure was exerted on the bone, then necrosis or death of the cells occurred, causing severe pain and implant loss within a month after surgery.24
Vent holes were also introduced toward the apex of the implant which improved osseointegration into the bone.4 This mechanical retention occurred as new alveolar bone grew into the open areas, essentially locking the implant in place.
The thread design of implants also varies between systems. One design is self-tapping, meaning that the threads are sharp and able to cut their way through the bone (ie, Nobel Biocare). Another design has noncutting threads (ie, Straumann). A self-tapping thread has an advantage: the osteotomy can be perfected as the implant is being placed, resulting in a close fit between the implant and the bone.
The implant platform can also have different shapes. It can have an internal or external platform with the abutment. The original Brånemark system had an external connection. The internal connection platform is the most preferred method used now in dental practices (Figure 11 through Figure 13).
Dental professionals may be easily overwhelmed by the variety of implants available on the market. The dentist should choose a dental implant system based on evidence-based research. First, the system should prove reliability and a high clinical success rate of at least 5 years. Secondly, the implant manufacturer must be reputable, offering a versatile implant system that is easy to use.4
MINI-IMPLANTS
Mini-implants were introduced in dentistry as a temporary implant. These were placed to support a denture or temporary prosthesis during the healing time after implant surgery25,26 (Figure 14). Several manufacturers now produce mini-implants for permanent restoration of missing teeth. The cost of a mini-implant is approximately the cost of a regular implant, making it more affordable for the patient. However, the postoperative studies to date only show a success rate of 60% to 70% after 5 years.
In 1983, Creekmore and Eklund started working with small-sized bone screws used as anchors for elastics in orthodontics.27 These are mini-implants, known in orthodontics as temporary anchorage devices (TADs), and are gaining more attention in this field. They are usually inserted and remain in place for 6 to 9 months, after which they are easily removed.28 TADs have a diameter of 1.2 mm to 2 mm and are especially useful to intrude and distalize molars and to close open bites.29
ZYGOMATIC IMPLANTS
Certain patients no longer have an adequate amount of bone remaining in the maxilla. This happens if the patient has worn dentures for an extended time, or has severely atrophied bone or bone reductions resulting from cancer. When posterior teeth are missing for an extended period of time, the sinus can pneumatize or drop down, and only a shell of bone remains between the sinus and oral cavity. Brånemark wanted to find a treatment solution for these patients. If the patient proved to have sufficient, quality bone in the zygomatic arch behind the maxillary sinus, a zygoma implant was placed. The zygomatic bones are situated lateral to the nose and also form part of the orbital bone and prominence of the cheek. The initial 10-year implant study conducted by Brånemark and colleagues found a success rate of 94%.30
The length of a zygoma implant is 30 mm to 52.5 mm, which is two to five times the length of a regular implant. By using zygomatic implants, the cost and need for bone grafting can be decreased. A multicenter study completed in 1997 showed a success rate of 96.3%.30
PROSTHETIC OPTIONS
Single Tooth
Most adults (70%) are missing at least one tooth.31 Developing a diagnosis and final treatment plan for tooth replacement is the dentist’s responsibility. However, all dental team members should be familiar with the different options, risks and benefits of replacing a single missing tooth.
There are three options to replace a single missing tooth:
1. A removable partial denture (RPD)
2. A 2- to 3-unit fixed bridge
3. An implant finished with a permanent crown
Dentists must agree to the American Dental Association’s Code of Ethics as a condition of membership. This code upholds the principles to “do good” and “do no harm” to dental patients. The standard of care that advocates these principles is to recommend the placement of a dental implant. It is the most conservative option and preserves the integrity of the adjacent teeth and surrounding bone structure.
An RPD is the least expensive alternative, is reversible, and can be altered. Many patients, however, do not like a removable prosthetic and have trouble getting used to it. The RPD needs to be removed at night to let the tissues and the teeth it sits on rest, it is not as stable during chewing (10% of original chewing capability23) or speaking, and must be replaced when the jaw changes shape because of bone and tissue resorption.
A bridge involves replacing the tooth with a pontic, which is suspended by one or more abutments. This technique involves the removal of healthy, adjacent tooth structure to create the abutment support. It is difficult to clean underneath a bridge, which makes them more prone to caries and periodontal disease. Also, the adjacent teeth take on a heavier load, which increases the risk of fracture. If a problem develops with an abutment tooth, the entire bridge fails and must be removed. Studies show up to 50% failure rates from 10 to 15 years in function.32
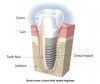
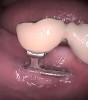
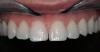
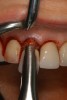
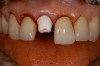
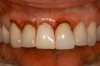
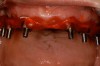
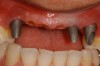
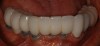
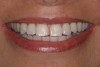
A dental implant most closely replicates natural tooth structure. Once it is osseointegrated, many patients cannot differentiate an implant from a natural tooth. Furthermore, dental implants do not decay or need root canal therapy. Even though the cost is slightly more than a bridge, it is an investment for the future, as implants usually last longer than a bridge. A 10-year report on posterior single implants shows a success rate of 97%.33 Once an implant is placed, the osseointegration and tissue healing time of approximately 4 months is necessary before a final crown is placed. A temporary crown can be placed the same day the implant is placed, but this is only for esthetics, not for function (Figure 15 through Figure 19).
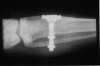
Young patients, those under 16 or 17 years of age and still in their growing years, cannot receive dental implants. A hand-wrist radiograph is prescribed to determine if growth is complete (Figure 20). If the patient is still growing, a resin-bonded fixed bridge can be used as an option until the patient is a viable implant recipient. Another temporary option is a denture, also known as a “flipper” or “stay plate.” This option is intended for esthetics only until a permanent solution is chosen.
PARTIALLY EDENTULOUS
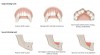
When patients are missing multiple consecutive teeth, the best replacement options are dental implants. A bridge is not a preferred choice due to the long span of edentulism, causing excessive stress on the abutment teeth. A removable partial denture is the least expensive, non-surgical option. However, the anchor teeth supporting this prosthesis are also subject to excessive forces. Studies report that up to 44% of anchor teeth for RPDs are lost early.34
There are two options when planning implant treatment for partially edentulous patients. One is to replace every missing tooth with an individual implant and crown. The second option is to attach a fixed bridge onto several implants.
Replacing every missing tooth with an implant and crown may not be possible in every case. However, some patients want to recreate individual teeth. The hard task of replacing individual teeth in the esthetic zone (anterior) is maintaining or creating the soft tissue architecture (interdental papillae). The best results occur when inserting implants immediately following extraction, thus preserving the gingival tissue. In the posterior zone, where the forces of mastication are highest, individual implants are recommended.
Implant-supported bridges are a predictable and efficient way of replacing several missing teeth. As with a tooth-supported bridge, oral hygiene requires patient instruction in flossing underneath the bridge and around implants. If the patient fails to maintain healthy tissues under bridges and around implants, bone loss, known as peri-implantitis, can occur.
COMPLETELY EDENTULOUS
Many fearful dental patients avoid dental treatment, resulting in the loss of teeth due to periodontal disease or extensive decay. With the advancements in dental implant technology, the dentist can insert implants immediately following extraction and fix a temporary, full-arch prosthesis to the implants.35 Many patients are unaware of the option of not going even one day with a removable denture. It is the responsibility of the dental team to remain current on dental technology and to educate patients about their implant options.
After approximately 4 months of healing, the final denture can be fabricated. This can be made of acrylic or porcelain. Both achieve great esthetic results, but porcelain is three to four times more expensive. Recent studies show that it is beneficial to splint implants together with a fixed temporary denture versus a removable transitional denture because it decreases the risk of failure.23
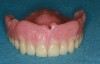
As stated earlier, dentures replace approximately 10% of chewing function. This causes digestive problems due to an inability to chew the food properly, also leading to malnutrition, due to eating only softer, more processed foods. Atrophy of the alveolar arches occurs due to lack of adequate pressure on the bone. This atrophy results in resorption of the tissues leading to mouth sores and tissue irritation. When the denture is allowed to irritate the mental foramen, the patient can experience pain and numbness of the lower lip. A positive solution for a denture patient is to have two to four implants inserted into the alveolar bone. The denture is then connected to the implants via snap-on attachments or a bar resulting in stabilization (Figure 21 through Figure 23). According to the 2002 McGill Consensus Statement on overdentures, mandibular two-implant overdentures are superior to conventional dentures in all clinical trials, even up to 9 years following insertion.36
Because the maxillary arch is wider than the mandibular arch, and the cancellous bone is more porous, four to six implants are utilized for a maxillary overdenture. An advantage of having an implant-supported overdenture in the maxilla is that the palatal area remains uncovered to the soft palate. Having the palate open to the taste buds allows for an enhanced sense of taste. Another advantage is relief from triggering the gag reflex. A properly inserted overdenture can be inserted without adhesives and easily removed, allowing for consistent and thorough cleaning. Finally, it produces better lip support for patients who have experienced bone loss in the anterior area.
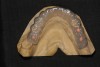
Correctly completing a treatment plan for the edentulous patient is very important. Some edentulous patients may not be candidates for fixed overdentures due to the lack of existing alveolar bone. To restore the lip support, a flange is often necessary, or an extensive amount of bone grafting must be completed. A flange cannot be attached onto a fixed bridge because the patient will not be able to clean under it (Figure 24).
DIAGNOSTICS
A few records are necessary to determine the treatment options for the patient and placement of the implant(s). When considering potential implant treatment, the standard of care today is for the patient to receive a computed tomography (CT) scan. The patient should wear a radiographic guide during the scanning procedure. This radiographic guide is a great communication tool to help the surgeon visualize implant placement (Figure 25). To make the radiographic guide, maxillary and mandibular mounted impressions need to be obtained to determine the correct bite and location of the teeth to be replaced with implants. The guide is prescribed and made in a dental laboratory.
CT Imaging
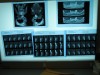
CT scans have been used in medicine since 1973 and in dentistry since 1987. The CT scan allows the dentist to visualize the bone anatomy and nerve locations in three dimensions (Figure 26). The latest technology in CT scans is called a cone beam computed tomography (CBCT) scan. These scans are digital and require less radiation than a full-mouth series of dental radiographs. Medical CT scans use 40 to 60 times more radiation than CBCT scans in dentistry.23 Most dental offices do not currently own a CBCT scanner, so patients are referred to a local imaging center that has the dental software. However, as the CBCT scanners become more affordable, it is expected that more dental offices will be purchasing them (Figure 27).
Treatment Planning Software
Several companies are providing dental software as a solution for accurate treatment planning of implant cases. Surgeons can simulate implant placement prior to surgery and obtain bone density values. Once the simulation of implant placement is set, a precisely replicated surgical guide can be fabricated, leaving little or no chance for error.
SURGICAL PROTOCOL
Any licensed, properly trained dentist can place dental implants. It is important to understand the implant placement protocol of the system used. A team approach will result in a smoother procedure and a happier patient.
Patients count on the dental assistant to answer questions regarding the procedure, often when the doctor is out of the treatment room. The dental assistant can ease nervous or confused patients. It is advisable to give complete information about the surgery so patients are confident of the procedure before surgery. Patients must understand the whole procedure in layman’s terms in order for the dentist to obtain informed consent and keep their trust.
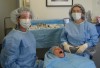
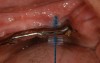
Pre-packaged, sterile implant kits can be purchased from implant manufacturers. The kits can be customized for dental operatories. It is very important to maintain a sterile field during implant surgery. This minimizes the number of infections postoperatively and the risk of implant failure (Figure 28). While setting up for implant surgery, it is recommended to have a second, roving dental assistant, who can retrieve the supplies while an assistant wearing sterile gloves prepares the treatment area. A proper surgical setup requires approximately 30 minutes. This stringent technique to maintain a sterile field may be a challenge to implement but it is absolutely necessary. Several training DVDs on proper treatment room preparation are available and highly recommended, especially as the team is just beginning to add implant placement to its treatment list and for training new dental team members.
The responsibilities of a surgical dental assistant are: setting up the treatment room, monitoring the patient, instrument exchange, retraction, and effective oral evacuation of the oral cavity and surgical site. Ideally, a second roving assistant stays available to obtain any necessary supplies outside of the sterile area.
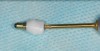
A challenge with the implant surgical kit is maintaining the organization of many small parts that are used intraorally (Figure 29). It is important to ensure that small drills and/or screwdrivers are not aspirated by the patient. Screwdrivers can be ligated at the handle with a long piece of floss for easy retrieval if they slip and become an aspiration risk.
Every dental implant system has a unique drilling sequence. Some designs are tapered and some are cylindrical. The cylindrical system kit has fewer drills. It is important to know the correct terminology for each piece of the kit prior to surgery. It is recommended to contact the company representative and arrange an education session with the entire clinical team to learn about each particular implant system.
All implant handpieces are electric and need to be set up prior to the start of surgery. The electric unit can be used with any implant drill system. Dental unit water lines utilizing city water should be suspended for implant procedures. Sterile saline bags are connected to the unit, allowing saline to be pumped to the handpiece at all times during drilling of the osteotomy. Sterile saline is used to prevent the possibility of any infection caused by bacterial bioburden in regular water. As a regular handpiece uses water for cooling, the use of irrigation fluid helps to prevent overheating of the bone, which can lead to implant failure (Figure 30).37
RESTORATIVE PROTOCOL
A restorative temporization procedure immediately follows implant placement surgery. Often times, especially in the esthetic zone, immediate abutments are placed over the implant to support an immediate, temporary restoration.
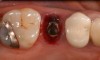
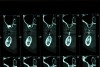
After 4 to 6 months of tissue healing and osseointegration, the final restoration is fabricated. An impression is obtained, either at implant level or at the abutment level, to fabricate the final crown. The implant-level impression records the implant position and requires precision. An impression coping is screwed onto the implant to be transferred into the impression. The copings are utilized for a closed- or open-tray technique. The closed-tray technique is used mostly with one implant, and the open-tray technique is used more frequently for multiple implants, when different implant angles exist (Figure 31 and Figure 32). With either technique, the impression material most often recommended is polyether.38 Bite registration, shade selection, and opposing models are collected in the same manner as crown-and-bridge cases.
There are different types, shapes, and sizes of abutments that are either prefabricated by the manufacturer or custom crafted by a dental laboratory technologist (Figure 33). The choice of abutment is made according to the esthetics desired, the thickness of the tissue around the implant, and the angle of the implant. It is important to note that every abutment is connected to the implant using a screw.
The crown can be cemented into place or retained by a screw over the implant. For a multiple-implant bridge or bar overdenture restoration, the framework try-in appointment is important prior to porcelain build-up or overdenture fabrication to ensure a passive fit. The fit must be confirmed by a radiograph. Framework trial appointments require a minimal setup. No anesthetic is required; however, a screwdriver for the chosen implant system is required.
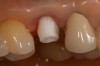
The implant prosthesis delivery appointment is similar to that of a crown or bridge delivery (Figure 34). If the prosthesis is screw-retained, then no cement is necessary and an occlusal filling material, such as composite, is necessary. After the occlusal bite registration is checked, the patient receives home care instructions regarding restoration maintenance (Figure 35).
STERILIZATION AND HANDLING
The instruments used in the dental implant placement and restoration require special care. It is important to contact a representative from the manufacturer of the implant system for specific recommendations of that particular system.
All instruments and reusable drills used in the dental implant procedure should be cleaned using an ultrasonic cleaner with an enzymatic wash. Prior to placing them in the ultrasonic bath, each drill, screwdriver, and torque wrench must be cleaned manually with a small brush to remove any blood or bone particles. The torque wrench must be disassembled if it was used in a surgical field, to remove any remaining blood and debris preventing proper sterilization and future use (Figure 36).
Some drills have an internal channel used for irrigation during surgery that acts as a cooling system. This inside drill channel is kept free of blockages by cleaning it after every surgery with an irrigation syringe and water. To prevent rusting, it is important to dry the instruments before sterilization. Dry heat, autoclave, gas, and chemiclave techniques are all acceptable methods of sterilization. It is very important to replace the drills in their proper position in the surgical kit.
The contra-angle must be cleaned first under running water. The head should be separated from the shank and both parts carefully lubricated and sterilized according to the manufacturer’s recommendations.
PATIENT MANAGEMENT
Informed Consent
The informed consent information should be presented to the patient prior to the start of treatment. Proper informed consent paperwork will list the dentist performing the treatment, the patient’s name, the expected procedures being completed, alternatives to treatment, the risks involved in performing treatment and refusing treatment, the average times for healing and possible healing complications, and the expected costs to be incurred. By signing the consent form, the patient is confirming an understanding of the treatment, the risks of treatment, and any alternative options.
A preoperative discussion with time for questions and answers is completed prior to the date of surgery. Patients may telephone with additional concerns before the surgery date. These questions should be asked and addressed in person at a follow-up consultation appointment. Additional informed consent information can be presented by any member of the dental team, after the initial consultation appointment. However, it is the doctor’s responsibility to review the risks, benefits, and alternatives with the patient prior to an implant procedure.23
It is important to update all patient medical histories at each visit to identify any health issues and the list of prescribed medications. Patients who have had a recent heart attack, complications of diabetes, mental illness, immunosuppression, and certain blood disorders may not receive a dental implant unless their physician approves the treatment.
Preoperative Preparation of the Patient
The patient should have an oral hygiene appointment within the month before the surgery to minimize the amount of plaque present at the time of surgery. A 30-second rinse immediately before surgery with 0.12% chlorhexidine mouthwash also aids in reducing the amount of bacteria present in the mouth at the time of surgery.39 Any removable appliances, such as partial dentures and retainers, are removed from the patient’s mouth prior to the rinse and surgery. Prior to implant surgery, antibiotic and anti-inflammatory medications are administered to the patient to reduce the chance of infection. One gram of amoxicillin, or 300 mg clindamycin for patients allergic to penicillin, and 600 mg of ibuprofen may be administered.
Most implant surgeries may be performed without any type of patient sedation. However, if the patient requests sedation, the risks and benefits of oral or intravenous sedation procedures should be discussed. Oral sedation is a great option for shorter procedures lasting less than 2 hours. Patients undergoing any sedation procedures must have transportation when leaving the office and this must be discussed with the patient as preoperative protocols. Patients must follow protocols concerning the pre-medications and food intake prior to surgery.
Postoperative Instructions for the Patient
Written and oral postoperative instructions must be reviewed with the patient prior to the start of surgery and again after the surgery. Having an advocate to help with immediate instructions and the return home is advised. Patients must follow all medication protocols as prescribed, especially in taking the antibiotic as directed until gone. They are advised to rest, eat soft foods, and rinse with salt water for the remainder of the day. The patient is given an ice pack to minimize swelling and a pack of sterile gauze to be used in case of minor bleeding. They should start chlorhexidine mouth rinses the second day after surgery. Chlorhexidine, the active ingredient in Peridex® or Periogard®, has been shown to inhibit the initial stages of blood clot formation; therefore, emphasis must be placed on delaying these rinses until the second day after surgery. Additional home care instructions include no smoking, using drinking straws, exercising, or directly brushing the surgical site for 1 week.
Written, postoperative instructions may also include recommended homeopathic treatments. The most common of these is the plant extract Arnica montana, which aids in decreasing bruising, swelling, and pain. This product is commonly used after plastic surgery or any other trauma. It comes in gel, cream, or sublingual pellets. The sublingual pellets are preferred for implant surgery. Only short-term use is recommended, as there are potential, undesirable side effects including tachycardia, shortness of breath, and contact dermatitis.
IMPLANT MAINTENANCE
Implants attach differently to bone than teeth. The PDL is a fibrous attachment that anchors teeth into the alveolus. When the PDL is lost or diseased, the tooth becomes loose and tender. Because implants do not rely on PDLs for attachment, even if the majority of bone is lost around an implant, no mobility is observed. Often times, the patient does not have any symptoms when peri-implantitis occurs. Therefore, it is imperative that regular dental prophylaxis appointments are scheduled. If bone loss is detected early, treatment can be administered quickly to restore health around the implants.
Home care for dental implants is the same as for natural teeth. Daily brushing and flossing are mandatory to remove plaque build-up, which can cause peri-implantitis. However, patients rely on the dental team to give them instructions on how to clean the implants. If regular floss is too small for the interproximal spaces, then proxy brushes should be recommended (Figure 37). It is necessary to offer home care instructions for every oral hygiene aid offered to a dental implant patient.
For an older patient with poor dexterity, due to arthritis for example, it may be difficult or impossible to clean using dental floss. Adjacent irrigating devices such as a Waterpik® (Water Pik, Inc., www.waterpik.com) (Figure 38) or AirFloss® (Philips Sonicare, www.usa.philips.com) (Figure 39) may be recommended for daily use for patients receiving an implant. Antiseptic rinses can be used as the irrigation in the reservoir helping to reduce the inflammation in the tissues surrounding the implant.40
IMPLANT COMPLICATION
Dental implants are the best option we have today to replace missing teeth. However, complications during treatment may arise, such as failure to osseointegrate or bone loss while in function (Figure 40).
Implant integration happens in 95% to 99% of the cases. Occasionally, gingival tissue infections occur shortly after surgery due to any one of the billions of bacteria in the oral cavity. To minimize infections, it is important for the patient to take an oral antibiotic, as well as use an antiseptic rinse from post-surgery days 2 through 7.
As mentioned earlier, dental implants require daily brushing and flossing or peri-implantitis can occur. This condition is the equivalent to periodontitis due to poor oral hygiene and lack of recare/recall visits (Figure 41). Signs of this condition include redness, bleeding upon probing, and gingival pocketing.
Geriatric patients, patients with osteoporosis, and those receiving treatment for certain cancers, have a higher incidence of implant failure due to decreased bone density. With these groups of patients, their physician often prescribes bisphosphonate drugs, such as Boniva® and Zometa®. These drugs can interfere with normal bone healing and prevent necessary osseointegration. This condition is called osteonecrosis of the jaw (ONJ). Patients taking these types of drugs for other health conditions should not be recommended for dental implants.41
Mechanical complications include loosening of screws, fractured screws, and even fractured implants due to force overload. However, the incidence of fixture fracture has been reported to be less of an issue than that of tooth fracture13 (Figure 42 through Figure 43).
SUMMARY
Dentistry has advanced significantly in the area of dental implant technology. Dental implants offer same-day tooth replacement options. After a few months of tissue healing, osseointegration, and final crown delivery, patients will have a fixed restoration that enhances their oral health function and esthetic appearance.
Many patients struggle with ill-fitting removable full and partial dentures. The resulting conditions of periodontal bone loss, malnutrition, and overall low self-esteem can occur. Fortunately, better options exist with today’s implant technology. As patients are counseled on dental implant procedures, they can be assured that with basic home care protocols, their dental implant investment can have a high rate of success. Furthermore, implants will not decay once osseointegrated, so crowns do not need to be replaced due to recurrent caries (Figure 44).
Every patient must understand the importance of having any dental treatment. Dental professionals must comprehend all implications involved in implant kit choices and the pre- and postoperative procedures. This knowledge enhances the advocacy for single-tooth implants and implants that allow for a well-fitting overdenture. Patients count on dental team members to educate them on all choices to replace missing teeth, and dental implants are recommended as the standard of care for patients.
About the Author
Sanda Moldovan, DDS, MS, CNS, specializes in dental implants, periodontics, and integrative nutrition. She is in private practice and lectures on dental implants in the Continuing Education Department at the University of California at Los Angeles School of Dentistry. She is a regular on “The Doctors” on CBS and has appeared on several other television networks. Dr. Moldovan is a Diplomate of the American Academy of Periodontology. She continues to stay involved and up-to-date with the latest research and technology available in her field, including laser techniques and stem cell bone grafting techniques.
REFERENCES
1. Millennium Research Group Report: US Markets for Dental Implants; 2006.
2. Ring ME, Dentistry: An Illustrated History. New York, NY: Harry N. Abrams, Inc.; 1985, and St. Louis, MO: The CV Mosby Co.; 1985.
3. Ring ME. A thousand years of dental implants: a definitive history. Part 1. Compend Contin Educ Dent. 1995;16(10):1060-1064.
4. Worthington P, Lang BR, LaVelle WE. Osseointegration in Dentistry: An Introduction. Hanover Park, IL: Quintessence Publishing Co, Inc.; 1994..
5. Goldberg NI, Gershkoff A. The implant lower denture. Dent Dig. 1949:55(11): 490-494.
6. Bodine RL, Yanase RT, Bodine A. Forty years of experience with subperiosteal implant dentures in 41 edentulous patients. J Prosthet Dent. 1996;75(1):33-44.
7. James RA, Truitt PH, Foust BE, et al. Subperiosteal implants. J Calif Dent Assoc. 1988;1:10-14.
8. Small IA. The mandibular staple bone plate. Its use and advantages in reconstructive surgery. Dent Clin North Am. 1986;30(2):175-187.
9. Small IA, Misiek D. A sixteen-year evaluation of the mandibular staple bone plate. J Oral Maxillofac Surg. 1986;44(1): 60-66.
10. Linkow LI, Mahler MS. Validating the endosteal blade-vent implant. Oral Health. 1975;65(11):16-23.
11. Kapur KK. Veterans Administration cooperative dental implant study, Part I: Methodology and comparisons between treatment groups at baseline. J Prosth Dent. 1987;58: 499-512.
12. Kapur KK. Veterans Administration cooperative dental implants study, Part II: Comparisons of success rates and periodontal health between two treatment modalities. J Prosth Dent. 1987;62: 685-703.
13. Brånemark PI, Zarb GA, Albrektsson T. Tissue-Integrated Prostheses: Osseointegration in Clinical Dentistry. Chicago, IL: Quintessence Publishing Co, Inc.; 1985.
14. Nobel Biocare. The story about an invention that makes people smile. Sweden: Nobel Biocare; 2005.
15. Brånemark PI, Hansson BO, Adell R, et al. Osseointegrated implants in the treatment of the edentulous jaw. Experience from a 10-year period. Scand J Plast Reconstr Surg Suppl. 1977;16:1-132.
16. Kay JF. Calcium phosphate coatings: understanding the chemistry and biology and their effective use. Compend Cont Educ Dent. 1993;15(Suppl):S520-S525.
17. Gottlander M, Albrektsson T. Histomorphometric studies of hydroxyapatite-coated and uncoated CP titanium threaded implants in bone. Int J Oral Maxillofac Implants. 1991;6(4):399-404.
18. Albrektsson T, Sennerby L. Direct bone anchorage of oral implants: clinical and experimental considerations of the concept of osseointegration. Int J Prosthodont. 1990;3(1):30-41.
19. Levandowsky JA, Johnson CM. Structural failure of osseointegrated implants at the time of restoration. A clinical report. J Prosth Dent. 1989;62(2):127-129.
20. Tufekci, E, Brantley WA, Mitchell JC, McGlumphy EA. Microstructures of plasma-sprayed hydroxyapatite-coated Ti-6Al-4V dental implants. Int J Oral Maxillofac Implants. 1997;12(1):25-31.
21. ADA Council on Scientific Affairs. Dental endosseous implants: an update. J Am Dent Assoc. 2004;135(1):92-97.
22. Von Wowern N, Gotfredsen K. Implant-supported overdentures, a prevention of bone loss in edentulous mandibles? A 5-year follow-up study. Clin Oral Implants Res. 2001;12(1):19-25.
23. Misch CE. Contemporary Implant Dentistry. 3rd ed. 2008: Philadelphia, PA: Elsevier, Inc.;1101.
24. Palma-Carrio C, Maestre-Ferrin L, Penarrocha-Oltra D, et al. Risk factors associated with early failure of dental implants. A literature review. Med Oral Patol Oral Cir Bucal. 2011;16(4):e514-517.
25. Minsk L. Interim implants for immediate loading of temporary restorations. Compend Contin Educ Dent. 2001;22(3):186-194.
26. Mazor Z. Using transitional implants for immediate fixed temporary prostheses. [Interview]. Dent Implantol Update. 2000;11(4):29-31.
27. Creekmore TD, Eklund MK. The possibility of skeletal anchorage. J Clin Orthod. 1983;17(4):266-269.
28. Singh K, Kumar D, Bansal A. Temporary anchorage devices - Mini-implants. Natl J Maxillofac Surg. 2010;1(1):30-34.
29. Sung J-H, Kyung H-M, Bae S-M, et al. Microimplants in Orthodontics. Daegu, Korea: Dentos; 2006.
30. Sevetz E. Treatment of the severely atrophic fully edentulous maxilla: the zygoma implant option. Atlas Oral Maxillofac Surg Clin North Am. 2006:14:121-136.
31. Meskin L, Brown J. Prevalence and patterns of tooth loss in US adult and senior populations. Int J Oral Implantol. 1988;5(1):59-60.
32. Scurria MS, Bader JD, Shugars DA. Meta-analysis of fixed partial denture survival: prostheses and abutments. J Prosthet Dent. 1998;79(4):459-464.
33. Priest GF. Failure rates of restorations for single-tooth replacement. Int J Prosthodont. 1996;9(1):38-45.
34. Aquilino SA, Shugars DA, Bader JD, White BA. Ten-year survival rates of teeth adjacent to treated and untreated posterior bounded edentulous spaces. J Prosthet Dent. 2001;85(5):455-460.
35. Tarnow DP, Emtiaz S, Classi A. Immediate loading of threaded implants at stage 1 surgery in edentulous arches: ten consecutive case reports with 1- to 5-year data. Int J Oral Maxillofac Implants. 1997;12(3):319-324.
36. Feine JS, Carlsson GE, Awad MA, et al. The McGill consensus statement on overdentures. Mandibular two-implant overdentures as first choice standard of care for edentulous patients. Montreal, Quebec, May 24-25, 2002. Gerodontology. 2002;19(1):3-4.
37. Piattelli A, Piattelli M, Mangano C, Scarano A. A histologic evaluation of eight cases of failed dental implants: is bone overheating the most probable cause? Biomaterials. 1998;19(7-9):683-690.
38. Assif D, Fenton A, Zarb G, Schmitt A. Comparative accuracy of implant impression procedures. Int J Periodontics Restorative Dent. 1992;12(2):112-121.
39. Veksler AE, Kayrouz GA, Newman MG. Reduction of salivary bacteria by pre-procedural rinses with chlorhexidine 0.12%. J Periodontol. 1991;62(11):649-651.
40. Levin RP. Waterpik dental water jet: creating value for your patients. Compend Contin Educ Dent. 2009;30(Spec No 1):20-21.
41. Etminan M, Aminzadeh K. Bisphosphonates and ONJ. J Am Dent Assoc. 2008;139(5):535-536.