You must be signed in to read the rest of this article.
Registration on CDEWorld is free. Sign up today!
Forgot your password? Click Here!
The creation of a successful restoration is dependent upon proper planning and meticulous clinical processes. Therefore an understanding of impression techniques is fundamental.1 Terry et al call the impression “the foundation and blueprint to restorative success for indirect restorations” and say the “art of impression taking requires recording the exact dimensions of the preparation, the position of the soft tissue, the architecture of the margins of the preparation, and the relationship of the prepared teeth to the surrounding dentition.”2
Describing their own technique for achieving predictably accurate impressions, Paquette and Sheets summarized the “key issues for success” as involving “moisture control, atraumatic tissue retraction, cleanliness of the tooth preparation and associated tissues, avoidance of air entrapment, avoidance of material tearing or distortion upon removal, and adequate inspection of the impression after removal to ensure complete accuracy.”3
Material Characteristics
The first step in achieving these objectives involves selecting the correct material from among the wide variety of impression materials—each of which has its own advantages and disadvantages. This calls for consideration of material characteristics, chiefly viscosity, hydrophilicity, and setting time.
Viscosity
Impression materials are supplied in four viscosities. American Dental Association (ADA) Specification 19 determines viscosity by measuring the diameter of 1 ml of impression material placed between two glass plates with a standard weight applied; the larger the diameter of the disc of impression material, the lower the viscosity.4 Materials with low viscosity have high flow and those with high viscosity have low flow. The viscosity of the material determines how it is dispensed—eg, by syringe, paste tray, automix cartridge (Figure 1) and it increases with the proportion of filler.5
The low-viscosity materials—also known as light body, syringe, or wash materials—flow easily into and record fine details; they are generally used in conjunction with a second more viscous material.2 Medium-viscosity materials are known as monophase, high are known as heavy body or tray material, and very high are known as putty.4
Hydrophilicity
Impression materials are also characterized by their degree of hydrophilicity, which describes their affinity for moisture. Those that are hydrophilic (ie, moisture loving) absorb water; hydrophobic materials do not absorb water; and those that are hydroactive (rendered hydrophilic) displace moisture from tooth and tissue surfaces but do not absorb it.5
Moisture compatibility significantly impacts the material’s ability to record surface detail accurately in the intraoral environment. Hydrophilic materials have a high affinity for moisture, provide good surface wetting, and allow for a high degree of surface detail. Hydrophobic impression materials have a low affinity for moisture (high contact angle), provide poor surface wetting, and result in a lower degree of surface detail.6,7
Hydroactive impression materials are normally hydrophobic and are rendered hydrophilic through the addition of surfactants. These materials provide excellent surface wetting (low contact angle) as well as a high degree of surface detail.6
Setting Time
The setting time for an impression material is the total time from the start of the mix until the impression material has completely set and can be removed from the oral cavity without distortion. The working time is measured from the start of the mix until the material can no longer be manipulated without introducing distortion or inaccuracy in the final impression.6 The impression material must be completely mixed and seated in position before the end of the working time.2 This period ranges from slow, to regular to fast; it may also be variable due to the effects of temperature, humidity, and how the material is mixed.8
Tear Resistance and Elastic Recovery
Impression materials should have tear resistance and elastic recovery—that is, enough strength to allow removal without tearing along with the ability to recover to its pre-stressed shape. A material with higher tear energy confers better resistance to tear for the impression.9,10
Tear resistance and elastic recovery are important in preserving the accuracy of the impression during intraoral removal and after cast separation. Materials with sufficient tear resistance and elastic recovery will withstand multiple pours, producing several accurate casts, which is a major advantage in contemporary restorative dentistry.2,7
Dimensional Stability
The ability of an impression to accurately replicate the intraoral structures depends on its dimensional stability. The reasons for dimensional changes in elastomeric impression materials include a reduction in spatial volume caused by contraction from polymerization, reduction in set volume from liberation of by-product or accelerator components, water absorption from wet or varying humidity environments, and changes in temperature.7,11
Impression Materials
There are many different types of impression-taking materials, including alginates (reversible and irreversible hydrocolloids); polysulfides; polyethers; silicones (C-silicone and A-silicone); vinyl-polyether; vinyl-polyether hybrids; and polyvinyl siloxane).4 All have advantages and disadvantages. The choice of impression materials depends mainly on personal preferences, handling, and the impression techniques used.5 Generally speaking, those most commonly used for final impressions fall into one of two broad categories—polyether (PE) and polyvinyl siloxane (PVS), which is currently most popular.2,3
In describing the “ideal impression material,” Burgess listed numerous features including excellent flow, long working time, short setting time, long shelf life, good tear strength, no distortion when removed from the mouth, and the ability to demonstrate excellent detail reproduction. He further specified that it should not shrink during polymerization, shipping, or storage, and it should be biocompatible and non-toxic, with an acceptable odor and taste. However, he added, no single material yet meets all these requirement.4
Alginates
The advantages of alginates, which are very hydrophilic, include that they are easily mixed and manipulated; are cost effective in larger amounts; and do not have an unpleasant taste or odor. However, they are time-consuming and technique-sensitive, and must be poured immediately and only once. In addition, they provide fewer surface details than other methods.13
Polysulfide Rubber (Polysulfides)
Polysulfides, which are slightly hydrophilic, are inexpensive, antibacterial, and highly resistant to tears, as well as offering a long working time. They also provide good wettability and good reproduction of detail. Their negatives include an unpleasant taste and odor and a long setting time. Further, they are messy to mix and manipulate, must be poured within an hour, and are subject to high distortion.14
Polyether Rubber (Polyethers)
The advantages of polyethers, which are considered hydrophilic, include low polymerization shrinkage, long-term dimensional stability, multiple accurate pours, hydrophilicity, highly accurate surface detail, elastic recovery, minimal distortion on removal, adequate tear strength, and good shelf life. The disadvantages include unpleasant taste and odor, rigidity (sets to a stiff consistency), difficult intraoral removal and cast separation, and expense.15
Hydrocolloids—Condensation Silicones (C-silicones)
Hydrocolloids C-silicones—ie, condensation silicones—are the traditional silicones. Offering adequate working and setting time, they have a pleasant odor, are non-staining, demonstrate adequate tear resistance, and permit easy removal from the mouth. With them, working and setting times can be controlled. However, they have a short shelf life and poor dimensional stability, in addition to being technique sensitive and time-consuming to mix, handle, and clean up. C-silicones are also slightly more expensive and must be poured immediately.5,16
Hydrocolloids—Addition Silicones (PVS)
Hydrocolloids A-silicones, which are hydrophilic, offer numerous additional advantages including adequate tear resistance, extremely high precision, and minimal distortion on removal. They are dimensionally stable, very compatible with gypsum, have variable set times, and can be used with automated mixing devices.2,3,4,16 Negative features include their need for a dry field and sensitivity to sulphur/latex contamination. Some give off hydrogen as a byproduct.2,4,16
Material Dispensing Systems
The choice of a material dispensing system is determined mainly by viscosity. The most commonly chosen, paste/paste, comes as a base paste and catalyst paste, which are mixed together manually and placed in a tray or syringe. Low or medium viscosity materials are typically dispensed in automix cartridges—ie, a disposable two changer plastic cartridge with base and catalyst pastes. For heavy tray materials, a dynamic mixing machine, a motorized mixing device with two chambers for the two products, is appropriate. It comes with a disposable dynamic mixing tip. Putty/putty materials come in separate tubs.
Impression Tray Selection and Preparation
The appropriate tray—one that fits accurately and passively in the mouth—is selected based on indication, material type, and case size.3,16 Different types of ready-made stock trays include double-arch (triple or cross-bite trays) for cases limited to one to two units; partial arch or quadrant trays for one-or two-unit cases; and full-arch for all size cases. Many dentists prefer custom impression trays to improve accuracy.3 In either case, trays should be rigid and have the capacity to support the impression material.17 To properly capture details of the tooth or tissue without distortion or tearing, there should be a minimal thickness of impression material8 (Figure 2). However, there should be at least 2 mm to 3 mm between the tray and the areas to be impressed.8
Tray adhesive, which is material-specific, may be needed to properly stabilize and bond material to the tray. The adhesive should be applied to the tray 15 minutes before the impression procedure to allow for complete drying and effectiveness of the material.3
Treatment Area Preparation
As well fitting restorations that support periodontal health are the objective of impressions, careful tooth and tissue preparation are essential prerequisites.
Margin Placement and Design
Margins can be placed subgingivally, supragingivally, or epigingivally3 (but never right at the free gingival margin) using a beveled, chamfer, feather-edge, shoulder, or modified shoulder design.18 To preserve biologic width for periodontal health, the recommended distance from the crest of the alveolar bone to the base of the gingival sulcus is 2.04 mm—that is, 1.07 mm for the supra-alveolar connective tissue attachment, and 0.97 mm for the junctional epithelium.19
The dentist should also take care to create an “impressible preparation” through the optimal amount of buccal, interproximal, lingual, and occlusal reduction of the prepared tooth,8 which plays an important role in overall fit, esthetics, and long-term periodontal health of the prosthetic restoration.
Finally clinicians should always be aware of the potential undercuts in the area being impressed, as the impression material must be drawn over them without causing permanent distortion. They should therefore take care to select impression materials and techniques that will help address them.5,20
Tissue Retraction and Hemostasis
Best practices also require that the gingiva around the prepared teeth be displaced and bleeding controlled. The three categories of techniques for tissue retraction—both to expose prepared margins and control bleeding—include mechanical, chemico-mechanical, and surgical.21
Mechanical displacement involves physically moving the gingival tissues aside from the tooth/tooth preparation margins to allow for visualization and access for treatment. Among the most popular methods of gingival displacement is the use of a single or double gingival retraction cord (Figure 3), the choice of which is based on personal preference in materials and whether or not it is impregnated with chemicals.3
While hemostasis may be achieved as a result of pressure from the retraction cord alone, it is often accomplished through chemico-mechanical displacement—ie, combining chemical action with packing of a retraction cord. A variety of chemical solutions and gels have been recommended for use with gingival retraction cords because of their properties to act as an astringent or hemostatic agent. Common astringent-hemostatic agents include ferric sulfate, aluminum chloride, racemic epinephrine, aluminum potassium sulfate, aluminum sulfate, and zinc phenolsulfonate/racemic epinephrine.22
While the gingival retraction cord is widely considered the most effective method for retracting tissue to the depth of the sulcus, sometimes, gingival bleeding is difficult to control. When a cord is packed into the sulcus, the tissues may start to bleed, rendering impression-taking difficult or impossible. For this reason, there are also cordless devices that provide for non-traumatic, non-invasive tissue management and hemostasis in the gingival sulcus. These materials and techniques can be used by themselves or in combination with the use of gingival retraction cord, electrosurgery, or laser tissue sculpting when bleeding is difficult to control.22
To facilitate impression-taking, clinicians can use electrosurgery or laser surgery to remove excess soft tissue to expose of the preparation margin when it is time to take the final impression. In addition, they can perform gingivectomies with either an electrosurge or laser to deal with excessive and/or irritated soft tissue.23
Impression-Taking Techniques
The three main impression-taking techniques are categorized by the number of required steps and materials. All have respective advantages and disadvantages and indications.24
1-Step, 1 Material
The simplest of the techniques, monophase requires one step and one material—preferably a medium-viscosity material—which acts as both a tray and wash material. After the base and catalyst are mixed, a portion of material is placed into a syringe; the remainder is placed in a tray. The material is syringed around the preparation and into the sulcus, after which the filled tray is seated in the patient’s mouth, where it is held in place until it sets fully, then withdrawn and evaluated.25
1-Step, 2 Materials
This technique requires one step but two materials, which are individually mixed, then used in a single step. Here the heavier material acts as a base and the light wash records fine detail. If the preliminary material is a paste, the method is called “double-mix;” if putty, it’s called “sandwich.”25
The steps involved are as follows: The heavy material or putty is mixed and dispensed in the tray. A groove is then pressed into the material to accommodate the teeth. Next, the wash is placed in the groove, then syringed around preparation margins and into the sulcus. The impression tray is placed in the patient’s mouth and held in place until it sets fully. Finally, it is withdrawn and evaluated.25
2 Materials – 2 Steps
With this method, there are two different impression materials and two separate steps—for example, initially, a high-viscosity/putty impression is taken, then a final impression with a light wash material. The preliminary impression must be thoroughly relieved to eliminate possible undercuts and to create a uniform space for the wash.5,8
Both special relief and contamination protection can be automatically achieved by placing a soft plastic separating sheet over putty materials before taking the final impression.25
The initial impression is taken in a stock tray with high-viscosity or putty material, which is shaped into a groove in the tray to accommodate teeth. The impression tray is held in place until intraoral setting time has elapsed. The preliminary impression is withdrawn from the mouth, rinsed under running water, and thoroughly relieved to eliminate undercuts. Wash is applied to putty in the tray and syringed around preparation margins and into the sulcus. The impression tray is then placed in the patient’s mouth—initially with pressure—then held in place until fully set, then withdrawn and evaluated.25
Setting, Removal, Inspection
During the polymerization/setting phase, the impression tray should be left in an undisturbed, steady position for the appropriate amount of time—the use of a timer is advisable—until the material is completely polymerized. Then, to prevent distortion, a quick snap motion should be used to remove the impression tray from the mouth.3
Whatever the material, instructions generally recommend that the impression tray be withdrawn parallel to the axes of the preparations. For lower posterior preparations, the impression should be first released from the prepared teeth toward the vestibule; the region of rotation is then in the contralateral vestibule. For upper posterior preparations, the impression is first released from the contralateral vestibule before being withdrawn parallel to the axes of the preparations. For anterior preparations, the impression is first released bilaterally from the dorsal vestibule before being withdrawn parallel to the axes of the preparations.
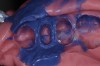
After removal, the impression should be thoroughly inspected for evidence of voids, distortions, or other defects, using oculars or a microscope, if possible to ascertain the presence of margin detail, with impression material extending beyond the preparation margins (Figure 4). In the event of inaccuracies, such as those seen in Figure 5 and Figure 6), Paquette and Sheets recommend immediately taking a second impression—with or without the removal of the deeper/sulcular cord—to take advantage of the tissue displacement.3
Digital Dentistry
While the vast majority of clinicians continue to use the traditional impression-making methods described, a growing number of dentists are foregoing the use of impression trays and materials in favor of digital impression devices, which use an intraoral scanner to capture digital images of the preparation and surrounding area. However, it is important to understand that regardless of the method used to create the master model (Figure 7 and Figure 8), the criteria for success—that is precise soft tissue management and tooth preparation—remain essential prerequisites, because if the device cannot “see” the preparation margin, it cannot capture it.8,23
So-called “scan-optimized impressions” can be a bridge between standard impressions and the digital workflow. Such impressions enable clinicians who have not yet embraced digital impression-taking to take advantage of digital dentistry benefits, including the ability to immediately verify the accuracy of the master model at high magnification on a high-resolution monitor, thus enabling them to immediately pour a second impression, if necessary, and avoid costly and inconvenient delays and patient visits.
Conclusion
Practitioners using innovative impression materials and precise techniques can create excellent impressions that can then be “digitized” via the use of an extraoral scanner (Figure 9 through Figure 11). Clinicians—most of whom have already incorporated technology into their practice management systems—can thus enter the digital workflow process without major training or investment.
References
1. Bhakta S, Vere J, Calder I, Patel R. Impressions in implant dentistry. Br Dent J. 2011 Oct 21;211(8):361-367. [Abstract]
2. Terry DA, Leinfelder KF, Lee EA, et al. The impression: a blueprint to restorative success. Inside Dentistry. 2006;2(5). http://www.dentalaegis.com/id/2006/06/restorative-dentistry/the-impression-a-blueprint-to-restorative-success. Accessed October 9, 2013.
3. Paquette JM, Sheets CG. An Impression Technique for Repeated Success. Inside Dentistry. February 2012;8(2). http://www.dentalaegis.com/id/2012/02/an-impression-technique-for-repeated-success. Accessed October 9, 2013.
4. Burgess JO. Impression material basics. Inside Dentistry. 2005;1(1). http://www.dentalaegis.com/id/2005/10/impression-material-basics. Accessed October 6, 2013.
5. Hamalian TA, Nasr E, Chidiac JJ. Impression materials in fixed prosthodontics: influence of choice on clinical procedure J Prosthodont. 2011 Feb;20(2):153-160.
6. Pitel ML. Successful Impression Taking. First Time. Everytime. Armonk, NY: Heraeus Kulzer; 2005.
7. Lee EA. Impression material selection in contemporary fixed prosthodontics: technique, rationale, and indications. Compend Contin Educ Dent. 2005;26(11):780-789.
8. Cranham JC. Making accurate master impressions. Inside Dentistry. 2012;8(6). http://www.dentalaegis.com/id/2012/06/making-accurate-master-impressions. Accessed September 30, 2013.
9. Chai J, Takahashi Y, Lautenschlager EP. Clinically relevant mechanical properties of elastomeric impression materials. Int J Prosthodont. 1998;11(3):219-223.
10. Hondrum SO. Tear and energy properties of three impression materials. Int J Prosthodont. 1994;7(6):517-521.
11. Mandikos MN. Polyvinyl siloxane impression materials: an update on clinical use. Aust Dent J. 1998;43(6):428-434.
12. Lu H, Nguyen B, Powers JM. Mechanical properties of 3 hydrophilic addition silicone and polyether elastomeric impression materials. J Prosthet Dent. 2004;92(2):151-154.
13. Pandula V. Alginate impression material. Junior Dentist Website. http://www.juniordentist.com/alginate-impression-material.html. Accessed October 11, 2013.
14. Pandula V. Polysulfide elastomeric impression materials. Junior Dentist Website. http://www.juniordentist.com/polysufide-impression-material.html. Accessed October 11, 2013.
15. Pandula V. Elastomeric impression materials. Junior Dentist Website. http://www.juniordentist.com/elastomeric-impression-materials.html. Accessed October 11, 2013.
16. Pandula V. Silicon elastomeric impression materials. Junior Dentist Website. http://www.juniordentist.com/silicone-impression-material.html. Accessed October 11, 2013.
17. Hoyos A, Soderholm KJ. Influence of tray rigidity and impression technique on accuracy of polyvinyl siloxane impressions . Int J Prosthodont. 2011;24(1):49-54.
18. Shenoy A, Shenoy N, Babannavar R. Periodontal considerations determining the design and location of margins in restorative dentistry. J Interdiscliplinary Dent. 2012;2(1):3.
19. Nugala B, Santosh Kumar BB, et al. Biologic width and its importance in periodontal and restorative dentistry. J Conserv Dent. 2012;15(1):12–17.
20. Kurtzman GM. Creating great dental impressions. Inside Dental Assisting. 2012;8(1). http://www.dentalaegis.com/ida/2012/02/creating-great-dental-impressions. Accessed September 30, 2013.
21. Levartovsky S, Masri M, Alter E, Pilo R. Tissue displacement and impression techniques--part 1. Refuat Hapeh Vehashinayim. 2012 Jul;29(3):19-27, 55. [Article in Hebrew]
22. Strassler HE, Boksman L. Tissue Management, gingival retraction and hemostasis. Oral Health Group. http://www.oralhealthgroup.com/news/tissue-management-gingival-retraction-and-hemostasis/1000519731. Accessed 10/1/2013.
23. Radz GM. The key to the perfect impression. Inside Dentistry. 2010;31(6).
24. Levartovsky S, Zalis M, Pilo R, et al. The effect of one-step vs. two-step impression techniques on long-term accuracy and dimensional stability when the finish line is within the gingival sulcular area. Prosthodont. 2013 Jun 4. doi: 10.1111/jopr.12062. [Epub ahead of print][abstract].
25. Nissan J, Rosner O, Bukhari MA, et al. Effect of various putty-wash impression techniques on marginal fit of cast crowns. Int J Periodontics Restorative Dent. 2013 Jan-Feb;33(1):e37-42.
About the Author
Howard E. Strassler, DMD
Professor and Director of Operative Dentistry
University of Maryland Dental School
Baltimore, Maryland