You must be signed in to read the rest of this article.
Registration on CDEWorld is free. Sign up today!
Forgot your password? Click Here!
Dentists take for granted that activating a light-curing device will reliably and predictably light-cure the materials they are using. There are important factors that need to be taken into account when light-curing resin adhesives, resin-based composites, resin cements, and other light-activated restorative materials to ensure the quality and durability of the restorations being placed. Clinicians have choices in the light-curing devices they use. Not all light-curing devices are equivalent in their features, such as power density, energy delivered to the tooth and the restorative being placed, timing, availability of accessories, configuration of curing probes/tips, and energy source to power the device, among others. Also, recent research demonstrates that orientation and diameter of the light probe tip can have a significant impact on the degree of light-curing producing better physical properties, as well as improved adhesion to tooth substrates.1-9 While practitioners are looking for time savings when light-curing, shorter timed increments for light-curing when placing restorations may not be the best choice.
Light-curing resin composites were introduced in restorative dentistry in 1969. The earliest light-cured materials were photopolymerized with ultraviolet light-polymerizing devices. This era of command set of composite resins was paralleled with the introduction of adhesive bonding of composites to enamel. These early curing lights had limited depth of cure within the composite resin and through tooth structure due the shorter wavelengths (10 nm to 380 nm) of UV radiation energy. These limitations translated into extended times for light-curing (minutes) using small increments of composite, 1 mm at a time.
In the mid to late 1970s, UV light-curing devices were phased out and replaced with visible light-curing devices that used photosensitive chemistries in the 460 nm to 480 nm wavelength, typically camphorquinone (CQ) for polymerization of composites.10 The longer wavelengths of this visible light spectrum allowed for a more penetrating curing light and light energy. These light-curing devices needed to be plugged into an electrical outlet. Light energy was delivered to the tooth and restoration with tethered liquid-containing cables or fiber-optic cables with light guides attached or with light-transmitting tips directly connected to an all-inclusive housing handle containing the bulb and cooling fans.
The earliest visible light devices used broader-light-spectrum, quartz-tungsten-halogen bulbs (QTH) that were filtered to limit heat (heat was also controlled with fans within the device housing) and narrow the spectrum of wavelength of the light delivered by the tip of the light guide (end of the light-transmitting device) to the violet-blue range. The violet-blue range of 400 nm to 500 nm matches the light-absorption range of CQ, the primary photoinitiator of resin-based composites. This increased energy of photopolymerization ushered in an era of improved physical properties with resin-based composites that were set by exposure to relatively safe, high-intensity light sources. It has been reported that a minimum light-energy output of 300 mW/cm2 is necessary to cure a 2-mm-thick composite resin specimen.11 Typically, these curing lights delivered energy-density outputs of 400 mW/cm2 to 800 mW/cm2.12
In the 1990s, there were significant improvements in the devices used for light-curing. QTH devices had improvements that increased the energy delivered to the restorative material. Most QTH curing lights delivered at least 600 mW/cm2 and, in some cases using specialized turbo tips, more than 1,300 mW/cm2.13 Even with improvements in energy output, there were still some drawbacks to QTH devices that included size and weight of the curing devices, heat generated by the bulb, excessive noise generated by the cooling fans, decrease in energy output over time of bulb use, and the requirement for most units to be plugged into an electrical outlet. At the same time, high-intensity light sources for resin-based composite curing, plasma-arc curing (PAC), were introduced. PAC lights have photo-spectrum emissions in the range of 400 nm to 500 nm. PAC lights use an intense light source (a fluorescent bulb containing plasma), which produces the highest energy output of any light-curing device allowing for shorter curing times.10 An exposure time of 10 seconds with a PAC light is equivalent to a 40-second exposure with QTH.14 Disadvantages to high-energy, faster-curing PAC lights include the devices being large and heavy with a housing that must have adequate ventilation and a large enough and sometimes very loud fan to cool the unit. A comparison of QTH- and PAC-cured composite resins demonstrated variation based on the composites and individual lights for different physical properties. There was no one light that performed uniformly better than the others.15-17
A significant change in how resin-based composites were light-cured occurred in the late 1990s with the introduction of light-emitting diodes (LED) that provided light in the blue-visible spectrum with a range of 450 nm to 490 nm.12,18 The first-generation LED curing devices had low energy outputs. Currently, the latest generation of LED curing devices provide consistent energy outputs of greater than 1,000 mW/cm2.19,20 The benefits of the latest generation of LED curing lights include:
- Consistent, constant, and higher light-energy output through the life of the emitter.
- More practitioner-friendly because of many having lightweight cordless features with rechargeable batteries or, for corded devices, a lightweight ergonomic design; in some cases, hybrid lights that can be either corded for electrical outlet plug-in or cordless.
- Either a heat sink or smaller and quieter fan to cool the LED.
- Incorporation of broader light spectrum and multiple LEDs to ensure more complete photopolymerization of resin-based composites using both CQ and other photoinitiators.
- More useful light transmitted in the 410-nm to 490-nm range or between the 450-nm to 490-nm range because there is no need to provide filters for the light source.10,18
Even though LED curing lights are a positive development for photopolymerization of composites, there are some considerations that must be taken into account. Know the light spectrum of the LED and the photoinitiator of the resin-based composites and adhesives being used. Though most composites are cured in the spectrum of 450 nm to 480 nm, ask the manufacturer’s representative about the photoinitiator(s) of the restorative materials.21,22 For battery-powered units, there has been a concern expressed about possible power drop-off over time based on the number of cycles the unit has been used. Two research studies evaluating a wide number of LED curing lights reported that cordless, rechargeable LED curing lights had no significant decrease in power as the battery life approached its end point.23,24
Polymerization Stress and Light-Curing
Polymerization shrinkage of resin-based composite has prompted investigations into how composites are cured. A number of light-curing techniques have been proposed to minimize polymerization shrinkage and shrinkage stresses during restoration placement. The focus of stress reduction during composite polymerization is based upon the C (configuration)-factor, which is defined as the effect of cavity preparation design on the polymerization shrinkage of composite resin.24-26 C-factor is the ratio of bonded surfaces to unbonded or free surfaces of the tooth preparation. The higher the C-factor, the greater for potential disruption of the bond due to polymerization shrinkage of the composite. To control polymerization shrinkage and shrinkage stresses of RBC, several techniques for light-curing have been described. These include soft-start polymerization, ramped light-curing, staged (delayed) curing and pulse-delay curing.10 The research and acceptance of these techniques has been not been clear cut.27-29 To control polymerization shrinkage and shrinkage stresses, the incremental placement of composite resin has been recommended.30,31
Improve Clinical Results through Light-Curing
Currently, the latest generation of QTH, PAC, and LED curing lights are significantly better than what has been available in the past. Once the cavity preparations are completed, restorative materials should be placed following a step-by-step technique. Lack of attention to detail in any composite placement steps can have a direct impact on restoration durability and clinical success. In the author’s experience, the use of the curing light during restoration placement can have one of the greatest impacts on the restorations. Do dentists take light-curing for granted? The status of adhesion to tooth structure, the optimization of the physical properties of composite resins to resist the forces of occlusion and mastication that can cause fracture, to resist microleakage, sensitivity, and recurrent caries, to resist wear in function, to be polished, to maintain their luster and color are all dependent on proper light-curing techniques.1-9 By following specific guidelines, a clinician can ensure maximum polymerization of the light-cured restorative materials that are being placed.32
Light Guide Placement When Polymerizing Restorations
In recent years, some manufacturers have made claims of “5 second” light-curing. If fact, some manufacturers claim that their composite resins can be cured to depths greater than 5 mm. This is not the case; in fact, shorter light-curing times for areas of cavity preparations greater than 4 mm to 6 mm from the light tip require additional light-curing.33
There is a significant challenge when light-curing Class II composite resins to the gingival margin of the proximal box. Clinical evidence has demonstrated that Class II composite resins have significantly higher rates of caries at the gingival margin when compared to amalgam restorations.34-36 Reasons for these significant differences in caries rates at the gingival margins of Class II composite resins can be related to technique sensitivity of some dentin bonding systems, polymerization shrinkage of composite resin, challenges in techniques placing highly viscous composite resin into proximal boxes without trapping air bubbles leading to poor marginal adaptation, contamination of the tooth surfaces due to poor isolation of the field, poor polymerization of the resin adhesive and composite due to inadequate output of a curing light,37,38 and distance of the light guide from the gingival margin.39-41
Light-curing may in fact be a significant culprit for premature failure of Class II composite resins at the gingival margin of the proximal box. The gingival margin area is the high-risk area for recurrent caries. This is the site where caries for Class II defects first initiates. Xu and coworkers investigated the adhesion of composite resin as the distance from the light guide increased. Their investigation was prompted by the number of studies demonstrating poor marginal seal and increased microleakage at the gingival margin of these restorations when compared to the occlusal enamel margins. Their conclusion was that when curing adhesives in deep proximal boxes with a curing light of 600 Mw/cm2, the curing time should be increased to 40 to 60 seconds to ensure optimal polymerization.42 Others have also made similar recommendations for increase in curing time even with curing lights with greater than 1,000 Mw/cm2 for initial increments of composite resin placement in proximal boxes.15,33
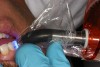
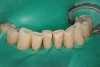
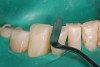
A number of studies have investigated the ability to light-cure composite resins based on the position of the curing light.43-45 While many preparations provide for excellent clinical access for curing lights, there are hard-to-reach areas of the oral cavity. In some cases, the curing light tip itself is a limiting factor to how close the light can get to the surfaces being light-cured and whether or not it has the correct orientation. In fact, dentists and dental assistants (many who hold the light and activate it) are not well trained in the art and science of light-curing. One only has to read articles on clinical techniques that require light-curing to see that typically the only reference to light-curing in the article is to “light cure for (fill in a number) seconds.” The orientation of the light tip, diameter of the light tip, and type of light being used relative to energy output is rarely noted. This author’s interest in better light-curing of restorations has led to learning how to use a unique and innovative device, MARC, which is a laboratory-grade, clinically relevant, light-curing energy measurement tool. The sensors to measure the light energy delivered are embedded in a typodont head and jaws with immediate results and data collected by a chairside computer. This elegant device measures the useful light-curing energy delivered to simulated restorations. It provides immediate feedback so that one can train with the device immediately to improve one’s light-curing skills. Several research studies reported on this device made the following recommendation: to maximize energy delivered, the operator should wear eye protection, should watch what he or she is doing, and should hold the light both close and perpendicular to the restoration (Figure 1 through Figure 6).43 Placement of the light source at a less than perpendicular angle to the cavity preparation can lead to incomplete photopolymerization (Figure 7 and Figure 8).
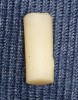
There is a wide variety in the diameter of the light tips provided with different curing lights. While an 8-mm-wide diameter tip can meet the requirements of most restorations, there are times that a wider-diameter curing light tip is necessary. When placing sealants or composites on the occlusal surfaces for permanent molars, or light-curing the complete facial surface of an maxillary anterior tooth when placing porcelain veneers or direct composite resin veneers, a wider diameter is highly recommended. Smaller-diameter tips will require an overlapping of the tip and multiple curing areas to ensure complete polymerization of the restoration. Also, a technique that has been favored when placing porcelain veneers is the use of a small-diameter tacking tip to stabilize the veneer and allow for removal of excess resin cement before complete light-curing (Figure 9 and Figure 10). When selecting a curing light, evaluate the ability of the curing light to accept a selection of different diameters of curing tips for the variety of different restorations that are being placed.
Curing Light Maintenance to Ensure Optimal Light-Curing
For optimal operation of a curing light, it is important that there is a routine evaluation of the curing light’s status. When a curing light is activated, it is impossible for the clinician to evaluate the quantity and quality of the light be discharged to polymerize a restoration. The brightness of the light can provide a false sense of security that the light is in fact adequately polymerizing the restorative material. A number of studies have demonstrated that the light energy delivered by many curing lights used in private practices are inadequate and are not providing maximum photopolymerization.46-49 Over time, there can be a decrease in the output of curing lights due to bulb degradation (QTH),50 autoclaving the fiber-optic light probe,51 breakage and fracture of the light tip,52 and the presence of cured composite resin and debris on the exposed light tip.52,53 How can a practitioner monitor the energy delivered by a curing light? The light intensity and energy output of a light-curing device can be checked using a hand-held or integrated, built-in radiometer in the light-curing unit. A radiometer measures all light energy output of a curing light through a window on the unit.10,54 While a relatively inexpensive portable radiometer and a built-in radiometer do not provide the accuracy of a laboratory-grade power meter, it does provide useful data that allow the clinician to check any changes in the light-energy output of the curing light by keeping a log once a month of light output measured with an in-office radiometer.54,55 When using a radiometer, it is important that the same light-tip diameter be used. The smaller the diameter of light tip, the higher the energy output recorded.54 Also, use a radiometer calibrated for the light source being evaluated. A decrease in power output of a curing light can be compensated for by increasing the curing time. Also, additional light-curing times are necessary for very light shades of composite resin (bleaching shades), very dark shades of composite resin, flowable composite resin, and microfill composite resins.5,32,56,57
Conclusion
Do not take light-curing for granted. There are many factors that affect optimal photopolymerization of the restorative materials being used. First know the curing light—it is important to evaluate the curing light unit and light-curing tip for any defects. Also, maintain a log of the power output of the curing light to check on any changes in light intensity over time. With a well-functioning curing light in hand, it is critical that specific criteria be followed to provide patients with high-quality photopolymerized restorations. The light tip must be as close to the tooth and restorative material as possible; it must be as close to perpendicular to the surface being light-cured as possible; the light-guide diameter must be over the surface being light-cured (for smaller tips, it may be necessary to overlap the curing area and cure the restoration in multiple sites); the operator must use a protective shield, which can be either handheld, protective orange glasses or built-in on the curing light so that when the light is activated, the operator does not have to look away or move the light tip for an optimal position; and darker and very light shades of composite resin require additional light-curing. Following these guidelines will ensure maximum photopolymerization of the restorations being placed.
References
1. Christensen GJ. Preventing sensitivity in Class II composite resin restorations. J Am Dent Assoc. 1998;129(10):1469-1470.
2. Felix CA, Price RB, Andreou P. Effect of reduced exposure times on the microhardness of 10 resin composites cured by high-power LED and QTH curing lights. J Can Dent Assoc. 2006;72(2):147.
3. D’Alpino PH, Wang L, Rueggeberg FA, et al. Bond strength of resin-based restorations polymerized with different light-curing sources. J Adhes Dent. 2006;8(5):293-298.
4. El Shamy H, El-Mowafy O. Relative hardness of composite buildups polymerized with two different LED lights. Int J Prosthodont. 2009;22(5):476-478.
5. Price RB, Felix CA, Andreou P. Knoop hardness of ten resin composites irradiated with high-power LED and quartz-tungsten-halogen lights. Biomaterials. 2005;26(15):2631-2641.
6. Nilgun Ozturk A, Usumerz A, Azturk B, et al. Influence of different light sources on microleakage of Class V composite resin restorations. J Oral Rehabil. 2004;31(5):500-504.
7. Price RB, Fahey J, Felix DM. Knoop hardness mapping used to compare the efficacy of LED, QTH and PAC curing lights. Oper Dent. 2010;35(1):58-68.
8. Sharkey S, Ray N, Burke F, et al. Surface hardness of light activated composites cured by two different visible light sources: an in vitro study. Quintessence Int. 2001;32(5):401-405.
9. Rueggeberg FA, Caughman WF, Curtis JW Jr. Effect of light intensity and exposure duration on cure of resin composite. Oper Dent. 1994;19(1):26-32.
10. Malhotra N, Kundabala M. Light curing considerations for resin-based composite materials: a review. Part I. Compend Contin Educ Dent. 2010;31(7):498-505.
11. Bayne SC, Taylor DF. Dental Materials. In: Roberson TM, ed. The Art and Science of Operative Dentistry. 3rd ed. St. Louis, MO: Mosby Publishing Inc; 1995:260.
12. Suh BI, Feng L, Wang YH, et al. The effect of the pulse-delay cure technique on residual strain in composites. Compend Contin Educ Dent. 1999;20(2 Suppl):4-12.
13. Yap AU, Wong NY, Siow KS. Composite cure and shrinkage associated with high intensity curing light. Oper Dent. 2003;28(4):357-364.
14. Powers JM, Sakaguchi RL. Craig's Restorative Dental Materials. 12th ed. St Louis, MO: Mosby Publishing Inc; 2007:189-192.
15. Price RB, Derand T, Sedarous M, et al. Effect of distance on the power density from two light guides. J Esthet Dent. 2000;12(6):320-327.
16. Hofmann N, Hiltl O, Hugo B, et al. Guidance of shrinkage vectors vs irradiation at reduced intensity for improving marginal seal of class V resin-based composite restorations in vitro. Oper Dent. 2002;27(5):510-515.
17. Milar BJ, Nicholson JW. Effect of curing with plasma light on the properties of polymerizable dental restorative materials. J Oral Rehabil. 2001;28(6):549-552.
18. Duke ES. Light-emitting diodes in composite resin polymerization. Compend Contin Educ Dent. 2001;22:722-725.
19. Kraemer N, Lohbauer U, Garcia-Godoy F, et al. Light curing of resin-based composite in the LED era. Am J Dent. 2008;21(3):135-142.
20. Price RB, Felix CA, Andreou P. Third-generation vs a second-generation LED curing light: effect on Knoop microhardness. Compend Contin Educ Dent. 2006;27(9):490-496.
21. Jimenez-Planas A, Martin J, Abalos C, et al. Developments in polymerization lamps. Quintessence Int. 2008;39(2):e74-e84.
22. Santini A. Current status of visible light activation units and the curing of light activated resin-based composite materials. Dent Update. 2010;37(4):218-227.
23. Judy RH, Dunn WJ, Patel AB, et al. Effective single-charge end point of cordless light-emitting diode light-curing units. Am J Orthod Dentofacial Orthop. 2006;130(3):378-384.
24. Owens BM, Rodriguez KH. Radiometric and spectrophotometric analysis of third generation light-emitting diode (LED) light-curing units. J Contemp Dent Pract. 2007;8(2):43-51.
25. McLeod ME, Price RB, Felix CM. Effect of configuration factor on shear bond strengths of self-etch adhesive systems to ground enamel and dentin. Oper Dent. 2010;35(1):84-93.
26. Yoshikawa T, Burrow MF, Tagami J. The effects of bonding system and light curing on reducing stress of different C-factor cavities. J Adhes Dent. 2001;3(2):177-183.
27. Hardan LS, Amm EW, Ghayad A. Effect of different modes of light curing and resin composites on microleakage of Class II restorations. Odontostomatol Trop. 2008;31(124):27-34.
28. Burgess JO, DeGoes M, Walker R, et al. An evaluation of four light-curing units comparing soft and hard curing. Pract Periodontics Aesthet Dent. 1999;11(1):125-132.
29. Kanca J 3rd, Suh BI. Pulse activation: reducing resin-based composite contraction stresses at the enamel cavosurface margins. Am J Dent. 1999;12(3):107-112.
30. Petrovic LM, Drobac MR, Stojanac ILJ, et al. A method of improving marginal adaptation by elimination of singular stress point in composite restorations during resin photo-polymerization. Dent Mater. 2010;26(5):449-455.
31. Ferracane JL. Buonocore Lecture. Placing dental composites—a stressful experience. Oper Dent. 2008;33(3):247-257.
32. Caughman WF, Rueggeberg FA, Curtis JW Jr. Clinical guidelines for photocuring restorative resins. J Am Dent Assoc. 1995;126(9):1280-1286.
33. Miller MB. Curing lights: Does a 5-second cure really work? Gen Dent. 2009; 57(2):118.
34. Bellinger DC, Trachtenberg F, Barregard L, et al. Neuropsychological and renal effects of dental amalgam in children: a randomized clinical trial. JAMA. 2006;295(15):1775-1783.
35. DeRouen TA, Martin MD, LeRoux BG, et al. Neurobehavioral effects of dental amalgam in children: a randomized clinical trial. JAMA. 2006;295(15):1784-1792.
36. Bernardo M, Luis H, Martin MD, et al. Survival and reasons for failure of amalgam versus composite resin restorations placed in a randomized clinical trial. J Am Dent Assoc. 2007;138(6):775-783.
37. Hinoura K, Miyazaki M, Onose H. Effect of irradiation time to light-cured resin composite on dentin bond strength. Am J Dent. 1991;4(6):273-276.
38. Rueggeberg FA, Jordan D. Light tip distance and cure of resin composite. J Dent Res. 1992;71(Special Issue a):188 (Abstract 661).
39. Felix CA, Price RB. Effect of distance on power density from curing lights. J Dent Res. 2006;85(Special Issue B): Abstract 2486.
40. Pilo R, Oelgiesser D, Cardash HS. A survey of output intensity and potential depth of cure among light-curing units in clinical use. J Dent. 1999;27(3):235-241.
41. Pires JA Cvitko E, Denehy GE, et al. Effects of curing tip distance on light intensity and composite resin microhardness. Quintessence Int. 1993;24(7):517-521.
42. Xu X, Sandras D, Burgess JO. Shear bond strength with increasing light-guide distance from dentin. J Esthet Restor Dent. 2006;18(1):19-27.
43. Price RB, McLeod ME, Felix CM. Quantifying light energy delivered to a Class I restoration. J Can Dent Assoc. 2010;76:a23.
44. Strassler HE, Ladwig E. Meeting the challenge of the Class II composite resin proximal contact. Available at: http://parkell.dentalaegis.com/. Accessed September 20, 2010.
45. Rueggeberg F, Mutluay MM, Price RBT, et al. Efficacy of a training device for increasing curing energy delivery. J Dent Res. 2010;89(Special Issue B): Abstract 4079.
46. Tate WH, Porter KH, Dosch RO. Successful photocuring: don't restore without it. Oper Dent. 1999;24(2):109-114.
47. Martin FE. A survey of the efficiency of visible light curing units. J Dent. 1998;26(3):239-243.
48. Barghi N, Berry T, Hatton C. Evaluating intensity output of curing lights in dental office. J Am Dent Assoc. 1994;125(7):992-996.
49. Pilo R, Oelgiesser D, Cardash HS. A survey of output intensity and potential for depth of cure among light-curing units in clinical use. J Dent. 1999;27(3):235-241.
50. Friedman J. Variability of lamp characteristics in dental curing lights. J Esthet Dent. 1989;1(6):189-190.
51. Rueggeberg FA, Caughman WF, Comer RW. The effect of autoclaving on energy transmission through light curing tips. J Am Dent Assoc. 1996;127(8):1183-1187.
52. Poulos JG, Styner DL. Curing lights: changes in intensity output with use over time. Gen Dent. 1997;45(1):70-73.
53. Strydom C. Dental curing lights- maintenance of visible light curing units. SADJ. 2002;57(6):227-233.
54. Leonard DL, Charlton DG, Hilton TJ. Effect of curing-tip diameter on the accuracy of dental radiometers. Oper Dent. 1999;24(1):31-37.
55. Rueggeberg FA. Precision of hand-held dental radiometers. Quintessence Int. 1993;24(6):391-396.
56. Strassler HE. Cure depths compared with LED and other curing lights. J Dent Res. 2003;82(Special Issue): Abstract 894.
57. Strassler HE, Massey WL. Cure depths using different curing lights. J Dent Res. 2002;81(Special Issue): Abstract 2567.