You must be signed in to read the rest of this article.
Registration on CDEWorld is free. Sign up today!
Forgot your password? Click Here!
Biomimetic dentistry is an interdisciplinary material science that is not only about creating the strongest restoration, but rather creating a restoration that is highly compatible with the structural, functional, and biologic properties of underlying dental tissues, thereby reproducing and emulating the original performance and characteristics of the intact tooth.1 Literally translated, biomimetic means to mimic life. We study nature’s properties so that we can better duplicate it. Biomimetic dentistry treats weak, fractured, and decayed teeth in a way that keeps them strong and seals them from the invasion of bacteria.
Biomimetic treatments began with conservative adhesive restorations of the anterior dentition in the 1980s. Bonded porcelain veneers were shown to restore the functional biomechanics of anterior teeth by Pascal Magne in his 2012 book, Bonded Porcelain Restorations in the Anterior Dentition: A Biomimetic Approach. His mentor at the University of Geneva, Didier Dietschi, published a book on posterior adhesive restorations in 1997. The University of Geneva and the University of Southern California, where Dr. Magne teaches, are the leaders in this discipline.
Through biomimetic protocols, we are able to develop highly bonded interfaces using stress-reducing and bond-increasing techniques. These protocols allow treatment plans to eliminate full-coverage restorations, reduce the need for cutting down sound tooth structure, and help avoid root canal treatments by keeping the pulp vital whenever possible, as endodontically treated teeth become brittle and more prone to fracture because of a lack of pulpal fluid in the dentinal tubules.2 For adhesive direct restorations, the goal is to preserve tooth structure and maintain a vital pulp. The conventional cavity preparation, as outlined by G.V. Black, is no longer considered to be conservative or valid.3-5 Retention form and resistance form have been eliminated because the highly bonded interphase of biomimetic protocols reconnects all parts of the tooth that mimic a natural tooth.
The amount of tooth structure removed during initial operative procedures has been demonstrated to have a direct correlation to the longevity of restorative procedures and an inverse relation to the strength of the remaining tooth structure.6-8 The reduction of occlusal enamel is the first step toward the weakening of the crown portion of a tooth, causing that prepared tooth to behave like a tin can with the top removed, subject to cracks and the potential for interproximal caries.9,10
The goals of biomimetic dentistry are to: (1) eliminate any infection in dentin through the proper diagnosis and removal of caries; (2) prevent gaps or cracks into dentin through the diagnosis and treatment of structural compromises; (3) create a strong connection of all tissues; (4) prevent any internal stresses or strains; (5) resist attrition, abrasion, and erosion through proper tooth preparation and restoration design; (6) and function properly within the occlusal envelope of chewing motions. The path to achieving these goals is touched on in this article and referenced in the list of sources. However, a deeper understanding will require further course study and hands-on training.
Although the most successful dentistry, in terms of durability and longevity, involves procedures that are the least invasive, the need for ideal esthetics often results in the sacrifice of sound tooth structure to achieve the patient’s esthetic desires. This article explores how to work up, stage, and execute a biomimetic smile makeover that closely adheres to the principles and fundamentals of biomimetic dentistry without compromising the desired esthetic result.
ADHESIVE DENTISTRY—STAYING BONDED
It has been stated that adhesive dentistry could be expressed as a simple relationship between bonds and stress. If the bonds can withstand the stress, the restorative technique will be successful.11,12 This is perhaps the most important concept of biomimetic dentistry. We want to increase the bond strength of the materials we use, reduce the stresses on the remaining tooth structure, and maintain the seal of the restoration to prevent infection and fracture. Through the evolution and advancement of adhesive dentistry and improved protocols and techniques, we now have the ability to biomimetically reproduce the union between synthetic dental materials and natural anatomic tooth structures.13 Reproducing the original performance of the intact tooth (“biomimetics”) should be the driving force in restorative dentistry.1
The protocol that was followed throughout the case presentation includes several very important concepts. The first is the concept of conservative caries treatment that was established by Fusayama.14-16 Ideal caries removal endpoints are indicated, including the creation of a peripheral seal zone and the absolute avoidance of pulpal exposure for vital teeth.17-19 By creating a peripheral seal zone consisting of normal superficial dentin, the dentino-enamel junction (DEJ), and enamel, a bond strength of 45 MPa to 55 MPa can be generated to mimic the tensile strength of the DEJ, which has been measured at 51.5 MPa.17 This peripheral seal zone will be confirmed by the total absence of caries using a caries detector dye. A light pink staining from the dye is acceptable within this area and can still achieve a bondability of about 30 MPa.17,20 Additionally, studies have shown that the inner carious dentin can become remineralized by a normal biologic process after adhesive resin treatments.21
The protocol also involved making every effort to avoid cracks and gap formation in dentin. In the absence of dentin fractures or caries, enamel crack lines may not require treatment. However, if there is a crack in dentin, the clinician should go to the bottom of the crack and eliminate the crack if possible, or it will continue to propagate.22 Polyethylene fibers are proven to increase the fracture strength of teeth by absorbing and diffusing forces, and help to resist crack opening, decrease the resin shrinkage, and prevent more catastrophic failures from occurring.23-25 These fibers also help to increase the dentin bond strengths in areas with a high configuration factor (C-factor).26,27 The C-factor is the ratio of the bonded surface area to the unbonded or free surface area.28,29 It has been proven that teeth will fracture in a less catastrophic manner when polyethylene fibers are applied under the direct composite resin restorations.30
A very important part of the author’s bonding protocol involves using a 2% chlorhexidine solution on exposed dentin after phosphoric acid-etching when using a total-etch technique to deactivate endogenous collagenase enzymes called matrix metalloproteinases (MMPs) and preserve the maximum bond strength.31-33 By deactivating the MMPs, a less pronounced water-treeing affect can be observed, which means less degradation of resin–dentin bonds.34 Long-term water exposures are a factor known to promote bond degradation.35,36 The author chooses to use one self-etch primer in particular (Clearfil SE Protect; Kuraray, kuraraydental.com.com) when bonding mostly to dentin because it contains an adhesive that forms an effective and stable ionic bond with the hydroxyapatite,37 and, in addition, it does not require chlorhexidine because it has a unique proprietary component that deactivates the MMPs, while other bonding systems require the use of a 2% chlorhexidine to achieve the best bond strengths.17,38 Self-etching primers do very well in deep dentin, and seem to be able to infiltrate through the smear layer into the underlying caries-affected dentin more easily than it would though normal dentin.39-42 Additionally, the milder acid-etching effects of the self-etching primer may help to reduce that outward flow of fluid, resulting in superior dentin sealing.43 Studies show that reliable dentin adhesive systems render the application of a liner or base unnecessary when it comes to protecting the pulp or to establishing adhesion.44 The author uses OptiBond FL (Kerr, www.kerrdental.com) and Clearfil SE Protect because studies show that they exhibit the highest bond strengths and they are least affected by aging;45,46 however, there are a number of other products that would work well for biomimetic protocols, such as ALL-BOND 3 (Bisco, www.bisco.com), PQ1 (Ultradent, www.ultradent.com), or Scotchbond Universal (3M ESPE, solutions.3m.com) for adhesives, and Vit-l-escence (Ultradent), Herculite Ultra (Kerr), or Z100 (3M ESPE) for composite.
It is recommended that the dentin bonding agent be applied and cured onto the freshly cut dentin immediately after the preparation of the tooth, before any temporary cement is used for the indirect restoration.47,48 Indirect restorations require the immediate dentin sealing (IDS) of the prepared dentin surfaces to prevent bacterial contamination, temporary cement contamination, and postoperative sensitivity.49-51 IDS allows the dentin bond time to mature (ie, decoupling time) before it is challenged by the polymerization stress of the resin cement layer or subsequent layers of the composite resin.52 Because the dentin bond strength develops progressively over time, with the free radicals within the resin still available for bonding even after 12 weeks’ time, a delayed placement of the final restorations can often alleviate some of the residual stresses.53 It is important to use a substantial thickness of the adhesive layer during the IDS step to partially absorb the composite deformation. Heavily thinned layers of bonding agents are subjected to severe oxygen inhibition and are, therefore, almost not cured despite being exposed to the curing light for 40 seconds.54,55 The elastic release of the adhesive layer is an appropriate way to limit the intensity of the forces transmitted to the remaining natural tooth tissues.56
The author used a 0.5-mm layer of flowable composite to resin-coat the dentin to produce a gap-free resin–dentin interface and improve the IDS.57 The use of a flowable composite alone or in combination with polyethylene fibers significantly reduces leakage at the occlusal margins and at the gingival margins.58,59 A thick adhesive layer and the use of a flowable resin function as a stress-absorbing layer and helps to improve the effectiveness of the dentin bonding adhesive in counteracting the polymerization stress at the resin–dentin interface.60-62 Resin-coating not only protects the prepared dentin immediately after, but helps to minimize pulp irritation and postoperative sensitivity while also providing a higher bond strength to resin cement.63
The dentin bonding systems the author used were allowed to mature for 5 minutes to allow for more strain relief and decoupling time for the IDS technique, so that the best bond strength, pulpal protection, and minimal postoperative sensitivity could be achieved.17,60-65 Dentin bonds take longer to mature.66 However, if given enough time, the bond to dentin will be higher than that to enamel because the cohesive strength to dentin is greater.67
By using an appropriate layering technique, we can increase the bond strengths, especially in areas with a high C-factor, where the deep cavity floors can affect the dentin adhesion.62,68 The layering technique is also designed to accommodate the polymerization contraction of composite resins and to partially absorb functional stresses.51 Once a layer of resin is light-cured, a competition between polymerization shrinkage of the composite and adhesion to the substrate begins. If the bond strength is weaker than the shrinkage stresses between the resin and adhesive system, the tooth–restoration interface may break, forming a gap that will allow for marginal microleakage (and resulting sensitivity).62 With time, these residual stresses can be exacerbated under functional loads and may accelerate deterioration of the bond.69
Studies now show that composite does not shrink toward the light, but rather flows toward the most bondable surface, with the contraction stresses developing at the restoration–tooth interface.69-71 If the polymerization of the resin proceeds gradually, the material may be able to release some of the stress and not be as damaging to the adhesive bonds.72 Small layered increments of resin will lend itself to a more durable restoration, because a stronger composite–dentin bond can be formed when the polymerization contraction is restricted to one direction.73 It has also been proven that the slower the progression of the curing procedure, the more time is given for stresses to be relieved.74,75
CASE PRESENTATION
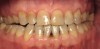
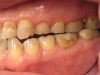
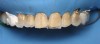
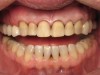
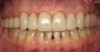
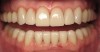
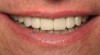
In June 2013, a 47-year-old man presented to the author’s office with the chief complaint, of having lost a lot of enamel after 25 years of suffering from acid reflux. He was interested protecting and rebuilding his teeth without reducing much more tooth structure (Figure 1 through Figure 9). He was also concerned about trapping food between teeth Nos. 2 and 3. The patient had seen an endodontist for a swelling in the upper right area between the molars, which was drained but did not require root canal therapy, and the author advised him to see the periodontist for a consultation to discuss all esthetic options and treatment plan for an implant to replace his missing upper left first molar. The author decided to take records for an esthetic wax-up to determine how much he would need to open up the vertical dimension of occlusion (VDO) in order to create a more ideal smile using the conservative biomimetic principles and achieving better facial harmony.
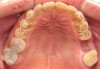
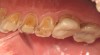
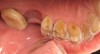
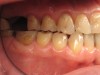
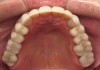
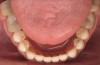
When viewing his maxillary teeth from an occlusal and lingual view, one can see the erosion and wear (Figure 4, Figure 6, and Figure 7), and it becomes evident just how collapsed he actually is. This patient shows more teeth on his left side and less on the right when smiling, and the shortness and color of his teeth contributes to a definite aging of his smile. Additionally, his lips appear less full without the lip support of the lost tooth structure. The patient had Class I molar relationships on both the right and left sides, and a posterior open bite on his right side in the area of teeth Nos. 4 through 6 (Figure 8 and Figure 9). There was no crowding evident and both arches were found to have lingually inclined teeth, which may have contributed to his wear. It was also noted that his posterior teeth were worn down with a very flat anatomy and lacked proper functional guidance.
Case Work-Up
A visual, periodontal, and occlusal assessment was completed. Comprehensive records were taken, including: a full-mouth series of x-rays, a complete set of photographs, diagnostic impressions, centric relation (CR) and protrusive bite records, and a preoperative facebow record to take into account the occlusal cant and facial asymmetry that is not perceived in intraoral images or study casts.76 The lab fabricated an analytic wax-up for the reconstruction of a functionally and esthetically reconstructed VDO, and then the author performed an intraoral esthetic evaluation of the wax-up using a diagnostic putty template fashioned from the wax-up to create a matrix for creating an exact replica to be used as a starting point for the provisionals (Figure 10 through Figure 13). This template was filled with a bis-GMA–based direct provisional material and seated over the isolated preexisting tooth structure. This allowed the patient to “try on” his potential new smile and helped him to envision the possibilities and have realistic expectations about what could be accomplished (Figure 14). The esthetic mock-up also served as a fixed occlusal splint for 2 to 3 months for the functional evaluation phase. The use of the provisional restorations represents an essential stage in the course of restorative treatment strategies and plays a critical role in preserving or reestablishing masticatory function, phonetics, and esthetic appearance.77 Modifications were made in his temporaries to best compensate for any asymmetry and to balance and harmonize his smile.78 His case was evaluated following the requirements for occlusal stability as outlined by Dawson,79 and adjusted the set-up to create stable stops on all teeth when in CR, anterior guidance in harmony with the movements within the envelope of function, full posterior disclusion in protrusive movement, and no posterior interferences on the working or nonworking side in canine guidance.
The first step included an appraisal of the maxillary central incisors relative to the upper lip, as would normally be done when the treatment planning sequence begins with esthetics.80 The author took the time to set up the length and horizontal edge position of the maxillary incisors in the provisional stage to evaluate the envelope of function and to evaluate the patient’s speech, especially when pronouncing the “F,” “V,” and “S” sounds.79,81,82 The author had the curvature of the lower lip be the guide for the ideal smile arc from central incisor to canine.83 The additive/reductive technique was used to balance the harmony of the buccal corridors of the patient’s smile. Because most people have some degree of asymmetry, minimizing the buccal corridor space on either side and modifying it to create the illusion of symmetry is a critical feature of smile design.84-88
With the patient’s input, the author decided to restore the severely damaged dentition with veneers and onlays on conservatively prepared teeth made from IPS e-max (Ivoclar Vivadent; www.ivoclarvivadent.us), and to bond these restorations adhesively after caries excavation and biomimetic reconstruction of deficient tooth structure. The author tried to avoid full-coverage preparations whenever possible to maintain the integrity of the remaining tooth structure; however, tooth No. 15 was treatment planned to be prepared for a full-coverage crown only because it was replacing an existing crown on a previously prepared tooth. Additionally, an implant would be placed and restored with a porcelain-fused-to-metal crown around a UCLA custom abutment in the area of tooth No. 14.
The Restorative Phase
The patient’s maxillary temporary reconstruction, based on the wax-up, was sectioned distal to tooth No. 6 so that the upper right segment could be prepared at the first visit. Bite registrations were taken so that the final restorations could be made to the new VDO. Teeth Nos. 2 and 3 were structurally compromised but restorable; teeth Nos. 4 and 5 had a lot of acid erosion, but were otherwise sound.
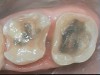
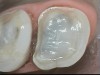
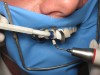
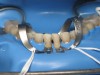
It was noted that the patient had a large interproximal food trap between teeth Nos. 2 and 3, which at one point had caused an abscess to develop prior to the author meeting the patient. He had seen an endodontist to drain it prior to becoming a patient in the author’s office. After removing the old failing bonded restorations and the recurrent deep caries, laser troughing of the tissue surrounding the distal margin of tooth No. 3 was performed with a soft-tissue diode laser (Figure 15 and Figure 16). Teeth Nos. 2 and 3 were prepared using a self-etching primer and adhesive system and then resin-coated with 0.5 mm of flowable composite resin (Clearfil Majesty Flow; Kuraray) around any exposed dentin, with polyethylene fibers embedded in the resin. About 1 mm of Clearfil AP-X (Kuraray) was applied because it has a modulus of elasticity similar to that of dentin and lower polymerization shrinkage. A warmed posterior composite (Clearfil Majesty Flow) was then used in appropriate small increments to elevate the deeper gingival margin.51 Deep margin elevation aims to elevate the gingival margin to a level where it can be sealed with a rubber dam during the delivery of the restoration.89 Additionally, relocating the cervical preparation supragingivally over the existing margin is a noninvasive alternative to surgical crown-lengthening in order to relocate cavity margins supragingivally.90 Teeth Nos. 2 and 3 were prepared for onlays, and teeth Nos. 4 and 5 were prepared for onlay/veneers after the palatal cusps were biomimetically reconstructed with incremental layers of bonding to reduce the cuspal strain.91 Teeth Nos. 4 and 5 had IDS after they were prepared.
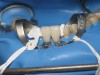
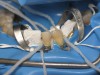
At his next visit, the temporary restorations were sectioned distal to tooth No. 11 in order to prepare the upper left segment. Teeth Nos. 12 and 13 were prepared in the same manner as teeth Nos. 4 and 5, after moderate-to-deep caries was excavated from the facial cervical of tooth No. 13, and small occlusal pit-and-fissure caries was excavated from teeth Nos. 12 and 13. The palatal cusps of these teeth were also reconstructed in the same manner as teeth Nos. 4 and 5 were. Tooth No. 15 had an e-max crown over a newly reconstructed core to replace the old failing crown, and the dentin was sealed prior to temporization. All of the posterior restorations were inserted using a dual-cure resin cement and seated using the author’s own unique proprietary device (Inlay/Onlay Styx Cosmetic Innovations, Inc., www.cosmeticinnovations.com) to position and seat the restorations while using an EMS plastic ultrasonic tip to help vibrate out the excess cement for a more complete seal of the margins.
Teeth whitening had also been performed on his lower arch using a combination of the custom Philips NiteWhite gel home trays (Philips, www.philipsoralhealthcare.com) for 1 week to precondition the teeth, followed by four rounds of in-office ZOOM 2 Advanced Power whitening (Philips). Initially he was determined to be a D3/C1 shade, and after the in-office procedure he lightened to a B1/040 shade. The patient wanted the final shade of his upper teeth to be a brighter version of A1, looking natural and bright, but not too white.
After the posterior teeth were inserted and his occlusion equilibrated, the author performed a structured composite resin build-up of the lingual portion of maxillary anterior teeth Nos. 6 through 11, based on the mock wax-up and the creation of a clear silicone putty palatal table, to allow for enhanced control of the final shape, form, shading, and functionality.92 The author was able to relieve or add to the lingual resin to achieve better anterior coupling. The shades were layered in small increments to blend and to minimize the polymerization stresses. The teeth were then prepared for veneers instead of full-coverage crowns to be more conservative to tooth structure.
Final impressions were taken using regular and soft-body polyether impression materials (Impregum; 3M ESPE) along with a bite registration and counter model. Additionally, a stump shade photograph was taken to assist the lab in knowing how to layer the porcelain to attain the desired effects and selected shade (Figure 17).
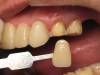
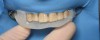
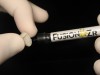
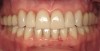
The veneers were tried in and a rubber dam was used to create adequate isolation and ensure a clean, dry, and easily accessible restorative environment (Figure 18 through Figure 22). Optibond FL was subsequently used as the bonding agent, with chlorhexidine 2% used on the exposed dentin after etching. The veneers were cleaned and prepared with silane. The veneers were seated two at a time using a light-cured clear cement (for this case we used Fusion-Zr™ (Taub Products, www.taubdental.com) and the author’s own unique proprietary device (Veneer Styx, Cosmetic Innovations, Inc.) positioning device for final insertion (Figure 23 through Figure 28). A plastic-tipped ultrasonic instrument was used in conjunction to help vibrate out the excess cement and achieve a complete seating of the restoration. After all of the veneers were inserted, the rubber dam was removed and the contacts were checked and then occlusion in centric, lateral crossover, and protrusive movements (Figure 29 and Figure 30). A nightguard was made to help protect the patient’s investment.
At the conclusion of the planned treatment of his maxillary arch, the patient decided that he also wanted to restore his lower teeth to achieve optimum esthetics and protect his worn dentition. The author replaced the old, failing onlay with a new e-max onlay for tooth No. 18, performed direct biomimetic bonded reconstructions (in the same manner as described previously) for teeth Nos. 19 and 30 to replace the older inlay and failing onlay, respectively. Tooth No. 31 had an e-max crown over a newly reconstructed core to replace the older failing crown, and the dentin was sealed prior to temporization. Teeth Nos. 20 through 29 were conservatively prepared for veneers. All restorations were sealed, temporized, and subsequently cleaned, isolated, tried in, seated, and adjusted in the same manner as described previously for the maxillary restorations (Figure 31 through Figure 33). His nightguard was rechecked and adjusted in centric and excursive movements (Figure 34 through Figure 38).
CONCLUSION
Rejuvenating one’s smile has the power to inspire self-confidence and rebuild one’s image. As a profession, we need to perform our esthetic procedures using the latest in dental materials, techniques, and technology to preserve what teeth our patients have, for as long as they have them. Invasive procedures and unnecessary reduction of tooth structure can eventually weaken the teeth and result in stresses and cracks, contributing to bacterial infections and fractures, and the subsequent need for root canals, extractions, implants, and bridges. By adhering to the principles and fundamentals of biomimetic dentistry outlined in this article, we can achieve uncompromised esthetic results and give our patients the beautiful, healthy, and youthful smiles that will help enable them to find new love, land that new job, give them that extra edge in business and networking, and to simply just live a happier and healthier lifestyles.
DISCLOSURE
The author is founder and president of Cosmetic Innovations, Inc., and is the inventor of Veneer Styx and Inlay/Onlay Styx; both products were mentioned in this article.
ACKNOWLEDGMENT
I would like to acknowledge the Alleman-Deliperi Center for Biomimetic Dentistry for helping to move our profession forward and for showing me what it means to stay bonded. In particular, I would like to thank Drs. David Alleman and Simone Deliperi for helping to show me the way. I would also like to thank Dr. David Gerdole for his sharing his knowledge, especially with his rubber dam isolation techniques. Additionally, I would like to acknowledge our master ceramist Jason Kim and his entire dental laboratory team for their guidance and support throughout the planning and execution of this challenging smile makeover.
REFERENCES
1. Magne P, Belser U. Rationalization of shape and related stress distribution in posterior teeth—a finite element study using nonlinear contact analysis. Int J Periodontics Restorative Dent. 2002;22:425-433.
2. Kishen A, Vedantam S. Hydromechanics in dentin: role of dentinal tubules and hydrostatic pressure on mechanical stress-strain distribution. Dent Mater. 2007;23:1296-1306.
3. Magne P. Composite resins and bonded porcelain: the postamalgam era? J Calif Dent Assoc. 2006;34:135-147.
4. Urabe I, Nakajima M, Sano H, Tagami J. Physical properties of the dentin-enamel junction region. Am J Dent. 2000;13:129-135.
5. Neves A, Coutinho E, Cardoso M, et al. Current concepts and techniques for caries excavation and adhesion to residual dentin. J Adhes Dent. 2011;13:7-22.
6. Rainey J. A sub-occlusal oblique ridge: identification of a previously unreported tooth structure: the Rainey ridge. J Clin Pediatr Dent. 1996;21(1):9-13.
7. Rainey J. The maxillary molar mesial sub-occlusal enamel web: identification of a previously unreported structure: the maxillary Rainey web. J Clin Pediatr Dent. 1998;22(3):195-198.
8. Versluis A, Tantbirojn D, Pintado M, et al. Residual shrinkage stress distributions in molars after composite restoration. Dent Mater. 2004;20:554-564.
9. Larson T, Douglas W, Geistfeld R. Effect of prepared cavities on the strength of teeth. Oper Dent. 1981;6:2-5.
10. Milicich G, Rainey J. Clinical presentations of stress distribution in teeth and the significance in operative dentistry. Pract Periodontics Aesthet Dent. 2000;12(7):695-700.
11. Unterbrink G, Liebenberg W. Flowable resin composites as “filled adhesives”: literature review and clinical recommendations. Quintessence Int. 1999;30:249-257.
12. Dietschi D, Magne P, Holz J. An in vitro study of parameters related to marginal and internal seal on bonded restorations. Quintessence Int. 1993;24(4):281-291.
13. Bazos P, Magne P. Bio-emulation: biomimetically emulating nature utilizing a histo-anatomic approach; structural analysis. Eur J Esthet Dent. 2011;6:8-19.
14. Fusayama T. Clinical guide for removing caries using a caries-detecting solution. Quintessence Int. 1988;19(6):397-401.
15. Momoi Y, Hayashi M, Fujitami M, et al. Clinical guidelines for treating caries in adults following a minimal intervention policy-evidence and consensus based report. J Dent. 2012:40:95-105.
16. Thompson V, Craig R, Curro F, et al. Treatment of deep carious lesions by complete excavation or partial removal—a critical review. J Am Dent Assoc. 2010;139(6):705-712.
17. Alleman D, Magne P. A systematic approach to deep caries removal end points: the peripheral seal concept in adhesive dentistry. Quintessence Int. 2012;43:197-207.
18. Doi J, Itota T, Yoshiyama M, et al. Bonding to root caries by a self-etching adhesive system containing MDPB. Am J Dent. 2004;17(2):89-93.
19. Gruythuysen R, van Strijp G, Wu M. Long-term survival of indirect pulp treatment performed in primary and permanent teeth with clinically diagnosed deep carious lesions. J Endo. 2010;36(9):1490-1491.
20. Wei S, Sadr A, Shimada Y, Tagami J. Effect of caries-affected dentin hardness on the shear strength of current adhesives. J Adhes Dent. 2008;10(6):431-440.
21. Akimoto N, Yokoyama G, Ohmori K, et al. Remineralization across the resin-dentin interface: in vivo evaluation with nanoindentation measurements, EDS, and SEM. Quintessence Int. 2001;32(7):561-570.
22. Ailor J. Managing incomplete tooth fractures. J Am Dent Assoc. 2000;131(8):1168-1174.
23. Belli S, Cobankara F, Eraslan O, et al. The effect of fiber insertion on fracture resistance of endodontically treated molars with MOD cavity and reattached fractured lingual cusps. J Biomed Mater Res B Appl Biomater. 2006;79(1):35-41.
24. Sengun A, Cobankara F, Orucoglu H. Effect of a new restoration technique on fracture resistance of endodontically treated teeth. Dent Traumatol. 2008;24:214-219.
25. Fennis W, Tezvergil A, Kuijs R, et al. In vitro fracture resistance of fiber reinforced cusp-replacing composite restorations. Dent Mater. 2005;21:565-572.
26. Belli S, Donmez N, Eskitascioglu G. The effect of c-factor and flowable resin or fiber use at the interface on microtensile bond strength to dentin. J Adhes Dent. 2006;8(4);247-253.
27. Erkut S, Gulsahi K, Imizrahoglu P, et al. Microleakage in overflared root canals restored with different fiber reinforced dowels. Oper Dent. 2008;33(1):92-101.
28. Feilzer A, de Gee A, Davidson C. Setting stress in composite resin in relation to configuration of the restoration. J Dent Res. 1987;66(11):1636-1639.
29. Nakaido T, Kunzelmann K, Chen H, et al. Evaluation of thermal cycling and mechanical loading on bond strength of a self-etching primer. Dent Mater. 2002;18:269-275.
30. Magne P, Boff L, Oderich E, Cardoso A. Computer-aided-design/computer-assisted-manufactured adhesive restoration of molars with a compromised cusp: effect of fiber-reinforced immediate dentin sealing and cusp overlap on fatigue strength. J Esthet Restor Dent. 2012;24(2):135-146.
31. Deliperi S, Bardwell D, Alleman D. Clinical evaluation of stress-reducing direct composite restorations structurally compromised molars: a 2-year report. Oper Dent. 2012;37(2):109-116.
32. Hashimoto M, Ohno H, Kaga M, et al. In vivo degradation of resin-dentin bonds in humans over 1 to 3 years. J Dent Res. 2000;79(6):1385-1391.
33. Pashley D, Tay F, Yiu C, et al. Collagen degradation by host-derived enzymes during aging. J Dent Res. 2004;83(3):216-221.
34. Donmez N, Belli S, Pashley D, Tay F. Ultrastucture correlates of in vivo/in vitro bond degradation of self-etch adhesives. J Dent Res. 2005;84(4):355-359.
35. Sharai K, De Munck J, Yoshida Y, et al. Effect of cavity configuration and aging on the bonding effectiveness of six adhesives to dentin. Dent Mater. 2005;21:110-124.
36. Van Meerbeek B, Peumans M, Poitevin A, et al. Relationship between bond-strength tests and clinical outcomes. Dent Mater. 2009;doi:10.1016/j.dental.2009.11.148.
37. Yoshida Y, Yoshihara K, Nagaoka N, et al. Self-assembled nano-layering at the adhesive interface. J Dent Res. 2012;91(4):376-381.
38. Carrilho M, Geraldeli S, Tay F, et al. In vivo preservation of the hybrid layer by chlorhexidine. J Dent Res. 2007;86(6):529-533.
39. Nakajima M, Ogata M, Okuda M, et al. Bonding to caries-affected dentin using self-etching primers. Am J Dent. 1999:12(6):309-314.
40. Sattabanasuk V, Shimada Y, Tagami J. The bond of resin to different dentin surface characteristics. Oper Dent. 2004;29(3):333-341.
41. Yoshikawa T, Sano H, Burrow M, et al. Effects of dentin depth and cavity configuration on bond strength. J Dent Res. 1999;78(4):898-905.
42. Braem M. Microshear fatigue testing of tooth/adhesive interfaces. J Adhes Dent. 2007;9:24-253.
43. Hashimoto M, Ito S, Tay F, et al. Fluid movement across the resin-dentin interface during and after bonding. J Dent Res. 2004;83(11):843-848.
44. Opdam N, Bronkhorst E, Roeters J, Loomans B. Longevity and reasons for failure of sandwich and total-etch posterior composite resin restorations. J Adhes Dent. 2007;9(5):469-475.
45. De Munck J, Mine A, Poitevin A, et al. Meta-analytical review of parameters involved in dentin bonding. J Dent Res. 2012;91(4):351-357.
46. Van Meerbeek B, De Munck J, Mattar D, et al. Microtensile bond strengths of an etch and rinse and self-etch adhesive to enamel and dentin as a function of surface treatment. Oper Dent. 2003;28(5):647-660.
47. Bertschinger C, Paul S, Luthy H, Scharer P. Dual application of dentin bonding agents: effect on bond strength. Am J Dent. 1996;9(3):115-119.
48. Magne P, Kim T, Cascione D, Donovan T. Immediate dentin sealing improves bond strength on indirect restorations. J Prosthet Dent. 2005;94(6):511-519.
49. Iida K, Inokoshi S, Kurosaki N. Interfacial gaps following ceramic inlay cementation vs direct composites. Oper Dent. 2003;28(4):445-452.
50. Krejci I, Stavridakis M. New perspectives on dentin adhesion-differing methods of bonding. Pract Periodontics Aesthet Dent. 2000;12(8):727-732.
51. Dietschi D, Spreafico R. Current clinical concepts for adhesive cementation of tooth-colored posterior restorations. Pract Periodontics Aesthet Dent. 1998;10(1):47-54.
52. Deliperi S, Alleman D. Stress-reducing protocol for direct composite restorations in minimally invasive cavity preparations. Pract Proced Aesthet Dent. 2009;21(2):E1-E6.
53. Magne P, So W, Cascione D. Immediate dentin sealing supports delayed restoration placement. J Prosthet Dent. 2007;98(3):166-174.
54. Frankenberger R, Lohbauer U, Taschner M, et al. Adhesive luting revisited: influence of adhesive, temporary cement, cavity cleaning, and curing mode on internal dentin bond strength. J Adhes Dent. 2007;9:269-273.
55. Jayasooriya P, Pereira P, Nikaido T, Tagami J. Efficacy of a resin coating on bond strengths of resin cement to dentin. J Esthet Restor Dent. 15(2):105-113.
56. Ausiello P, Apicella A, Davidson C. Effect of adhesive layer properties on stress distribution in composite restorations—a 3D finite element analysis. Dent Mater. 2002;18:295-303.
57. Belli S, Inokoshi S, Ozer F, et al. The effect of additional enamel etching and a flowable composite to the interfacial integrity of class II adhesive composite restorations. Oper Dent. 2001;26:70-75.
58. Belli S, Orugoglu H, Yildirim C, Eskitascioglu G. The effect of fiber placement of flowable resin lining on microleakage in class II adhesive restorations. J Adhes Dent. 2007;9(2):175-181.
59. El-Mowafy O, El-Badrawy W, Eltanty A, et al. Gingival microleakage of class II resin composite restorations with fiber inserts. Oper Dent. 2007;32(3):298-305.
60. Deliperi S, Bardwell D. An alternative method to reduce polymerization shrinkage [stresses] in direct posterior composite restorations. J Am Dent Assoc. 2002;133(10):1387-1398.
61. Dietschi D, Monasevic M, Krejci I, Davidson C. Marginal and internal adaptation of class II restorations after immediate or delayed composite placement. J Dent. 2002;30:259-269.
62. Ozel E, Soyman M. Effects of fiber nets, application techniques and flowable composites on Microleakage and the effect of fiber nets on polymerization shrinkage in class II MOD cavities. Oper Dent. 2009;34(2):174-180.
63. Jayasooriya P, Pereira P, Nikaido T, et al. The effect of a “resin coating” on the interfacial adaptation of composite inlays. Oper Dent. 2003;28:28-35.
64. Fukegawa D, Hayakawa S, Yoshida Y, et al. Chemical interaction of phosphoric acid ester with hydroxyapatite. J Dent Res. 2006;85(10):941-944.
65. Wilson N, Cowan A, Unterbrink G, et al. A clinical evaluation of class II composites placed using a decoupling technique. J Adhes Dent. 2000;2(4);319-329.
66. Irie M, Suzuki K, Watts D. Immediate performance of self-etching versus system adhesives with multiple light-activated restoratives. Dent Mater. 2004;20:873-880.
67. Irie M, Suzuki K, Watts D. Marginal gap formation of light-activated restorative materials: effects of immediate setting shrinkage and bond strength. Dent Mater. 2002;18:203-210.
68. Nikolaenko S, Lohbauer U, Roggendorf M, et al. Influence of c-factor and layering technique on microtensile bond strength to dentin. Dent Mater. 2004;20:579-585.
69. Kuroe T, Tachibana K, Tanino Y, et al. Contraction stress of composite resin build-up procedures for pulpless molars. J Adhes Dent. 2003;5(1):71-77.
70. Cho M, Dickens S, Bae J, et al. Effect of interfacial bond quality on the direction of polymerization shrinkage flow in resin composite restorations. Oper Dent. 2002;27:297-304.
71. Versluis A, Tantbirojn D, Douglas W. Do dental composites always shrink toward the light? J Dent Res. 1998;77(6):1435-1445.
72. Davidson C, de Gee A. Relaxation of polymerization contraction stresses by flow in dental composites. J Dent Res. 1984;63(2):146-148.
73. Davidson C, de Gee A, Feilzer A. The competition between the composite-dentin bond strength and the polymerization contraction stress. J Dent Res. 1984;63(12):1396-1399.
74. Stavridakis M, Dietschi D, Krejci I. Polymerization shrinkage of flowable resin-based restorative materials. Oper Dent. 2005;30(1):118-128.
75. Uno S, Tanaka T, Natsuizaka A, Abo T. Effect of slow-curing on cavity wall adaptation using a new intensity-changeable light source. Dent Mater. 2003;19:147-152.
76. Sabri R. The eight components of a balanced smile. J Clin Orthod. 2005;39(3):155-167.
77. Edelhoff D, Beuer F, Schweiger J, et al. CAD/CAM-generated high-density polymer restorations for the pretreatment of complex cases. Quintessence Int. 2012;43(6):457-467.
78. Ker AJ, Chan R, Fields HW, et al. Esthetics and smile characteristics from the layperson’s perspective: a computer-based survey study. J Am Dent Assoc. 2008;139(10):1318-1327.
79. Dawson P. Functional Occlusion: From TMJ to Smile Design. St. Louis, MO, Mosby; 2006:181.
80. Spear F, Kokich VG, Mathews D. Interdisciplinary management of anterior dental esthetics. J Am Dent Assoc. 2006;137(2):160-169.
81. Hess L. The relevance of occlusion in the golden age of esthetics. Inside Dentistry. 2008;4(2):36-44.
82. Chiche GJ, Pinault A. Esthetics of Anterior Fixed Prosthodontics. Hanover Park, IL: Quintessence Pub. Co; 1994:21.
83. Sarver DM. The importance of incisor positioning in the esthetic smile: the smile arc. Am J Orthod Dentofacial Orthop. 2001;120(2):98-111.
84. Peck S, Peck L. Selected aspects of the art and science of facial esthetics. Semin Orthod. 1995;1(2):105-126.
85. Moore T, Southard KA, Casko JS, et al. Buccal corridors and smile esthetics. Am J Orthod Dentofacial Orthop. 2005;127(2):208-213.
86. Roden-Johnson D, Gallerano R, English J. The effects of buccal corridor spaces and arch form on smile esthetics. Am J Orthod Dentofacial Orthop. 2005;127(3):343-350.
87. Gracco A, Cozzani M, D’Elia L, et al. The smile buccal corridors: aesthetic value for dentists and laypersons. Prog Orthod. 2006;7(1):56-65.
88. Ritter DE, Gandini LG, Pinto Ados S, Locks A. Esthetic influence of negative space in the buccal corridor during smiling. Angle Orthod. 2006;76(2):198-203.
89. Magne P, Spreafico R. Deep margin elevation; a paradigm shift. American Journal of Esthetic Dentistry. 2012;2:86-96.
90. Dietschi D, Olsburgh S, Krejci I, Davidson C. In vitro evaluation of marginal and internal adaptation after occlusal stressing on indirect class II composite restorations with different resinous bases. Eur J Oral Sci. 2003;111:73-80.
91. Lee M, Cho B, Son H, et al. Influence of cavity dimension and restoration methods on the cusp deflection of premolars in composite restoration. Dent Mater. 2007;23:288-295.
92. Papacharalambous C. Building custom shells for conservative tooth reconstruction: an elegant strategy. J Adhes Dent. 2005;7(1):69-84.